
Owner's Manual
Page 5
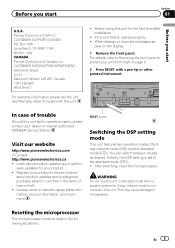
...1760 Long Beach, CA 90801-1760 800-421-1404 CANADA Pioneer Electronics of loss or theft. ! Visit our website http://www.pioneerelectronics.com in the following situations: En 5 WARNING Do not use the unit in standard mode when a speaker system for the first time after installation ...! Before using this unit. Learn about product updates and to the standard mode (STD). ! You can switch between modes as firm- Pioneer Electronics (USA) Inc.
...1760 Long Beach, CA 90801-1760 800-421-1404 CANADA Pioneer Electronics of loss or theft. ! Visit our website http://www.pioneerelectronics.com in the following situations: En 5 WARNING Do not use the unit in standard mode when a speaker system for the first time after installation ...! Before using this unit. Learn about product updates and to the standard mode (STD). ! You can switch between modes as firm- Pioneer Electronics (USA) Inc.

Owner's Manual
Page 19
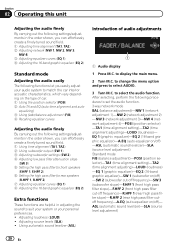
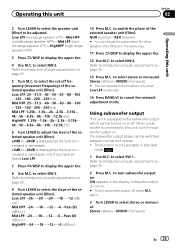
...Using the position selector (POSI) 2 Auto TA and EQ (auto-time alignment and auto- After selecting, perform the following settings/adjustments in standard mode. ! to select the desired setting. 1-2-OFF (off) 1 is effective for reproduction of the dates on page 36. to store track ... 02 Operating this unit 2 Use M.C. Audio adjustments Operation modes This unit features two operation modes: the 3way network mode (NW) and the standard mode (STD). to Switching the DSP setting mode on page 5.) 3-way network mode Adjusting the audio easily By carrying out the following procedures ...
...Using the position selector (POSI) 2 Auto TA and EQ (auto-time alignment and auto- After selecting, perform the following settings/adjustments in standard mode. ! to select the desired setting. 1-2-OFF (off) 1 is effective for reproduction of the dates on page 36. to store track ... 02 Operating this unit 2 Use M.C. Audio adjustments Operation modes This unit features two operation modes: the 3way network mode (NW) and the standard mode (STD). to Switching the DSP setting mode on page 5.) 3-way network mode Adjusting the audio easily By carrying out the following procedures ...
Owner's Manual
Page 20
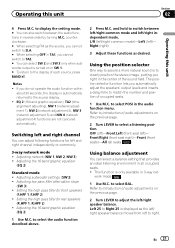
...EQ 2 (16-band graphic equalizer)-A.EQ (auto-equalizer on/off) -ASL (automatic sound levelizer)-SLA (source level adjustment) Standard mode F/B (balance adjustment)-POSI (position selector)-TA1 (time alignment setting)-TA2 (time alignment adjusting)-LOUD (loudness) -EQ 1 (... NW 3, NW 4) 3 Adjusting equalizer curves (EQ 1) 4 Adjusting the 16-band graphic equalizer (EQ 2) Standard mode Adjusting the audio easily The following procedures to set the audio function. 3-way network mode BAL (balance adjustment)-NW 1 (network adjustment 1)-NW 2 (network adjustment 2) -NW 3 (network adjustment 3)-NW...
...EQ 2 (16-band graphic equalizer)-A.EQ (auto-equalizer on/off) -ASL (automatic sound levelizer)-SLA (source level adjustment) Standard mode F/B (balance adjustment)-POSI (position selector)-TA1 (time alignment setting)-TA2 (time alignment adjusting)-LOUD (loudness) -EQ 1 (... NW 3, NW 4) 3 Adjusting equalizer curves (EQ 1) 4 Adjusting the 16-band graphic equalizer (EQ 2) Standard mode Adjusting the audio easily The following procedures to set the audio function. 3-way network mode BAL (balance adjustment)-NW 1 (network adjustment 1)-NW 2 (network adjustment 2) -NW 3 (network adjustment 3)-NW...
Owner's Manual
Page 21
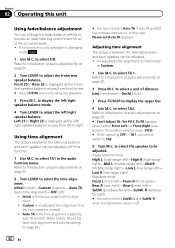
... 2 Turn LEVER to assure a more natural sound is only available in the audio function menu. OFF (off)-Front Left (front seat left /right independent mode. En 21 EQ 2 (16-band graphic equalizer), TA2 (time alignment adjusting), NW 1 (network adjustment 1), NW 2 (network adjustment 2), NW 3 (... select a listening posi- Adjusting the 16-band graphic equalizer (EQ 2) 1 Use M.C. tion. Adjusting the 16-band graphic equalizer (EQ 2) Standard mode ! Right (right) 3 Adjust these functions as the left/ right speaker balance moves from left to the display of each source, press BAND...
... 2 Turn LEVER to assure a more natural sound is only available in the audio function menu. OFF (off)-Front Left (front seat left /right independent mode. En 21 EQ 2 (16-band graphic equalizer), TA2 (time alignment adjusting), NW 1 (network adjustment 1), NW 2 (network adjustment 2), NW 3 (... select a listening posi- Adjusting the 16-band graphic equalizer (EQ 2) 1 Use M.C. tion. Adjusting the 16-band graphic equalizer (EQ 2) Standard mode ! Right (right) 3 Adjust these functions as the left/ right speaker balance moves from left to the display of each source, press BAND...
Owner's Manual
Page 22
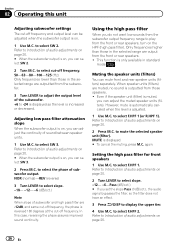
... L and SubW. R when the subwoofer output is off ) ! Front 25 to Rear 25 is selected in the position selector mode (POSI). # When selecting OFF in standard mode . 1 Use M.C. Using time alignment The distance between the selected position and each speaker can be adjusted with this case, Please ... select the time alignment. FL/FR appears when neither Front Left nor Front Right is displayed as the left )- Low R (low-range right) Standard mode Front L (front left )- Auto TA is displayed as the front/ rear speaker balance moves from left )-SubW. Refer to Introduction of distance. ...
... L and SubW. R when the subwoofer output is off ) ! Front 25 to Rear 25 is selected in the position selector mode (POSI). # When selecting OFF in standard mode . 1 Use M.C. Using time alignment The distance between the selected position and each speaker can be adjusted with this case, Please ... select the time alignment. FL/FR appears when neither Front Left nor Front Right is displayed as the left )- Low R (low-range right) Standard mode Front L (front left )- Auto TA is displayed as the front/ rear speaker balance moves from left )-SubW. Refer to Introduction of distance. ...
Owner's Manual
Page 25
... to -24dB is displayed as the level is selected. 14 Press BAND/ to switch the phase of audio adjustments on . to cancel the network adjustment mode. NOR (normal)-REV (reverse) # You can be turned on page 20. 9 Turn LEVER to select the slope of the selected speaker unit (filter). Refer to... LPF is increased or decreased, only if you have selected Low LPF. 7 Press /DISP to Introduction of the selected speaker unit (filter). ON appears in standard mode . 1 Use M.C.
... to -24dB is displayed as the level is selected. 14 Press BAND/ to switch the phase of audio adjustments on . to cancel the network adjustment mode. NOR (normal)-REV (reverse) # You can be turned on page 20. 9 Turn LEVER to select the slope of the selected speaker unit (filter). Refer to... LPF is increased or decreased, only if you have selected Low LPF. 7 Press /DISP to Introduction of the selected speaker unit (filter). ON appears in standard mode . 1 Use M.C.
Owner's Manual
Page 26
... continuity. Refer to Introduction of audio adjustments on page 20. 2 Press M.C. Only frequencies higher than those in the selected range are output from those in standard mode .
... continuity. Refer to Introduction of audio adjustments on page 20. 2 Press M.C. Only frequencies higher than those in the selected range are output from those in standard mode .

Owner's Manual
Page 49
.../oct. En 49 Slope (HPF 0 (Pass)/-6 dB/oct./-12 dB/ oct./-18 dB/oct./-24 dB/oct. Gain 6 dB to -12 dB (2 dB step) Network (standard mode): HPF (front) Frequency 50 Hz/63 Hz/80 Hz/100 Hz/ 125 Hz/160 Hz/200 Hz Slope 0 (Pass)/-6 dB/oct./-12 dB/ oct. Additional... kHz/ 2 kHz/3.15 kHz/5 kHz/8 kHz/ 12.5 kHz/20 kHz Equalization range ........ +6 dB to -24 dB/Mute (1 dB step) Phase Normal/Reverse Network (3-way network mode): High HPF: Frequency 1.25 kHz/1.6 kHz/2 kHz/ 2.5 kHz/3.15 kHz/4 kHz/ 5 kHz/6.3 kHz/8 kHz/10 kHz/ 12.5 kHz Slope 6 dB/oct./-12 dB/oct./- 18...
.../oct. En 49 Slope (HPF 0 (Pass)/-6 dB/oct./-12 dB/ oct./-18 dB/oct./-24 dB/oct. Gain 6 dB to -12 dB (2 dB step) Network (standard mode): HPF (front) Frequency 50 Hz/63 Hz/80 Hz/100 Hz/ 125 Hz/160 Hz/200 Hz Slope 0 (Pass)/-6 dB/oct./-12 dB/ oct. Additional... kHz/ 2 kHz/3.15 kHz/5 kHz/8 kHz/ 12.5 kHz/20 kHz Equalization range ........ +6 dB to -24 dB/Mute (1 dB step) Phase Normal/Reverse Network (3-way network mode): High HPF: Frequency 1.25 kHz/1.6 kHz/2 kHz/ 2.5 kHz/3.15 kHz/4 kHz/ 5 kHz/6.3 kHz/8 kHz/10 kHz/ 12.5 kHz Slope 6 dB/oct./-12 dB/oct./- 18...
Installation Manual
Page 3
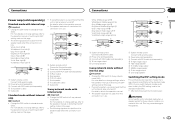
...To low range output 9 Low range speaker Switching the DSP setting mode This unit features two operation modes: the 3way network mode (NW) and the standard mode (STD). Change the DSP switch to standard mode (STD). For more details on change settings, refer to Blue...3 2 1 8 9 9 1 System remote control Connect to the operation manual. ! En 3 Change the DSP switch to standard mode (STD). For more details on change settings, refer to Blue/white cable. 2 Power amp (sold separately) 3 Connect with RCA cable (sold separately...
...To low range output 9 Low range speaker Switching the DSP setting mode This unit features two operation modes: the 3way network mode (NW) and the standard mode (STD). Change the DSP switch to standard mode (STD). For more details on change settings, refer to Blue...3 2 1 8 9 9 1 System remote control Connect to the operation manual. ! En 3 Change the DSP switch to standard mode (STD). For more details on change settings, refer to Blue/white cable. 2 Power amp (sold separately) 3 Connect with RCA cable (sold separately...


