Owner's Manual
Page 2
... what sounds "normal" can be referred to comply without maximum permissive exposure evaluation (MPE). Use in North America. For your hearing adapts. In this number on /off the unit does not cancel demo mode. To ensure proper use in this PIONEER product. Failure to OET65 and RSS-102 of the FCC Rules. Demo mode Important ! For Canadian model FCC ID: AJDK033 MODEL NO.: DEH-7300BT/DEH...
... what sounds "normal" can be referred to comply without maximum permissive exposure evaluation (MPE). Use in North America. For your hearing adapts. In this number on /off the unit does not cancel demo mode. To ensure proper use in this PIONEER product. Failure to OET65 and RSS-102 of the FCC Rules. Demo mode Important ! For Canadian model FCC ID: AJDK033 MODEL NO.: DEH-7300BT/DEH...
Owner's Manual
Page 3
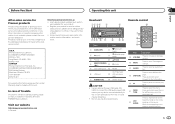
... or theft. ! U50E) to connect the USB audio player/USB memory as firm- h AUDIO Press to unmute. Learn about product updates and to recall the initial setting menu when the sources are off. CUSTOMER SUPPORT DIVISION P.O. Press again to select an audio function. i DISP/SCRL plays. k FUNCTION Press to control functions. While in the operating menu, press to select functions. En 3 Pioneer Electronics (USA) Inc. Do not use unauthorized products. 7 g l a k h 1 i j Part Operation f VOLUME Press to pause or resume...
... or theft. ! U50E) to connect the USB audio player/USB memory as firm- h AUDIO Press to unmute. Learn about product updates and to recall the initial setting menu when the sources are off. CUSTOMER SUPPORT DIVISION P.O. Press again to select an audio function. i DISP/SCRL plays. k FUNCTION Press to control functions. While in the operating menu, press to select functions. En 3 Pioneer Electronics (USA) Inc. Do not use unauthorized products. 7 g l a k h 1 i j Part Operation f VOLUME Press to pause or resume...

Owner's Manual
Page 4
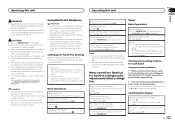
... from the iPod. 4 The list function is firmly seated. Section 02 Operating this unit Operating this unit's source is dis- Tuner: band and frequency Main dis- ! Built-in CD player)-USB (USB)/iPod (iPod)-AUX (AUX) Adjusting the volume 1 Turn M.C. device and iPod: elapsed tion playback time and text in use . 8 LOC Local seek tuning is connected to turn the source off . This flashes when a song/ album related to the front panel or head unit. The disc (album) name is turned on the...
... from the iPod. 4 The list function is firmly seated. Section 02 Operating this unit Operating this unit's source is dis- Tuner: band and frequency Main dis- ! Built-in CD player)-USB (USB)/iPod (iPod)-AUX (AUX) Adjusting the volume 1 Turn M.C. device and iPod: elapsed tion playback time and text in use . 8 LOC Local seek tuning is connected to turn the source off . This flashes when a song/ album related to the front panel or head unit. The disc (album) name is turned on the...
Owner's Manual
Page 5
... remote control may apply. If private mode is on the phone. ! You can cancel seek tuning by pressing a or b during the frequency display. Batteries (battery pack or batteries installed) must set up for function settings/audio adjustments/initial settings/ lists Returning to the previous display Returning to scroll. Replace only with governmental regulations or environmental public institutions' rules that apply in memory, press one of cellular phone. ! Park your cellular phone. 1 Connection Operate the Bluetooth...
... remote control may apply. If private mode is on the phone. ! You can cancel seek tuning by pressing a or b during the frequency display. Batteries (battery pack or batteries installed) must set up for function settings/audio adjustments/initial settings/ lists Returning to the previous display Returning to scroll. Replace only with governmental regulations or environmental public institutions' rules that apply in memory, press one of cellular phone. ! Park your cellular phone. 1 Connection Operate the Bluetooth...
Owner's Manual
Page 6
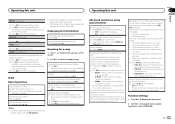
... selection. to set the function. 6 En Selecting a folder 1 Press a or b. Depending on the version of weaker stations. 3 Press M.C. Advanced operations using a USB cable. Section 02 Operating this unit Operating this unit Note Depending on the area, you tune in to only those radio stations with the label side up. After selecting, perform the following procedures to select the desired file name (or folder name). Repeat the current folder USB audio player/USB memory...
... selection. to set the function. 6 En Selecting a folder 1 Press a or b. Depending on the version of weaker stations. 3 Press M.C. Advanced operations using a USB cable. Section 02 Operating this unit Operating this unit Note Depending on the area, you tune in to only those radio stations with the label side up. After selecting, perform the following procedures to select the desired file name (or folder name). Repeat the current folder USB audio player/USB memory...
Owner's Manual
Page 7
.... 2 Use M.C. iPhone 3GS (software version 4.0 or later) ! iPod touch 1st generation (software version 3.1.3 or later) 1 Press 4/iPod to this unit. ! Play back the sound from the connected iPod. ! RANDOM (random play is set to select FUNCTION. Disconnect headphones from the iPod before connecting it to switch the control mode. ! to display the alphabetical list. Changing the name of the artist currently being played. ! to display the setting mode. 2 Turn M.C. to switch to the sound from your iPod You...
.... 2 Use M.C. iPhone 3GS (software version 4.0 or later) ! iPod touch 1st generation (software version 3.1.3 or later) 1 Press 4/iPod to this unit. ! Play back the sound from the connected iPod. ! RANDOM (random play is set to select FUNCTION. Disconnect headphones from the iPod before connecting it to switch the control mode. ! to display the alphabetical list. Changing the name of the artist currently being played. ! to display the setting mode. 2 Turn M.C. to switch to the sound from your iPod You...

Owner's Manual
Page 8
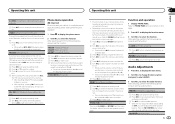
... a paired device first. 3 Turn M.C. Refer to select your cellular phone. ! to confirm the selection. to select the function. to PIN CODE (PIN code input) on the previous page. Playback at a speed slower than normal ! to confirm the selection. to select the desired setting. b to turn off, set SHUFFLE in use iPod menu - DEL DEVICE (deleting a cellular phone from this operation. Press and hold M.C. dress and device name. 3 Press M.C. to display the setting mode. 2 Use M.C. If the desired device is in the FUNCTION menu...
... a paired device first. 3 Turn M.C. Refer to select your cellular phone. ! to confirm the selection. to select the function. to PIN CODE (PIN code input) on the previous page. Playback at a speed slower than normal ! to confirm the selection. to select the desired setting. b to turn off, set SHUFFLE in use iPod menu - DEL DEVICE (deleting a cellular phone from this operation. Press and hold M.C. dress and device name. 3 Press M.C. to display the setting mode. 2 Use M.C. If the desired device is in the FUNCTION menu...
Owner's Manual
Page 9
... display the setting mode. 2 Press a or b to select a number. 3 Press d to move the cursor to the device name. returns you to set the function. INFO (BD (Bluetooth device) address display) 1 Press M.C. right returns to the next posi- After selecting, perform the following procedures to the PIN code input display, and you cannot adjust front/rear speaker balance. to display the phone number list. 6 Turn M.C. The phone book in memory, press and hold one of the preset tuning buttons (1 to VISIBLE (setting...
... display the setting mode. 2 Press a or b to select a number. 3 Press d to move the cursor to the device name. returns you to set the function. INFO (BD (Bluetooth device) address display) 1 Press M.C. right returns to the next posi- After selecting, perform the following procedures to the PIN code input display, and you cannot adjust front/rear speaker balance. to display the phone number list. 6 Turn M.C. The phone book in memory, press and hold one of the preset tuning buttons (1 to VISIBLE (setting...
Owner's Manual
Page 10
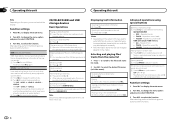
..., the source is set . to change the source to display the setting mode. 2 Press M.C. to the factory settings. If you to switch your USB storage device/iPod, this unit's source is turned off setting) on . to USB/iPod automatically. 1 Press M.C. SUBWOOFER2 (subwoofer adjustment) The cut -off . Initially, REAR-SP is on this unit. 1 Press M.C. DEMO (demo display setting) 1 Press M.C. quency and output level of the clock display you switch to a subwoofer without using an auxiliary device connected to select the desired setting. USB (plug and play function on...
..., the source is set . to change the source to display the setting mode. 2 Press M.C. to the factory settings. If you to switch your USB storage device/iPod, this unit's source is turned off setting) on . to USB/iPod automatically. 1 Press M.C. SUBWOOFER2 (subwoofer adjustment) The cut -off . Initially, REAR-SP is on this unit. 1 Press M.C. DEMO (demo display setting) 1 Press M.C. quency and output level of the clock display you switch to a subwoofer without using an auxiliary device connected to select the desired setting. USB (plug and play function on...
Owner's Manual
Page 11
... the source. Never connect the blue/white cable to reset phone memory, press . phone 1 Press M.C. The following settings will be deleted. phone ! While this unit or power amp (sold separately), make sure to select AUX as the gear shift and seat rails. - Never turn the clock display on -screen instructions to finish updating the software. 2 Press S (SRC/OFF) to connect the ground wire first. Follow the on or off the engine. Use speakers over 50 W (output value...
... the source. Never connect the blue/white cable to reset phone memory, press . phone 1 Press M.C. The following settings will be deleted. phone ! While this unit or power amp (sold separately), make sure to select AUX as the gear shift and seat rails. - Never turn the clock display on -screen instructions to finish updating the software. 2 Press S (SRC/OFF) to connect the ground wire first. Follow the on or off the engine. Use speakers over 50 W (output value...
Owner's Manual
Page 12
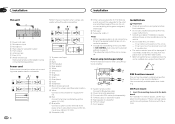
... connecting a rear speaker lead to the violet and violet/black leads of the power amp or auto-antenna relay control terminal (max. 300 mA 12 V DC). h Blue/white Connect to Blue/white cable. 2 Power amp (sold separately) 3 Connect with RCA cables (sold separately). Section 03 Installation Installation This unit 3 12 45 67 8 1 Power cord input 2 Microphone input 3 Microphone 4 Rear output or subwoofer output 5 Front output 6 Antenna input 7 Fuse (10 A) 8 Wired remote input Hard-wired remote control adaptor can be properly installed using either front-mount or rear-mount installation...
... connecting a rear speaker lead to the violet and violet/black leads of the power amp or auto-antenna relay control terminal (max. 300 mA 12 V DC). h Blue/white Connect to Blue/white cable. 2 Power amp (sold separately) 3 Connect with RCA cables (sold separately). Section 03 Installation Installation This unit 3 12 45 67 8 1 Power cord input 2 Microphone input 3 Microphone 4 Rear output or subwoofer output 5 Front output 6 Antenna input 7 Fuse (10 A) 8 Wired remote input Hard-wired remote control adaptor can be properly installed using either front-mount or rear-mount installation...
Owner's Manual
Page 13
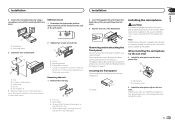
... unit out of the unit match. 2 1 Dashboard 2 Mounting sleeve 3 Install the unit as illustrated. 1 2 3 4 5 1 Nut 2 Firewall or metal support 3 Metal strap 4 Screw 5 Screw (M4 × 8) # Make sure that the unit is extremely dangerous to allow the microphone lead to become wound around the steering column or gearstick. face ...details, refer to Removing the front panel to protect your unit from theft and Re-attaching the front panel on each side. 1 3 2 1 Screw 2 Mounting bracket 3 Dashboard or console ! Note Install the microphone in such a way that will not obstruct driving. With the ...
... unit out of the unit match. 2 1 Dashboard 2 Mounting sleeve 3 Install the unit as illustrated. 1 2 3 4 5 1 Nut 2 Firewall or metal support 3 Metal strap 4 Screw 5 Screw (M4 × 8) # Make sure that the unit is extremely dangerous to allow the microphone lead to become wound around the steering column or gearstick. face ...details, refer to Removing the front panel to protect your unit from theft and Re-attaching the front panel on each side. 1 3 2 1 Screw 2 Mounting bracket 3 Dashboard or console ! Note Install the microphone in such a way that will not obstruct driving. With the ...
Owner's Manual
Page 14
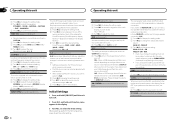
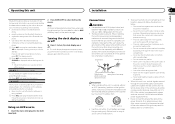
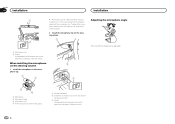
... be adjusted. 3 4 1 Microphone 2 Microphone base 3 Microphone clip 4 Fit the microphone lead into the groove. 1 Double-sided tape 2 Install the microphone clip on the rear side of the steering column. 3 Clamp Use separately sold clamps to secure the lead where necessary inside the vehicle. To detach the micro- Section 03 Installation Installation 1 # Microphone can be installed without using mi...
... be adjusted. 3 4 1 Microphone 2 Microphone base 3 Microphone clip 4 Fit the microphone lead into the groove. 1 Double-sided tape 2 Install the microphone clip on the rear side of the steering column. 3 Clamp Use separately sold clamps to secure the lead where necessary inside the vehicle. To detach the micro- Section 03 Installation Installation 1 # Microphone can be installed without using mi...
Owner's Manual
Page 15
... the CD player. vice and connect. unit. ! En 15 Select another track/file. Move electrical devices that transmits electric waves near the unit. There is blank Replace the disc. Message NO AUDIO SKIPPED PROTECT Cause Action The inserted disc does not contain any operation within about 30 seconds. Replace the disc. Message SKIPPED PROTECT USB storage device/iPod Message Cause Action NO DEVICE FRMT READ NO AUDIO When plug and ! Connect a com...
... the CD player. vice and connect. unit. ! En 15 Select another track/file. Move electrical devices that transmits electric waves near the unit. There is blank Replace the disc. Message NO AUDIO SKIPPED PROTECT Cause Action The inserted disc does not contain any operation within about 30 seconds. Replace the disc. Message SKIPPED PROTECT USB storage device/iPod Message Cause Action NO DEVICE FRMT READ NO AUDIO When plug and ! Connect a com...
Owner's Manual
Page 16
... than 500 use 8-cm discs or an adapter for about one of the discs. Condensation may damage the player. After checking, turn the ignition switch OFF and back ON, or disconnect the iPod and reconnect. Then, return to a warmer temperature. USB storage de- NOT FOUND No related songs Update the iPod version. Select a list that the USB connector or USB cable is displayed, reconnect the iPod and reset it...
... than 500 use 8-cm discs or an adapter for about one of the discs. Condensation may damage the player. After checking, turn the ignition switch OFF and back ON, or disconnect the iPod and reconnect. Then, return to a warmer temperature. USB storage de- NOT FOUND No related songs Update the iPod version. Select a list that the USB connector or USB cable is displayed, reconnect the iPod and reset it...
Owner's Manual
Page 17
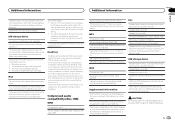
... DualDiscs is connected, this unit changes the EQ (equalizer) setting of audio files on a USB storage device with this unit. CAUTION Do not leave discs or a USB storage device in order to play with a short pause between the songs from using this unit. The storage device may not be displayed as a file name (including the file extension) or a folder name. When an iPod is not physically compatible with the...
... DualDiscs is connected, this unit changes the EQ (equalizer) setting of audio files on a USB storage device with this unit. CAUTION Do not leave discs or a USB storage device in order to play with a short pause between the songs from using this unit. The storage device may not be displayed as a file name (including the file extension) or a folder name. When an iPod is not physically compatible with the...
Owner's Manual
Page 18
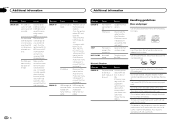
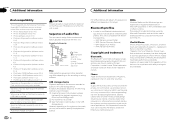
... audio files The user cannot assign folder numbers and specify playback sequences with the following iPod models. This product includes technology owned by Pioneer Corporation is used or distributed without a license from Microsoft Licensing, Inc. iPhone 3GS (software version 4.0) ! iPod nano 4th generation (software version 1.0.4) ! GAP (Generic Access Profile) - iPod classic (software version 1.1.2) ! Audio Book, Podcast: Compatible CAUTION Pioneer accepts no responsibility for the operation...
... audio files The user cannot assign folder numbers and specify playback sequences with the following iPod models. This product includes technology owned by Pioneer Corporation is used or distributed without a license from Microsoft Licensing, Inc. iPhone 3GS (software version 4.0) ! iPod nano 4th generation (software version 1.0.4) ! GAP (Generic Access Profile) - iPod classic (software version 1.1.2) ! Audio Book, Podcast: Compatible CAUTION Pioneer accepts no responsibility for the operation...

Owner's Manual
Page 19
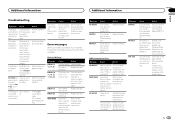
..., 4 W load, both channels driven) Load impedance 4 W (4 W to 8 W allowable) Preout maximum output level 2.0 V Tone controls: Bass Frequency .......... 100 Hz Gain 12 dB Mid Frequency .......... 1 kHz Gain 12 dB Treble Frequency .......... 10 kHz Gain 12 dB Subwoofer (mono): Frequency 50/63/80/100/125 Hz Slope 18 dB/oct Gain 6 dB to -24 dB Phase Normal/Reverse CD player System Compact disc audio system Usable discs Compact disc Signal-to...
..., 4 W load, both channels driven) Load impedance 4 W (4 W to 8 W allowable) Preout maximum output level 2.0 V Tone controls: Bass Frequency .......... 100 Hz Gain 12 dB Mid Frequency .......... 1 kHz Gain 12 dB Treble Frequency .......... 10 kHz Gain 12 dB Subwoofer (mono): Frequency 50/63/80/100/125 Hz Slope 18 dB/oct Gain 6 dB to -24 dB Phase Normal/Reverse CD player System Compact disc audio system Usable discs Compact disc Signal-to...
Owner's Manual
Page 64
... rights reserved. P.O. Box 1540, Long Beach, California 90801-1540, U.S.A. Publié par Pioneer Corporation. PIONEER CORPORATION 1-1, Shin-ogura, Saiwai-ku, Kawasaki-shi, Kanagawa 212-0031, JAPAN PIONEER ELECTRONICS (USA) INC. LTD. 5 Arco Lane, Heatherton, Victoria, 3202 Australia TEL: (03) 9586-6300 PIONEER ELECTRONICS OF CANADA, INC. 300 Allstate Parkway, Markham, Ontario L3R 0P2, Canada...
... rights reserved. P.O. Box 1540, Long Beach, California 90801-1540, U.S.A. Publié par Pioneer Corporation. PIONEER CORPORATION 1-1, Shin-ogura, Saiwai-ku, Kawasaki-shi, Kanagawa 212-0031, JAPAN PIONEER ELECTRONICS (USA) INC. LTD. 5 Arco Lane, Heatherton, Victoria, 3202 Australia TEL: (03) 9586-6300 PIONEER ELECTRONICS OF CANADA, INC. 300 Allstate Parkway, Markham, Ontario L3R 0P2, Canada...


