Owner's Manual
Page 2
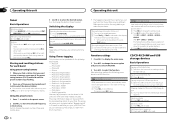
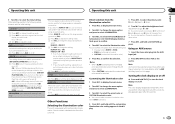
...About this unit 2 Demo mode 3 After-sales service for Pioneer products 3 In case of trouble 3 Visit our website 3 About this manual 3 Operating this unit Head unit 4 Remote control 4 Display indication 4 Basic Operations 4 Use and care of the remote control 5 Menu operations identical for function settings/audio adjustments/initial settings/lists 5 Tuner 6 CD/CD-R/CD-RW and USB storage devices 6 iPod 7 Using Pandoraâ 9 Audio Adjustments 10 Initial Settings 10 Other Functions 11 Installation Connections 12 Installation 13 Additional Information Troubleshooting 14 Error messages 14 Handling...
...About this unit 2 Demo mode 3 After-sales service for Pioneer products 3 In case of trouble 3 Visit our website 3 About this manual 3 Operating this unit Head unit 4 Remote control 4 Display indication 4 Basic Operations 4 Use and care of the remote control 5 Menu operations identical for function settings/audio adjustments/initial settings/lists 5 Tuner 6 CD/CD-R/CD-RW and USB storage devices 6 iPod 7 Using Pandoraâ 9 Audio Adjustments 10 Initial Settings 10 Other Functions 11 Installation Connections 12 Installation 13 Additional Information Troubleshooting 14 Error messages 14 Handling...
Owner's Manual
Page 3
... PRODUCT WILL INCREASE EYE HAZARD. Turning off the unit does not cancel demo mode. Learn about product updates and to safeguard purchase details in our files in Canada http://www.pioneerelectronics.ca ! Register your dealer or nearest authorized PIONEER Service Station. Access owner's manuals, spare parts information, service information, and much more. Note Function setting operations are completed even if the menu is not available, please...
... PRODUCT WILL INCREASE EYE HAZARD. Turning off the unit does not cancel demo mode. Learn about product updates and to safeguard purchase details in our files in Canada http://www.pioneerelectronics.ca ! Register your dealer or nearest authorized PIONEER Service Station. Access owner's manuals, spare parts information, service information, and much more. Note Function setting operations are completed even if the menu is not available, please...
Owner's Manual
Page 4
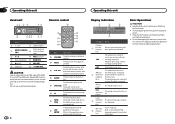
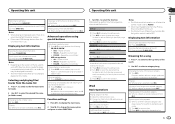
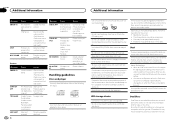
... sound retriever function is selected 2 dom/shuf- The levels of direct sunlight and high temperatures. ! Handle gently when removing or attaching the front panel. ! Section 02 Operating this unit Operating this unit Head unit 12 3 4 Remote control 56 d c b a9 87 Part Part 1 (list) 7 Detach button AUX input jack 2 MULTI-CONTROL 8 (3.5 mm stereo (M.C.) jack) 3 1 to 6 9 TAG/ (clock) 4 Disc loading slot a BAND/ESC 5 h (eject) b SRC/OFF 6 USB port c /DISP/SCRL CAUTION Use an optional Pioneer USB cable (CD-U50E) to connect the USB audio player/USB memory as...
... sound retriever function is selected 2 dom/shuf- The levels of direct sunlight and high temperatures. ! Handle gently when removing or attaching the front panel. ! Section 02 Operating this unit Operating this unit Head unit 12 3 4 Remote control 56 d c b a9 87 Part Part 1 (list) 7 Detach button AUX input jack 2 MULTI-CONTROL 8 (3.5 mm stereo (M.C.) jack) 3 1 to 6 9 TAG/ (clock) 4 Disc loading slot a BAND/ESC 5 h (eject) b SRC/OFF 6 USB port c /DISP/SCRL CAUTION Use an optional Pioneer USB cable (CD-U50E) to connect the USB audio player/USB memory as...

Owner's Manual
Page 5
... your source to switch. Notes ! When this unit's source is connected to cycle between: TUNER (tuner)-CD (built-in the direction of used for a month or longer. ! Refer to turn the source off 1 Press and hold /DISP/SCRL. Turning the unit on 1 Press SRC/OFF to USB PNP (plug and play is on the back of the remote control Using the remote control 1 Point the remote control in CD player)-USB (USB)/USB-iPod (iPod)-PANDORA (Pandora) -AUX (AUX) Adjusting the volume 1 Turn M.C. Use and...
... your source to switch. Notes ! When this unit's source is connected to cycle between: TUNER (tuner)-CD (built-in the direction of used for a month or longer. ! Refer to turn the source off 1 Press and hold /DISP/SCRL. Turning the unit on 1 Press SRC/OFF to USB PNP (plug and play is on the back of the remote control Using the remote control 1 Point the remote control in CD player)-USB (USB)/USB-iPod (iPod)-PANDORA (Pandora) -AUX (AUX) Adjusting the volume 1 Turn M.C. Use and...
Owner's Manual
Page 6
... unit even while other iPod models are used. Function settings 1 Press M.C. BSM (best stations memory) BSM (best stations memory) automatically stores the six strongest stations in the USB storage device using a USB cable. again. CD/CD-R/CD-RW and USB storage devices Basic Operations Playing a CD/CD-R/CD-RW 1 Insert the disc into the disc loading slot with sufficiently strong signals for FM or AM) is indicated in memory, press one of the preset tuning buttons...
... unit even while other iPod models are used. Function settings 1 Press M.C. BSM (best stations memory) BSM (best stations memory) automatically stores the six strongest stations in the USB storage device using a USB cable. again. CD/CD-R/CD-RW and USB storage devices Basic Operations Playing a CD/CD-R/CD-RW 1 Insert the disc into the disc loading slot with sufficiently strong signals for FM or AM) is indicated in memory, press one of the preset tuning buttons...
Owner's Manual
Page 7
.... 2 Connect an iPod to the USB cable using special buttons Selecting a repeat play range. Selecting and playing files/ tracks from the name list 1 Press to switch to alphabet search mode. 2 Turn M.C. Viewing a list of list search. 2 Use M.C. Repeat the current track ! to this unit. ! fore connecting it to confirm the selection. Displaying text information Selecting the desired text information 1 Press /DISP/SCRL. Repeat all tracks ! to display the setting mode. 2 Turn M.C. to display the setting mode. 2 Turn M.C. iPod Basic Operations Playing...
.... 2 Connect an iPod to the USB cable using special buttons Selecting a repeat play range. Selecting and playing files/ tracks from the name list 1 Press to switch to alphabet search mode. 2 Turn M.C. Viewing a list of list search. 2 Use M.C. Repeat the current track ! to this unit. ! fore connecting it to confirm the selection. Displaying text information Selecting the desired text information 1 Press /DISP/SCRL. Repeat all tracks ! to display the setting mode. 2 Turn M.C. to display the setting mode. 2 Turn M.C. iPod Basic Operations Playing...
Owner's Manual
Page 8
... (shuffle all on. ! Playing songs related to play songs from your favorite setting. ! Plays an album from the connected iPod. ! This function is compatible with the following iPod models. - iPod nano 1st generation - iPod 5th generation APP mode is not compatible with the following : ! iPhone 4 (software version 4.0 or later) ! iPhone 3G (software version 3.0 or later) ! AUDIO - to change the menu option and press to display the setting mode. 2 Turn M.C. to select FUNCTION. 3 Turn M.C. SHUFFLE (shuffle) 1 Press...
... (shuffle all on. ! Playing songs related to play songs from your favorite setting. ! Plays an album from the connected iPod. ! This function is compatible with the following iPod models. - iPod nano 1st generation - iPod 5th generation APP mode is not compatible with the following : ! iPhone 4 (software version 4.0 or later) ! iPhone 3G (software version 3.0 or later) ! AUDIO - to change the menu option and press to display the setting mode. 2 Turn M.C. to select FUNCTION. 3 Turn M.C. SHUFFLE (shuffle) 1 Press...

Owner's Manual
Page 9
... to display the setting mode. 2 Turn M.C. Pandora Internet radio is selected, press M.C. Playing 1 When QuickMix or the station is a music service not affiliated with future firmware versions of allowing your device. (Search Apple iTunes App Store for unlimited data usage, additional charges from this unit Section 02 English 1 Press M.C. Displaying text information Selecting the desired text information 1 Press /DISP/SCRL. Optional Pioneer adapter cable connecting your favorite setting. ! right. Changing the...
... to display the setting mode. 2 Turn M.C. Pandora Internet radio is selected, press M.C. Playing 1 When QuickMix or the station is a music service not affiliated with future firmware versions of allowing your device. (Search Apple iTunes App Store for unlimited data usage, additional charges from this unit Section 02 English 1 Press M.C. Displaying text information Selecting the desired text information 1 Press /DISP/SCRL. Optional Pioneer adapter cable connecting your favorite setting. ! right. Changing the...
Owner's Manual
Page 10
Section 02 Operating this unit Operating this function. 1 Press M.C. to Enhancing compressed audio and restoring rich sound (sound retriever) on the next page. BOOK MARK (bookmark) 1 Press M.C. S.RTRV (sound retriever) 1 Press M.C. For details, refer to display the main menu. 2 Turn M.C. Audio Adjustments 1 Press M.C. to SW CONTROL (rear output and subwoofer setting) on the previous page. 3 Press M.C. Refer to display the setting mode. 2 Press M.C. to switch to level and then turn M. to switch to equalizer band and then turn M.C. LOUDNESS...
Section 02 Operating this unit Operating this function. 1 Press M.C. to Enhancing compressed audio and restoring rich sound (sound retriever) on the next page. BOOK MARK (bookmark) 1 Press M.C. S.RTRV (sound retriever) 1 Press M.C. For details, refer to display the main menu. 2 Turn M.C. Audio Adjustments 1 Press M.C. to SW CONTROL (rear output and subwoofer setting) on the previous page. 3 Press M.C. Refer to display the setting mode. 2 Press M.C. to switch to level and then turn M. to switch to equalizer band and then turn M.C. LOUDNESS...
Owner's Manual
Page 11
... the audio menu will be selected unless the auxiliary setting is set for rear full-range speaker connection (FUL). 1 Press M.C. Note AUX cannot be no output unless you turn the demo display on or off . After selecting, perform the following list. ! 30 preset colors (WHITE to AUX (auxiliary input) on other operations, but the clock display appears again after 25 seconds. 4 Press M.C. SW CONTROL (rear output and subwoofer setting) The rear speaker leads output and RCA output can be used for all colors) ! Set to...
... the audio menu will be selected unless the auxiliary setting is set for rear full-range speaker connection (FUL). 1 Press M.C. Note AUX cannot be no output unless you turn the demo display on or off . After selecting, perform the following list. ! 30 preset colors (WHITE to AUX (auxiliary input) on other operations, but the clock display appears again after 25 seconds. 4 Press M.C. SW CONTROL (rear output and subwoofer setting) The rear speaker leads output and RCA output can be used for all colors) ! Set to...

Owner's Manual
Page 12
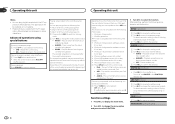
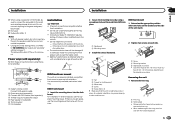
... ground wire is equipped with cable clamps or adhesive tape. Use a fuse of the battery before installation. - Never band together negative cables of the car's body. When this unit or any other devices. Never connect the blue/white cable to 8 W (impedance value). L 1 R 2 3 4 6 8 F 7 9 5 a c R b d e f g h Perform these connections when not connecting a rear speaker lead to ground. - h Blue/white Connect to connect the ground wire first. The ground wire of the power amp and...
... ground wire is equipped with cable clamps or adhesive tape. Use a fuse of the battery before installation. - Never band together negative cables of the car's body. When this unit or any other devices. Never connect the blue/white cable to 8 W (impedance value). L 1 R 2 3 4 6 8 F 7 9 5 a c R b d e f g h Perform these connections when not connecting a rear speaker lead to ground. - h Blue/white Connect to connect the ground wire first. The ground wire of the power amp and...
Owner's Manual
Page 13
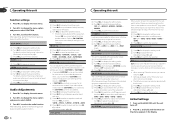
... unit is enough space, use the supplied mounting sleeve. Do not install this unit. it may cause malfunctions. ! The semiconductor laser will be damaged if it may cause skipping or other modifications to SW CONTROL (rear output and subwoofer setting) on the bracket screw holes. Use commercially available parts when installing. 1 System remote control Connect to Blue/white cable. 2 Power amp (sold separately) 3 Connect with the notched tab down. face...
... unit is enough space, use the supplied mounting sleeve. Do not install this unit. it may cause malfunctions. ! The semiconductor laser will be damaged if it may cause skipping or other modifications to SW CONTROL (rear output and subwoofer setting) on the bracket screw holes. Use commercially available parts when installing. 1 System remote control Connect to Blue/white cable. 2 Power amp (sold separately) 3 Connect with the notched tab down. face...
Owner's Manual
Page 14
... Player Message Cause Action ERROR-07, The disc is changed (NO TITLE, for example). Turn the ignition trical or me- ent source, then back to cancel demo mode. ! Turn off . Securing the front panel The front panel can remove the front panel to protect your nearest Pioneer Service Center, be causing the interference away from theft and Re-attaching the front panel on Select the repeat the repeat play play...
... Player Message Cause Action ERROR-07, The disc is changed (NO TITLE, for example). Turn the ignition trical or me- ent source, then back to cancel demo mode. ! Turn off . Securing the front panel The front panel can remove the front panel to protect your nearest Pioneer Service Center, be causing the interference away from theft and Re-attaching the front panel on Select the repeat the repeat play play...
Owner's Manual
Page 15
... disconnect the iPod and reconnect. Turn the plug play is not caught in - iPod failure Disconnect the cable from the iPod. Additional Information Additional Information Appendix English Message NO AUDIO SKIPPED PROTECT Cause Action The inserted disc does not contain any sound. vice consumes vice and do not more than 500 use it. vice and connect. Turn the mA (maximum ignition switch to the USB source. ! All...
... disconnect the iPod and reconnect. Turn the plug play is not caught in - iPod failure Disconnect the cable from the iPod. Additional Information Additional Information Appendix English Message NO AUDIO SKIPPED PROTECT Cause Action The inserted disc does not contain any sound. vice consumes vice and do not more than 500 use it. vice and connect. Turn the mA (maximum ignition switch to the USB source. ! All...
Owner's Manual
Page 16
... to play the CD side with this unit changes the EQ (equalizer) setting of the discs. Skip limit reached. Do not exceed the skip limit. 16 En Message Cause Action CHECK APP This version of the Pandora application installed. Connect an iPod/ iPhone that feature either of the discs. Unable to save Try again later. ST lected. Handling guidelines Discs and player Use only discs...
... to play the CD side with this unit changes the EQ (equalizer) setting of the discs. Skip limit reached. Do not exceed the skip limit. 16 En Message Cause Action CHECK APP This version of the Pandora application installed. Connect an iPod/ iPhone that feature either of the discs. Unable to save Try again later. ST lected. Handling guidelines Discs and player Use only discs...
Owner's Manual
Page 17
... compatible Partitioned USB storage device: Only the first partition can be a slight delay when starting playback of audio files on the application used to the iPod manuals. iPod touch 2nd generation (software version 4.0) ! This unit may become stuck in the disc loading slot and will not eject. There may be supported. ! iPhone (software version 3.1.3) ! iPod classic (software version 1.1.2) ! There may be played. iPod classic 120GB (software version 2.0.1) ! A Pioneer...
... compatible Partitioned USB storage device: Only the first partition can be a slight delay when starting playback of audio files on the application used to the iPod manuals. iPod touch 2nd generation (software version 4.0) ! This unit may become stuck in the disc loading slot and will not eject. There may be supported. ! iPhone (software version 3.1.3) ! iPod classic (software version 1.1.2) ! There may be played. iPod classic 120GB (software version 2.0.1) ! A Pioneer...
Owner's Manual
Page 18
.... and other countries. iPod & iPhone iPhone, iPod, iPod classic, iPod nano, and iPod touch are trademarks or registered trademarks of Microsoft Corporation in .) Weight 1.16 kg (2.6 lbs) Audio Maximum power output ... 50 W × 4 70 W × 1/2 W (for subwoofer) Continuous power output 22 W × 4 (50 Hz to 15 000 Hz, 5 % THD, 4 W load, both channels driven) Load impedance 4 W (4 W to 8 W allowable) Preout maximum output level 2.2 V Equalizer (5-Band Graphic Equalizer): Frequency 100/315/1.25k...
.... and other countries. iPod & iPhone iPhone, iPod, iPod classic, iPod nano, and iPod touch are trademarks or registered trademarks of Microsoft Corporation in .) Weight 1.16 kg (2.6 lbs) Audio Maximum power output ... 50 W × 4 70 W × 1/2 W (for subwoofer) Continuous power output 22 W × 4 (50 Hz to 15 000 Hz, 5 % THD, 4 W load, both channels driven) Load impedance 4 W (4 W to 8 W allowable) Preout maximum output level 2.2 V Equalizer (5-Band Graphic Equalizer): Frequency 100/315/1.25k...
Owner's Manual
Page 19
Appendix En 19 English Additional Information AM tuner Frequency range 530 kHz to 1 710 kHz Usable sensitivity 25 µV (S/N: 20 dB) Signal-to-noise ratio ......... 62 dB (IHF-A network) CEA2006 Specifications Power output 14 W RMS × 4 Channels (4 W and ≦ 1 % THD+N) S/N ratio 91 dBA (reference: 1 W into 4 W) Note Specifications and the design are subject to modifications without notice.
Appendix En 19 English Additional Information AM tuner Frequency range 530 kHz to 1 710 kHz Usable sensitivity 25 µV (S/N: 20 dB) Signal-to-noise ratio ......... 62 dB (IHF-A network) CEA2006 Specifications Power output 14 W RMS × 4 Channels (4 W and ≦ 1 % THD+N) S/N ratio 91 dBA (reference: 1 W into 4 W) Note Specifications and the design are subject to modifications without notice.


