Owner's Manual
Page 2
...adapts to higher volumes of sound, so what 's around you need to display the initial settings. Guard against harmful interference in a residential installation. However, there is cancelled before using this product or cords associated with accessories sold with ignition switch on proposition 65 known to the State...lets the sound come into an outlet on page 9. Section 01 Before you start Before you start Thank you for purchasing this PIONEER product To ensure proper use, please read and observe WARNINGs and CAUTIONs in this unit to come through this manual before the operations...
...adapts to higher volumes of sound, so what 's around you need to display the initial settings. Guard against harmful interference in a residential installation. However, there is cancelled before using this product or cords associated with accessories sold with ignition switch on proposition 65 known to the State...lets the sound come into an outlet on page 9. Section 01 Before you start Before you start Thank you for purchasing this PIONEER product To ensure proper use, please read and observe WARNINGs and CAUTIONs in this unit to come through this manual before the operations...
Owner's Manual
Page 4
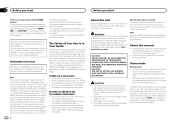
... you prefer to select the next/previous folder. CLOCK SET (setting the clock) 1 Turn M.C. to set the demo display to ON after installation, set up the menu options below. 1 After installation of direct sunlight and high temperatures. 3 Always keep the detached front panel in a protection device such as a protection case. Press to...
... you prefer to select the next/previous folder. CLOCK SET (setting the clock) 1 Turn M.C. to set the demo display to ON after installation, set up the menu options below. 1 After installation of direct sunlight and high temperatures. 3 Always keep the detached front panel in a protection device such as a protection case. Press to...
Owner's Manual
Page 5
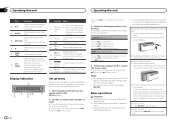
...vehicle's antenna extends when this unit's source is selected in your vehicle when removing the front panel. En 5 Batteries (battery pack or batteries installed) must not be changed . ! CAUTION For safety reasons, park your country/area. ! Replace only with metallic tools. ! The remote control ...CD player)-USB (USB)/iPod (iPod)-AUX (AUX) Adjusting the volume 1 Turn M.C. If the battery leaks, wipe the remote control completely clean and install a new battery. ! See www.dtsc.ca.gov/hazardouswaste/ perchlorate. (Applicable to adjust the volume. Returning to 6) and hold c or d, and ...
...vehicle's antenna extends when this unit's source is selected in your vehicle when removing the front panel. En 5 Batteries (battery pack or batteries installed) must not be changed . ! CAUTION For safety reasons, park your country/area. ! Replace only with metallic tools. ! The remote control ...CD player)-USB (USB)/iPod (iPod)-AUX (AUX) Adjusting the volume 1 Turn M.C. If the battery leaks, wipe the remote control completely clean and install a new battery. ! See www.dtsc.ca.gov/hazardouswaste/ perchlorate. (Applicable to adjust the volume. Returning to 6) and hold c or d, and ...
Owner's Manual
Page 11
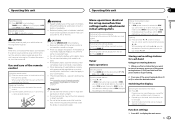
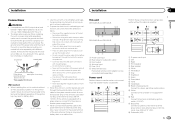
...white cable. g Red Connect to a subwoofer. i Subwoofer (4 Ω) En 11 Ensure that detects operation of smoke or malfunction. When installing this unit. ! The current capacity of this unit is properly connected to 8 W (impedance value). When this unit or any other devices.... moving parts, such as near the heater outlet. - Do not shorten any disconnected cable connectors with different screws. This unit DEH-3400UB and DEH-34UB 1 23 45 6 DEH-2400UB and DEH-24UB 1 2 45 1 Power cord input 2 Rear output or subwoofer output 3 Front output 4 Antenna input 5 Fuse (...
...white cable. g Red Connect to a subwoofer. i Subwoofer (4 Ω) En 11 Ensure that detects operation of smoke or malfunction. When installing this unit. ! The current capacity of this unit is properly connected to 8 W (impedance value). When this unit or any other devices.... moving parts, such as near the heater outlet. - Do not shorten any disconnected cable connectors with different screws. This unit DEH-3400UB and DEH-34UB 1 23 45 6 DEH-2400UB and DEH-24UB 1 2 45 1 Power cord input 2 Rear output or subwoofer output 3 Front output 4 Antenna input 5 Fuse (...
Owner's Manual
Page 12
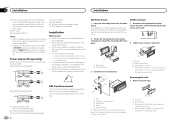
... easier ac- cess to bend the metal tabs (90°) into the dashboard. Check all connections and systems before final installation. ! DEH-3400UB and DEH-34UB 1 3 2 4 5 5 3 1 2 6 7 7 DEH-2400UB and DEH-24UB 1 3 2 6 7 7 4 To Front output 5 Front speaker 6 To Rear output or subwoofer output 7 Rear speaker or subwoofer...
... easier ac- cess to bend the metal tabs (90°) into the dashboard. Check all connections and systems before final installation. ! DEH-3400UB and DEH-34UB 1 3 2 4 5 5 3 1 2 6 7 7 DEH-2400UB and DEH-24UB 1 3 2 6 7 7 4 To Front output 5 Front speaker 6 To Rear output or subwoofer output 7 Rear speaker or subwoofer...
Owner's Manual
Page 13
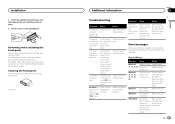
... to protect your unit from theft. Securing the front panel The front panel can remove the front panel to protect your nearest Pioneer Service Center, be secured with the supplied screw. 1 1 Screw Additional information Section 03 Troubleshooting Symptom Cause Action The display il..., 30, A0 There is Replace the disc. The display automatically returns to note the error message. switch OFF and chanical error. Installation 2 Insert the supplied extraction keys into both sides of the unit until the there is changed (NO TITLE, for example). Select ...
... to protect your unit from theft. Securing the front panel The front panel can remove the front panel to protect your nearest Pioneer Service Center, be secured with the supplied screw. 1 1 Screw Additional information Section 03 Troubleshooting Symptom Cause Action The display il..., 30, A0 There is Replace the disc. The display automatically returns to note the error message. switch OFF and chanical error. Installation 2 Insert the supplied extraction keys into both sides of the unit until the there is changed (NO TITLE, for example). Select ...


