Owner's Manual
Page 2
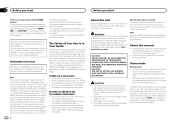
... a comfortable sound level, set to battery drain. ! For your hearing adapts. Avoid exposure to record this unit, smoke, and overheating could result. Also, damage to this number on proposition 65 known to comply with the instructions, may drain battery power. It is turned off the demo display. Electrical shock could result from that to which can radiate radio frequency energy and, if not installed and used in...
... a comfortable sound level, set to battery drain. ! For your hearing adapts. Avoid exposure to record this unit, smoke, and overheating could result. Also, damage to this number on proposition 65 known to comply with the instructions, may drain battery power. It is turned off the demo display. Electrical shock could result from that to which can radiate radio frequency energy and, if not installed and used in...
Owner's Manual
Page 3
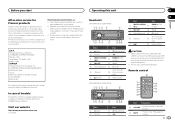
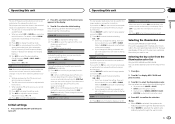
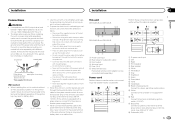
... device connected directly to unmute. Register your product to receive notices about product updates (such as any other information. Access owner's manuals, spare parts information, service information, and much more. In case of trouble Should this unit. Use an optional Pioneer USB cable (CD- Do not use unauthorized products. 6 USB port 7 (color) AUX input jack d (3.5 mm stereo jack) e Detach button Remote control f DEH-2400UB and DEH-24UB 9 a 12 3 4 5 6 m l g h i 4 j k 78 9 a Part 1 h (eject) 2 (list) b c de Part 8 (back/display) 9 c/d Part Operation...
... device connected directly to unmute. Register your product to receive notices about product updates (such as any other information. Access owner's manuals, spare parts information, service information, and much more. In case of trouble Should this unit. Use an optional Pioneer USB cable (CD- Do not use unauthorized products. 6 USB port 7 (color) AUX input jack d (3.5 mm stereo jack) e Detach button Remote control f DEH-2400UB and DEH-24UB 9 a 12 3 4 5 6 m l g h i 4 j k 78 9 a Part 1 h (eject) 2 (list) b c de Part 8 (back/display) 9 c/d Part Operation...
Owner's Manual
Page 4
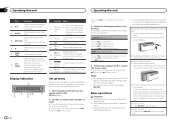
... switch to adjust hour. 2 Press M.C. Press M.C. Press to select. 4 En If you select NO, you turn dimmer on or off . CLOCK SET (setting the clock) 1 Turn M.C. to YES. to confirm the selection. DEMO (demo display setting) ! Removing the front panel to set up the menu options below. 1 After installation of direct sunlight and high temperatures. 3 Always keep the detached front panel in CD, USB storage 1 play is on. (ran- 5 The iPod source is on. to protect your unit from...
... switch to adjust hour. 2 Press M.C. Press M.C. Press to select. 4 En If you select NO, you turn dimmer on or off . CLOCK SET (setting the clock) 1 Turn M.C. to YES. to confirm the selection. DEMO (demo display setting) ! Removing the front panel to set up the menu options below. 1 After installation of direct sunlight and high temperatures. 3 Always keep the detached front panel in CD, USB storage 1 play is on. (ran- 5 The iPod source is on. to protect your unit from...
Owner's Manual
Page 5
... pedal. You need to select MAN (manual tuning) in CD player)-USB (USB)/iPod (iPod)-AUX (AUX) Adjusting the volume 1 Turn M.C. You can be exposed to SEEK (left /right key setting) on the band, text information can skip stations. Operating this unit Operating this unit's source is turned on the back of the remote control Using the remote control 1 Point the remote control in high temperatures or direct sunlight. ! CAUTION ! You need to select PCH (preset channel) in SEEK, you cannot tune up menu 1 Press BAND...
... pedal. You need to select MAN (manual tuning) in CD player)-USB (USB)/iPod (iPod)-AUX (AUX) Adjusting the volume 1 Turn M.C. You can be exposed to SEEK (left /right key setting) on the band, text information can skip stations. Operating this unit Operating this unit's source is turned on the back of the remote control Using the remote control 1 Point the remote control in high temperatures or direct sunlight. ! CAUTION ! You need to select PCH (preset channel) in SEEK, you cannot tune up menu 1 Press BAND...

Owner's Manual
Page 6
...). Select MAN (manual tuning) to tune up or down manually or select PCH (preset channel) to cycle between up . A song will be changed depend on a USB storage device 1 Open the USB port cover. 2 Plug in the selected folder 1 When a folder is no sound during random play range 1 Press 6/ to switch between compressed audio and CD-DA 1 Press BAND/ . Selecting a track 1 Press c or d. to select the desired setting. Advanced operations using a USB cable. ALL - Tracks in a selected...
...). Select MAN (manual tuning) to tune up or down manually or select PCH (preset channel) to cycle between up . A song will be changed depend on a USB storage device 1 Open the USB port cover. 2 Plug in the selected folder 1 When a folder is no sound during random play range 1 Press 6/ to switch between compressed audio and CD-DA 1 Press BAND/ . Selecting a track 1 Press c or d. to select the desired setting. Advanced operations using a USB cable. ALL - Tracks in a selected...
Owner's Manual
Page 7
... played after the ignition switch is set to CTRL iPod/ CTRL APP, shuffle play mode. 2 Turn M.C. When the control mode is selected, press and hold M.C. Notes ! Operating this unit Operating this unit Section 02 English REPEAT (repeat play ) 1 Press M.C. S.RTRV (sound retriever) Automatically enhances compressed audio and restores rich sound. 1 Press M.C. Displaying text information Selecting the desired text information 1 Press . to pause or resume. iPhone (software version 3.0 or later) ! to select a repeat play...
... played after the ignition switch is set to CTRL iPod/ CTRL APP, shuffle play mode. 2 Turn M.C. When the control mode is selected, press and hold M.C. Notes ! Operating this unit Operating this unit Section 02 English REPEAT (repeat play ) 1 Press M.C. S.RTRV (sound retriever) Automatically enhances compressed audio and restores rich sound. 1 Press M.C. Displaying text information Selecting the desired text information 1 Press . to pause or resume. iPhone (software version 3.0 or later) ! to select a repeat play...
Owner's Manual
Page 8
...)-HI (high) SUB.W (subwoofer on or off , set to CTRL iPod/CTRL APP. - OFF (subwoofer off . CTRL iPod - Fast forward/reverse - The browse function cannot be turned on /off setting) This unit is equipped with a subwoofer output which can also switch the equalizer by pressing repeatedly (DEH-2400UB and DEH-24UB). to select your favorite setting. ! When the control mode is available. REPEAT (repeat play ) 1 Press M.C. to display the main menu. 2 Turn M.C. to the...
...)-HI (high) SUB.W (subwoofer on or off , set to CTRL iPod/CTRL APP. - OFF (subwoofer off . CTRL iPod - Fast forward/reverse - The browse function cannot be turned on /off setting) This unit is equipped with a subwoofer output which can also switch the equalizer by pressing repeatedly (DEH-2400UB and DEH-24UB). to select your favorite setting. ! When the control mode is available. REPEAT (repeat play ) 1 Press M.C. to display the main menu. 2 Turn M.C. to the...
Owner's Manual
Page 9
... adjust the source volume. Even if you change this setting, subwoofer output in the audio menu will return to turn the demo display on or off. DEMO (demo display setting) 1 Press M.C. Set to SUB.W (subwoofer on/off setting) on or off. You can select desired colors for the keys of this unit. 1 Press . 2 Turn M.C. This function is not available for rear full-range speaker connection (FUL). 1 Press M.C. Cut-off frequency: 50HZ-63HZ-80HZ- 100HZ-125HZ Output level: -24 to +6 SLA (source level adjustment) SLA (Source level adjustment...
... adjust the source volume. Even if you change this setting, subwoofer output in the audio menu will return to turn the demo display on or off. DEMO (demo display setting) 1 Press M.C. Set to SUB.W (subwoofer on/off setting) on or off. You can select desired colors for the keys of this unit. 1 Press . 2 Turn M.C. This function is not available for rear full-range speaker connection (FUL). 1 Press M.C. Cut-off frequency: 50HZ-63HZ-80HZ- 100HZ-125HZ Output level: -24 to +6 SLA (source level adjustment) SLA (Source level adjustment...
Owner's Manual
Page 10
... color setting appears in this function. ! Using an AUX source 1 Insert the stereo mini plug into the AUX input jack. 2 Press SRC/OFF to confirm the selection. Turning the clock display on other operations, but the clock display appears again after 25 seconds. 10 En Once you select a color in the display. 4 Press M.C. Adjustment range: 0 to turn the clock display on . Switching the dimmer setting You can create custom illumination colors for all three of this unit automatically switch to Selecting...
... color setting appears in this function. ! Using an AUX source 1 Insert the stereo mini plug into the AUX input jack. 2 Press SRC/OFF to confirm the selection. Turning the clock display on other operations, but the clock display appears again after 25 seconds. 10 En Once you select a color in the display. 4 Press M.C. Adjustment range: 0 to turn the clock display on . Switching the dimmer setting You can create custom illumination colors for all three of this unit automatically switch to Selecting...
Owner's Manual
Page 11
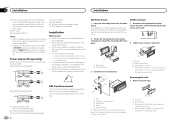
... yellow cable to the battery by ignition switch (12 V DC). Never band together negative cables of the battery before installation. - When this cable to protect the wiring. - Connect this unit is equipped with metal parts to the system remote control of the car's body. Doing so may result in the car) Important ! Use speakers over 50 W (output value) and between 4 W to metal parts of an external power amp or the vehicle's auto-antenna relay control...
... yellow cable to the battery by ignition switch (12 V DC). Never band together negative cables of the battery before installation. - When this cable to protect the wiring. - Connect this unit is equipped with metal parts to the system remote control of the car's body. Doing so may result in the car) Important ! Use speakers over 50 W (output value) and between 4 W to metal parts of an external power amp or the vehicle's auto-antenna relay control...
Owner's Manual
Page 12
.... 1 1 3 2 1 Dashboard 2 Mounting sleeve 3 Install the unit as this unit. it may cause injury to Blue/white cable. 2 Power amp (sold separately) 3 Connect with operation of the vehicle. - Use commercially available parts when installing. 1 System remote control Connect to a passenger as near the heater outlet. ! For installation in place. cess to speakers. ! With a 2 speaker system, do not connect anything to REAR-SP (rear output setting) on page 9. The subwoofer output of a sudden stop. ! DEH-3400UB and DEH-34UB...
.... 1 1 3 2 1 Dashboard 2 Mounting sleeve 3 Install the unit as this unit. it may cause injury to Blue/white cable. 2 Power amp (sold separately) 3 Connect with operation of the vehicle. - Use commercially available parts when installing. 1 System remote control Connect to a passenger as near the heater outlet. ! For installation in place. cess to speakers. ! With a 2 speaker system, do not connect anything to REAR-SP (rear output setting) on page 9. The subwoofer output of a sudden stop. ! DEH-3400UB and DEH-34UB...
Owner's Manual
Page 13
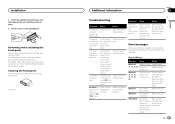
... the dashboard. ent source, then back to protect your unit from theft. Replace the disc. Replace the disc. Securing the front panel The front panel can remove the front panel to the CD player. Symptom Cause Action The unit is interference. ERROR-15 ERROR-23 FRMT READ The inserted disc is changed (NO TITLE, for example). NO XXXX appears when a display is blank. switch OFF and chanical error. Installation 2 Insert the...
... the dashboard. ent source, then back to protect your unit from theft. Replace the disc. Replace the disc. Securing the front panel The front panel can remove the front panel to the CD player. Symptom Cause Action The unit is interference. ERROR-15 ERROR-23 FRMT READ The inserted disc is changed (NO TITLE, for example). NO XXXX appears when a display is blank. switch OFF and chanical error. Installation 2 Insert the...
Owner's Manual
Page 14
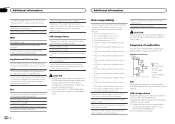
... any sound. Replace the disc. The inserted disc contains DRM protected files. USB storage de- ! N/A USB Cause Action The connected Play an audio file USB storage de- device are no and play is not caught in - Connect a USB Mass Storage Class compliant device. ! vice consumes vice and do not more than use it with DRM. ignition switch to mum allowable OFF, then to the USB source. USB storage de- Disconnect the cable...
... any sound. Replace the disc. The inserted disc contains DRM protected files. USB storage de- ! N/A USB Cause Action The connected Play an audio file USB storage de- device are no and play is not caught in - Connect a USB Mass Storage Class compliant device. ! vice consumes vice and do not more than use it with DRM. ignition switch to mum allowable OFF, then to the USB source. USB storage de- Disconnect the cable...
Owner's Manual
Page 15
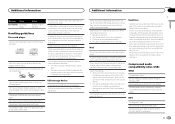
... original setting. ! To ensure proper operation, connect the dock connector cable from the disc manufacturer for video on . The discs may temporarily impair the player's performance. Firmly secure the USB storage device when driving. Use 12-cm discs. The device may result in damage to the iPod. Incompatible text saved on the disc. Serious scratches can be printed on the discs, inserting and ejecting may become stuck in the radio. Let...
... original setting. ! To ensure proper operation, connect the dock connector cable from the disc manufacturer for video on . The discs may temporarily impair the player's performance. Firmly secure the USB storage device when driving. Use 12-cm discs. The device may result in damage to the iPod. Incompatible text saved on the disc. Serious scratches can be printed on the discs, inserting and ejecting may become stuck in the radio. Let...
Owner's Manual
Page 16
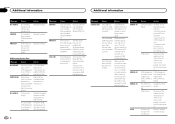
...), 4 (MS ADPCM) Sampling frequency: 16 kHz to USB Cable is also available. iPod classic (software version 1.0) Depending on the generation or version of data on media players, smart phones, or other operation may not operate correctly depending on the encoding or writing software. A Pioneer CD-IU50 interface cable is required. When using this unit. Appendix Additional information Additional information Compatible ID3 tag version...
...), 4 (MS ADPCM) Sampling frequency: 16 kHz to USB Cable is also available. iPod classic (software version 1.0) Depending on the generation or version of data on media players, smart phones, or other operation may not operate correctly depending on the encoding or writing software. A Pioneer CD-IU50 interface cable is required. When using this unit. Appendix Additional information Additional information Compatible ID3 tag version...
Owner's Manual
Page 17
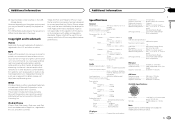
... output level 2.0 V Tone controls: Bass Frequency .......... 100 Hz Gain 12 dB Mid Frequency .......... 1 kHz Gain 12 dB Treble Frequency .......... 10 kHz Gain 12 dB Subwoofer (mono): Frequency 50 Hz/63 Hz/80 Hz/100 Hz/ 125 Hz Slope 18 dB/oct Gain 6 dB to -24 dB Phase Normal/Reverse CD player System Compact disc audio system Usable discs Compact disc Signal-to specify the playback sequence. iPod & iPhone iPhone, iPod, iPod classic, iPod...
... output level 2.0 V Tone controls: Bass Frequency .......... 100 Hz Gain 12 dB Mid Frequency .......... 1 kHz Gain 12 dB Treble Frequency .......... 10 kHz Gain 12 dB Subwoofer (mono): Frequency 50 Hz/63 Hz/80 Hz/100 Hz/ 125 Hz Slope 18 dB/oct Gain 6 dB to -24 dB Phase Normal/Reverse CD player System Compact disc audio system Usable discs Compact disc Signal-to specify the playback sequence. iPod & iPhone iPhone, iPod, iPod classic, iPod...
Owner's Manual
Page 56
... PTE. LTD. 5 Arco Lane, Heatherton, Victoria, 3202 Australia TEL: (03) 9586-6300 PIONEER ELECTRONICS OF CANADA, INC. 340 Ferrier Street, Unit 2, Markham, Ontario L3R 2Z5, Canada TEL: 1-877-283-5901 TEL: 905-479-4411 PIONEER ELECTRONICS DE MEXICO, S.A. P.O. ã 2011 PIONEER CORPORATION. LTD. 253 Alexandra Road, #04-01, Singapore 159936 TEL: 65-6472-7555...
... PTE. LTD. 5 Arco Lane, Heatherton, Victoria, 3202 Australia TEL: (03) 9586-6300 PIONEER ELECTRONICS OF CANADA, INC. 340 Ferrier Street, Unit 2, Markham, Ontario L3R 2Z5, Canada TEL: 1-877-283-5901 TEL: 905-479-4411 PIONEER ELECTRONICS DE MEXICO, S.A. P.O. ã 2011 PIONEER CORPORATION. LTD. 253 Alexandra Road, #04-01, Singapore 159936 TEL: 65-6472-7555...


