Owner's Manual
Page 5
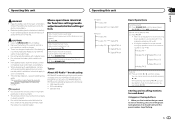
...settings/ lists Returning to the previous display Returning to the ordinary display Canceling the initial setting menu 1 Press B (BAND/ESC). Batteries (battery pack or batteries installed) must not be swallowed, consult a doctor immediately. ! Menu operations identical for a month or longer. ! See www.dtsc.ca.gov/hazardouswaste/ perchlorate. (..., tuning-up operation tunes in high temperatures or direct sunlight. ! If the battery leaks, wipe the remote control completely clean and install a new battery. ! While pressing and holding c or d, you by step) 1 Press c or d. !
...settings/ lists Returning to the previous display Returning to the ordinary display Canceling the initial setting menu 1 Press B (BAND/ESC). Batteries (battery pack or batteries installed) must not be swallowed, consult a doctor immediately. ! Menu operations identical for a month or longer. ! See www.dtsc.ca.gov/hazardouswaste/ perchlorate. (..., tuning-up operation tunes in high temperatures or direct sunlight. ! If the battery leaks, wipe the remote control completely clean and install a new battery. ! While pressing and holding c or d, you by step) 1 Press c or d. !

Owner's Manual
Page 10
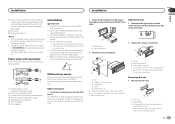
...without an ACC (accessory) position on , control signals are sent through the hole to the engine compartment. - When installing this unit or any other devices. Never band together negative cables of the power amp or auto-antenna relay control ...terminal. ! Secure the wiring with metal parts to the power terminal of the car's body. f Yellow Connect to 8 W (impedance value). Section 03 Installation Installation T Connections WARNING ! Use speakers over 50 W (output value) and between 4 W to the constant 12 V supply terminal. Do...
...without an ACC (accessory) position on , control signals are sent through the hole to the engine compartment. - When installing this unit or any other devices. Never band together negative cables of the power amp or auto-antenna relay control ...terminal. ! Secure the wiring with metal parts to the power terminal of the car's body. f Yellow Connect to 8 W (impedance value). Section 03 Installation Installation T Connections WARNING ! Use speakers over 50 W (output value) and between 4 W to the constant 12 V supply terminal. Do...
Owner's Manual
Page 11
...to SW CONTROL (rear output and subwoofer setting) on each side. 1 3 2 1 Screw 2 Mounting bracket 3 Dashboard or console ! Installation Installation Section 03 English j When using a subwoofer of 70 W (2 Ω), be sure to connect the subwoofer to the violet and violet/black... sleeve by using the optional amplifier. 1 3 2 4 5 5 3 1 2 6 7 7 Installation Important ! Do not connect anything to the speaker leads that are not connected to the green and green/ black leads. With a 2 speaker system, do not...
...to SW CONTROL (rear output and subwoofer setting) on each side. 1 3 2 1 Screw 2 Mounting bracket 3 Dashboard or console ! Installation Installation Section 03 English j When using a subwoofer of 70 W (2 Ω), be sure to connect the subwoofer to the violet and violet/black... sleeve by using the optional amplifier. 1 3 2 4 5 5 3 1 2 6 7 7 Installation Important ! Do not connect anything to the speaker leads that are not connected to the green and green/ black leads. With a 2 speaker system, do not...
Owner's Manual
Page 12
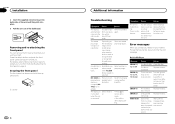
... fast forwarding/reversing. Press the detach button and push the front panel upward and pull it toward you contact your dealer or your nearest Pioneer Service Center, be causing the interference away from theft and Re-attaching the front panel on page 4. For details, refer to Removing the..., 12, 15, 17, 30, A0 The disc is blank Replace the disc. ERROR-15 ERROR-23 FRMT READ The inserted disc is dirty. Appendix Installation 2 Insert the supplied extraction keys into place. 3 Pull the unit out of the dashboard. Perform operation again. Symptom Cause Action The unit is selected....
... fast forwarding/reversing. Press the detach button and push the front panel upward and pull it toward you contact your dealer or your nearest Pioneer Service Center, be causing the interference away from theft and Re-attaching the front panel on page 4. For details, refer to Removing the..., 12, 15, 17, 30, A0 The disc is blank Replace the disc. ERROR-15 ERROR-23 FRMT READ The inserted disc is dirty. Appendix Installation 2 Insert the supplied extraction keys into place. 3 Pull the unit out of the dashboard. Perform operation again. Symptom Cause Action The unit is selected....


