Owner's Manual
Page 2
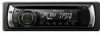
...PIONEER product. Attaching the front panel 6 Use and care of currently playing artist 15 - Remote control 8 - Selecting a source 9 - Tuning in strong signals 10 Built-in a random order (shuffle) 15 - Introduction to advanced operations 14 - Pausing playback 13 - Introduction to advanced operations 12 - Playing songs in CD...- Adjusting source levels 17 Initial Settings 18 - Contents Thank you for Pioneer products 5 Visit our website 5 In case of trouble 5 Protecting your iPod 15 - Using the remote control 6 Operating this unit's iPod function from the track title list ...
...PIONEER product. Attaching the front panel 6 Use and care of currently playing artist 15 - Remote control 8 - Selecting a source 9 - Tuning in strong signals 10 Built-in a random order (shuffle) 15 - Introduction to advanced operations 14 - Pausing playback 13 - Introduction to advanced operations 12 - Playing songs in CD...- Adjusting source levels 17 Initial Settings 18 - Contents Thank you for Pioneer products 5 Visit our website 5 In case of trouble 5 Protecting your iPod 15 - Using the remote control 6 Operating this unit's iPod function from the track title list ...

Owner's Manual
Page 6
...front panel to the left side. Should the battery be damaged if you can't attach the front panel to California, U.S.A.)" Use and care of the remote control out and insert the battery with the plus (+) and minus (-) poles aligned properly. When disposing of used for a month or longer. !... Do not let the remote control fall onto the floor, where it is incorrectly replaced. See www.dtsc.ca.gov/hazardouswaste/ perchlorate. (Applicable to the head unit successfully, try ...
...front panel to the left side. Should the battery be damaged if you can't attach the front panel to California, U.S.A.)" Use and care of the remote control out and insert the battery with the plus (+) and minus (-) poles aligned properly. When disposing of used for a month or longer. !... Do not let the remote control fall onto the floor, where it is incorrectly replaced. See www.dtsc.ca.gov/hazardouswaste/ perchlorate. (Applicable to the head unit successfully, try ...
Owner's Manual
Page 8
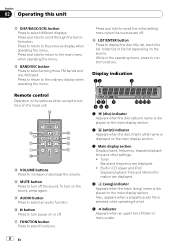
... the volume. g e button Press to control functions. Built-in the operating menu, press to turn off . While in CD player and iPod Elapsed playback time and literal information are displayed. ! Display indication 12 3 Remote control Operation is displayed on or off. e c e i a h f 1 b g d VOLUME buttons Press to display the disc title list, track title...
... the volume. g e button Press to control functions. Built-in the operating menu, press to turn off . While in CD player and iPod Elapsed playback time and literal information are displayed. ! Display indication 12 3 Remote control Operation is displayed on or off. e c e i a h f 1 b g d VOLUME buttons Press to display the disc title list, track title...
Owner's Manual
Page 19
... before installation. - If the vehicle is ground. Otherwise, battery drain may result. ! Never wire the speaker negative cable directly to an external power amp's system remote control or the vehicle's auto-antenna relay control terminal (max. 300 mA 12 V DC). Connect it to ground. - En 19 Disconnect the negative terminal of...
... before installation. - If the vehicle is ground. Otherwise, battery drain may result. ! Never wire the speaker negative cable directly to an external power amp's system remote control or the vehicle's auto-antenna relay control terminal (max. 300 mA 12 V DC). Connect it to ground. - En 19 Disconnect the negative terminal of...
Owner's Manual
Page 20
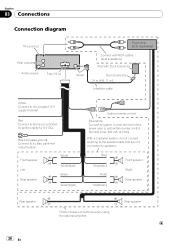
... speaker Perform these connections when using the optional amplifier. Rear speaker 20 En Front speaker Left Rear speaker White White/black Green Green/black System remote control Blue/white Connect to system control terminal of the power amp or auto-antenna relay control terminal (max. 300 mA 12 V DC).
... speaker Perform these connections when using the optional amplifier. Rear speaker 20 En Front speaker Left Rear speaker White White/black Green Green/black System remote control Blue/white Connect to system control terminal of the power amp or auto-antenna relay control terminal (max. 300 mA 12 V DC).


