Owner's Manual
Page 3
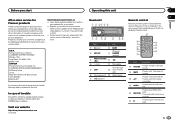
...9a b cd Part Part 1 h (eject) 8 BAND 2 SRC/OFF (back)/ 9 DIMMER (dimmer) 3 MULTI-CONTROL a (M.C.) c/d 4 (list) b 1/ to 6/ 5 DISP AUX input jack c (3.5 mm stereo jack) 6 Disc loading slot d Detach button 7 (equalizer) 02 Remote control Remote controller buttons marked with this unit fail to recall preset stations. e a f 8 l k g h 2 i j...contact the companies listed below for repair without advance contact. Pioneer Electronics (USA) Inc. Box 1760 Long Beach, CA 90801-1760 800-421-1404 CANADA Pioneer Electronics of trouble Should this unit. h AUDIO Press to ...
...9a b cd Part Part 1 h (eject) 8 BAND 2 SRC/OFF (back)/ 9 DIMMER (dimmer) 3 MULTI-CONTROL a (M.C.) c/d 4 (list) b 1/ to 6/ 5 DISP AUX input jack c (3.5 mm stereo jack) 6 Disc loading slot d Detach button 7 (equalizer) 02 Remote control Remote controller buttons marked with this unit fail to recall preset stations. e a f 8 l k g h 2 i j...contact the companies listed below for repair without advance contact. Pioneer Electronics (USA) Inc. Box 1760 Long Beach, CA 90801-1760 800-421-1404 CANADA Pioneer Electronics of trouble Should this unit. h AUDIO Press to ...
Owner's Manual
Page 5
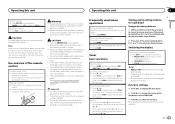
... : TUNER (tuner)-CD (CD player)-AUX (AUX) Adjusting the volume 1 Turn M.C. Remove the battery if the remote control is a danger of children. The remote control may not function properly in the direction of the front panel to change automatically. ! CLOCK (source name and clock...the function. Replacing the battery 1 Slide the tray out on the next page. FREQUENCY (frequency) ! When disposing of the remote control Using the remote control 1 Point the remote control in direct sunlight. ! to display the main menu. 2 Turn M.C. Select PCH (preset channel) under the brake or ...
... : TUNER (tuner)-CD (CD player)-AUX (AUX) Adjusting the volume 1 Turn M.C. Remove the battery if the remote control is a danger of children. The remote control may not function properly in the direction of the front panel to change automatically. ! CLOCK (source name and clock...the function. Replacing the battery 1 Slide the tray out on the next page. FREQUENCY (frequency) ! When disposing of the remote control Using the remote control 1 Point the remote control in direct sunlight. ! to display the main menu. 2 Turn M.C. Select PCH (preset channel) under the brake or ...
Owner's Manual
Page 9
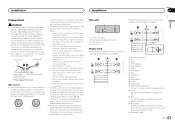
... cord input 2 Rear output or subwoofer output 3 Antenna input 4 Fuse (10 A) Power cord Perform these connections when using a subwoofer without an ACC (accessory) position on , control signals are sent through the hole to do so may result in a fire or malfunction. ! L 2 4 6 F 7 i a SW b 1 R 3 8 9... the negative speaker cable directly to a clean, paint-free metal location. g Red Connect to the system remote control of the ignition key may result in battery drain. The black cable is limited. - When installing this cable to terminal...
... cord input 2 Rear output or subwoofer output 3 Antenna input 4 Fuse (10 A) Power cord Perform these connections when using a subwoofer without an ACC (accessory) position on , control signals are sent through the hole to do so may result in a fire or malfunction. ! L 2 4 6 F 7 i a SW b 1 R 3 8 9... the negative speaker cable directly to a clean, paint-free metal location. g Red Connect to the system remote control of the ignition key may result in battery drain. The black cable is limited. - When installing this cable to terminal...
Owner's Manual
Page 10
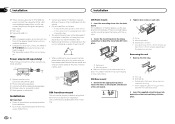
... angle of less than 60°. 60° Power amp (sold separately) Perform these connections when using the optional amplifier. 1 3 2 4 5 5 1 System remote control Connect to the violet and violet/black leads of this unit where: - DIN Rear-mount 1 Determine the appropriate position where the holes on the bracket...
... angle of less than 60°. 60° Power amp (sold separately) Perform these connections when using the optional amplifier. 1 3 2 4 5 5 1 System remote control Connect to the violet and violet/black leads of this unit where: - DIN Rear-mount 1 Determine the appropriate position where the holes on the bracket...


