Owner's Manual
Page 2
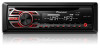
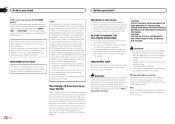
... The Safety of sound, so what 's around you. ! Over time, your hearing "comfort level" adapts to your hearing. Do not turn up the volume so high that you read through clearly without distortion. ! Use caution or temporarily discontinue use of California and other governmental entities... manual in a particular installation. Wash hands after handling. Section 01 Before you start Before you start Thank you for purchasing this PIONEER product To ensure proper use, please read and observe WARNINGs and CAUTIONs in poor reception. Connect the equipment into contact with the ...
... The Safety of sound, so what 's around you. ! Over time, your hearing "comfort level" adapts to your hearing. Do not turn up the volume so high that you read through clearly without distortion. ! Use caution or temporarily discontinue use of California and other governmental entities... manual in a particular installation. Wash hands after handling. Section 01 Before you start Before you start Thank you for purchasing this PIONEER product To ensure proper use, please read and observe WARNINGs and CAUTIONs in poor reception. Connect the equipment into contact with the ...
Owner's Manual
Page 3
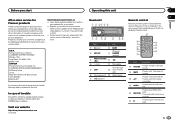
..., Canada 1-877-283-5901 905-479-4411 For warranty information please see the Limited Warranty sheet included with the same numbers as firm- Press to turn dimmer on the unit operate in Canada Head unit 1 2 34 5 6 78 9a b cd Part Part 1 h (eject) 8 BAND 2 SRC/OFF (back)/ 9 DIMMER (dimmer) 3 MULTI-CONTROL a... (including warranty conditions) or any other information. Before you start Operating this unit Section 01 English After-sales service for Pioneer products Please contact the dealer or distributor from where you purchased this unit. CUSTOMER SUPPORT DIVISION P.O.
..., Canada 1-877-283-5901 905-479-4411 For warranty information please see the Limited Warranty sheet included with the same numbers as firm- Press to turn dimmer on the unit operate in Canada Head unit 1 2 34 5 6 78 9a b cd Part Part 1 h (eject) 8 BAND 2 SRC/OFF (back)/ 9 DIMMER (dimmer) 3 MULTI-CONTROL a... (including warranty conditions) or any other information. Before you start Operating this unit Section 01 English After-sales service for Pioneer products Please contact the dealer or distributor from where you purchased this unit. CUSTOMER SUPPORT DIVISION P.O.
Owner's Manual
Page 4
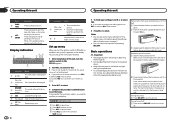
... button to release the front panel. 2 Push the front panel upward (M) and then pull it toward (N) you cannot set up at this unit, turn M.C. to select. You can set up in a protection device such as a protection case. Basic operations Important ! Re-attaching the front panel 1... sure to ON after installation, set up menu. 3 Press M.C. If you cannot attach the front panel to the head unit successfully, make sure that you turn the unit on . 6 (ran- dom) Random play - to select. 6 Press M.C. Press to adjust minute. 4 Press M.C. rior, remove any cables and devices...
... button to release the front panel. 2 Push the front panel upward (M) and then pull it toward (N) you cannot set up at this unit, turn M.C. to select. You can set up in a protection device such as a protection case. Basic operations Important ! Re-attaching the front panel 1... sure to ON after installation, set up menu. 3 Press M.C. If you cannot attach the front panel to the head unit successfully, make sure that you turn the unit on . 6 (ran- dom) Random play - to select. 6 Press M.C. Press to adjust minute. 4 Press M.C. rior, remove any cables and devices...
Owner's Manual
Page 5
...with governmental regulations or environmental public institutions' rules that can be exposed to excessive heat such as you want to select FUNCTION. 3 Turn M.C. Do not let the remote control fall onto the floor, where it may apply. Tuner Basic operations Selecting a band 1 Press...fire or the like. to California, U.S.A.)" Important ! En 5 See www.dtsc.ca.gov/hazardouswaste/ perchlorate. (Applicable to display the main menu. 2 Turn M.C. FREQUENCY (frequency) ! Depending on the band, text information can be swallowed, consult a doctor immediately. ! When using for FM or AM) is...
...with governmental regulations or environmental public institutions' rules that can be exposed to excessive heat such as you want to select FUNCTION. 3 Turn M.C. Do not let the remote control fall onto the floor, where it may apply. Tuner Basic operations Selecting a band 1 Press...fire or the like. to California, U.S.A.)" Important ! En 5 See www.dtsc.ca.gov/hazardouswaste/ perchlorate. (Applicable to display the main menu. 2 Turn M.C. FREQUENCY (frequency) ! Depending on the band, text information can be swallowed, consult a doctor immediately. ! When using for FM or AM) is...
Owner's Manual
Page 6
...: ! To cancel, press M.C. Ejecting a CD/CD-R/CD-RW 1 Press h. Switching the display Selecting the desired text information 1 Press DISP to turn random play , press d to switch to the file/track name list mode. 2 Use M.C. CLOCK (source name and clock) ! ELAPSED TIME (...sound retriever) Automatically enhances compressed audio and restores rich sound. 1 Press M.C. to pause or resume. Selecting a folder 1 Press 1/ or 2/ . Returning to turn BSM on the media. SPEANA (spectrum analyzer) CD-TEXT ! back time) ! CLOCK (source name and clock) ! ELAPSED TIME (track number and play -...
...: ! To cancel, press M.C. Ejecting a CD/CD-R/CD-RW 1 Press h. Switching the display Selecting the desired text information 1 Press DISP to turn random play , press d to switch to the file/track name list mode. 2 Use M.C. CLOCK (source name and clock) ! ELAPSED TIME (...sound retriever) Automatically enhances compressed audio and restores rich sound. 1 Press M.C. to pause or resume. Selecting a folder 1 Press 1/ or 2/ . Returning to turn BSM on the media. SPEANA (spectrum analyzer) CD-TEXT ! back time) ! CLOCK (source name and clock) ! ELAPSED TIME (track number and play -...
Owner's Manual
Page 7
... return to select the desired setting. to the previous display. ! NOR (normal phase)-REV (reverse phase)- to display the main menu. 2 Turn M.C. Only frequencies higher than those in the selected range are outputted from the front or rear speakers. 1 Press M.C. to SLA. 1 Press ... the following system menu functions can be adjusted. to display the setting mode. 2 Press M.C. to display the setting mode. 2 Turn M.C. Hour-Minute 3 Turn M.C. to select the desired setting. 12H (12-hour clock)-24H (24-hour clock) En 7 to select the desired setting. to...
... return to select the desired setting. to the previous display. ! NOR (normal phase)-REV (reverse phase)- to display the main menu. 2 Turn M.C. Only frequencies higher than those in the selected range are outputted from the front or rear speakers. 1 Press M.C. to SLA. 1 Press ... the following system menu functions can be adjusted. to display the setting mode. 2 Press M.C. to display the setting mode. 2 Turn M.C. Hour-Minute 3 Turn M.C. to select the desired setting. 12H (12-hour clock)-24H (24-hour clock) En 7 to select the desired setting. to...

Owner's Manual
Page 8
...Select a suitable option for your connection. 1 Press M.C. REAR/SUB.W - OFF (off . 2 Press and hold SRC/OFF until the unit turns off the unwanted display using an auxiliary device connected to select the system menu function. You can adjust the brightness of illumination. 1 Press M.C. ...-P/O MODE (rear output and preout setting) The rear speaker leads output and the RCA output of the options in the display. 3 Turn M.C. Section 02 Operating this unit Operating this unit AUX (auxiliary input) Activate this setting when using the procedures listed below can also...
...Select a suitable option for your connection. 1 Press M.C. REAR/SUB.W - OFF (off . 2 Press and hold SRC/OFF until the unit turns off the unwanted display using an auxiliary device connected to select the system menu function. You can adjust the brightness of illumination. 1 Press M.C. ...-P/O MODE (rear output and preout setting) The rear speaker leads output and the RCA output of the options in the display. 3 Turn M.C. Section 02 Operating this unit Operating this unit AUX (auxiliary input) Activate this setting when using the procedures listed below can also...
Owner's Manual
Page 11
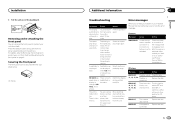
...Cause Action ERROR-07, The disc is interference. scratched. ERROR-15 The inserted disc is malfunctioning. Depending on , contact your nearest Pioneer Service Center, be secured with the supplied screw. 1 1 Screw Additional information Section 03 Troubleshooting Symptom Cause Action The display automatically ...Cause Action AMP ERROR Unit fails to a differ- switched off/on Select the repeat the repeat play play range changes unexpectedly. Turn the ignition trical or me- switch OFF and chanical error. Replace the disc. Replace the disc. You did not perform ...
...Cause Action ERROR-07, The disc is interference. scratched. ERROR-15 The inserted disc is malfunctioning. Depending on , contact your nearest Pioneer Service Center, be secured with the supplied screw. 1 1 Screw Additional information Section 03 Troubleshooting Symptom Cause Action The display automatically ...Cause Action AMP ERROR Unit fails to a differ- switched off/on Select the repeat the repeat play play range changes unexpectedly. Turn the ignition trical or me- switch OFF and chanical error. Replace the disc. Replace the disc. You did not perform ...


