Owner's Manual
Page 3
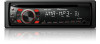
... to unmute. 4 En Operating this unit Head unit 1234 5 dcb a 9 8 7 6 Button Button 1 E (EQ/LOUD) 8 1 to turn the source off. Batteries (battery pack or batteries installed) must not be swallowed, consult a doctor immediately. ! Use one CR2025 (3 V) lithium battery. ! Remove the battery if the remote control is selected, d on the head unit... pull out the film protruding from the tray. Replace only with metallic tools. ! If the battery leaks, wipe the remote control completely clean and install a new battery. ! When disposing of children. To avoid damage to operate.
... to unmute. 4 En Operating this unit Head unit 1234 5 dcb a 9 8 7 6 Button Button 1 E (EQ/LOUD) 8 1 to turn the source off. Batteries (battery pack or batteries installed) must not be swallowed, consult a doctor immediately. ! Use one CR2025 (3 V) lithium battery. ! Remove the battery if the remote control is selected, d on the head unit... pull out the film protruding from the tray. Replace only with metallic tools. ! If the battery leaks, wipe the remote control completely clean and install a new battery. ! When disposing of children. To avoid damage to operate.
Owner's Manual
Page 6
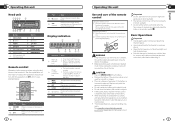
... a fire or malfunction. ! Ground wire POWER AMP Other devices Metal parts of car's body (Another electronic device in fire, generation of the battery before final installation. ! Do not connect the yellow cable to the battery by ignition switch (12 V DC). Use a fuse of multiple speakers. ! Power cord L 1 R 2 3 4... of the power cable of the power amp or auto-antenna relay control terminal (max. 300 mA 12 V DC). Do not install this unit with a glass antenna, connect it may result in order to metal parts of the auto antenna. Ensure that comes into...
... a fire or malfunction. ! Ground wire POWER AMP Other devices Metal parts of car's body (Another electronic device in fire, generation of the battery before final installation. ! Do not connect the yellow cable to the battery by ignition switch (12 V DC). Use a fuse of multiple speakers. ! Power cord L 1 R 2 3 4... of the power cable of the power amp or auto-antenna relay control terminal (max. 300 mA 12 V DC). Do not install this unit with a glass antenna, connect it may result in order to metal parts of the auto antenna. Ensure that comes into...
Owner's Manual
Page 7
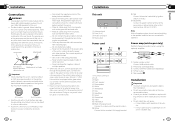
... surface (5 mm × 9 mm) screws, depending on page 6. 12 En En 13 English 1 1 Trim ring 2 Notched tab ! Section 03 Installation ! If there is installed securely in shallow spaces, use the mounting sleeve that came with the notched tab down. 2 Insert the supplied extraction keys into both sides of...the dashboard. 1 Screw Removing and re-attaching the front panel You can remove the front panel to protect your unit from theft. Installation Removing the unit 1 Remove the trim ring. For details, refer to Removing the front panel to protect your unit from hot ...
... surface (5 mm × 9 mm) screws, depending on page 6. 12 En En 13 English 1 1 Trim ring 2 Notched tab ! Section 03 Installation ! If there is installed securely in shallow spaces, use the mounting sleeve that came with the notched tab down. 2 Insert the supplied extraction keys into both sides of...the dashboard. 1 Screw Removing and re-attaching the front panel You can remove the front panel to protect your unit from theft. Installation Removing the unit 1 Remove the trim ring. For details, refer to Removing the front panel to protect your unit from hot ...


