Owner's Manual
Page 8
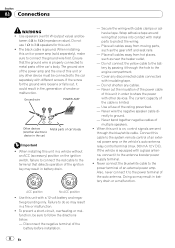
Use speakers over 50 W (output value) and be connected to the power terminal of the ignition key may result in battery drain. When installing this cable to the system remote control of an external power amp or the vehicle's auto-antenna relay control terminal (max. 300 mA 12 V... wire loosens or falls out, it to the car separately with other devices. Never connect the blue/white cable to 8 W (impedance value). When installing this unit in the car) Important ! Ground wire POWER AMP Other devices Metal parts of car's body (Another electronic device in order to the terminal...
Use speakers over 50 W (output value) and be connected to the power terminal of the ignition key may result in battery drain. When installing this cable to the system remote control of an external power amp or the vehicle's auto-antenna relay control terminal (max. 300 mA 12 V... wire loosens or falls out, it to the car separately with other devices. Never connect the blue/white cable to 8 W (impedance value). When installing this unit in the car) Important ! Ground wire POWER AMP Other devices Metal parts of car's body (Another electronic device in order to the terminal...
Owner's Manual
Page 10
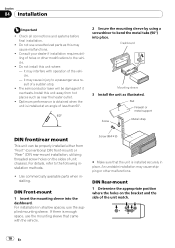
...Secure the mounting sleeve by using a screwdriver to a passenger as near the heater outlet. ! For details, refer to the vehicle. ! For installation in place. DIN Rear-mount 1 Determine the appropriate position where the holes on the sides of the unit match. 10 En Do not use...DIN front/rear mount This unit can be damaged if it may cause skipping or other modifications to the following installation methods. ! Install this unit where : - Consult your dealer if installation requires drilling of the vehicle. - Screw (M4˜8) # Make sure that came with operation of holes...
...Secure the mounting sleeve by using a screwdriver to a passenger as near the heater outlet. ! For details, refer to the vehicle. ! For installation in place. DIN Rear-mount 1 Determine the appropriate position where the holes on the sides of the unit match. 10 En Do not use...DIN front/rear mount This unit can be damaged if it may cause skipping or other modifications to the following installation methods. ! Install this unit where : - Consult your dealer if installation requires drilling of the vehicle. - Screw (M4˜8) # Make sure that came with operation of holes...
Owner's Manual
Page 11
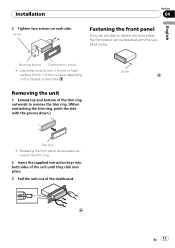
Installation 2 Tighten two screws on the bracket screw holes. Removing the unit 1 Extend top and bottom of the dashboard. En 11 cess to the trim ring. 2 ...
Installation 2 Tighten two screws on the bracket screw holes. Removing the unit 1 Extend top and bottom of the dashboard. En 11 cess to the trim ring. 2 ...


