
Owner's Manual
Page 96
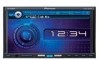
Section 19 Digital Signal Processor # Press SOURCE to direct sunlight for the seat on the multi-channel processor. # To cancel auto TA and EQ part way through, touch BACK or ESC. 10 When auto TA and EQ is completed, Complete is placed. If the microphone is subjected to turn the ...
Section 19 Digital Signal Processor # Press SOURCE to direct sunlight for the seat on the multi-channel processor. # To cancel auto TA and EQ part way through, touch BACK or ESC. 10 When auto TA and EQ is completed, Complete is placed. If the microphone is subjected to turn the ...

Other Manual
Page 1
... • When this system, be used with this product's source is switched ON, a control signal is ground. Please ground this unit's DVD features should never be sure to disconnect the ≠ battery cable before beginning installation. • Refer to the amp's power terminal. Before ... driven. INSTALLATION MANUAL OF OF AVH-P6000DVD Printed in such a way that it will not obstruct driving. • Make sure that wires will not interfere with moving parts, such as the gear shift, handbrake and seat rails. Be sure to authorized Pioneer service personnel. • Secure ...
... • When this system, be used with this product's source is switched ON, a control signal is ground. Please ground this unit's DVD features should never be sure to disconnect the ≠ battery cable before beginning installation. • Refer to the amp's power terminal. Before ... driven. INSTALLATION MANUAL OF OF AVH-P6000DVD Printed in such a way that it will not obstruct driving. • Make sure that wires will not interfere with moving parts, such as the gear shift, handbrake and seat rails. Be sure to authorized Pioneer service personnel. • Secure ...
Other Manual
Page 4
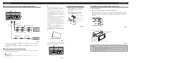
...bracket If the pawl gets in the way, bend it down Fig. 12 Binding screw or flush surface screw Be sure to use of unauthorized parts can cause malfunctions. • Consult with the unit to ensure proper installation. WARNING: • NEVER install the display in a location that the...binding screws (5 mm × 6 mm) or flush surface screws (5 mm × 6 mm), depending on each side. Fig. 10 Installation using a display connected to DVD player. Remote control unit Velcro tape (small) (hard) Velcro tape (small) (soft) Fig.11 Fig. 9 • The cords must not cover up properly, and...
...bracket If the pawl gets in the way, bend it down Fig. 12 Binding screw or flush surface screw Be sure to use of unauthorized parts can cause malfunctions. • Consult with the unit to ensure proper installation. WARNING: • NEVER install the display in a location that the...binding screws (5 mm × 6 mm) or flush surface screws (5 mm × 6 mm), depending on each side. Fig. 10 Installation using a display connected to DVD player. Remote control unit Velcro tape (small) (hard) Velcro tape (small) (soft) Fig.11 Fig. 9 • The cords must not cover up properly, and...


