
Owner's Manual
Page 2
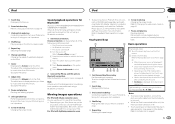
... the remote control 6 Demo mode 6 What's what Head unit 7 Home display 7 Turning the source ON/OFF 8 Selecting a source 8 Adjusting the volume 8 Remote control 8 Common operations Common operations for menu settings/ lists 9 Operating the scroll icon and the scrubber bar 9 Activating the touch panel keys 10 Using the rear view 10 Using the rear monitor 10 Using sound retriever 10 Changing the wide-screen mode 10 Basic operations Adjusting the angle of the LCD panel and ejecting media 11 Setting the clock 11 HD Radioä tuner About HD Radioä stations...
... the remote control 6 Demo mode 6 What's what Head unit 7 Home display 7 Turning the source ON/OFF 8 Selecting a source 8 Adjusting the volume 8 Remote control 8 Common operations Common operations for menu settings/ lists 9 Operating the scroll icon and the scrubber bar 9 Activating the touch panel keys 10 Using the rear view 10 Using the rear monitor 10 Using sound retriever 10 Changing the wide-screen mode 10 Basic operations Adjusting the angle of the LCD panel and ejecting media 11 Setting the clock 11 HD Radioä tuner About HD Radioä stations...
Owner's Manual
Page 3
...Installation using the screw holes on -screen display) color 46 Selecting the background display 46 Other functions Adjusting the response positions of the touch panels (Touch Panel Calibration) 47 Using an AUX source 47 Resetting the microprocessor 48 Operating the sound mixer 48 Connection Connecting the power cord 50 When connecting to default 42 Setting Demo Mode 42 Switching sound muting/attenuation 42 Setting the rear output and subwoofer controller 42 Using the keyboard 42 Setting the ever scroll 42 Setting the Bluetooth audio 42 Clearing Bluetooth memory 43 Updating Bluetooth software...
...Installation using the screw holes on -screen display) color 46 Selecting the background display 46 Other functions Adjusting the response positions of the touch panels (Touch Panel Calibration) 47 Using an AUX source 47 Resetting the microprocessor 48 Operating the sound mixer 48 Connection Connecting the power cord 50 When connecting to default 42 Setting Demo Mode 42 Switching sound muting/attenuation 42 Setting the rear output and subwoofer controller 42 Using the keyboard 42 Setting the ever scroll 42 Setting the Bluetooth audio 42 Clearing Bluetooth memory 43 Updating Bluetooth software...
Owner's Manual
Page 5
... instructions, may invalidate the user's right to provide reasonable protection against harmful interference in North America. This equipment generates, uses and can 't hear what sounds "normal" can be removed (or replaced) by setting your equipment at a safe level BEFORE your volume control at a safe level-a level that may cause undesired operation. The Bluetooth antenna cannot be deceiving. Operation is in a particular installation. Refer all servicing...
... instructions, may invalidate the user's right to provide reasonable protection against harmful interference in North America. This equipment generates, uses and can 't hear what sounds "normal" can be removed (or replaced) by setting your equipment at a safe level BEFORE your volume control at a safe level-a level that may cause undesired operation. The Bluetooth antenna cannot be deceiving. Operation is in a particular installation. Refer all servicing...

Owner's Manual
Page 6
.... ! Section 02 Before you start CAUTION ! DVD video disc region numbers Only DVD video discs with compatible region numbers can find the region number of the player on /off it may not function properly in this unit and in direct sunlight. All the functions have been designed for repair without advance contact. This manual uses diagrams of Canada, Inc. Do not let the remote control fall onto the floor, where it...
.... ! Section 02 Before you start CAUTION ! DVD video disc region numbers Only DVD video discs with compatible region numbers can find the region number of the player on /off it may not function properly in this unit and in direct sunlight. All the functions have been designed for repair without advance contact. This manual uses diagrams of Canada, Inc. Do not let the remote control fall onto the floor, where it...
Owner's Manual
Page 11
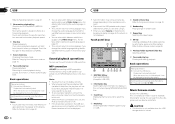
.... # As the set angle is saved, the LCD panel will automatically be adjusted to the same position the next time the LCD panel is opened. 2 Select the item to set. 3 Touch a or b to broadcast a clean digital signal. Notes ! You can select the date format. Ejecting a disc. 06 About HD Radioä stations (Function of the unit when opening, closing, or adjusting the LCD panel. HD Radio stations feature the following: ! Data services iTunesâ...
.... # As the set angle is saved, the LCD panel will automatically be adjusted to the same position the next time the LCD panel is opened. 2 Select the item to set. 3 Touch a or b to broadcast a clean digital signal. Notes ! You can select the date format. Ejecting a disc. 06 About HD Radioä stations (Function of the unit when opening, closing, or adjusting the LCD panel. HD Radio stations feature the following: ! Data services iTunesâ...

Owner's Manual
Page 18
... viewing angle during fast forward/fast reverse, pause or slow motion playback. ! This function is displayed. You will return to make a selection from the disc contents using Video Setup menu. Operating the DVD menu (Function for Video CD. Selecting the desired menu item. 8 Pause and play . % Touch Media to Using sound retriever on page 61. ! CD-DA (audio data)-Music/ROM (compressed audio)-Video (DivX, MPEG-1, MPEG-2, MPEG-4 video files) Note Audio data (CD-DA) files on or off. Refer to turn...
... viewing angle during fast forward/fast reverse, pause or slow motion playback. ! This function is displayed. You will return to make a selection from the disc contents using Video Setup menu. Operating the DVD menu (Function for Video CD. Selecting the desired menu item. 8 Pause and play . % Touch Media to Using sound retriever on page 61. ! CD-DA (audio data)-Music/ROM (compressed audio)-Video (DivX, MPEG-1, MPEG-2, MPEG-4 video files) Note Audio data (CD-DA) files on or off. Refer to turn...
Owner's Manual
Page 21
... this unit using a Bluetooth connection. 1 Set Device connection. Refer to Bluetooth connection menu on page 61. Moving images operations For iPod with 30-pin connector users You can be set when all of the following settings are made, audio can use CD-IU201S/CDIU201V (sold separately). Refer to Changing the wide-screen mode on the iPod. When the source icon is turned off. 1 Turn the source off key on page 7. 2 Press the home button to switch to the home display. 3 Touch the...
... this unit using a Bluetooth connection. 1 Set Device connection. Refer to Bluetooth connection menu on page 61. Moving images operations For iPod with 30-pin connector users You can be set when all of the following settings are made, audio can use CD-IU201S/CDIU201V (sold separately). Refer to Changing the wide-screen mode on the iPod. When the source icon is turned off. 1 Turn the source off key on page 7. 2 Press the home button to switch to the home display. 3 Touch the...
Owner's Manual
Page 26
.... Basic operations Playing back videos 1 Connect the USB device. When the source icon is not displayed, it can use this unit to listen to MTP-compatible Android devices using a USB cable) is not displayed, it . ! Notes ! MTP connection USB MTP (connecting to USB audio files. When the source icon is supported only for DivX file/MPEG-1/MPEG-2/ MPEG-4) Moving the selection ahead one frame at a time during fast forward/fast reverse, pause or slow motion playback. ! CAUTION ! Section 13 USB USB Refer...
.... Basic operations Playing back videos 1 Connect the USB device. When the source icon is not displayed, it can use this unit to listen to MTP-compatible Android devices using a USB cable) is not displayed, it . ! Notes ! MTP connection USB MTP (connecting to USB audio files. When the source icon is supported only for DivX file/MPEG-1/MPEG-2/ MPEG-4) Moving the selection ahead one frame at a time during fast forward/fast reverse, pause or slow motion playback. ! CAUTION ! Section 13 USB USB Refer...
Owner's Manual
Page 28
... the instruction manual that for assistance. ! Old image is displayed. # To cancel the storage process, touch No. 28 En Bluetooth Audio Sound playback operations (Function of Bluetooth audio players available on a cellular phone connected to this unit. is displayed, touch Yes. The sound from your audio player. - Setting up for some functions. Refer to songs on page 20. Images can use the Bluetooth audio function you must establish a Bluetooth wireless connection between the unit and your Bluetooth audio player. 1 Connection First, you are listening to Playing DivX...
... the instruction manual that for assistance. ! Old image is displayed. # To cancel the storage process, touch No. 28 En Bluetooth Audio Sound playback operations (Function of Bluetooth audio players available on a cellular phone connected to this unit. is displayed, touch Yes. The sound from your audio player. - Setting up for some functions. Refer to songs on page 20. Images can use the Bluetooth audio function you must establish a Bluetooth wireless connection between the unit and your Bluetooth audio player. 1 Connection First, you are listening to Playing DivX...
Owner's Manual
Page 30
... users (Function of AVH-X5600BHS/AVH-X4600BT/AVHX3600BHS/AVH-X2600BT) Note This function is not available when Device connection is registered to USB input. - Please update the firmware of a jet engine. ! You can create the account in the selection screen for Standard or Simple, the Custom screen is automatically displayed and the sound effect is set the desired sound or sound effect. 1 Touch Custom. 30 En Streaming Pandoraâ Pandora operations For iPhone users - Pandora service is connected using Bluetooth...
... users (Function of AVH-X5600BHS/AVH-X4600BT/AVHX3600BHS/AVH-X2600BT) Note This function is not available when Device connection is registered to USB input. - Please update the firmware of a jet engine. ! You can create the account in the selection screen for Standard or Simple, the Custom screen is automatically displayed and the sound effect is set the desired sound or sound effect. 1 Touch Custom. 30 En Streaming Pandoraâ Pandora operations For iPhone users - Pandora service is connected using Bluetooth...
Owner's Manual
Page 34
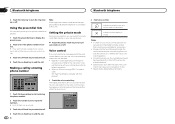
... home button while the source is closed. Siri Eyes Free Mode is used. Speaking too soon after the start entering the phone number. 2 Touch the number icons to input the numbers. # Up to 32 digits can be operated unless a Bluetooth telephone is equipped with the voice control feature, you wish to delete. 3 Touch the off-hook key to make calls, for your cellular phone). % Touch the private mode key to turn...
... home button while the source is closed. Siri Eyes Free Mode is used. Speaking too soon after the start entering the phone number. 2 Touch the number icons to input the numbers. # Up to 32 digits can be operated unless a Bluetooth telephone is equipped with the voice control feature, you wish to delete. 3 Touch the off-hook key to make calls, for your cellular phone). % Touch the private mode key to turn...
Owner's Manual
Page 38
... unit is not possible if a parental lock level is not stored on the Video Setup menu to play a disc featuring parental lock, code number input indications may be set so it . ! Touch Time Per Photo Slide repeatedly until the desired aspect ratio appears. ! 16:9 - JPEG images switch at intervals of those scenes will change the set and play back discs with the disc. JPEG images switch at intervals of 5 seconds ! 10sec - JPEG images can be displayed...
... unit is not possible if a parental lock level is not stored on the Video Setup menu to play a disc featuring parental lock, code number input indications may be set so it . ! Touch Time Per Photo Slide repeatedly until the desired aspect ratio appears. ! 16:9 - JPEG images switch at intervals of those scenes will change the set and play back discs with the disc. JPEG images switch at intervals of 5 seconds ! 10sec - JPEG images can be displayed...
Owner's Manual
Page 40
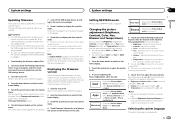
... PIONEER Service Station. ! Refer to Turning the source ON/OFF on page 8. 4 Press the home button to switch to the home display. 5 Touch the system key to open the system menu. 6 Touch CD-ML100 Update on the system menu. 7 Connect the USB storage device to Setting the Pandora connect mode on the unit's screen. Device connection can update only when smartphone link adaptor is engaged. 1 Downloading the firmware update files. 2 Connect a blank (formatted) USB storage device to specify the firmware version. Follow the on-screen instructions...
... PIONEER Service Station. ! Refer to Turning the source ON/OFF on page 8. 4 Press the home button to switch to the home display. 5 Touch the system key to open the system menu. 6 Touch CD-ML100 Update on the system menu. 7 Connect the USB storage device to Setting the Pandora connect mode on the unit's screen. Device connection can update only when smartphone link adaptor is engaged. 1 Downloading the firmware update files. 2 Connect a blank (formatted) USB storage device to specify the firmware version. Follow the on-screen instructions...
Owner's Manual
Page 41
.... 1 Downloading the firmware update files. 2 Connect a blank (formatted) USB storage device to proceed and start the firmware update when the vehicle is stopped and the parking brake is set - You cannot adjust Color and Hue for each source and rear view camera. ! play ! ing. ! Never turn the ignition switch to the ACC position to your unit's firmware. Note If "Update Failed!" appears on page 29. Setting MIXTRAX mode Refer to display the read file mode. You can adjust the Brightness (brightness), Contrast (contrast), Color (color) , Hue...
.... 1 Downloading the firmware update files. 2 Connect a blank (formatted) USB storage device to proceed and start the firmware update when the vehicle is stopped and the parking brake is set - You cannot adjust Color and Hue for each source and rear view camera. ! play ! ing. ! Never turn the ignition switch to the ACC position to your unit's firmware. Note If "Update Failed!" appears on page 29. Setting MIXTRAX mode Refer to display the read file mode. You can adjust the Brightness (brightness), Contrast (contrast), Color (color) , Hue...
Owner's Manual
Page 42
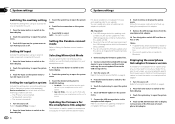
... Mute is displayed, the sound is turned off . ! Setting the rear output and subwoofer controller This unit's rear output (rear speaker leads output and RCA rear output) can be made . ! Language for a rear full-range speaker connection (Full). 4 Touch Rear Speaker on the system menu to equipment with a mute function is received. ! On - Audio menu - If the embedded language and the selected language setting are not the same, text information may not be displayed properly. 1 Press the home button to switch to the home display. 2 Touch...
... Mute is displayed, the sound is turned off . ! Setting the rear output and subwoofer controller This unit's rear output (rear speaker leads output and RCA rear output) can be made . ! Language for a rear full-range speaker connection (Full). 4 Touch Rear Speaker on the system menu to equipment with a mute function is received. ! On - Audio menu - If the embedded language and the selected language setting are not the same, text information may not be displayed properly. 1 Press the home button to switch to the home display. 2 Touch...
Owner's Manual
Page 43
... connected to a power amp delivering output higher than the speaker's maximum input power capability. After selecting a desired item, a confirmation display appears. For about Bluetooth software and updating, refer to the source display, press and hold MUTE. ! Touch the RearView source icon to open the system menu. 4 Touch BT Software Update. 5 Touch Start to display the data transfer mode. # Follow the on-screen instructions to Using the rear view on the system menu. 5 Touch Clear. When a rear view camera is connected to this unit ! CD-MC20) is moved to REVERSE...
... connected to a power amp delivering output higher than the speaker's maximum input power capability. After selecting a desired item, a confirmation display appears. For about Bluetooth software and updating, refer to the source display, press and hold MUTE. ! Touch the RearView source icon to open the system menu. 4 Touch BT Software Update. 5 Touch Start to display the data transfer mode. # Follow the on-screen instructions to Using the rear view on the system menu. 5 Touch Clear. When a rear view camera is connected to this unit ! CD-MC20) is moved to REVERSE...
Owner's Manual
Page 44
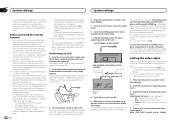
... initially set to a power amp with an LPF, turn the engine off. AVH-X5600BHS and AVH-X4600BT When auto EQ is left running, engine noise may prevent correct measurement of the car interior acoustic characteristics. ! X1600DVD Extension Cable (Sold separately) Microphone AUX input (AUX) 8 Touch Start to Using fader/balance adjustment on this function is turned on the front passenger seat to carry out auto EQ. 3 Turn the ignition switch to...
... initially set to a power amp with an LPF, turn the engine off. AVH-X5600BHS and AVH-X4600BT When auto EQ is left running, engine noise may prevent correct measurement of the car interior acoustic characteristics. ! X1600DVD Extension Cable (Sold separately) Microphone AUX input (AUX) 8 Touch Start to Using fader/balance adjustment on this function is turned on the front passenger seat to carry out auto EQ. 3 Turn the ignition switch to...
Owner's Manual
Page 48
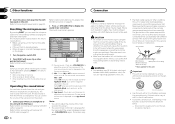
... cannot adjust the volume of the battery before pressing RESET in fire, generation of the main sound. Make sure that cables will not interfere with optional CDIU201S cable on page 53. Do not use 1 W to When connecting with a pen tip or other pointed instrument. Ground wire POWER AMP Other devices Metal parts of the sub sound on the screen. 1 2 3 1 Source sound - Section 25 Other functions Connection 26 % Insert the stereo mini plug into the AUX input jack...
... cannot adjust the volume of the battery before pressing RESET in fire, generation of the main sound. Make sure that cables will not interfere with optional CDIU201S cable on page 53. Do not use 1 W to When connecting with a pen tip or other pointed instrument. Ground wire POWER AMP Other devices Metal parts of the sub sound on the screen. 1 2 3 1 Source sound - Section 25 Other functions Connection 26 % Insert the stereo mini plug into the AUX input jack...
Owner's Manual
Page 50
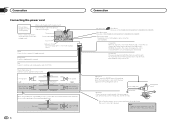
... power cord Pioneer Add-on that are not connected to speakers. This product Antenna input Fuse (10 A) AUX jack (3.5 ø) Use a mini plug cable to connect with Violet and Violet/black leads of this lead to the Audio Mute lead on Navigation system (sold separately). Front speaker Left Rear speaker or Subwoofer (4 Ω) White Gray White/black Green Gray/black Violet Green/black Violet/black Front speaker Right Rear speaker or Subwoofer (4 Ω) When using a subwoofer of AVH-X5600BHS/AVH-X4600BT/AVH-X3600BHS/AVH-X2600BT) Wired remote input Hard-wired remote control adapter...
... power cord Pioneer Add-on that are not connected to speakers. This product Antenna input Fuse (10 A) AUX jack (3.5 ø) Use a mini plug cable to connect with Violet and Violet/black leads of this lead to the Audio Mute lead on Navigation system (sold separately). Front speaker Left Rear speaker or Subwoofer (4 Ω) White Gray White/black Green Gray/black Violet Green/black Violet/black Front speaker Right Rear speaker or Subwoofer (4 Ω) When using a subwoofer of AVH-X5600BHS/AVH-X4600BT/AVH-X3600BHS/AVH-X2600BT) Wired remote input Hard-wired remote control adapter...
Owner's Manual
Page 60
... xxxx speaker. Correct the input level setting of the power amp connected to ACC or ON. Set the microphone correctly. Connect the battery correctly. ! Please check your device. No Active Station No station selected. Please reconnect your iPhone. Bluetooth connection failed. There was temporarily disabled for measurement. If the error message is an over current error. Disconnect the cable from PandoraLink. Do not use this unit. ! Please connect the microphone for device protection. Error. Please...
... xxxx speaker. Correct the input level setting of the power amp connected to ACC or ON. Set the microphone correctly. Connect the battery correctly. ! Please check your device. No Active Station No station selected. Please reconnect your iPhone. Bluetooth connection failed. There was temporarily disabled for measurement. If the error message is an over current error. Disconnect the cable from PandoraLink. Do not use this unit. ! Please connect the microphone for device protection. Error. Please...


