
Owner s Manual
Page 2
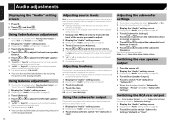
... Displaying the "Audio" setting screen 26 Using fader/balance adjustment 26 Using balance adjustment 26 Adjusting source levels 26 Adjusting loudness 26 Using the subwoofer output 26 Adjusting the subwoofer settings 26 Switching the rear speaker output 26 Switching the RCA rear output 26 Boosting the bass 27 Setting the high pass filter 27 Using the equalizer 27 ■Theme menu 27 Selecting the theme color 27 Removing a shortcut 30 ■Common operations.........30 Setting the time and date 30 Changing the wide screen mode 30 ■Other functions...
... Displaying the "Audio" setting screen 26 Using fader/balance adjustment 26 Using balance adjustment 26 Adjusting source levels 26 Adjusting loudness 26 Using the subwoofer output 26 Adjusting the subwoofer settings 26 Switching the rear speaker output 26 Switching the RCA rear output 26 Boosting the bass 27 Setting the high pass filter 27 Using the equalizer 27 ■Theme menu 27 Selecting the theme color 27 Removing a shortcut 30 ■Common operations.........30 Setting the time and date 30 Changing the wide screen mode 30 ■Other functions...
Owner s Manual
Page 4
... gain access to provide reasonable protection against this device. The Bluetooth antenna cannot be determined by turning the equipment off and on a circuit different from person's body (excluding extremities: hands, wrists, feet and ankles). This device complies with Part 15 of the FCC Rules. CAUTION: USE OF CONTROL OR ADJUSTMENT OR PERFORMANCE OF PROCEDURES OTHER THAN THOSE SPECIFIED...
... gain access to provide reasonable protection against this device. The Bluetooth antenna cannot be determined by turning the equipment off and on a circuit different from person's body (excluding extremities: hands, wrists, feet and ankles). This device complies with Part 15 of the FCC Rules. CAUTION: USE OF CONTROL OR ADJUSTMENT OR PERFORMANCE OF PROCEDURES OTHER THAN THOSE SPECIFIED...

Owner s Manual
Page 5
... the parking brake is applied. Keep this manual handy as viewing of the vehicle's operating systems or safety features, including air bags or hazard lamp buttons or (iii) impair the driver's ability to safely operate the vehicle. Please remember to use the functions described above while driving, they will divert your attention in any steps to tamper with a video image...
... the parking brake is applied. Keep this manual handy as viewing of the vehicle's operating systems or safety features, including air bags or hazard lamp buttons or (iii) impair the driver's ability to safely operate the vehicle. Please remember to use the functions described above while driving, they will divert your attention in any steps to tamper with a video image...
Owner s Manual
Page 6
... operate properly. If there appears to run the vehicle engine while using a display connected to V OUT The video output terminal (V OUT) is erased by persons other information. Notes on internal memory Before removing the vehicle battery Some of the settings and recorded contents will appear on the screen. To watch video image while driving, the warning "Viewing of spots, colored stripes, etc. To protect the LCD screen...
... operate properly. If there appears to run the vehicle engine while using a display connected to V OUT The video output terminal (V OUT) is erased by persons other information. Notes on internal memory Before removing the vehicle battery Some of the settings and recorded contents will appear on the screen. To watch video image while driving, the warning "Viewing of spots, colored stripes, etc. To protect the LCD screen...
Owner s Manual
Page 7
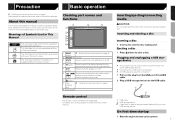
... . 4 button Press to switch the display between the top menu screen and the current source screen. 5 DISP button Press to answer or end a call. 7 button 8 Discloading slot Inserting and ejecting a disc on the model used. Checking part names and functions 7 1 2 3 4 5 6 8 9 1 RESET button Resetting the microprocessor on page 6 2 Volume (+/-) button 3 MUTE button Press to switch the mute setting to touch an appropriate soft key on page 7 Settings and recorded contents are supported the described operations. Inserting and ejecting a disc Inserting a disc...
... . 4 button Press to switch the display between the top menu screen and the current source screen. 5 DISP button Press to answer or end a call. 7 button 8 Discloading slot Inserting and ejecting a disc on the model used. Checking part names and functions 7 1 2 3 4 5 6 8 9 1 RESET button Resetting the microprocessor on page 6 2 Volume (+/-) button 3 MUTE button Press to switch the mute setting to touch an appropriate soft key on page 7 Settings and recorded contents are supported the described operations. Inserting and ejecting a disc Inserting a disc...
Owner s Manual
Page 10
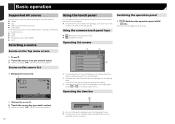
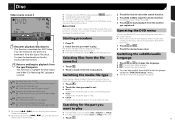
... screen. : Closes the screen. p When you want to touch the screen only with this product by connecting an auxiliary device. USB iPod Bluetooth audio (AVH-280BT) AUX Selecting a source Source on the Top menu screen 1 Press . 2 Touch the source icon you touch the key, the rest are not displayed on a single page. p This function is not available when the Bluetooth Audio is turned off . Operating list screens Switching the operation panel 1 : Switches the operation panel of AV sources...
... screen. : Closes the screen. p When you want to touch the screen only with this product by connecting an auxiliary device. USB iPod Bluetooth audio (AVH-280BT) AUX Selecting a source Source on the Top menu screen 1 Press . 2 Touch the source icon you touch the key, the rest are not displayed on a single page. p This function is not available when the Bluetooth Audio is turned off . Operating list screens Switching the operation panel 1 : Switches the operation panel of AV sources...
Owner s Manual
Page 11
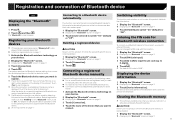
... your device supports SSP (Secure Simple Pairing), a sixdigit number appears on page 11 3 Touch [Connection]. 4 Touch the name of Bluetooth device 280BT Displaying the "Bluetooth" screen 1 Press . 2 Touch , and then . Touch the device name to pair the device. For details on your Bluetooth devices p If three devices are displayed. Switching visibility This function sets whether or not to make sure that you need to the operating instructions supplied with this product are already paired, "Memory Full" is displayed. Entering the PIN code for a connection and displays them...
... your device supports SSP (Secure Simple Pairing), a sixdigit number appears on page 11 3 Touch [Connection]. 4 Touch the name of Bluetooth device 280BT Displaying the "Bluetooth" screen 1 Press . 2 Touch , and then . Touch the device name to pair the device. For details on your Bluetooth devices p If three devices are displayed. Switching visibility This function sets whether or not to make sure that you need to the operating instructions supplied with this product are already paired, "Memory Full" is displayed. Entering the PIN code for a connection and displays them...
Owner s Manual
Page 13
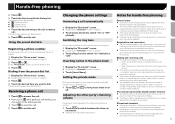
Changing the phone settings Answering a call automatically 1 Display the "Bluetooth" screen. Displaying the "Bluetooth" screen on or off. Setting the private mode During a conversation, you can be disabled. Adjusting the other end of the line hangs up to six phone numbers per device as presets. 1 Display the "Phone menu" screen. Displaying the Phone menu screen on page 12 2 Touch . 3 Touch the desired item you answer the phone using the button on page 11 2 Touch [Ring Tone] to switch "On" or...
Changing the phone settings Answering a call automatically 1 Display the "Bluetooth" screen. Displaying the "Bluetooth" screen on or off. Setting the private mode During a conversation, you can be disabled. Adjusting the other end of the line hangs up to six phone numbers per device as presets. 1 Display the "Phone menu" screen. Displaying the Phone menu screen on page 12 2 Touch . 3 Touch the desired item you answer the phone using the button on page 11 2 Touch [Ring Tone] to switch "On" or...
Owner s Manual
Page 14
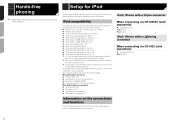
... connected. Setup for connecting each device, and the available sources are as follows. p Depending on the connections and functions The settings and cables required for iPod When using separately sold separately) Available sources iPod (audio) 14 Hands-free phoning Depending on the cellular phone, phone book transfer may not be compatible with this product. iPod / iPhone with a 30-pin connector When connecting via CD-IU201V (sold separately) Available sources iPod (audio) iPod (video) iPod / iPhone with a Lightning connector When connecting...
... connected. Setup for connecting each device, and the available sources are as follows. p Depending on the connections and functions The settings and cables required for iPod When using separately sold separately) Available sources iPod (audio) 14 Hands-free phoning Depending on the cellular phone, phone book transfer may not be compatible with this product. iPod / iPhone with a 30-pin connector When connecting via CD-IU201V (sold separately) Available sources iPod (audio) iPod (video) iPod / iPhone with a Lightning connector When connecting...
Owner s Manual
Page 17
... p For DVD-Videos, you want to play a normal music CD, Video-CD or DVD-Video using the "DVD/DivX Setup" menu. Setting the top-priority languages on page 28 *1 Selects a track from the list. Selecting files from the number you can select [Title], [Chapter] or [10Key]. Returns and begins playback from the file name list 1 Touch . 2 Touch a track on page 7 p If the disc is being played, appears. p If a Video-CD...
... p For DVD-Videos, you want to play a normal music CD, Video-CD or DVD-Video using the "DVD/DivX Setup" menu. Setting the top-priority languages on page 28 *1 Selects a track from the list. Selecting files from the number you can select [Title], [Chapter] or [10Key]. Returns and begins playback from the file name list 1 Touch . 2 Touch a track on page 7 p If the disc is being played, appears. p If a Video-CD...
Owner s Manual
Page 23
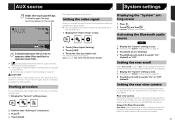
..." setting screen. Displaying the "System" setting screen on page 23 2 Touch [AV Source Settings]. 3 Touch [Bluetooth Audio] to operate music les. AUX source System settings Hides the touch panel keys. Activating the Bluetooth audio source 280BT 1 Display the "System" setting screen. Displaying the "System" setting screen on page 23 2 Touch [Ever Scroll] to fit, and that to switch "On" (default) or "Off". AUX 6/10 21 48 Full Switches between the screen to operate video les and that a portion of the rear view camera installed on the screen. Setting the...
..." setting screen. Displaying the "System" setting screen on page 23 2 Touch [AV Source Settings]. 3 Touch [Bluetooth Audio] to operate music les. AUX source System settings Hides the touch panel keys. Activating the Bluetooth audio source 280BT 1 Display the "System" setting screen. Displaying the "System" setting screen on page 23 2 Touch [Ever Scroll] to fit, and that to switch "On" (default) or "Off". AUX 6/10 21 48 Full Switches between the screen to operate video les and that a portion of the rear view camera installed on the screen. Setting the...
Owner s Manual
Page 24
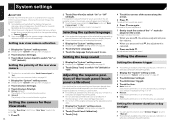
... can use this function when "Dimmer Trigger" is displayed, the displayed image will turn off at all times, "Rear View" needs to be displayed properly. 1 Display the "System" setting screen. Displaying the "System" setting screen on the AV operation screen, the camera view will appear automatically. The adjustment results are saved. 6 Press once again. Setting the dimmer duration in a safe place and apply the parking brake. Setting the camera for seven seconds on page 23 2 Touch [System Language]. 3 Touch the...
... can use this function when "Dimmer Trigger" is displayed, the displayed image will turn off at all times, "Rear View" needs to be displayed properly. 1 Display the "System" setting screen. Displaying the "System" setting screen on the AV operation screen, the camera view will appear automatically. The adjustment results are saved. 6 Press once again. Setting the dimmer duration in a safe place and apply the parking brake. Setting the camera for seven seconds on page 23 2 Touch [System Language]. 3 Touch the...
Owner s Manual
Page 25
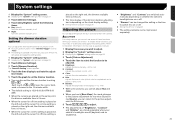
... clock display setting. Setting the time and date on page 30 Adjusting the picture You can adjust the picture for AV source. 5 Touch , , , to adjust. The adjustments of these functions, you can adjust the time that the dimmer is in a safe place and apply the parking brake. CAUTION For safety reasons, you cannot use this function when "Dimmer Trigger" is emphasized, red or green). (-24 to +24) Dimmer: Adjusts the brightness...
... clock display setting. Setting the time and date on page 30 Adjusting the picture You can adjust the picture for AV source. 5 Touch , , , to adjust. The adjustments of these functions, you can adjust the time that the dimmer is in a safe place and apply the parking brake. CAUTION For safety reasons, you cannot use this function when "Dimmer Trigger" is emphasized, red or green). (-24 to +24) Dimmer: Adjusts the brightness...
Owner s Manual
Page 26
... to switch "Subwoofer Settings"(default) or "Rear". Using balance adjustment p This function is available when "Rear Speaker Output" and "Preout" are available: 80Hz(default), 50Hz, 63Hz, 80Hz, 100Hz, 125Hz. Using the subwoofer output This product is set to "Subwoofer Settings". 1 Display the "Audio" setting screen. Displaying the "Audio" setting screen on page 26 2 Touch [Subwoofer Settings]. 3 Touch or to turn the subwoofer phase to normal or reverse. 4 Touch or to adjust the subwoofer level between sources. Switching the RCA rear output When "Rear Speaker Output" is...
... to switch "Subwoofer Settings"(default) or "Rear". Using balance adjustment p This function is available when "Rear Speaker Output" and "Preout" are available: 80Hz(default), 50Hz, 63Hz, 80Hz, 100Hz, 125Hz. Using the subwoofer output This product is set to "Subwoofer Settings". 1 Display the "Audio" setting screen. Displaying the "Audio" setting screen on page 26 2 Touch [Subwoofer Settings]. 3 Touch or to turn the subwoofer phase to normal or reverse. 4 Touch or to adjust the subwoofer level between sources. Switching the RCA rear output When "Rear Speaker Output" is...
Owner s Manual
Page 32
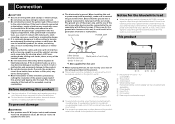
... be connected (sold separately), make sure to connect the ground wire first. To prevent damage WARNING Use speakers over 50 W (output value) and between 4 Ω to an external power amp's system remote control terminal, the auto-antenna relay control terminal, or the antenna booster power control terminal (max. 300 mA 12 V DC). Ensure that the cables and wires will be connected to 3 Ω speakers for the blue/white lead When the ignition switch is turned...
... be connected (sold separately), make sure to connect the ground wire first. To prevent damage WARNING Use speakers over 50 W (output value) and between 4 Ω to an external power amp's system remote control terminal, the auto-antenna relay control terminal, or the antenna booster power control terminal (max. 300 mA 12 V DC). Ensure that the cables and wires will be connected to 3 Ω speakers for the blue/white lead When the ignition switch is turned...

Owner s Manual
Page 34
... full-screen images displayed while backing or checking the rear of the vehicle may appear reversed. With the rear view camera you while driving. WARNING USE INPUT ONLY FOR REVERSE OR MIRROR IMAGE REAR VIEW CAMERA. Do not use the rear view camera, the rear view image is automatically switched from the speaker leads when this connection is behind you can change the RCA output of the subwoofer depending on your subwoofer system. iPod / iPhone with Lightning connector Connecting via the AUX input The USB interface cable for iPod / iPhone...
... full-screen images displayed while backing or checking the rear of the vehicle may appear reversed. With the rear view camera you while driving. WARNING USE INPUT ONLY FOR REVERSE OR MIRROR IMAGE REAR VIEW CAMERA. Do not use the rear view camera, the rear view image is automatically switched from the speaker leads when this connection is behind you can change the RCA output of the subwoofer depending on your subwoofer system. iPod / iPhone with Lightning connector Connecting via the AUX input The USB interface cable for iPod / iPhone...
Owner s Manual
Page 35
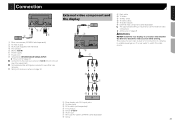
... cable (CD-RM10) (sold separately) 8 Yellow 35 Do not connect any other view cameras. Setting the rear view camera on page 23 External video component and the display 1 3 2 4 5 6 7 89 a b 3 9 Red, white a To Yellow b To Red, white c To video output d To audio outputs e External video component (sold separately) The appropriate setting is for connection of a display to enable passengers in a location that enables the driver to use the external video component. AUX source on page 33 Connect only the rear view camera to watch the video source...
... cable (CD-RM10) (sold separately) 8 Yellow 35 Do not connect any other view cameras. Setting the rear view camera on page 23 External video component and the display 1 3 2 4 5 6 7 89 a b 3 9 Red, white a To Yellow b To Red, white c To video output d To audio outputs e External video component (sold separately) The appropriate setting is for connection of a display to enable passengers in a location that enables the driver to use the external video component. AUX source on page 33 Connect only the rear view camera to watch the video source...
Owner s Manual
Page 37
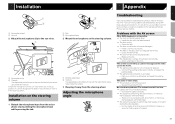
..., or frame-by a caution message and the video cannot be shown. The parking brake lead is activated. - Connect the parking brake lead correctly, and apply the parking brake. The parking brake interlock is not connected or applied. - The screen is covered by - frame playback with the AV screen CD or DVD playback is not possible. The disc is inserted upside down position. Installation on the steering...
..., or frame-by a caution message and the video cannot be shown. The parking brake lead is activated. - Connect the parking brake lead correctly, and apply the parking brake. The parking brake interlock is not connected or applied. - The screen is covered by - frame playback with the AV screen CD or DVD playback is not possible. The disc is inserted upside down position. Installation on the steering...
Owner s Manual
Page 38
... to off or change the level. Park your dealer or an authorized Pioneer Station for iPod / iPhone. - sary services on the display. Error messages When problems occur with the Application screen A black screen is out of the smartphone during disc playback. - Playback is not with the USB interface cable for assistance. 38 Turn the ignition key back to display the Top menu screen. The smartphone OS may fix this product is...
... to off or change the level. Park your dealer or an authorized Pioneer Station for iPod / iPhone. - sary services on the display. Error messages When problems occur with the Application screen A black screen is out of the smartphone during disc playback. - Playback is not with the USB interface cable for assistance. 38 Turn the ignition key back to display the Top menu screen. The smartphone OS may fix this product is...
Owner s Manual
Page 39
... USB cable is an electrical or mechanical error. - Once the iPod's main menu is not supported on the inserted disc are skipped. Replace the DVD with a compatible USB storage device. Audio Format not supported This type of this product. - Replace the disc. Follow the USB storage device instructions to flash memory. The playback history for VOD contents cannot be played. Security for the Bluetooth module of file is displayed, reconnect the iPod and reset...
... USB cable is an electrical or mechanical error. - Once the iPod's main menu is not supported on the inserted disc are skipped. Replace the DVD with a compatible USB storage device. Audio Format not supported This type of this product. - Replace the disc. Follow the USB storage device instructions to flash memory. The playback history for VOD contents cannot be played. Security for the Bluetooth module of file is displayed, reconnect the iPod and reset...


