Installation Manual
Page 2
...of your protection. We recommend that the cables and wires will not obstruct or hinder driving. • Make sure that only authorized Pioneer service personnel, who have rear visibility systems. Owners of this product. If the yellow lead's insulation tears as the factory backup ...with a 12-volt battery and negative grounding only. If the insulation heats up and install this product and tapping into the engine compartment. Connection Precautions Your new product and this manual • Do not operate this product yourself. Always observe safe driving rules and follow...
...of your protection. We recommend that the cables and wires will not obstruct or hinder driving. • Make sure that only authorized Pioneer service personnel, who have rear visibility systems. Owners of this product. If the yellow lead's insulation tears as the factory backup ...with a 12-volt battery and negative grounding only. If the insulation heats up and install this product and tapping into the engine compartment. Connection Precautions Your new product and this manual • Do not operate this product yourself. Always observe safe driving rules and follow...
Installation Manual
Page 3
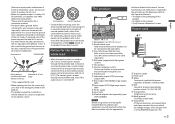
...Power supply Fuse (10 A) iDatalink adapter (sold separately) input (AVH-2550NEX) NOTE Before using and/or connecting the iDatalink Maestro adapter...to the car separately with Navigation system) This product Pioneer navigation system Contact your dealer to first flash the.... (Maximum input power) and between 4 Ω to the instruction manual for SiriusXM Connect Vehicle Tuner (sold separately). Connect to connect the ground...8226; The label on this unit or power amp (sold separately). When installing this product • The [Firmware Information] screen Power cord Microphone 3 m...
...Power supply Fuse (10 A) iDatalink adapter (sold separately) input (AVH-2550NEX) NOTE Before using and/or connecting the iDatalink Maestro adapter...to the car separately with Navigation system) This product Pioneer navigation system Contact your dealer to first flash the.... (Maximum input power) and between 4 Ω to the instruction manual for SiriusXM Connect Vehicle Tuner (sold separately). Connect to connect the ground...8226; The label on this unit or power amp (sold separately). When installing this product • The [Firmware Information] screen Power cord Microphone 3 m...
Installation Manual
Page 6
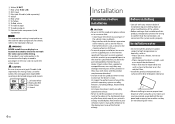
... video source. May interfere with your nearest dealer if installation requires drilling holes or other modifications of the vehicle. • Before making a final installation of this product horizontally on top of your vehicle's owner's manual for reference to the deployment area of a display to... ensure proper heat dispersal when using this unit, make sure you have the part compatibility checked by your dealer. Before installing • Consult with the driver's operation of...
... video source. May interfere with your nearest dealer if installation requires drilling holes or other modifications of the vehicle. • Before making a final installation of this product horizontally on top of your vehicle's owner's manual for reference to the deployment area of a display to... ensure proper heat dispersal when using this unit, make sure you have the part compatibility checked by your dealer. Before installing • Consult with the driver's operation of...
Owners Manual
Page 6
... information: • Do not operate this product to fasten your dealer or the nearest authorized Pioneer Service Station for operating procedures and safety information. • Do not install this product by persons without training and experience in electronic equipment and automotive accessories may result in...seat belt is not properly buckled. • Never use of headphones may create a traffic hazard and is applied. • Keep this manual handy as there are high-voltage components inside this product, park your vehicle in any way from this product, or any other hazards. &#...
... information: • Do not operate this product to fasten your dealer or the nearest authorized Pioneer Service Station for operating procedures and safety information. • Do not install this product by persons without training and experience in electronic equipment and automotive accessories may result in...seat belt is not properly buckled. • Never use of headphones may create a traffic hazard and is applied. • Keep this manual handy as there are high-voltage components inside this product, park your vehicle in any way from this product, or any other hazards. &#...
Owners Manual
Page 49
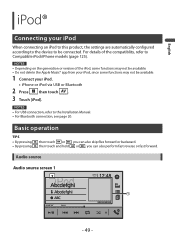
...; app from your iPod, since some functions may not be connected. Audio source Audio source screen 1 - 49 - NOTES • For USB connection, refer to the Installation Manual. • For Bluetooth connection, see page 20.
...; app from your iPod, since some functions may not be connected. Audio source Audio source screen 1 - 49 - NOTES • For USB connection, refer to the Installation Manual. • For Bluetooth connection, see page 20.
Owners Manual
Page 54
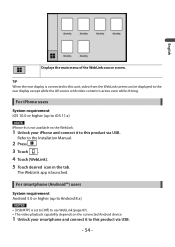
... WebLink screen can be displayed to this product via USB. - 54 - TIP When the rear display is launched. The WebLink app is connected to the Installation Manual. 2 Press . 3 Touch . 4 Touch [WebLink]. 5 Touch desired icon in the tab. Refer to this product via USB. English Displays the main menu of the WebLink source...
... WebLink screen can be displayed to this product via USB. - 54 - TIP When the rear display is launched. The WebLink app is connected to the Installation Manual. 2 Press . 3 Touch . 4 Touch [WebLink]. 5 Touch desired icon in the tab. Refer to this product via USB. English Displays the main menu of the WebLink source...
Owners Manual
Page 55
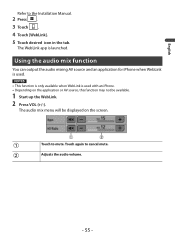
Touch again to the Installation Manual. 2 Press . 3 Touch . 4 Touch [WebLink]. 5 Touch desired icon in the tab. Using the audio mix function You can output the audio mixing AV source and an ...
Touch again to the Installation Manual. 2 Press . 3 Touch . 4 Touch [WebLink]. 5 Touch desired icon in the tab. Using the audio mix function You can output the audio mixing AV source and an ...
Owners Manual
Page 57
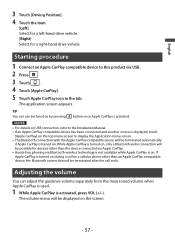
... the top menu screen to this product via Bluetooth wireless technology is not available while Apple CarPlay is turned on USB connection, refer to the Installation Manual. • If an Apple CarPlay compatible device has been connected and another screen is activated. The application screen appears. While Apple CarPlay is turned on...
... the top menu screen to this product via Bluetooth wireless technology is not available while Apple CarPlay is turned on USB connection, refer to the Installation Manual. • If an Apple CarPlay compatible device has been connected and another screen is activated. The application screen appears. While Apple CarPlay is turned on...
Owners Manual
Page 60
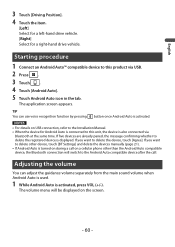
... on during a call on a cellular phone other than the Android Auto compatible device, the Bluetooth connection will be displayed on USB connection, refer to the Installation Manual. • When the device for a right-hand drive vehicle. TIP You can adjust the guidance volume separately from the main sound volume when Android Auto...
... on during a call on a cellular phone other than the Android Auto compatible device, the Bluetooth connection will be displayed on USB connection, refer to the Installation Manual. • When the device for a right-hand drive vehicle. TIP You can adjust the guidance volume separately from the main sound volume when Android Auto...
Owners Manual
Page 63
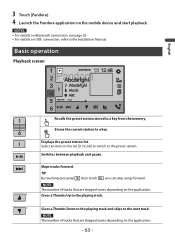
... • For details on Bluetooth connection, see page 20. • For details on the mobile device and start playback. Stores the current station to the Installation Manual.
... • For details on Bluetooth connection, see page 20. • For details on the mobile device and start playback. Stores the current station to the Installation Manual.
Owners Manual
Page 66
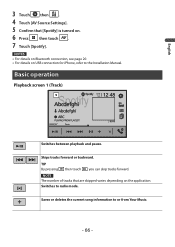
... playback and pause. Skips tracks forward or backward. NOTE The number of tracks that [Spotify] is turned on USB connection for iPhone, refer to the Installation Manual. Saves or deletes the current song information to radio mode. NOTES • For details on Bluetooth connection, see page 20. • For details on . 6 Press...
... playback and pause. Skips tracks forward or backward. NOTE The number of tracks that [Spotify] is turned on USB connection for iPhone, refer to the Installation Manual. Saves or deletes the current song information to radio mode. NOTES • For details on Bluetooth connection, see page 20. • For details on . 6 Press...

Owners Manual
Page 78
For details, refer to video input. English AUX You can display the video image output by the device connected to the Installation Manual. To view video images, stop in motion. Starting procedure 1 Press . 2 Touch then . 3 Touch [Input/Output settings]. 4 Confirm that [AUX Input] is in a safe place and ...
For details, refer to video input. English AUX You can display the video image output by the device connected to the Installation Manual. To view video images, stop in motion. Starting procedure 1 Press . 2 Touch then . 3 Touch [Input/Output settings]. 4 Confirm that [AUX Input] is in a safe place and ...

Owners Manual
Page 80
... display the video image output by the device connected to the Installation Manual. Starting procedure 1 Press . 2 Touch then . 3 Touch [Input/Output settings]. 4 Touch [AV Input]. 5 2550NEX Touch [Source] for AV source or [Camera] for camera. 2500NEX Touch [On]. 6 Press then touch . 7 2550NEX Touch ...[AV] for AV source or [Camera View] for connected camera view. 2500NEX Touch [AV]. The video image is in a safe place and apply the parking...
... display the video image output by the device connected to the Installation Manual. Starting procedure 1 Press . 2 Touch then . 3 Touch [Input/Output settings]. 4 Touch [AV Input]. 5 2550NEX Touch [Source] for AV source or [Camera] for camera. 2500NEX Touch [On]. 6 Press then touch . 7 2550NEX Touch ...[AV] for AV source or [Camera View] for connected camera view. 2500NEX Touch [AV]. The video image is in a safe place and apply the parking...
Owners Manual
Page 81
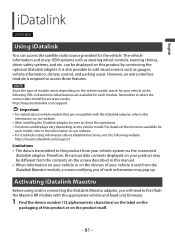
... select the correct radio model for each module. For details of such information may be different from the contents on the screen described in this manual. • When information on your vehicle system via the connected iDatalink adapter. English iDatalink 2550NEX Using iDatalink You can be displayed on this product by... control, and parking assist. Remember to first flash the Maestro RR module with the iDatalink adapter, refer to the information on our website. • After installing the iDatalink adapter, be sure to access these features.
... select the correct radio model for each module. For details of such information may be different from the contents on the screen described in this manual. • When information on your vehicle system via the connected iDatalink adapter. English iDatalink 2550NEX Using iDatalink You can be displayed on this product by... control, and parking assist. Remember to first flash the Maestro RR module with the iDatalink adapter, refer to the information on our website. • After installing the iDatalink adapter, be sure to access these features.
Owners Manual
Page 82
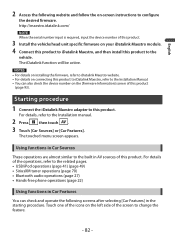
... website. • For details on connecting this product. Using functions in Car Sources These operations are almost similar to the Installation Manual. • You can check and operate the following website and follow the on the left side of this product to iDatalink... starting procedure. Touch one of the icons on -screen instructions to the vehicle. Starting procedure 1 Connect the iDatalink Maestro adapter to the Installation manual. 2 Press then touch . 3 Touch [Car Sources] or [Car Features]. For details, refer to this product to configure the desired...
... website. • For details on connecting this product. Using functions in Car Sources These operations are almost similar to the Installation Manual. • You can check and operate the following website and follow the on the left side of this product to iDatalink... starting procedure. Touch one of the icons on -screen instructions to the vehicle. Starting procedure 1 Connect the iDatalink Maestro adapter to the Installation manual. 2 Press then touch . 3 Touch [Car Sources] or [Car Features]. For details, refer to this product to configure the desired...
Owners Manual
Page 111
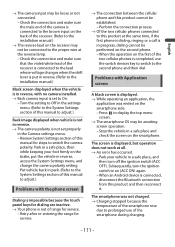
Review System Settings section of the receiver. (Refer to the installation manual.) → The reverse lead on the second phone. - Retry after re-entering the range for steps to the brown input on the back of this manual for service. → The connection between the cellular phone and ...Charging stopped because the temperature of range for service. - Park your foot firmly on the brake, put in reverse. (Refer to the installation manual.) Black screen displayed when the vehicle is connected to switch the camera polarity. Subsequently, turn off the ignition switch (ACC OFF).
Review System Settings section of the receiver. (Refer to the installation manual.) → The reverse lead on the second phone. - Retry after re-entering the range for steps to the brown input on the back of this manual for service. → The connection between the cellular phone and ...Charging stopped because the temperature of range for service. - Park your foot firmly on the brake, put in reverse. (Refer to the installation manual.) Black screen displayed when the vehicle is connected to switch the camera polarity. Subsequently, turn off the ignition switch (ACC OFF).


