Operating Instructions
Page 7
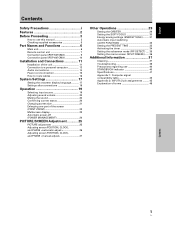
English Contents Safety Precautions i Features 2 Before Proceeding 3 How to use this manual 3 Checking supplied accessories 5 Part Names and Functions 6 Main unit 6 Remote control unit 7 Connection panel (PDP-507CMX 9 Connection panel (PDP-607CMX 10 Installation and Connections 11 Installation of the unit 11 Connection to a personal computer 13 Audio connections 14 Power cord connection 15 How to ...
English Contents Safety Precautions i Features 2 Before Proceeding 3 How to use this manual 3 Checking supplied accessories 5 Part Names and Functions 6 Main unit 6 Remote control unit 7 Connection panel (PDP-507CMX 9 Connection panel (PDP-607CMX 10 Installation and Connections 11 Installation of the unit 11 Connection to a personal computer 13 Audio connections 14 Power cord connection 15 How to ...

Operating Instructions
Page 9
...dedicated to the basic operations associated with selecting a source component up to the more complex operations associated with the plasma monitor and remote control unit, as their respective buttons and controls will be necessary. Depending on page 11 covers all the ...necessary points regarding installation of the Plasma Display and connections to a wide variety of actions and operations in this manual. E N H A N C E PICTURE RESET SETUP : : : : INPUT1 OPTION...
...dedicated to the basic operations associated with selecting a source component up to the more complex operations associated with the plasma monitor and remote control unit, as their respective buttons and controls will be necessary. Depending on page 11 covers all the ...necessary points regarding installation of the Plasma Display and connections to a wide variety of actions and operations in this manual. E N H A N C E PICTURE RESET SETUP : : : : INPUT1 OPTION...

Operating Instructions
Page 10
...images depicted in these Operating Instructions should be seen in its contents, the input source and various other control settings. When the Plasma Display controls include equivalent buttons to confirm whether the operation is described in practice, depending on the screen item displayed and its ...proper operating order. The following illustrations are provided to allow you to those buttons found on the remote control unit, the commands can be performed on the remote control unit, with the exception of the actual operations used for the section "PICTURE adjustment".
...images depicted in these Operating Instructions should be seen in its contents, the input source and various other control settings. When the Plasma Display controls include equivalent buttons to confirm whether the operation is described in practice, depending on the screen item displayed and its ...proper operating order. The following illustrations are provided to allow you to those buttons found on the remote control unit, the commands can be performed on the remote control unit, with the exception of the actual operations used for the section "PICTURE adjustment".

Operating Instructions
Page 11
English Checking supplied accessories Check that the following accessories were supplied. 1 Power cord (2 m/6.6 feet) 2 Remote control unit Before Proceeding 7 Ferrite cores (x 3) (for audio cables) ÷ These Operating Instructions ÷ Warranty 3 AA (R6) batteries (x 2) 4 Cleaning cloth (for screen) 5 Speed clamps (x 3) 6 Bead bands (x 3) Before Proceeding 5 En
English Checking supplied accessories Check that the following accessories were supplied. 1 Power cord (2 m/6.6 feet) 2 Remote control unit Before Proceeding 7 Ferrite cores (x 3) (for audio cables) ÷ These Operating Instructions ÷ Warranty 3 AA (R6) batteries (x 2) 4 Cleaning cloth (for screen) 5 Speed clamps (x 3) 6 Bead bands (x 3) Before Proceeding 5 En
Operating Instructions
Page 12
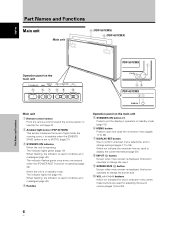
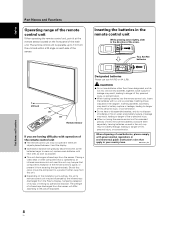
... sound volume (pages 19 and 20). VOL + 89 0 PDP-507CMX 1 STANDBY ON 23 PDP-607CMX 31 Main unit 1 Remote control sensor Point the remote control toward the remote sensor to operate the unit (page 8). 2 Ambient light sensor (PDP-507CMX) This sensor measures the level of light inside the viewing room... main unit STANDBY/ON 5 DISPLAY MENU / SET 67 INPUT SCREEN SIZE - English Part Names and Functions Main unit Main unit 4 (PDP-507CMX) 4 (PDP-607CMX) Operation panel on -screen menu (pages 17 to 36). 7 DISPLAY/SET button Use to confirm onscreen menu selections, and to change settings (pages...
... sound volume (pages 19 and 20). VOL + 89 0 PDP-507CMX 1 STANDBY ON 23 PDP-607CMX 31 Main unit 1 Remote control sensor Point the remote control toward the remote sensor to operate the unit (page 8). 2 Ambient light sensor (PDP-507CMX) This sensor measures the level of light inside the viewing room... main unit STANDBY/ON 5 DISPLAY MENU / SET 67 INPUT SCREEN SIZE - English Part Names and Functions Main unit Main unit 4 (PDP-507CMX) 4 (PDP-607CMX) Operation panel on -screen menu (pages 17 to 36). 7 DISPLAY/SET button Use to confirm onscreen menu selections, and to change settings (pages...
Operating Instructions
Page 13
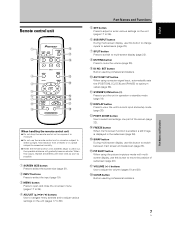
... unit (pages 17 to wear out, the operable distance will gradually become shorter. Remote control unit 1 0 - 2 = 3 ~ 4 ! 5 6 @ 7 # 8 $ 9 % When handling the remote control unit ¶ Do not drop the remote control unit or expose it to moisture. ¶ Do not use the remote control unit in a location subject to direct sunlight, heat radiation from a heater, or...
... unit (pages 17 to wear out, the operable distance will gradually become shorter. Remote control unit 1 0 - 2 = 3 ~ 4 ! 5 6 @ 7 # 8 $ 9 % When handling the remote control unit ¶ Do not drop the remote control unit or expose it to moisture. ¶ Do not use the remote control unit in a location subject to direct sunlight, heat radiation from a heater, or...
Operating Instructions
Page 14
...Please use batteries other component that component's reception of the remote control's signal, or prevent it at the remote sensor located on the installation surroundings, this unit may be influenced by the infrared rays discharged from the Plasma Display, hampering reception of its rays or limiting its ... screen. Inserting the batteries in the remote control unit While pressing down lightly, slide in fire or water, since rupture or leakage may result, leading to a position further away from this unit. ¶ Depending on the front panel of the main unit. Leaving batteries ...
...Please use batteries other component that component's reception of the remote control's signal, or prevent it at the remote sensor located on the installation surroundings, this unit may be influenced by the infrared rays discharged from the Plasma Display, hampering reception of its rays or limiting its ... screen. Inserting the batteries in the remote control unit While pressing down lightly, slide in fire or water, since rupture or leakage may result, leading to a position further away from this unit. ¶ Depending on the front panel of the main unit. Leaving batteries ...

Operating Instructions
Page 23
...the desired language. Follow the procedures below to ON. VOL + STANDBY/ON SET 5/∞ 2/3 MENU Main unit operating panel 1 Set the rear panel MAIN POWER switch to change to another language, the screen setting must be set to select [OPTION]. The selected language ...are pressed, the language alternates between those available, in memory, and the screen will be changed. System Settings MENU 2/3 SET 5/∞ Remote control unit STANDBY/ON DISPLAY MENU / SET INPUT SCREEN SIZE - MENU PICTURE SCREEN CONTRAST BRIGHTNESS H.ENHANCE V. Note When the onscreen display ...
...the desired language. Follow the procedures below to ON. VOL + STANDBY/ON SET 5/∞ 2/3 MENU Main unit operating panel 1 Set the rear panel MAIN POWER switch to change to another language, the screen setting must be set to select [OPTION]. The selected language ...are pressed, the language alternates between those available, in memory, and the screen will be changed. System Settings MENU 2/3 SET 5/∞ Remote control unit STANDBY/ON DISPLAY MENU / SET INPUT SCREEN SIZE - MENU PICTURE SCREEN CONTRAST BRIGHTNESS H.ENHANCE V. Note When the onscreen display ...
Operating Instructions
Page 24
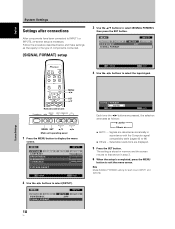
...N C E SETUP : : : : INPUT1 OPTION 0 0 0 0 PICTURE RESET SET ENTER MENU EXIT 2 Use the 2/3 buttons to display the menu screen. System Settings MENU 2/3 SET 5/∞ Remote control unit STANDBY/ON DISPLAY MENU / SET INPUT SCREEN SIZE - MENU PICTURE SCREEN CONTRAST BRIGHTNESS H.ENHANCE V. VOL + MENU SET 5/∞ 2/3 Main unit operating... panel 1 Press the MENU button to select [SETUP]. Note Make [SIGNAL FORMAT] setting for each input (INPUT1 and INPUT2...
...N C E SETUP : : : : INPUT1 OPTION 0 0 0 0 PICTURE RESET SET ENTER MENU EXIT 2 Use the 2/3 buttons to display the menu screen. System Settings MENU 2/3 SET 5/∞ Remote control unit STANDBY/ON DISPLAY MENU / SET INPUT SCREEN SIZE - MENU PICTURE SCREEN CONTRAST BRIGHTNESS H.ENHANCE V. VOL + MENU SET 5/∞ 2/3 Main unit operating... panel 1 Press the MENU button to select [SETUP]. Note Make [SIGNAL FORMAT] setting for each input (INPUT1 and INPUT2...
Operating Instructions
Page 25
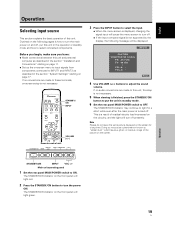
Main unit operating panel 1 Set the rear panel MAIN POWER switch to turn off presently. STANDBY/ ON INPUT VOLUME [+/-] Remote control unit STANDBY/ON DISPLAY MENU / SET INPUT SCREEN SIZE - If no connections are made to these terminals, on-screen setup is finished, press the... STANDBY/ON button to ON. Outlined on the following message will light green. Note Please do not leave the same picture displayed on the front panel will be displayed: INPUT1 CAUTION UNSUPPORTED SIGNAL FH: 86.7kHz FV: 88.5Hz - POL.H: - This is how to turn off. ÷ If the input ...
Main unit operating panel 1 Set the rear panel MAIN POWER switch to turn off presently. STANDBY/ ON INPUT VOLUME [+/-] Remote control unit STANDBY/ON DISPLAY MENU / SET INPUT SCREEN SIZE - If no connections are made to these terminals, on-screen setup is finished, press the... STANDBY/ON button to ON. Outlined on the following message will light green. Note Please do not leave the same picture displayed on the front panel will be displayed: INPUT1 CAUTION UNSUPPORTED SIGNAL FH: 86.7kHz FV: 88.5Hz - POL.H: - This is how to turn off. ÷ If the input ...

Operating Instructions
Page 26
... the volume at a desired level. Operation 20 En VOLUME : 10 Muting the sound MUTING Remote control unit Press the DISPLAY button. VOL + VOL +/- Press the MUTING button on the remote control unit. Confirming current status Main unit operating panel STANDBY/ON DISPLAY MENU / SET INPUT SCREEN SIZE - The currently selected input, screen size...
... the volume at a desired level. Operation 20 En VOLUME : 10 Muting the sound MUTING Remote control unit Press the DISPLAY button. VOL + VOL +/- Press the MUTING button on the remote control unit. Confirming current status Main unit operating panel STANDBY/ON DISPLAY MENU / SET INPUT SCREEN SIZE - The currently selected input, screen size...
Operating Instructions
Page 27
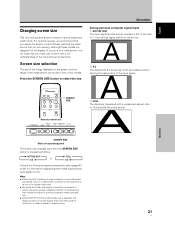
... four modes. Notes ÷ When the [FULL] setting is used to select the size. Although these modes are viewing. SCREEN SIZE Remote control unit STANDBY/ON DISPLAY MENU / SET INPUT SCREEN SIZE - English Changing screen size This unit incorporates screen modes of the manufacturer's intentions.... A Operation SCREEN SIZE Main unit operating panel The screen size changes each time the power is our hope that you make use of them with a widescreen aspect ratio of the...
... four modes. Notes ÷ When the [FULL] setting is used to select the size. Although these modes are viewing. SCREEN SIZE Remote control unit STANDBY/ON DISPLAY MENU / SET INPUT SCREEN SIZE - English Changing screen size This unit incorporates screen modes of the manufacturer's intentions.... A Operation SCREEN SIZE Main unit operating panel The screen size changes each time the power is our hope that you make use of them with a widescreen aspect ratio of the...
Operating Instructions
Page 28
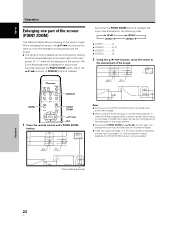
... is displayed for about three seconds whenever the POINT ZOOM button, one part of the screen (POINT ZOOM) This Plasma Display allows enlarging of the 5/∞/2/3 buttons, or DISPLAY button is pressed, the zoom ratio alternates in the center...screen to the desired part of the image. 24 R12 DISPLAY MENU POINT ZOOM 5/∞/2/3 SET 1 Press the remote control unit's POINT ZOOM button. 66.0 24 R12 Notes ¶ During use of the POINT ZOOM function,... canceled. English Operation 10 22.1 84.3 10 22.1 10 50 Operation Enlarging one of the screen image. x2 ÷ LEVEL4 ..........
... is displayed for about three seconds whenever the POINT ZOOM button, one part of the screen (POINT ZOOM) This Plasma Display allows enlarging of the 5/∞/2/3 buttons, or DISPLAY button is pressed, the zoom ratio alternates in the center...screen to the desired part of the image. 24 R12 DISPLAY MENU POINT ZOOM 5/∞/2/3 SET 1 Press the remote control unit's POINT ZOOM button. 66.0 24 R12 Notes ¶ During use of the POINT ZOOM function,... canceled. English Operation 10 22.1 84.3 10 22.1 10 50 Operation Enlarging one of the screen image. x2 ÷ LEVEL4 ..........
Operating Instructions
Page 29
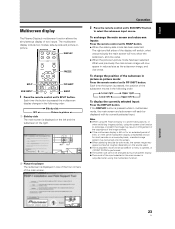
... Lower left 2 3 Upper right Upper left sides of the input selected in -picture mode: Press the remote control unit's PIP SHIFT button. Notes ¶ When using the Plasma Display in a profit-making activity, or when exhibiting images publicly, using the multiscreen function. Operation 2 Press... the remote control unit's SUB INPUT button to compress or stretch the image may result in infringement of...
... Lower left 2 3 Upper right Upper left sides of the input selected in -picture mode: Press the remote control unit's PIP SHIFT button. Notes ¶ When using the Plasma Display in a profit-making activity, or when exhibiting images publicly, using the multiscreen function. Operation 2 Press... the remote control unit's SUB INPUT button to compress or stretch the image may result in infringement of...
Operating Instructions
Page 30
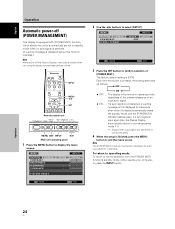
... confirm selection of an input sync signal. ÷ ON ....... INPUT MENU 2/3 SET Remote control unit STANDBY/ON DISPLAY MENU / SET INPUT SCREEN SIZE - VOL + MENU SET INPUT 2/3 Main unit operating panel 1 Press the MENU button to normal operation from the [POWER MGT.] function's standby ... the STANDBY/ON indicator flashes green. MENU PICTURE SCREEN CONTRAST BRIGHTNESS H.ENHANCE V. If a sync signal is input again later, the Plasma Display automatically returns to standby mode when no sync signal is detected. (A warning message is displayed before this function operates.) Note Always...
... confirm selection of an input sync signal. ÷ ON ....... INPUT MENU 2/3 SET Remote control unit STANDBY/ON DISPLAY MENU / SET INPUT SCREEN SIZE - VOL + MENU SET INPUT 2/3 Main unit operating panel 1 Press the MENU button to normal operation from the [POWER MGT.] function's standby ... the STANDBY/ON indicator flashes green. MENU PICTURE SCREEN CONTRAST BRIGHTNESS H.ENHANCE V. If a sync signal is input again later, the Plasma Display automatically returns to standby mode when no sync signal is detected. (A warning message is displayed before this function operates.) Note Always...

Operating Instructions
Page 31
... PICTURE/SCREEN Adjustment PICTURE adjustment 3 Use the 2/3 buttons to display the menu screen. VOL + MENU SET 5/∞ 2/3 Main unit operating panel 1 Press the MENU button to adjust the picture quality as desired. Note Make these adjustments for each input (INPUT1 or INPUT2) and signals....seen clearly. CONTRAST Adjust according to select [PICTURE RESET], then press the SET button. English PICTURE/SCREEN Adjustment MENU 2/3 SET 5/∞ Remote control unit STANDBY/ON DISPLAY MENU / SET INPUT SCREEN SIZE - To reset [PICTURE] mode settings to the default If settings have ...
... PICTURE/SCREEN Adjustment PICTURE adjustment 3 Use the 2/3 buttons to display the menu screen. VOL + MENU SET 5/∞ 2/3 Main unit operating panel 1 Press the MENU button to adjust the picture quality as desired. Note Make these adjustments for each input (INPUT1 or INPUT2) and signals....seen clearly. CONTRAST Adjust according to select [PICTURE RESET], then press the SET button. English PICTURE/SCREEN Adjustment MENU 2/3 SET 5/∞ Remote control unit STANDBY/ON DISPLAY MENU / SET INPUT SCREEN SIZE - To reset [PICTURE] mode settings to the default If settings have ...
Operating Instructions
Page 32
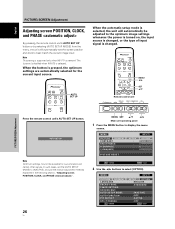
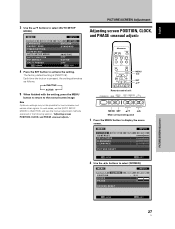
...explained in the following section, "Adjusting screen POSITION, CLOCK, and PHASE ". 26 En MENU SET 5/∞ 2/3 Main unit operating panel 1 Press the MENU button to the optimum image settings whenever the power is turned on, the input source is changed . When ... settings may not be adjusted to display the menu screen. In such cases, set the screen position and clock to select [OPTION]. MENU 2/3 SET 5/∞ Remote control unit STANDBY/ON DISPLAY MENU / SET INPUT SCREEN SIZE - MENU PICTURE SCREEN CONTRAST BRIGHTNESS H.ENHANCE V. E N H A N C E SETUP : : : : INPUT1 ...
...explained in the following section, "Adjusting screen POSITION, CLOCK, and PHASE ". 26 En MENU SET 5/∞ 2/3 Main unit operating panel 1 Press the MENU button to the optimum image settings whenever the power is turned on, the input source is changed . When ... settings may not be adjusted to display the menu screen. In such cases, set the screen position and clock to select [OPTION]. MENU 2/3 SET 5/∞ Remote control unit STANDBY/ON DISPLAY MENU / SET INPUT SCREEN SIZE - MENU PICTURE SCREEN CONTRAST BRIGHTNESS H.ENHANCE V. E N H A N C E SETUP : : : : INPUT1 ...
Operating Instructions
Page 33
... ENERGY SAVE TIMER SETTING S C R E E N M G T. PICTURE/SCREEN Adjustment Adjusting screen POSITION, CLOCK, and PHASE MENU 2/3 SET 5/∞ Remote control unit STANDBY/ON DISPLAY MENU / SET INPUT SCREEN SIZE - VOL + MENU SET 5/∞ 2/3 Main unit operating panel 1 Press the MENU button to [INACTIVE], and use the manual adjustment methods explained in the following section...
... ENERGY SAVE TIMER SETTING S C R E E N M G T. PICTURE/SCREEN Adjustment Adjusting screen POSITION, CLOCK, and PHASE MENU 2/3 SET 5/∞ Remote control unit STANDBY/ON DISPLAY MENU / SET INPUT SCREEN SIZE - VOL + MENU SET 5/∞ 2/3 Main unit operating panel 1 Press the MENU button to [INACTIVE], and use the manual adjustment methods explained in the following section...

Operating Instructions
Page 35
... :ENGLISH : S TA N D A R D :INACTIVE :OFF :ACTIVE :OFF MENU EXIT 4 Use the 5/∞ buttons to display the menu screen. VOL + MENU 5/∞ 2/3 Main unit operating panel 1 Press the MENU button to select [ORBITER]. Each time the button is pressed, the setting alternates as follows: 3 OFF 3 MODE1 MODE3 2 MODE2 2 ÷ OFF The... [ORBITER] is changed . ÷ MODE3 ......... The image size is reduced, and the screen display position is not being used. ÷ MODE1 ......... MENU 2/3 5/∞ Remote control unit STANDBY/ON DISPLAY MENU / SET INPUT SCREEN SIZE -
... :ENGLISH : S TA N D A R D :INACTIVE :OFF :ACTIVE :OFF MENU EXIT 4 Use the 5/∞ buttons to display the menu screen. VOL + MENU 5/∞ 2/3 Main unit operating panel 1 Press the MENU button to select [ORBITER]. Each time the button is pressed, the setting alternates as follows: 3 OFF 3 MODE1 MODE3 2 MODE2 2 ÷ OFF The... [ORBITER] is changed . ÷ MODE3 ......... The image size is reduced, and the screen display position is not being used. ÷ MODE1 ......... MENU 2/3 5/∞ Remote control unit STANDBY/ON DISPLAY MENU / SET INPUT SCREEN SIZE -

Operating Instructions
Page 36
Other Operations English Other Operations Setting the SOFT FOCUS Images are softened by suppressing the edge contrast. MENU 2/3 5/∞ Remote control unit STANDBY/ON DISPLAY MENU / SET INPUT SCREEN SIZE - MENU PICTURE SCREEN LANGUAGE ENERGY SAVE TIMER SETTING S C R E E N M...BRIGHTNESS H.ENHANCE V. The factory default setting is canceled. ÷ 1 to 4 Settings for [SOFT FOCUS]. VOL + MENU 5/∞ 2/3 Main unit operating panel 1 Press the MENU button to the normal screen image. Softened increases in the order 1, 2, 3, 4. 6 When finished with the setting, press the MENU...
Other Operations English Other Operations Setting the SOFT FOCUS Images are softened by suppressing the edge contrast. MENU 2/3 5/∞ Remote control unit STANDBY/ON DISPLAY MENU / SET INPUT SCREEN SIZE - MENU PICTURE SCREEN LANGUAGE ENERGY SAVE TIMER SETTING S C R E E N M...BRIGHTNESS H.ENHANCE V. The factory default setting is canceled. ÷ 1 to 4 Settings for [SOFT FOCUS]. VOL + MENU 5/∞ 2/3 Main unit operating panel 1 Press the MENU button to the normal screen image. Softened increases in the order 1, 2, 3, 4. 6 When finished with the setting, press the MENU...


