Owner's Manual
Page 3
...'s)...15 2.2 Install the Panel Using a Stand ...16 2.2.1 Use or Remove the Included Stand ...16 2.2.2 Connect the Speaker Cables ...22 2.3 Wall/Ceiling Mounting...23 2.4 Mount the Flat Panel TV ...24 2.5 Attach the Color Sensor ...26 2.6 Connect to Broadcast TV & Other Devices (DVR, Receiver, BDR, etc 29 2.6.1 Add Analog (conventional) and Digital TV Channels 29 2.6.2 Connect Your Other Pioneer Equipment...29 2.6.3 Connect the Power Cord to the Panel ...32 2.7 Route then Bundle the Power Cord and Cables ...32 3 Basic Operations For Television Viewing 34 3.1 Turn the Flat Panel TV ON...
...'s)...15 2.2 Install the Panel Using a Stand ...16 2.2.1 Use or Remove the Included Stand ...16 2.2.2 Connect the Speaker Cables ...22 2.3 Wall/Ceiling Mounting...23 2.4 Mount the Flat Panel TV ...24 2.5 Attach the Color Sensor ...26 2.6 Connect to Broadcast TV & Other Devices (DVR, Receiver, BDR, etc 29 2.6.1 Add Analog (conventional) and Digital TV Channels 29 2.6.2 Connect Your Other Pioneer Equipment...29 2.6.3 Connect the Power Cord to the Panel ...32 2.7 Route then Bundle the Power Cord and Cables ...32 3 Basic Operations For Television Viewing 34 3.1 Turn the Flat Panel TV ON...
Owner's Manual
Page 4
... Image...67 4.3.9 Adjust Color Signals...68 4.4 View in Multi-Screen ...69 4.4.1 Split/Swap/Shift the Screen...69 4.5 Freeze the Picture ...70 4.6 Use the Banner Feature...71 4.7 Select Alternatives for/to Sound ...72 4.7.1 Activate Closed Captioning (CC) ...72 4.7.2 Switch Languages Using MTS...74 4.7.3 Select SAP...74 4.7.4 Apply Sound Effect Settings ...75 4.7.5 Use Auto Volume Control (AVC)...75 4.8 Manage the Power ...76 5 Use Other Equipment With Your Flat Panel TV 78 5.1 Program the Remote Control to Operate Other Equipment 78 5.1.1 Use...
... Image...67 4.3.9 Adjust Color Signals...68 4.4 View in Multi-Screen ...69 4.4.1 Split/Swap/Shift the Screen...69 4.5 Freeze the Picture ...70 4.6 Use the Banner Feature...71 4.7 Select Alternatives for/to Sound ...72 4.7.1 Activate Closed Captioning (CC) ...72 4.7.2 Switch Languages Using MTS...74 4.7.3 Select SAP...74 4.7.4 Apply Sound Effect Settings ...75 4.7.5 Use Auto Volume Control (AVC)...75 4.8 Manage the Power ...76 5 Use Other Equipment With Your Flat Panel TV 78 5.1 Program the Remote Control to Operate Other Equipment 78 5.1.1 Use...
Owner's Manual
Page 5
... P - TV Parental Guideline Ratings (age/category-based 136 8.1.3 MPAA Movie Ratings (age-based) ...136 8.1.4 Canadian - V) ...141 8.2.6 VCR (Brands W - TABLE OF CONTENTS 5.4.2 Turn OFF the Power With an HDMI Command 91 5.4.3 Turn ON the Power With an HDMI Command ...91 5.4.4 Test the Power Control (On/Off)...92 5.5 Connect a Game Console or Camcorder ...92 5.6 Use the IR REPEATER OUT...92 5.7 Operate the Home Media Gallery ...93 5.7.1 Network Connections...94 5.7.2 Connect a USB Device...
... P - TV Parental Guideline Ratings (age/category-based 136 8.1.3 MPAA Movie Ratings (age-based) ...136 8.1.4 Canadian - V) ...141 8.2.6 VCR (Brands W - TABLE OF CONTENTS 5.4.2 Turn OFF the Power With an HDMI Command 91 5.4.3 Turn ON the Power With an HDMI Command ...91 5.4.4 Test the Power Control (On/Off)...92 5.5 Connect a Game Console or Camcorder ...92 5.6 Use the IR REPEATER OUT...92 5.7 Operate the Home Media Gallery ...93 5.7.1 Network Connections...94 5.7.2 Connect a USB Device...
Owner's Manual
Page 6
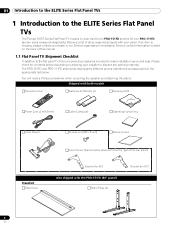
... both models Remote Control Batteries for Remote (2) Cleaning Cloth Power Cord (2 m/6.6 feet) Cable Clamps (4) Operating Instructions Color Sensor Screws (x 2) (M5 x 8 mm) Warranty Card Stand kit Base Cover Color Sensor Bracket (when attached to make installation quick and easy. Please check for 50") 6 En The PRO-151FD and PRO-111FD shipments have slightly different pieces. You will need a Philips screwdriver when mounting the speaker and attaching the stand. Below is a list of the rear panel) Bracket (for 60") Also...
... both models Remote Control Batteries for Remote (2) Cleaning Cloth Power Cord (2 m/6.6 feet) Cable Clamps (4) Operating Instructions Color Sensor Screws (x 2) (M5 x 8 mm) Warranty Card Stand kit Base Cover Color Sensor Bracket (when attached to make installation quick and easy. Please check for 50") 6 En The PRO-151FD and PRO-111FD shipments have slightly different pieces. You will need a Philips screwdriver when mounting the speaker and attaching the stand. Below is a list of the rear panel) Bracket (for 60") Also...
Owner's Manual
Page 14
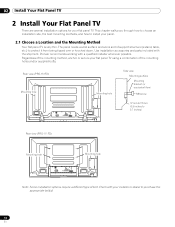
... and some sort of support structure (a stand, table, etc.) to 0.7 inches) Rear view (PRO-111FD) W Mounting hole W T W W Mounting hole W T W Note: Some installation options require a different type of bolt. Pioneer recommends working with the shipment. 02 Install Your Flat Panel TV 2 Install Your Flat Panel TV There are several installation options for your panel. 2.1 Choose a Location and the Mounting Method Your flat panel TV is very thin. Rear view (PRO-151FD) Mounting hole Mounting hole Side view Mounting surface Mounting bracket (or equivalent item) M8 screw 12 mm to 18...
... and some sort of support structure (a stand, table, etc.) to 0.7 inches) Rear view (PRO-111FD) W Mounting hole W T W W Mounting hole W T W Note: Some installation options require a different type of bolt. Pioneer recommends working with the shipment. 02 Install Your Flat Panel TV 2 Install Your Flat Panel TV There are several installation options for your panel. 2.1 Choose a Location and the Mounting Method Your flat panel TV is very thin. Rear view (PRO-151FD) Mounting hole Mounting hole Side view Mounting surface Mounting bracket (or equivalent item) M8 screw 12 mm to 18...
Owner's Manual
Page 25
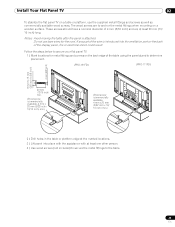
... the display panel, fire or electrical shock could result. The wood screws are at least one other person. 4 ) Use wood screws (not included) to secure the metal fittings to 5/8 inch) 4 mm (5/32 inch) 20 mm (13/16 inch) min. If any part of the wire is attached. These screws should have a nominal diameter of the table using the panel stand to determine placement. (PRO-151FD) (PRO-111FD...
... the display panel, fire or electrical shock could result. The wood screws are at least one other person. 4 ) Use wood screws (not included) to secure the metal fittings to 5/8 inch) 4 mm (5/32 inch) 20 mm (13/16 inch) min. If any part of the wire is attached. These screws should have a nominal diameter of the table using the panel stand to determine placement. (PRO-151FD) (PRO-111FD...
Owner's Manual
Page 29
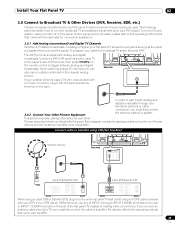
... panel is not listed, please refer to the operating instructions that came with the device(s) for connection assistance. 2.6.1 Add Analog (conventional) and Digital TV Channels Whether a TV station broadcasts in to the antenna/cable TV wall outlet using a cable STB or Satellite STB, plug in Analog or Digital, your panel for the clearest analog picture. Connect cable or Satellite using STB (Set Top Box): T T W W Satellite antenna Rear view SAT IN Cable STB/Satellite STB HDMI OUT AUDIO OUT COMPONENT VIDEO OUTPUT...
... panel is not listed, please refer to the operating instructions that came with the device(s) for connection assistance. 2.6.1 Add Analog (conventional) and Digital TV Channels Whether a TV station broadcasts in to the antenna/cable TV wall outlet using a cable STB or Satellite STB, plug in Analog or Digital, your panel for the clearest analog picture. Connect cable or Satellite using STB (Set Top Box): T T W W Satellite antenna Rear view SAT IN Cable STB/Satellite STB HDMI OUT AUDIO OUT COMPONENT VIDEO OUTPUT...

Owner's Manual
Page 44
... flat panel TV can do. 3.3.1 Change the Channel/Sub-Channel With the remote control pointed at the panel's remote sensor, press the CH + button to sequentially change sequentially from station to multiple signals. A digital channel can carry a different program. The muting symbol ( e ) appears on by minor increments. If the panel's default sound level is the Sub-channel. To return to the previous level, press MUTING again. Simply press the number buttons in Standby...
... flat panel TV can do. 3.3.1 Change the Channel/Sub-Channel With the remote control pointed at the panel's remote sensor, press the CH + button to sequentially change sequentially from station to multiple signals. A digital channel can carry a different program. The muting symbol ( e ) appears on by minor increments. If the panel's default sound level is the Sub-channel. To return to the previous level, press MUTING again. Simply press the number buttons in Standby...
Owner's Manual
Page 62
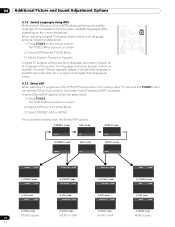
... Pioneer's Pro Adjust High Definition (HD) support, top quality blacks, better balanced whites, and overall color improvements. 4.3.1 Adjust for the content. To allow the panel to Natural during the Auto Size process, gray bars replace the black bars. Some content fails to activate Side Mask Detection. If the flat panel TV's Screen Size is on each side of a picture. These responses reduce after-image concerns. To allow the HD Wide Mode...
... Pioneer's Pro Adjust High Definition (HD) support, top quality blacks, better balanced whites, and overall color improvements. 4.3.1 Adjust for the content. To allow the panel to Natural during the Auto Size process, gray bars replace the black bars. Some content fails to activate Side Mask Detection. If the flat panel TV's Screen Size is on each side of a picture. These responses reduce after-image concerns. To allow the HD Wide Mode...
Owner's Manual
Page 73
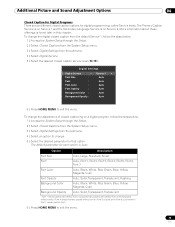
...change . 5 ) Select the desired parameter for each option is Auto. Digital Settings Digital Service : Font Size : Font : Font Color : Font Opacity : Background Color : Background Opacity : Service 1 Auto Auto Auto Auto Auto Auto 6 ) Press HOME MENU to exit the menu. 73 En Option Description Font Size Auto, Large, Standard, Small Font1 Auto, Font 1, Font 2, Font 3, Font 4, Font 5, Font 6, Font 7 Font Color Auto, Black, White, Red, Green, Blue, Yellow, Magenta, Cyan Font Opacity Auto, Solid, Transparent, Translucent, Flashing Background Color Auto, Black, White...
...change . 5 ) Select the desired parameter for each option is Auto. Digital Settings Digital Service : Font Size : Font : Font Color : Font Opacity : Background Color : Background Opacity : Service 1 Auto Auto Auto Auto Auto Auto 6 ) Press HOME MENU to exit the menu. 73 En Option Description Font Size Auto, Large, Standard, Small Font1 Auto, Font 1, Font 2, Font 3, Font 4, Font 5, Font 6, Font 7 Font Color Auto, Black, White, Red, Green, Blue, Yellow, Magenta, Cyan Font Opacity Auto, Solid, Transparent, Translucent, Flashing Background Color Auto, Black, White...
Owner's Manual
Page 74
... mode MAIN 9:30AM In SAP mode MONO 9:30AM In MONO mode MONO signals A digital TV program without sound or language information causes "N/ A" to appear on the remote control. To select Stereo/SAP options, follow the steps below. 1 ) Press TOOLS on the screen. If the selected language is available when the channel or program is changed, that language is available for that provides multi language services...
... mode MAIN 9:30AM In SAP mode MONO 9:30AM In MONO mode MONO signals A digital TV program without sound or language information causes "N/ A" to appear on the remote control. To select Stereo/SAP options, follow the steps below. 1 ) Press TOOLS on the screen. If the selected language is available when the channel or program is changed, that language is available for that provides multi language services...
Owner's Manual
Page 80
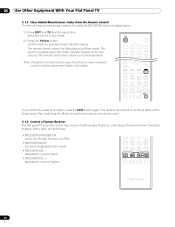
... TV at the same time. TV 1 5 HOPMCE MENU INPUT 2 3 4 6 7 AV SELECTION DISPLAY TV/DTV SCREEN SIZE RETURN SAT / DVD MENU HDMI CTRL SOURCE STOP REC HMG RECEIVER VOL INPUT SELECT TV CBL EDIT/LEARN DVD RCV SAT VCR DVR To exit before the reset is taken within 60 seconds. Note: The panel's remote control may not control or have complete control of buttons specifically for one second. Also, switching the Mode during this procedure cancels the reset. 5.1.5 Control a Pioneer Receiver The flat panel TV's remote control...
... TV at the same time. TV 1 5 HOPMCE MENU INPUT 2 3 4 6 7 AV SELECTION DISPLAY TV/DTV SCREEN SIZE RETURN SAT / DVD MENU HDMI CTRL SOURCE STOP REC HMG RECEIVER VOL INPUT SELECT TV CBL EDIT/LEARN DVD RCV SAT VCR DVR To exit before the reset is taken within 60 seconds. Note: The panel's remote control may not control or have complete control of buttons specifically for one second. Also, switching the Mode during this procedure cancels the reset. 5.1.5 Control a Pioneer Receiver The flat panel TV's remote control...

Owner's Manual
Page 120
...network devices. (502) Failed to authenticate. 05 Use Other Equipment With Your Flat Panel TV Dialog Screen Message No. 001 100 101 102 103 300 301 500 501 502 503 504 505 506 507 508 Message Problem Content cannot be played. (001) No details are available for the error, please check content A communication error...obtain DRM Check for the error This format is not supported. Failed to obtain DRM The copyright notice of router, hub, authorization other network devices. (505) Failed to authenticate. The Failed to reply. (103) Content cannot be played. (300) No further ...
...network devices. (502) Failed to authenticate. 05 Use Other Equipment With Your Flat Panel TV Dialog Screen Message No. 001 100 101 102 103 300 301 500 501 502 503 504 505 506 507 508 Message Problem Content cannot be played. (001) No details are available for the error, please check content A communication error...obtain DRM Check for the error This format is not supported. Failed to obtain DRM The copyright notice of router, hub, authorization other network devices. (505) Failed to authenticate. The Failed to reply. (103) Content cannot be played. (300) No further ...
Owner's Manual
Page 124
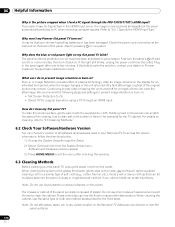
... or aerosol cleaners on the flat panel TV. Note: Do not affix labels, tapes, etc. Check the power cord connection at the wall and on my flat panel TV blink? Why does the blue or red power light on the back of plasma technology. Plug in your remote has failing batteries or has been damaged. How do I do to any visible location on the screen. Use a clean soft cloth (cotton or...
... or aerosol cleaners on the flat panel TV. Note: Do not affix labels, tapes, etc. Check the power cord connection at the wall and on my flat panel TV blink? Why does the blue or red power light on the back of plasma technology. Plug in your remote has failing batteries or has been damaged. How do I do to any visible location on the screen. Use a clean soft cloth (cotton or...
Owner's Manual
Page 125
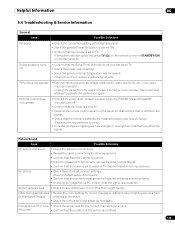
... flat panel TV. • Check the power control setting. • See if the panel's internal temperature has increased. Screen appears dark • Check for the current channel/input source. No picture • Check the picture adjustment settings. Helpful Information 06 6.4 Troubleshooting & Service Information General Issue Possible Solutions No power • Check the connection seating at the wall and panel. • See if the panel's Power On button is turned ON. • Confirm that the remote is set...
... flat panel TV. • Check the power control setting. • See if the panel's internal temperature has increased. Screen appears dark • Check for the current channel/input source. No picture • Check the picture adjustment settings. Helpful Information 06 6.4 Troubleshooting & Service Information General Issue Possible Solutions No power • Check the connection seating at the wall and panel. • See if the panel's Power On button is turned ON. • Confirm that the remote is set...
Owner's Manual
Page 126
... volume is turned down. • When using a video or PC input source, check that settings for the equipment are correct. Sound but no picture • Check if Picture Off is wrong (one side • Check if the speaker cable connections have been reversed between the panel and the HDMI equipment. • Confirm that the audio terminals are connected. Sound is selected from the center • If images in Full screen...
... volume is turned down. • When using a video or PC input source, check that settings for the equipment are correct. Sound but no picture • Check if Picture Off is wrong (one side • Check if the speaker cable connections have been reversed between the panel and the HDMI equipment. • Confirm that the audio terminals are connected. Sound is selected from the center • If images in Full screen...
Owner's Manual
Page 128
... Flash Memory card into the multi-card reader. • Confirm that the file complies to the supported format, bit rate, and/or profile. When using a home network, connect directly to the device's USB port. 128 En Reboot the PC after confirming its specifications and setup. • Check if the file complies to the supported format, bit rate and/or profile. If this is supported. Your flat panel TV...
... Flash Memory card into the multi-card reader. • Confirm that the file complies to the supported format, bit rate, and/or profile. When using a home network, connect directly to the device's USB port. 128 En Reboot the PC after confirming its specifications and setup. • Check if the file complies to the supported format, bit rate and/or profile. If this is supported. Your flat panel TV...
Owner's Manual
Page 133
... image. use one of action or rapid screen changes. This after playing other video sequences but do not disappear completely. Burned images may cause after-image lagging. When a program menu, or frozen image is permanent because the fluorescent materials burned. This effect is less of the technology. If, however, the faulty pixels can only be seen close up to 10 minutes, the flat panel TV automatically turns the image...
... image. use one of action or rapid screen changes. This after playing other video sequences but do not disappear completely. Burned images may cause after-image lagging. When a program menu, or frozen image is permanent because the fluorescent materials burned. This effect is less of the technology. If, however, the faulty pixels can only be seen close up to 10 minutes, the flat panel TV automatically turns the image...

Owner's Manual
Page 148
... changed. All advertising materials mentioning features or use in source and binary forms, with the distribution. 3. LOSS OF USE, DATA, OR PROFITS; IN NO EVENT SHALL THE COPYRIGHT OWNER OR CONTRIBUTORS BE LIABLE FOR ANY DIRECT, INDIRECT, INCIDENTAL, SPECIAL, EXEMPLARY, OR CONSEQUENTIAL DAMAGES (INCLUDING, BUT NOT LIMITED TO, PROCUREMENT OF SUBSTITUTE GOODS OR SERVICES; This software is based...
... changed. All advertising materials mentioning features or use in source and binary forms, with the distribution. 3. LOSS OF USE, DATA, OR PROFITS; IN NO EVENT SHALL THE COPYRIGHT OWNER OR CONTRIBUTORS BE LIABLE FOR ANY DIRECT, INDIRECT, INCIDENTAL, SPECIAL, EXEMPLARY, OR CONSEQUENTIAL DAMAGES (INCLUDING, BUT NOT LIMITED TO, PROCUREMENT OF SUBSTITUTE GOODS OR SERVICES; This software is based...
Owner's Manual
Page 162
... is a digital data transmission standard for converting analog audio signals to be used in 1/60 of a second for displaying text and still images. 08 Appendix 8.4 Glossary HDMI The High-Definition Multimedia Interface (HDMI) is a server that determines the name of network-computer within the local subnet. The 5.1-channel surround format is an encoding technology for "progressive"). (Home Media Gallery) Default Gateway Default gateway is based on...
... is a digital data transmission standard for converting analog audio signals to be used in 1/60 of a second for displaying text and still images. 08 Appendix 8.4 Glossary HDMI The High-Definition Multimedia Interface (HDMI) is a server that determines the name of network-computer within the local subnet. The 5.1-channel surround format is an encoding technology for "progressive"). (Home Media Gallery) Default Gateway Default gateway is based on...


