
User manual (English)
Page 2
Philips Digital Photo Frame Copyright ©2009 Koninklijke Philips N.V. No part of this publication may cause short-circuit to the electronic components and lead to malfunctions. ■ Do not use this product near water, ... electromagnetic sources, such as in the rain or allow any particular purpose. Water and moisture may be observed. ■ Do not place this product. Disclaimer Philips makes no representations or warranties, either expressed or implied, with respect to the contents hereof and specifically disclaims any warranties, merchantability or fitness for future...
Philips Digital Photo Frame Copyright ©2009 Koninklijke Philips N.V. No part of this publication may cause short-circuit to the electronic components and lead to malfunctions. ■ Do not use this product near water, ... electromagnetic sources, such as in the rain or allow any particular purpose. Water and moisture may be observed. ■ Do not place this product. Disclaimer Philips makes no representations or warranties, either expressed or implied, with respect to the contents hereof and specifically disclaims any warranties, merchantability or fitness for future...

User manual (English)
Page 3
... glass cleaners. ■ If a foreign substance or water gets in short-circuit or fire. ■ If there are no user serviceable parts inside this product. Philips Digital Photo Frame ■ Do not drop or apply shock/vibration to this product, and any signs of malfunction, disconnect the PhotoFrame from this product. ii Safety instructions...
... glass cleaners. ■ If a foreign substance or water gets in short-circuit or fire. ■ If there are no user serviceable parts inside this product. Philips Digital Photo Frame ■ Do not drop or apply shock/vibration to this product, and any signs of malfunction, disconnect the PhotoFrame from this product. ii Safety instructions...
User manual (English)
Page 4
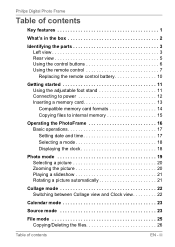
iii Philips Digital Photo Frame Table of contents Key features 1 What's in the box 2 Identifying the parts 3 Left view 3 Rear view 5 Using the control buttons 6 Using the remote control 7 Replacing ... Copying files to internal memory 15 Operating the PhotoFrame 16 Basic operations 17 Setting date and time 17 Selecting a mode 18 Displaying the clock 18 Photo mode 19 Selecting a picture 20 Zooming the picture 20 Playing a slideshow 21 Rotating a picture automatically 21 Collage mode 22 Switching between Collage view and Clock...
iii Philips Digital Photo Frame Table of contents Key features 1 What's in the box 2 Identifying the parts 3 Left view 3 Rear view 5 Using the control buttons 6 Using the remote control 7 Replacing ... Copying files to internal memory 15 Operating the PhotoFrame 16 Basic operations 17 Setting date and time 17 Selecting a mode 18 Displaying the clock 18 Photo mode 19 Selecting a picture 20 Zooming the picture 20 Playing a slideshow 21 Rotating a picture automatically 21 Collage mode 22 Switching between Collage view and Clock...
User manual (English)
Page 5
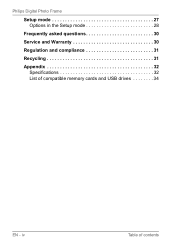
iv Table of compatible memory cards and USB drives 34 EN - Philips Digital Photo Frame Setup mode 27 Options in the Setup mode 28 Frequently asked questions 30 Service and Warranty 30 Regulation and compliance 31 Recycling 31 Appendix 32 Specifications 32 List of contents
iv Table of compatible memory cards and USB drives 34 EN - Philips Digital Photo Frame Setup mode 27 Options in the Setup mode 28 Frequently asked questions 30 Service and Warranty 30 Regulation and compliance 31 Recycling 31 Appendix 32 Specifications 32 List of contents

User manual (English)
Page 6
... This PhotoFrame is mainly equipped with the following features: ■ Clear and bright photos ■ Enables you to play back photos in stunning clarity and share great memories with friends and family. Philips Digital Photo Frame Dear Customer: Thank you to play back photos that are stored in a memory card or in a USB flash drive. ■ Allows...
... This PhotoFrame is mainly equipped with the following features: ■ Clear and bright photos ■ Enables you to play back photos in stunning clarity and share great memories with friends and family. Philips Digital Photo Frame Dear Customer: Thank you to play back photos that are stored in a memory card or in a USB flash drive. ■ Allows...

User manual (English)
Page 7
Quick Start Guide x 1 5. User Manual x 1 6. Registration Card x 1 • Actual product appearance may vary depending on the area where you have the following items. 1. AC power adapter x 1 3. Magnetic remote control (with CR2025 lithium battery) x 1 4. Digital PhotoFrame x 1 2. EN - 2 What's in this User Manual. • Available accessories may vary from the illustrations shown in the box Philips Digital Photo Frame What's in the box Carefully open the packing box and ensure that you purchased the PhotoFrame.
Quick Start Guide x 1 5. User Manual x 1 6. Registration Card x 1 • Actual product appearance may vary depending on the area where you have the following items. 1. AC power adapter x 1 3. Magnetic remote control (with CR2025 lithium battery) x 1 4. Digital PhotoFrame x 1 2. EN - 2 What's in this User Manual. • Available accessories may vary from the illustrations shown in the box Philips Digital Photo Frame What's in the box Carefully open the packing box and ensure that you purchased the PhotoFrame.

User manual (English)
Page 8
Identifying the parts EN - 3 See "Inserting a memory card" on page 13 for a CompactFlash (CF) card. You can play back photos stored in the inserted card, or copy photos from or to the inserted card. Description 1 CF memory card slot Allows for details. Philips Digital Photo Frame Identifying the parts Left view 1 2 3 4 56 No.
Identifying the parts EN - 3 See "Inserting a memory card" on page 13 for a CompactFlash (CF) card. You can play back photos stored in the inserted card, or copy photos from or to the inserted card. Description 1 CF memory card slot Allows for details. Philips Digital Photo Frame Identifying the parts Left view 1 2 3 4 56 No.

User manual (English)
Page 9
Philips Digital Photo Frame No. See "Inserting a memory card" on page 13 for a USB flash drive. EN - 4 Identifying the parts See "Inserting a memory card" on or turn off the PhotoFrame. You can play back photos stored in the inserted drive. 4 Mini USB port Allows you to connect the PhotoFrame to a computer so the... files can play back photos stored in -1 memory card slot Allows for an SD™ / SDHC™, MultiMediaCard™ (MMC), Memory Stick™ (MS), Memory Stick PRO™ ...
Philips Digital Photo Frame No. See "Inserting a memory card" on page 13 for a USB flash drive. EN - 4 Identifying the parts See "Inserting a memory card" on or turn off the PhotoFrame. You can play back photos stored in the inserted drive. 4 Mini USB port Allows you to connect the PhotoFrame to a computer so the... files can play back photos stored in -1 memory card slot Allows for an SD™ / SDHC™, MultiMediaCard™ (MMC), Memory Stick™ (MS), Memory Stick PRO™ ...

User manual (English)
Page 10
Identifying the parts EN - 5 Description 1 Control buttons Use the control buttons to help prevent possible theft. Philips Digital Photo Frame Rear view 1 2 3 4 5 No. See "Using the control buttons" on page 6 for details. 2 Hanging slot (for landscape wall mounting) Allows you to hang the PhotoFrame horizontally ...
Identifying the parts EN - 5 Description 1 Control buttons Use the control buttons to help prevent possible theft. Philips Digital Photo Frame Rear view 1 2 3 4 5 No. See "Using the control buttons" on page 6 for details. 2 Hanging slot (for landscape wall mounting) Allows you to hang the PhotoFrame horizontally ...

User manual (English)
Page 11
EN - 6 Identifying the parts Button Description 1 Clock button ■ Press this button to switch between Slideshow view and Clock view. ■ Press this button to switch between Collage view and Clock view, when a Collage effect has been selected. 2 Return button Returns to the previous page. 3 Up button Moves up. 4 Down button Moves down. 5 Left/Previous button Moves left/selects the previous item. 6 Right/Next button Moves right/selects the next item. 7 OK button Confirms the selection. Philips Digital Photo Frame Using the control buttons 123 4 56 7 No.
EN - 6 Identifying the parts Button Description 1 Clock button ■ Press this button to switch between Slideshow view and Clock view. ■ Press this button to switch between Collage view and Clock view, when a Collage effect has been selected. 2 Return button Returns to the previous page. 3 Up button Moves up. 4 Down button Moves down. 5 Left/Previous button Moves left/selects the previous item. 6 Right/Next button Moves right/selects the next item. 7 OK button Confirms the selection. Philips Digital Photo Frame Using the control buttons 123 4 56 7 No.
User manual (English)
Page 12
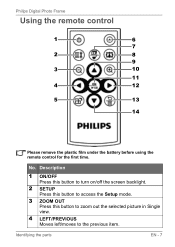
No. Description 1 ON/OFF Press this button to turn on/off the screen backlight. 2 SETUP Press this button to access the Setup mode. 3 ZOOM OUT Press this button to zoom out the selected picture in Single view. 4 LEFT/PREVIOUS Moves left/moves to the previous item. Identifying the parts EN - 7 Philips Digital Photo Frame Using the remote control 1 6 7 2 8 9 3 10 11 4 12 5 13 14 Please remove the plastic film under the battery before using the remote control for the first time.
No. Description 1 ON/OFF Press this button to turn on/off the screen backlight. 2 SETUP Press this button to access the Setup mode. 3 ZOOM OUT Press this button to zoom out the selected picture in Single view. 4 LEFT/PREVIOUS Moves left/moves to the previous item. Identifying the parts EN - 7 Philips Digital Photo Frame Using the remote control 1 6 7 2 8 9 3 10 11 4 12 5 13 14 Please remove the plastic film under the battery before using the remote control for the first time.

User manual (English)
Page 13
... ■ During slideshow, press this button to enter Collage view (slideshow with the Collage effect). ■ When in the internal memory. EN - 8 Identifying the parts Philips Digital Photo Frame No. For details, refer to "Source mode" on page 23 and "File mode" on page 22 for details. 9 UP Moves up. 10 ZOOM IN Press...
... ■ During slideshow, press this button to enter Collage view (slideshow with the Collage effect). ■ When in the internal memory. EN - 8 Identifying the parts Philips Digital Photo Frame No. For details, refer to "Source mode" on page 23 and "File mode" on page 22 for details. 9 UP Moves up. 10 ZOOM IN Press...

User manual (English)
Page 14
Identifying the parts EN - 9 With its magnetic backing, you can attach it to the last page. 14 DOWN Moves down. The supplied remote control is magnetic. Philips Digital Photo Frame No. Description 13 RETURN Press this button to cancel current action and/or to go back to the top left area on the back of the PhotoFrame as illustrated below.
Identifying the parts EN - 9 With its magnetic backing, you can attach it to the last page. 14 DOWN Moves down. The supplied remote control is magnetic. Philips Digital Photo Frame No. Description 13 RETURN Press this button to cancel current action and/or to go back to the top left area on the back of the PhotoFrame as illustrated below.

User manual (English)
Page 15
... according to the right. 2. Positive faces upwards 4. EN - 10 Identifying the parts This may result in the illustration below. Insert the new battery into fire. Philips Digital Photo Frame Replacing the remote control battery 1.
... according to the right. 2. Positive faces upwards 4. EN - 10 Identifying the parts This may result in the illustration below. Insert the new battery into fire. Philips Digital Photo Frame Replacing the remote control battery 1.

User manual (English)
Page 16
Philips Digital Photo Frame Getting started EN - 11 Getting started Using the adjustable foot stand Pop out the back stand as shown and adjust the length of the back stand so the PhotoFrame can stand up right. • It is recommended to place the PhotoFrame horizontally, because this direction provides the best viewing and operating experience.
Philips Digital Photo Frame Getting started EN - 11 Getting started Using the adjustable foot stand Pop out the back stand as shown and adjust the length of the back stand so the PhotoFrame can stand up right. • It is recommended to place the PhotoFrame horizontally, because this direction provides the best viewing and operating experience.
User manual (English)
Page 17
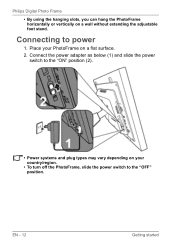
Place your country/region. • To turn off the PhotoFrame, slide the power switch to the "OFF" position. EN - 12 Getting started Philips Digital Photo Frame • By using the hanging slots, you can hang the PhotoFrame horizontally or vertically on a flat surface. 2. Connecting to the "ON" position (2). • Power systems and plug types may vary depending on your PhotoFrame on a wall without extending the adjustable foot stand. Connect the power adapter as below (1) and slide the power switch to power 1.
Place your country/region. • To turn off the PhotoFrame, slide the power switch to the "OFF" position. EN - 12 Getting started Philips Digital Photo Frame • By using the hanging slots, you can hang the PhotoFrame horizontally or vertically on a flat surface. 2. Connecting to the "ON" position (2). • Power systems and plug types may vary depending on your PhotoFrame on a wall without extending the adjustable foot stand. Connect the power adapter as below (1) and slide the power switch to power 1.
User manual (English)
Page 18
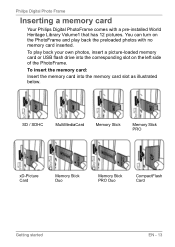
... PhotoFrame. To insert the memory card: Insert the memory card into the corresponding slot on the PhotoFrame and play back your own photos, insert a picture-loaded memory card or USB flash drive into the memory card slot as illustrated below. SD / SDHC MultiMediaCard ... Memory Stick Duo Memory Stick PRO Duo CompactFlash Card Getting started EN - 13 To play back the preloaded photos with a pre-installed World Heritage Library Volume1 that has 12 pictures. Philips Digital Photo Frame Inserting a memory card Your Philips Digital PhotoFrame comes with no memory card inserted.
... PhotoFrame. To insert the memory card: Insert the memory card into the corresponding slot on the PhotoFrame and play back your own photos, insert a picture-loaded memory card or USB flash drive into the memory card slot as illustrated below. SD / SDHC MultiMediaCard ... Memory Stick Duo Memory Stick PRO Duo CompactFlash Card Getting started EN - 13 To play back the preloaded photos with a pre-installed World Heritage Library Volume1 that has 12 pictures. Philips Digital Photo Frame Inserting a memory card Your Philips Digital PhotoFrame comes with no memory card inserted.

User manual (English)
Page 19
Philips Digital Photo Frame Compatible memory card formats Memory card formats Maximum capacity Secure Digital (SD™ / SDHC™) microSD/microSDHC (A card adapter is required.) miniSD/miniSDHC (A card adapter is required.) MultiMediaCard™ (MMC) Memory Stick™ (MS) MS PRO ...
Philips Digital Photo Frame Compatible memory card formats Memory card formats Maximum capacity Secure Digital (SD™ / SDHC™) microSD/microSDHC (A card adapter is required.) miniSD/miniSDHC (A card adapter is required.) MultiMediaCard™ (MMC) Memory Stick™ (MS) MS PRO ...

User manual (English)
Page 20
...turned on and a memory card (or USB flash drive) has been inserted, the following screen appears automatically. ■ To copy all the photos contained in the inserted memory card (or USB flash drive), select Yes and press to proceed. ■ To view your memory card or...To copy all the photos contained in the inserted memory card (or USB flash drive), select Yes and press to the PhotoFrame, highlight NO and press . The photos will start to play automatically off your photos without copying them to proceed. Getting started EN - 15 Philips Digital Photo Frame Copying files to internal ...
...turned on and a memory card (or USB flash drive) has been inserted, the following screen appears automatically. ■ To copy all the photos contained in the inserted memory card (or USB flash drive), select Yes and press to proceed. ■ To view your memory card or...To copy all the photos contained in the inserted memory card (or USB flash drive), select Yes and press to the PhotoFrame, highlight NO and press . The photos will start to play automatically off your photos without copying them to proceed. Getting started EN - 15 Philips Digital Photo Frame Copying files to internal ...

User manual (English)
Page 21
... the On- When using the control buttons, press the button corresponding to the icon shown on the remote control to bring up the OSD toolbar. Philips Digital Photo Frame Operating the PhotoFrame After turning on the PhotoFrame, you want to operate by its function or in its order.
... the On- When using the control buttons, press the button corresponding to the icon shown on the remote control to bring up the OSD toolbar. Philips Digital Photo Frame Operating the PhotoFrame After turning on the PhotoFrame, you want to operate by its function or in its order.


