
Leaflet
Page 2
...; Panel Size: 10.4 inch • Panel type: Digital Storage Media • USB: USB flash drive Convenience • Connected media status: Remaining memory • System status: Remaining memory • Screen background: White • Slideshow setting: Random • Photo effects: Radiant color • Playback mode: Full screen browse • Photo edit: Copy • Placement: Landscape • Photo format supported: JPEG photo • Built-in Internal Memory: 128MB Accessories • Included accessories: Remote Control Dimensions • Set dimensions with stand (W x H x D): 324...
...; Panel Size: 10.4 inch • Panel type: Digital Storage Media • USB: USB flash drive Convenience • Connected media status: Remaining memory • System status: Remaining memory • Screen background: White • Slideshow setting: Random • Photo effects: Radiant color • Playback mode: Full screen browse • Photo edit: Copy • Placement: Landscape • Photo format supported: JPEG photo • Built-in Internal Memory: 128MB Accessories • Included accessories: Remote Control Dimensions • Set dimensions with stand (W x H x D): 324...
User manual (English)
Page 2
No part of this User Manual for any person of such revision or changes. Safety instructions Before operating the PhotoFrame, carefully read and follow the instructions below. ■ Retain this publication may be reproduced, transmitted, transcribed... use this publication and to make changes from time to time in the operating instructions should be observed. ■ Do not place this product under sunlight or near heat sources, such as a microwave oven. i Philips Digital Photo Frame Copyright ©2009 Koninklijke Philips N.V. Disclaimer EN - Disclaimer Philips makes ...
No part of this User Manual for any person of such revision or changes. Safety instructions Before operating the PhotoFrame, carefully read and follow the instructions below. ■ Retain this publication may be reproduced, transmitted, transcribed... use this publication and to make changes from time to time in the operating instructions should be observed. ■ Do not place this product under sunlight or near heat sources, such as a microwave oven. i Philips Digital Photo Frame Copyright ©2009 Koninklijke Philips N.V. Disclaimer EN - Disclaimer Philips makes ...

User manual (English)
Page 3
.... ■ Do not use an unknown power adapter other than the one supplied with high-precision technology and has effective pixels of 99.99% or more, black dots or bright points of the screen. The metal contacts inside this product, and any signs of the LCD panel and is not a malfunction. ii Safety instructions Philips Digital Photo Frame ■ Do not drop...
.... ■ Do not use an unknown power adapter other than the one supplied with high-precision technology and has effective pixels of 99.99% or more, black dots or bright points of the screen. The metal contacts inside this product, and any signs of the LCD panel and is not a malfunction. ii Safety instructions Philips Digital Photo Frame ■ Do not drop...
User manual (English)
Page 4
... Digital Photo Frame Table of contents Key features 1 What's in the box 2 Identifying the parts 3 Left view 3 Rear view 5 Using the control buttons 6 Using the remote control 7 Replacing the remote control battery 10 Getting started 11 Using the adjustable foot stand 11 Connecting to power 12 Inserting a memory card 13 Compatible memory card formats 14 Copying files to internal memory 15 Operating the PhotoFrame 16 Basic operations 17 Setting date and time 17 Selecting a mode 18 Displaying the clock 18 Photo mode 19 Selecting a picture 20 Zooming the picture 20 Playing...
... Digital Photo Frame Table of contents Key features 1 What's in the box 2 Identifying the parts 3 Left view 3 Rear view 5 Using the control buttons 6 Using the remote control 7 Replacing the remote control battery 10 Getting started 11 Using the adjustable foot stand 11 Connecting to power 12 Inserting a memory card 13 Compatible memory card formats 14 Copying files to internal memory 15 Operating the PhotoFrame 16 Basic operations 17 Setting date and time 17 Selecting a mode 18 Displaying the clock 18 Photo mode 19 Selecting a picture 20 Zooming the picture 20 Playing...

User manual (English)
Page 6
... family. Philips Digital Photo Frame Dear Customer: Thank you for your growing digital picture library in a USB flash drive. ■ Allows you to set auto on/off timer. ■ Multi-language On-Screen Display (OSD) menus Key features EN - 1 To get the most out of Collage effects. ■ Allows you to select a power-saving mode for bringing our Philips Digital PhotoFrame into your new Philips product, please read through this entire User Manual before use.
... family. Philips Digital Photo Frame Dear Customer: Thank you for your growing digital picture library in a USB flash drive. ■ Allows you to set auto on/off timer. ■ Multi-language On-Screen Display (OSD) menus Key features EN - 1 To get the most out of Collage effects. ■ Allows you to select a power-saving mode for bringing our Philips Digital PhotoFrame into your new Philips product, please read through this entire User Manual before use.

User manual (English)
Page 7
Quick Start Guide x 1 5. Registration Card x 1 • Actual product appearance may vary depending on the area where you have the following items. 1. EN - 2 What's in this User Manual. • Available accessories may vary from the illustrations shown in the box Digital PhotoFrame x 1 2. Philips Digital Photo Frame What's in the box Carefully open the packing box and ensure that you purchased the PhotoFrame. User Manual x 1 6. AC power adapter x 1 3. Magnetic remote control (with CR2025 lithium battery) x 1 4.
Quick Start Guide x 1 5. Registration Card x 1 • Actual product appearance may vary depending on the area where you have the following items. 1. EN - 2 What's in this User Manual. • Available accessories may vary from the illustrations shown in the box Digital PhotoFrame x 1 2. Philips Digital Photo Frame What's in the box Carefully open the packing box and ensure that you purchased the PhotoFrame. User Manual x 1 6. AC power adapter x 1 3. Magnetic remote control (with CR2025 lithium battery) x 1 4.

User manual (English)
Page 9
... inserted card, or copy photos from your computer to the PhotoFrame. 5 Power switch Slide the power switch to the inserted card. EN - 4 Identifying the parts You can be transferred from or to turn on or turn off the PhotoFrame. Philips Digital Photo Frame No. Description 2 5-in the inserted drive. 4 Mini USB port Allows you to connect the PhotoFrame to a computer so the files can play back photos stored in -1 memory card slot Allows for details. 6 Power jack Connect...
... inserted card, or copy photos from your computer to the PhotoFrame. 5 Power switch Slide the power switch to the inserted card. EN - 4 Identifying the parts You can be transferred from or to turn on or turn off the PhotoFrame. Philips Digital Photo Frame No. Description 2 5-in the inserted drive. 4 Mini USB port Allows you to connect the PhotoFrame to a computer so the files can play back photos stored in -1 memory card slot Allows for details. 6 Power jack Connect...
User manual (English)
Page 12
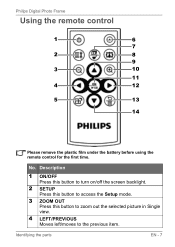
Identifying the parts EN - 7 Philips Digital Photo Frame Using the remote control 1 6 7 2 8 9 3 10 11 4 12 5 13 14 Please remove the plastic film under the battery before using the remote control for the first time. No. Description 1 ON/OFF Press this button to turn on/off the screen backlight. 2 SETUP Press this button to access the Setup mode. 3 ZOOM OUT Press this button to zoom out the selected picture in Single view. 4 LEFT/PREVIOUS Moves left/moves to the previous item.
Identifying the parts EN - 7 Philips Digital Photo Frame Using the remote control 1 6 7 2 8 9 3 10 11 4 12 5 13 14 Please remove the plastic film under the battery before using the remote control for the first time. No. Description 1 ON/OFF Press this button to turn on/off the screen backlight. 2 SETUP Press this button to access the Setup mode. 3 ZOOM OUT Press this button to zoom out the selected picture in Single view. 4 LEFT/PREVIOUS Moves left/moves to the previous item.

User manual (English)
Page 15
... an explosion. • If the battery is completely drained or the remote control is not in the illustration below. Philips Digital Photo Frame Replacing the remote control battery 1. Press the locking tab to the right. 2. EN - 10 Identifying the parts The battery must be placed with the positive pole facing upwards, as shown in use for a long time, remove the battery to local guidelines and regulations. •...
... an explosion. • If the battery is completely drained or the remote control is not in the illustration below. Philips Digital Photo Frame Replacing the remote control battery 1. Press the locking tab to the right. 2. EN - 10 Identifying the parts The battery must be placed with the positive pole facing upwards, as shown in use for a long time, remove the battery to local guidelines and regulations. •...
User manual (English)
Page 18
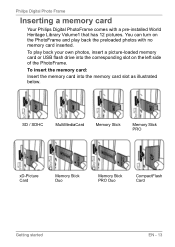
Philips Digital Photo Frame Inserting a memory card Your Philips Digital PhotoFrame comes with no memory card inserted. You can turn on the left side of the PhotoFrame. To insert the memory card: Insert the memory card into the corresponding slot on the PhotoFrame and play back your own photos, insert a picture-loaded memory card or USB flash drive into the memory card slot as illustrated below. To play back the preloaded photos with a pre-installed World Heritage Library Volume1 that has 12 pictures. SD...
Philips Digital Photo Frame Inserting a memory card Your Philips Digital PhotoFrame comes with no memory card inserted. You can turn on the left side of the PhotoFrame. To insert the memory card: Insert the memory card into the corresponding slot on the PhotoFrame and play back your own photos, insert a picture-loaded memory card or USB flash drive into the memory card slot as illustrated below. To play back the preloaded photos with a pre-installed World Heritage Library Volume1 that has 12 pictures. SD...

User manual (English)
Page 19
... subject to change or remove the memory card when the power of the PhotoFrame is not supported. EN - 14 Getting started In other words, you can change without prior notice. • Both 5-in Windows only. Formatting memory cards with NTFS or MAC is either turned on or turned off. • The PhotoFrame supports both Windows and MAC operating systems. However, when formatting your memory cards, use FAT16 and FAT32 file systems in -1 and CF memory card slots support hot...
... subject to change or remove the memory card when the power of the PhotoFrame is not supported. EN - 14 Getting started In other words, you can change without prior notice. • Both 5-in Windows only. Formatting memory cards with NTFS or MAC is either turned on or turned off. • The PhotoFrame supports both Windows and MAC operating systems. However, when formatting your memory cards, use FAT16 and FAT32 file systems in -1 and CF memory card slots support hot...

User manual (English)
Page 21
Philips Digital Photo Frame Operating the PhotoFrame After turning on the PhotoFrame, you can press any button to bring up the toolbar. • In this User Manual, instructions or examples provided are based upon operation with the function you want to operate by its function or in its order. Screen Display (OSD) toolbar. Proceed with the remote control. You can use the supplied remote control or use the control buttons, refer to the icon shown on...
Philips Digital Photo Frame Operating the PhotoFrame After turning on the PhotoFrame, you can press any button to bring up the toolbar. • In this User Manual, instructions or examples provided are based upon operation with the function you want to operate by its function or in its order. Screen Display (OSD) toolbar. Proceed with the remote control. You can use the supplied remote control or use the control buttons, refer to the icon shown on...

User manual (English)
Page 23
A Analog view - B Digital view - EN - 18 Operating the PhotoFrame When in Clock view, press / to set the Time. B Please go to "Time Setup" under the "Setup" mode to select a desired type. Analog view - Press twice to toggle among the following modes: Photo, Collage, Calendar, File, Source and Setup. A Digital view - Displaying the clock The Clock view provides four skin types of clock display. Philips Digital Photo Frame Selecting a mode In the main menu, press / to display the Clock view.
A Analog view - B Digital view - EN - 18 Operating the PhotoFrame When in Clock view, press / to set the Time. B Please go to "Time Setup" under the "Setup" mode to select a desired type. Analog view - Press twice to toggle among the following modes: Photo, Collage, Calendar, File, Source and Setup. A Digital view - Displaying the clock The Clock view provides four skin types of clock display. Philips Digital Photo Frame Selecting a mode In the main menu, press / to display the Clock view.

User manual (English)
Page 24
Collage view/ Clock view OSD toolbar Move up, down, Return left and right Confirm selection Current mode Currently selected picture Picture thumbnail list Photo mode EN - 19 The PhotoFrame supports the JPEG (*.jpg) and BMP (*.bmp) file formats. Philips Digital Photo Frame Photo mode The Photo mode allows you to view photos that are stored in the PhotoFrame (including Internal Memory, Favorite and Preinstalled Library), in a memory card or in the inserted USB flash drive.
Collage view/ Clock view OSD toolbar Move up, down, Return left and right Confirm selection Current mode Currently selected picture Picture thumbnail list Photo mode EN - 19 The PhotoFrame supports the JPEG (*.jpg) and BMP (*.bmp) file formats. Philips Digital Photo Frame Photo mode The Photo mode allows you to view photos that are stored in the PhotoFrame (including Internal Memory, Favorite and Preinstalled Library), in a memory card or in the inserted USB flash drive.

User manual (English)
Page 26
... the slideshow and enter Single view, press . Rotating a picture automatically The PhotoFrame has a built-in tilt sensor that were taken sideways. When the PhotoFrame is placed in the internal memory. 4. Photo mode EN - 21 Slideshow of photos. During the slideshow, you want to enter slideshow view. 2. Follow the instructions below to enable auto rotation. Philips Digital Photo Frame 3. To re-start the slideshow, press again. Playing a slideshow 1. When the PhotoFrame is placed in horizontal position, rotate the PhotoFrame 90...
... the slideshow and enter Single view, press . Rotating a picture automatically The PhotoFrame has a built-in tilt sensor that were taken sideways. When the PhotoFrame is placed in the internal memory. 4. Photo mode EN - 21 Slideshow of photos. During the slideshow, you want to enter slideshow view. 2. Follow the instructions below to enable auto rotation. Philips Digital Photo Frame 3. To re-start the slideshow, press again. Playing a slideshow 1. When the PhotoFrame is placed in horizontal position, rotate the PhotoFrame 90...

User manual (English)
Page 27
... repeatedly will be displayed in the Collage or Setup mode, you have not set a Collage effect in the preview window to the right. When in slideshow with various themes of Collage effects. See "Displaying the clock" on page 18 for more details. If you have set any Collage effect) and Clock view. Philips Digital Photo Frame Collage mode The Collage mode allows you to switch between Collage view and Clock view...
... repeatedly will be displayed in the Collage or Setup mode, you have not set a Collage effect in the preview window to the right. When in slideshow with various themes of Collage effects. See "Displaying the clock" on page 18 for more details. If you have set any Collage effect) and Clock view. Philips Digital Photo Frame Collage mode The Collage mode allows you to switch between Collage view and Clock view...

User manual (English)
Page 32
Philips Digital Photo Frame Setup mode The Setup mode allows you to the last submenu Open the submenu Confirm selection Setup options menu File mode EN - 27 Collage view/ Clock view OSD toolbar Return Move up, down return to adjust settings on slideshow, display, time, OSD languages, startup and factory default settings.
Philips Digital Photo Frame Setup mode The Setup mode allows you to the last submenu Open the submenu Confirm selection Setup options menu File mode EN - 27 Collage view/ Clock view OSD toolbar Return Move up, down return to adjust settings on slideshow, display, time, OSD languages, startup and factory default settings.

User manual (English)
Page 34
... enable "on/off timer" when the PhotoFrame is powered on, the PhotoFrame will power off automatically according to the "off" schedule, and then restart according to enable or disable "on/off timer", and selects to the "on" schedule. Property Views the remaining/total capacity in Clock view. File mode EN - 29 Philips Digital Photo Frame Time Setup Sets up current date, time, on/off schedule for "on...
... enable "on/off timer" when the PhotoFrame is powered on, the PhotoFrame will power off automatically according to the "off" schedule, and then restart according to enable or disable "on/off timer", and selects to the "on" schedule. Property Views the remaining/total capacity in Clock view. File mode EN - 29 Philips Digital Photo Frame Time Setup Sets up current date, time, on/off schedule for "on...

User manual (English)
Page 36
... installed and used televisions for dismantling and collection of reusable materials, or contact your dealer for companies that will not occur in a residential installation. Philips Digital Photo Frame Regulation...batteries supplied with the limits for help. This equipment can be determined by turning the equipment off and on, the user is connected. ■ Consult the dealer or an experienced radio/TV technician for a Class B digital device, pursuant to which can be recycled. To minimize the amount of waste in the environment, check your area. ■ The PhotoFrame uses...
... installed and used televisions for dismantling and collection of reusable materials, or contact your dealer for companies that will not occur in a residential installation. Philips Digital Photo Frame Regulation...batteries supplied with the limits for help. This equipment can be determined by turning the equipment off and on, the user is connected. ■ Consult the dealer or an experienced radio/TV technician for a Class B digital device, pursuant to which can be recycled. To minimize the amount of waste in the environment, check your area. ■ The PhotoFrame uses...

User manual (English)
Page 38
Philips Digital Photo Frame Item Description Philips Clock Feature Smart Energy Saver Feature Foot Stand Playback Mode Language Support Color Adjustment (Gamma/Color Correction) Yes Yes Adjustable Full Screen browse, Slideshow view, Thumbnail view, and Zoom-in tilt sensor) Appendix EN - 33 Yes Brightness Yes Adjustment Contrast Yes Adjustment Auto Rotation Yes (with built-in /Zoom-out English, French, Spanish, Portuguese, German, Dutch and Italian.
Philips Digital Photo Frame Item Description Philips Clock Feature Smart Energy Saver Feature Foot Stand Playback Mode Language Support Color Adjustment (Gamma/Color Correction) Yes Yes Adjustable Full Screen browse, Slideshow view, Thumbnail view, and Zoom-in tilt sensor) Appendix EN - 33 Yes Brightness Yes Adjustment Contrast Yes Adjustment Auto Rotation Yes (with built-in /Zoom-out English, French, Spanish, Portuguese, German, Dutch and Italian.


