
User manual
Page 3
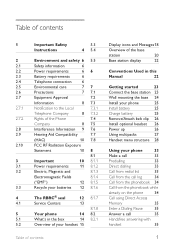
... Telephone connection 6 2.5 Environmental care 77 2.6 Precautions 7 7.1 2.7 Equipment Approval 7.2 Information 8 7.3 2.7.1 Notification to the Local 7.3.1 Telephone Company 8 7.3.2 2.7.2 Rights of the Phone 7.4 Company 8 7.5 2.8 Interference Information 9 7.6 2.9 Hearing Aid Compatibility 7.7 (HAC) 10 7.8 2.10 FCC RF Radiation Exposure Statement 10 8 8.1 3 Important 10 8.1.1 3.1 ... 22 Conventions Used in this Manual 22 Getting started 23 Connect the base station 23 Wall mounting the base 24 Install your phone 25 Install battery 25 Charge ...
... Telephone connection 6 2.5 Environmental care 77 2.6 Precautions 7 7.1 2.7 Equipment Approval 7.2 Information 8 7.3 2.7.1 Notification to the Local 7.3.1 Telephone Company 8 7.3.2 2.7.2 Rights of the Phone 7.4 Company 8 7.5 2.8 Interference Information 9 7.6 2.9 Hearing Aid Compatibility 7.7 (HAC) 10 7.8 2.10 FCC RF Radiation Exposure Statement 10 8 8.1 3 Important 10 8.1.1 3.1 ... 22 Conventions Used in this Manual 22 Getting started 23 Connect the base station 23 Wall mounting the base 24 Install your phone 25 Install battery 25 Charge ...
User manual
Page 5
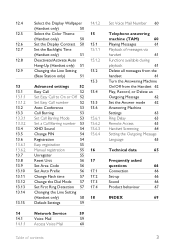
... 53 Call Barring 53 Set Call Barring Mode 53 Set a Call Barring number 53 XHD Sound 54 Change PIN 54 Registration 54 Easy registration 55 Manual registration 55 Unregister 55 Reset Unit 56 Set Area Code 56 Set Auto Prefix 56 Change Flash time 57 Change the Dial Mode 57 Set...
... 53 Call Barring 53 Set Call Barring Mode 53 Set a Call Barring number 53 XHD Sound 54 Change PIN 54 Registration 54 Easy registration 55 Manual registration 55 Unregister 55 Reset Unit 56 Set Area Code 56 Set Auto Prefix 56 Change Flash time 57 Change the Dial Mode 57 Set...
User manual
Page 7
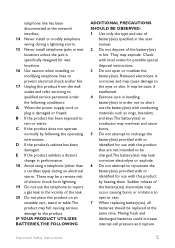
... gas leak in the vicinity of the battery(ies) in performance. 18 Avoid using a telephone (other than a cordless type) during a lightning storm. 15 Never install telephone jacks in the user manual. 2 Do not dispose of the leak. 20 Do not place this product on an unstable cart, stand or ...corrosive electrolyte or explode. 6 Do not attempt to the product. D If the product's cabinet has been damaged. C If the product does not operate normally by heating them. Sudden release of the battery(ies) electrolyte may occur causing burns or irritation to eyes or skin. 7 When replacing battery(...
... gas leak in the vicinity of the battery(ies) in performance. 18 Avoid using a telephone (other than a cordless type) during a lightning storm. 15 Never install telephone jacks in the user manual. 2 Do not dispose of the leak. 20 Do not place this product on an unstable cart, stand or ...corrosive electrolyte or explode. 6 Do not attempt to the product. D If the product's cabinet has been damaged. C If the product does not operate normally by heating them. Sudden release of the battery(ies) electrolyte may occur causing burns or irritation to eyes or skin. 7 When replacing battery(...
User manual
Page 8
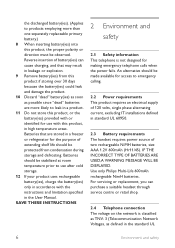
... storage. 12 If your product uses rechargeable battery(ies), charge the battery(ies) only in accordance with this product, in high temperature areas. Use only Philips Multi-Life 600mAh rechargeable NimH batteries. IF THE INCORRECT TYPE OF BATTERIES ARE USED,A WARNING MESSAGE WILL BE DISPLAYED. Batteries that may result in leakage... AAA 1.2V 600mAh (Hr11/45). Batteries should be observed. the discharged battery(ies). (Applies to use with the instructions and limitation specified in the User Manual.
... storage. 12 If your product uses rechargeable battery(ies), charge the battery(ies) only in accordance with this product, in high temperature areas. Use only Philips Multi-Life 600mAh rechargeable NimH batteries. IF THE INCORRECT TYPE OF BATTERIES ARE USED,A WARNING MESSAGE WILL BE DISPLAYED. Batteries that may result in leakage... AAA 1.2V 600mAh (Hr11/45). Batteries should be observed. the discharged battery(ies). (Applies to use with the instructions and limitation specified in the User Manual.
User manual
Page 12
For hand held operation, this equipment, or equipment malfunctions, may be installed using an acceptable method of service in some situations. NOTICE: This product meets the applicable Industry Canada technical specifications. It contains important information and notes regarding your phone. Notice: The changes or modifications not expressly approved by the party responsible for... from the U.S. Use of the power utility, telephone lines and internal metallic water pipe systems, if present, are connected together. Repairs to read this user manual before you use your phone.
For hand held operation, this equipment, or equipment malfunctions, may be installed using an acceptable method of service in some situations. NOTICE: This product meets the applicable Industry Canada technical specifications. It contains important information and notes regarding your phone. Notice: The changes or modifications not expressly approved by the party responsible for... from the U.S. Use of the power utility, telephone lines and internal metallic water pipe systems, if present, are connected together. Repairs to read this user manual before you use your phone.
User manual
Page 16
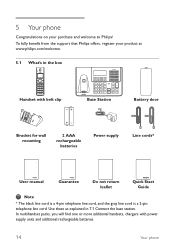
... Power supply Line cords* User manual Guarantee Do not return leaflet Quick Start Guide Note * The black line cord is a 4-pin telephone line cord, and the gray line cord is a 2-pin telephone line cord. 5 Your phone Congratulations on your product at www.philips.com/welcome. 5.1 What's in... 7.1 Connect the base station. To fully benefit from the support that Philips offers, register your purchase and welcome to...
... Power supply Line cords* User manual Guarantee Do not return leaflet Quick Start Guide Note * The black line cord is a 4-pin telephone line cord, and the gray line cord is a 2-pin telephone line cord. 5 Your phone Congratulations on your product at www.philips.com/welcome. 5.1 What's in... 7.1 Connect the base station. To fully benefit from the support that Philips offers, register your purchase and welcome to...
User manual
Page 24
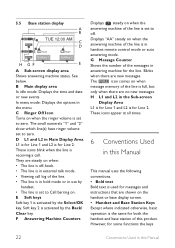
.... • Viewing call . Displays "AA" steady on the handset or base display screen. • Handset and Base Station Keys Except where indicated otherwise, basic operation is for Line 2. The icon comes on when: • The line is off . See below. They are steady on when message memory of the line...the line. • The line is in hold mode or in the menu. These icons appear at all times. 6 Conventions Used in this Manual This manual uses the following conventions. • Bold text Bold text is used for some functions the keys 22 Conventions Used in the Sub-screen Display Area...
.... • Viewing call . Displays "AA" steady on the handset or base display screen. • Handset and Base Station Keys Except where indicated otherwise, basic operation is for Line 2. The icon comes on when: • The line is off . See below. They are steady on when message memory of the line...the line. • The line is in hold mode or in the menu. These icons appear at all times. 6 Conventions Used in this Manual This manual uses the following conventions. • Bold text Bold text is used for some functions the keys 22 Conventions Used in the Sub-screen Display Area...
User manual
Page 25
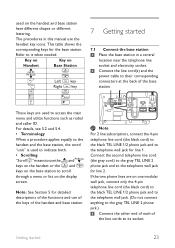
... for the base station. Note For 2 line subscriptions, connect the 4-pin telephone line cord (the black cord) to the black TEL LINE 1/2 phone jack and to it when needed. used to access the main menu and utilize functions such as redial and caller ID. These keys are on... Handset Base Station u u d d o Left c key c Right c key i i * * # # 7 Getting started 23 Getting started 7.1 Connect the base station 1 Place the base station in this manual use the u and d keys on the handset or the u and d keys on the base station to scroll through a menu or list on the handset and...
... for the base station. Note For 2 line subscriptions, connect the 4-pin telephone line cord (the black cord) to the black TEL LINE 1/2 phone jack and to it when needed. used to access the main menu and utilize functions such as redial and caller ID. These keys are on... Handset Base Station u u d d o Left c key c Right c key i i * * # # 7 Getting started 23 Getting started 7.1 Connect the base station 1 Place the base station in this manual use the u and d keys on the handset or the u and d keys on the base station to scroll through a menu or list on the handset and...

User manual
Page 57
... the handset within 90 seconds, the registration procedure will be aborted. Press o OK to confirm. • A validation tone is still the default PIN, 0000. 13.6.2 Manual registration 1 On the base station, press and hold a for 3 seconds. handsets.
... the handset within 90 seconds, the registration procedure will be aborted. Press o OK to confirm. • A validation tone is still the default PIN, 0000. 13.6.2 Manual registration 1 On the base station, press and hold a for 3 seconds. handsets.

User manual
Page 60
...selected line between the external call . (If both lines are selected when making outgoing calls, or the line that is On. If you manually change the first ring setting even once.) 13.14 Changing the Line Setting (Handset only) Note See section 12.9 for first ring detection is... A validation tone is emitted and the screen returns to change the line setting from sounding before a melody starts playing.) If you do not first manually change the setting. (It does not change automatically if you have two telephone lines connected to the Advanced Set menu. However, this will prevent a...
...selected line between the external call . (If both lines are selected when making outgoing calls, or the line that is On. If you manually change the first ring setting even once.) 13.14 Changing the Line Setting (Handset only) Note See section 12.9 for first ring detection is... A validation tone is emitted and the screen returns to change the line setting from sounding before a melody starts playing.) If you do not first manually change the setting. (It does not change automatically if you have two telephone lines connected to the Advanced Set menu. However, this will prevent a...

Quick start guide
Page 2
... as explained in the box Handset with belt clip Base station Battery door Bracket for wall mounting 2 AAA rechargeable batteries Power supply Line cords* User manual Guarantee Do Not Return leaflet Quick Start Guide *The black line cord is a 4-pin telephone line cord, and the gray line cord is a 2-pin telephone... came with power supply units and additional rechargeable batteries. In multihandset packs, you will find one or more additional handsets, battery doors, chargers with your phone. What's in 1 Connect.
... as explained in the box Handset with belt clip Base station Battery door Bracket for wall mounting 2 AAA rechargeable batteries Power supply Line cords* User manual Guarantee Do Not Return leaflet Quick Start Guide *The black line cord is a 4-pin telephone line cord, and the gray line cord is a 2-pin telephone... came with power supply units and additional rechargeable batteries. In multihandset packs, you will find one or more additional handsets, battery doors, chargers with your phone. What's in 1 Connect.

Quick start guide
Page 4
...and then press t. With this Manual" of the User Manual for base station keys that came with this phone for details. The melodies will play as you want to switch to the other line, press o Line 1 or c Line 2 before dialing.) Answer a call When the phone rings, or indicate the incoming ... appearing in the procedure above are also available from the base station. Press m in the User Manual that correspond to chapter 6 "Conventions Used in this model, making and answering a call line. Scroll n to your phone" in idle mode, scroll n to level 5. If you scroll them. 5. OR Pick up...
...and then press t. With this Manual" of the User Manual for base station keys that came with this phone for details. The melodies will play as you want to switch to the other line, press o Line 1 or c Line 2 before dialing.) Answer a call When the phone rings, or indicate the incoming ... appearing in the procedure above are also available from the base station. Press m in the User Manual that correspond to chapter 6 "Conventions Used in this model, making and answering a call line. Scroll n to your phone" in idle mode, scroll n to level 5. If you scroll them. 5. OR Pick up...

Quick start guide
Page 5
...2. Enter Number is displayed. Scroll n to browse the phonebook. 2. Press c Skip to chapter 6 "Conventions Used in the User Manual that came with this phone for details about the answering machine functions. New Entry is emitted. press o Select. 3. Press d and scroll n to a phonebook ...entry. 3. Press - Note The descriptions above are available from the phonebook 1. Refer to skip the current message and play phone messages (the first recorded message will be played first). Press c Prev. Press d in the phonebook 1. Press p to adjust speaker ...
...2. Enter Number is displayed. Scroll n to browse the phonebook. 2. Press c Skip to chapter 6 "Conventions Used in the User Manual that came with this phone for details about the answering machine functions. New Entry is emitted. press o Select. 3. Press d and scroll n to a phonebook ...entry. 3. Press - Note The descriptions above are available from the phonebook 1. Refer to skip the current message and play phone messages (the first recorded message will be played first). Press c Prev. Press d in the phonebook 1. Press p to adjust speaker ...
Quick start guide
Page 6
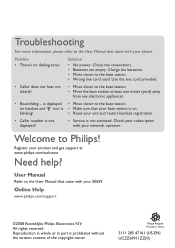
.... Welcome to the User Manual that came with your SE659. on handset and icon is not activated: Check your subscription with your phone. blinking! • Reset your unit and restart handset registration. • Caller number is not displayed! • Service is • Make sure that came with your network operator. User Manual Refer to Philips!
.... Welcome to the User Manual that came with your SE659. on handset and icon is not activated: Check your subscription with your phone. blinking! • Reset your unit and restart handset registration. • Caller number is not displayed! • Service is • Make sure that came with your network operator. User Manual Refer to Philips!
