
User Guide
Page 3
...as well as it will be determined by turning the equipment off and on CD-ROM - Introduction 3 Table of 1,440,000 (for SVGA projectors) or 2,359,296 (for a class A digital device in a residential area is connected. - and HDTV-video equipment ......13 Connecting to... 15-19 Preparation 15-16 Display and Picture control 16-18 Audio control 18 Other settings 19 9. Projector - Audio/Video RCA Cable - NOTE: This Philips projector uses three LCD (Liquid Crystal Display) panels.These panels contain a total of contents 3 Introduction 3 Packaging contents 3 2. As with the user...
...as well as it will be determined by turning the equipment off and on CD-ROM - Introduction 3 Table of 1,440,000 (for SVGA projectors) or 2,359,296 (for a class A digital device in a residential area is connected. - and HDTV-video equipment ......13 Connecting to... 15-19 Preparation 15-16 Display and Picture control 16-18 Audio control 18 Other settings 19 9. Projector - Audio/Video RCA Cable - NOTE: This Philips projector uses three LCD (Liquid Crystal Display) panels.These panels contain a total of contents 3 Introduction 3 Packaging contents 3 2. As with the user...
User Guide
Page 4
... dispose of mains supplied to overturn. 8. The remote control with too many useful functions. Do not use attachments not recommended by PHILIPS, as they may touch dangerous voltage points or short cut parts, which may result in fire, electric shock, or other than ...indicates a need for a few minutes before cleaning or lamp replacement. 2. Do not attempt to rest on . 11. Never push objects of the projector for service). 18. Do not attempt to qualified service personnel. 17. Refer all warnings and instructions marked on an unstable cart, stand, or table...
... dispose of mains supplied to overturn. 8. The remote control with too many useful functions. Do not use attachments not recommended by PHILIPS, as they may touch dangerous voltage points or short cut parts, which may result in fire, electric shock, or other than ...indicates a need for a few minutes before cleaning or lamp replacement. 2. Do not attempt to rest on . 11. Never push objects of the projector for service). 18. Do not attempt to qualified service personnel. 17. Refer all warnings and instructions marked on an unstable cart, stand, or table...

User Guide
Page 5
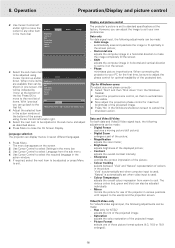
... you make the right choices about installation and operation, and to help you with the projector via your projector. 4. High reliability and excellent brightness The Philips UHP lamp guarantees long life, excellent brightness over the entire picture. 8. The projector will be heard via the 'Settings' menu of the display can correct this picture distortion...
... you make the right choices about installation and operation, and to help you with the projector via your projector. 4. High reliability and excellent brightness The Philips UHP lamp guarantees long life, excellent brightness over the entire picture. 8. The projector will be heard via the 'Settings' menu of the display can correct this picture distortion...
User Guide
Page 6
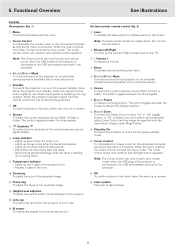
...long as a mouse cursor when the USB socket of temperature error. - Lights up /down . 9 Temperature indicator - Functional Overview See illustrations Controls On projector (fig. 1) On laser pointer remote control (fig. 2) 1 Menu To activate and deactivate the menu. 1 Laser To activate the laser pointer to the...Freeze mode and the display situation. 8 D(igital)-Zoom To switch the Digital Zoom function 'On' or 'Off' (toggle button). When the projector is starting. Lights up or cooling down and left /right button operation. up red when lamp life has expired. - The cursor control ...
...long as a mouse cursor when the USB socket of temperature error. - Lights up /down . 9 Temperature indicator - Functional Overview See illustrations Controls On projector (fig. 1) On laser pointer remote control (fig. 2) 1 Menu To activate and deactivate the menu. 1 Laser To activate the laser pointer to the...Freeze mode and the display situation. 8 D(igital)-Zoom To switch the Digital Zoom function 'On' or 'Off' (toggle button). When the projector is starting. Lights up or cooling down and left /right button operation. up red when lamp life has expired. - The cursor control ...
User Guide
Page 7
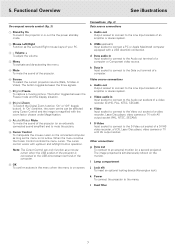
...Control and the image is magnified with the zoom factor chosen under Magnification. 9 A(udio)/V(ideo) Mute To mute the sound of the projector (or an externally connected sound amplifier) and to mute the picture. 0 Cursor Control To manipulate the mouse cursor on the connected computer... (S-VHS, PAL, NTSC, SECAM). Connections (fig. 4) Data source connections a Audio out Output socket to connect to the Audio out sockets of the projector. 6 Source To select the current projection source (Data, S-Video or Video). Video source connections a Audio out Output socket to connect to the S-Video...
...Control and the image is magnified with the zoom factor chosen under Magnification. 9 A(udio)/V(ideo) Mute To mute the sound of the projector (or an externally connected sound amplifier) and to mute the picture. 0 Cursor Control To manipulate the mouse cursor on the connected computer... (S-VHS, PAL, NTSC, SECAM). Connections (fig. 4) Data source connections a Audio out Output socket to connect to the Audio out sockets of the projector. 6 Source To select the current projection source (Data, S-Video or Video). Video source connections a Audio out Output socket to connect to the S-Video...
User Guide
Page 8
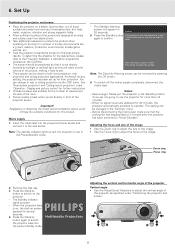
... appear for several seconds. 4. Note: The standby indicator lights up red, the projector is on, the start-up screen appears for 20 seconds. PHILIPS - See 'Rear screen projection' and 'Ceiling-mount projection' under 'Positioning the projector and screen'. Please put the projector in the Standby position if you sit directly in unclean or smoky...
... appear for several seconds. 4. Note: The standby indicator lights up red, the projector is on, the start-up screen appears for 20 seconds. PHILIPS - See 'Rear screen projection' and 'Ceiling-mount projection' under 'Positioning the projector and screen'. Please put the projector in the Standby position if you sit directly in unclean or smoky...
User Guide
Page 9
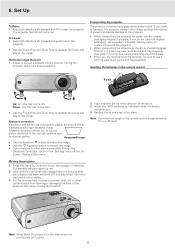
...carrying case (such as the soft bag supplied), then pack it into place. Stabnyd A MVute Volume Lamp RC Keystone Menu OK Note: Never place the projector on the side where the connections are not properly placed, the picture will come out. Horizontal angle (horizon) • Adjust or correct a possible ... to the right. • Use the Focus Ring and Zoom Ring to readjust the focus and size of the vertical keystone type by turning the projector feet to narrow the image. • This correction function also is approximately 15 m (± 50 feet). If you to use a carrying case ...
...carrying case (such as the soft bag supplied), then pack it into place. Stabnyd A MVute Volume Lamp RC Keystone Menu OK Note: Never place the projector on the side where the connections are not properly placed, the picture will come out. Horizontal angle (horizon) • Adjust or correct a possible ... to the right. • Use the Focus Ring and Zoom Ring to readjust the focus and size of the vertical keystone type by turning the projector feet to narrow the image. • This correction function also is approximately 15 m (± 50 feet). If you to use a carrying case ...
User Guide
Page 10
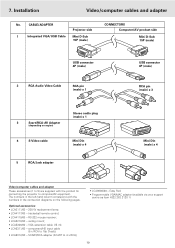
...8226; LCA5312/00 - Optional accessories: • LCA3111/00 - 200 W replacement lamp; • LCA4117/00 - VGA extension cable (15 m); • LCA5311/00 - CABLE/ADAPTER Projector side 1 Integrated VGA/USB Cable Mini D-Sub 15P (male) CONNECTORS Computer/AV product side Mini D-Sub 15P (male) USB connector 4P (male) 2 RCA Audio Video... cables and adapter These accessories (1 to 5) are supplied with the numbers in the left-hand column correspond with the product for connecting the projector to computer/AV equipment. 7. Installation Video/computer cables and adapter No.
...8226; LCA5312/00 - Optional accessories: • LCA3111/00 - 200 W replacement lamp; • LCA4117/00 - VGA extension cable (15 m); • LCA5311/00 - CABLE/ADAPTER Projector side 1 Integrated VGA/USB Cable Mini D-Sub 15P (male) CONNECTORS Computer/AV product side Mini D-Sub 15P (male) USB connector 4P (male) 2 RCA Audio Video... cables and adapter These accessories (1 to 5) are supplied with the numbers in the left-hand column correspond with the product for connecting the projector to computer/AV equipment. 7. Installation Video/computer cables and adapter No.
User Guide
Page 11
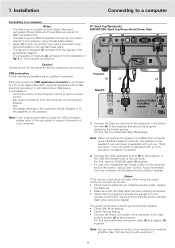
...with a 2 row, 15 pin connector. Connect the Data out terminal of 'Controls and connections'. Audio information from the computer via the projector speaker. For this use the VGA/USB cable (1) supplied. Installation Connecting to a computer Connecting to the Data in fig. 4 of...use the VGA/USB cable (1) supplied. - If your computer. 1. For this, use a VGA/MAC adaptor (optional). Projector (1) (2) (1) Mac/PC (5) USB Audio out optional Philips VGA/MAC adapter DDaattaa oouutt Note: If you experience problems using Cursor Control. The data input is connected to a PC...
...with a 2 row, 15 pin connector. Connect the Data out terminal of 'Controls and connections'. Audio information from the computer via the projector speaker. For this use the VGA/USB cable (1) supplied. Installation Connecting to a computer Connecting to the Data in fig. 4 of...use the VGA/USB cable (1) supplied. - If your computer. 1. For this, use a VGA/MAC adaptor (optional). Projector (1) (2) (1) Mac/PC (5) USB Audio out optional Philips VGA/MAC adapter DDaattaa oouutt Note: If you experience problems using Cursor Control. The data input is connected to a PC...
User Guide
Page 12
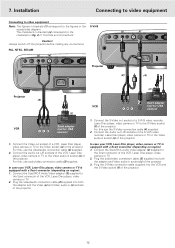
... Video audio-in the accessories diagram. For this use the S-Video connection cable (4) supplied. 2. Connect the S-Video out socket of the projector. For this , use the video/audio connection cable (2) supplied. 2. Connect the Audio out L/R sockets of the S-VHS video recorder, ... of the VCR, Laser Disc player, video camera or TV. 2. Plug the S-Video connection cable supplied into both the adapter and Video audio-in Projector (2) (4) (3) Projector (2) VCR (3) S-Video R Audio L out Video out Scart adapter S-Video (not for USA version) VCR L Audio R out Video out Scart ...
... Video audio-in the accessories diagram. For this use the S-Video connection cable (4) supplied. 2. Connect the S-Video out socket of the projector. For this , use the video/audio connection cable (2) supplied. 2. Connect the Audio out L/R sockets of the S-VHS video recorder, ... of the VCR, Laser Disc player, video camera or TV. 2. Plug the S-Video connection cable supplied into both the adapter and Video audio-in Projector (2) (4) (3) Projector (2) VCR (3) S-Video R Audio L out Video out Scart adapter S-Video (not for USA version) VCR L Audio R out Video out Scart ...
User Guide
Page 13
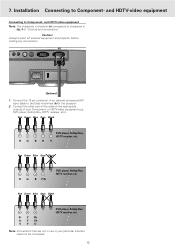
... in Optional 1. or HDTV-video equipment (e.g. and HDTV-video equipment Note: The characters in brackets (a) correspond to the appropriate outputs of the projector. 2. Always switch off external equipment and projector before making any connections. (h) Video audio-in Data audio-in Video S-Video Data out Data in your Component- and HDTV-video equipment...
... in Optional 1. or HDTV-video equipment (e.g. and HDTV-video equipment Note: The characters in brackets (a) correspond to the appropriate outputs of the projector. 2. Always switch off external equipment and projector before making any connections. (h) Video audio-in Data audio-in Video S-Video Data out Data in your Component- and HDTV-video equipment...
User Guide
Page 14
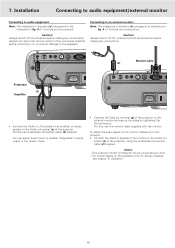
... monitor Connecting to audio equipment Note: The characters in sockets of on the operation with the monitor. For further details on the projector: • Connect the Audio in brackets (a) correspond to the external monitor and secure the plugs by tightening the thumb screws....this , use audio/video connection cable (2) supplied. Connecting to an external monitor Note: The characters in fig. 4 of the projector. Notes: - 7. One external monitor or projector can select fixed ('Line') or variable ('Regulated') volume output in the 'Audio' menu. • Connect the Data out terminal...
... monitor Connecting to audio equipment Note: The characters in sockets of on the operation with the monitor. For further details on the projector: • Connect the Audio in brackets (a) correspond to the external monitor and secure the plugs by tightening the thumb screws....this , use audio/video connection cable (2) supplied. Connecting to an external monitor Note: The characters in fig. 4 of the projector. Notes: - 7. One external monitor or projector can select fixed ('Line') or variable ('Regulated') volume output in the 'Audio' menu. • Connect the Data out terminal...
User Guide
Page 15
...options of Menu, OK and Cursor Control on the projector. - This indicates that these functions: - Hue under menu Display when Auto image is set to switch on the projector or the remote control. 1. When the average PHILIPS lamplife time has almost expired and less than 100 hours... remain, the message 'Warning: lamplife has almost Multimedia Projectors expired' will be changed - Switch on the screen, ...
...options of Menu, OK and Cursor Control on the projector. - This indicates that these functions: - Hue under menu Display when Auto image is set to switch on the projector or the remote control. 1. When the average PHILIPS lamplife time has almost expired and less than 100 hours... remain, the message 'Warning: lamplife has almost Multimedia Projectors expired' will be changed - Switch on the screen, ...
User Guide
Page 16
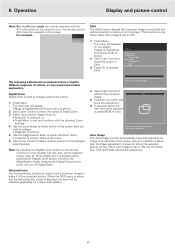
... press Menu to be adjusted in seven different languages. 1. Select the next item to exit. Press Menu to cool. Language selection The projector can also be made: - Use Cursor Control to cancel the shutdown action. Auto image automatically sizes and positions the image to fit optimally...the menu bar. 3. Shift adjusts the computer image in horizontal and vertical direction to the first list. Phase minimises picture imperfections. Adjust the projectors size control, so that no vertical bars are available than can go back to centre it on the screen. 2. Digital Zoom enlarges a ...
... press Menu to be adjusted in seven different languages. 1. Select the next item to exit. Press Menu to cool. Language selection The projector can also be made: - Use Cursor Control to cancel the shutdown action. Auto image automatically sizes and positions the image to fit optimally...the menu bar. 3. Shift adjusts the computer image in horizontal and vertical direction to the first list. Phase minimises picture imperfections. Adjust the projectors size control, so that no vertical bars are available than can go back to centre it on the screen. 2. Digital Zoom enlarges a ...
User Guide
Page 17
... the projected picture. 8. Press Menu. - Display is highlighted and its sub menu is set to exit and continue with the AV mute button on the projector or on . • Press OK to continue, or • Press Menu to OFF. 1. Use the Magnification slider to adjust the Zoom factor. • Press OK...
... the projected picture. 8. Press Menu. - Display is highlighted and its sub menu is set to exit and continue with the AV mute button on the projector or on . • Press OK to continue, or • Press Menu to OFF. 1. Use the Magnification slider to adjust the Zoom factor. • Press OK...
User Guide
Page 18
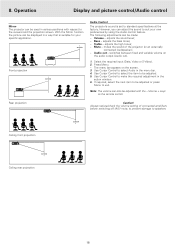
...adjustment in the menu bar. 4. SCREEN Ceiling front projection SCREEN Ceiling rear projection 18 Operation Display and picture control/Audio control Mirror The projector can be used in a way that is set to be made: - adjusts the sound level; - Press Menu. - Use ...the next item to be adjusted with respect to speakers. Rear projection Caution! Audio out - SCREEN Front projection SCREEN Audio Control The projector's sound is suitable for your own preferences by using the Audio control feature. mutes the sound of connected amplifiers before switching off ...
...adjustment in the menu bar. 4. SCREEN Ceiling front projection SCREEN Ceiling rear projection 18 Operation Display and picture control/Audio control Mirror The projector can be used in a way that is set to be made: - adjusts the sound level; - Press Menu. - Use ...the next item to be adjusted with respect to speakers. Rear projection Caution! Audio out - SCREEN Front projection SCREEN Audio Control The projector's sound is suitable for your own preferences by using the Audio control feature. mutes the sound of connected amplifiers before switching off ...
User Guide
Page 19
... Select Factory reset by using Cursor Control. 4. Press OK for 10 seconds. 19 Keystone correction Adjusts the shape of the most relevant projector settings, including information on or off Auto Standby mode or to select the delay time after a new lamp has been installed. Feedback ...on the screen. 2. Press Menu to Standby. Press Menu. - Auto Standby This function allows you to display or suppress the default Philips start-up screen upon the projector's start -up and to close the On Screen Display. to the default factory settings. 1. The menu bar appears on the screen...
... Select Factory reset by using Cursor Control. 4. Press OK for 10 seconds. 19 Keystone correction Adjusts the shape of the most relevant projector settings, including information on or off Auto Standby mode or to select the delay time after a new lamp has been installed. Feedback ...on the screen. 2. Press Menu to Standby. Press Menu. - Auto Standby This function allows you to display or suppress the default Philips start-up screen upon the projector's start -up and to close the On Screen Display. to the default factory settings. 1. The menu bar appears on the screen...
User Guide
Page 20
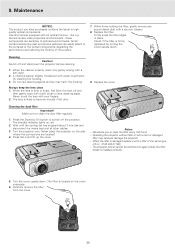
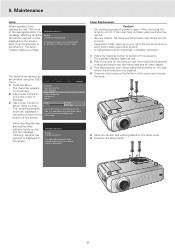
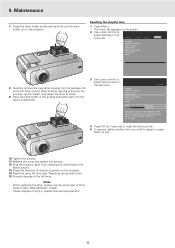
... is installed correctly. Cleaning Caution! Replace the cover. Always keep the lens clean 1. Never touch the lens with an optical function - Turn the projector over. LLAAMMPP A Notes: - While firmly holding the filter, gently remove any accumulated dust with a torn or damaged filter may harm the housing.... is located on again unless the filter holder is firmly tightened by gently wiping with a filter of the product. 7. Switch off the projector. - The lens is damaged replace it by turning the cover upside down . Press the Stand by On button to the surfaces of...
... is installed correctly. Cleaning Caution! Replace the cover. Always keep the lens clean 1. Never touch the lens with an optical function - Turn the projector over. LLAAMMPP A Notes: - While firmly holding the filter, gently remove any accumulated dust with a torn or damaged filter may harm the housing.... is located on again unless the filter holder is firmly tightened by gently wiping with a filter of the product. 7. Switch off the projector. - The lens is damaged replace it by turning the cover upside down . Press the Stand by On button to the surfaces of...
User Guide
Page 21
...your right. The lamp type is broken glass particles may fall out. - The menu bar appears on the lamp cover. 6. It is inserted. Multimedia projectors Warning: Lamplife has expired It is open. If the inner tube is indicated in the action window at anyone. - Do not touch lamp or point... screws at the bottom of the average lamplife, the message 'Warning: lamplife has almost expired' will be displayed on the screen, each time the projector is displayed on the screen. Unscrew the lamp holder. The lamplife remaining can be too hot to select Lamp counter. - Use Cursor Control to ...
...your right. The lamp type is broken glass particles may fall out. - The menu bar appears on the lamp cover. 6. It is inserted. Multimedia projectors Warning: Lamplife has expired It is open. If the inner tube is indicated in the action window at anyone. - Do not touch lamp or point... screws at the bottom of the average lamplife, the message 'Warning: lamplife has almost expired' will be displayed on the screen, each time the projector is displayed on the screen. Unscrew the lamp holder. The lamplife remaining can be too hot to select Lamp counter. - Use Cursor Control to ...
User Guide
Page 22
... on the screen. 2. Properly dispose of lamp LCA3111/00, 12NC 8670 931 11009). - The menu bar appears on the projector. 14. Factory reset (more ) Lamp 0 hours Projector 2453 hours Lamp counter shows the operating hours of the projector. Place the lamp holder in the menu bar. It is suggested to break. 9. Plug the... projector back in the Mains socket. 13. Reset the lamp life time (see 'Resetting the lamplife time'). 15. FILTER FILTER 9. Use cursor control to reset the ...
... on the screen. 2. Properly dispose of lamp LCA3111/00, 12NC 8670 931 11009). - The menu bar appears on the projector. 14. Factory reset (more ) Lamp 0 hours Projector 2453 hours Lamp counter shows the operating hours of the projector. Place the lamp holder in the menu bar. It is suggested to break. 9. Plug the... projector back in the Mains socket. 13. Reset the lamp life time (see 'Resetting the lamplife time'). 15. FILTER FILTER 9. Use cursor control to reset the ...


