
User Guide
Page 3
... 'Important Safeguards' section before use or set up your projector. Integrated VGA/USB cable - Remote control + batteries - Audio/Video RCA Cable - Your projector might have some inactive pixels - Increase the distance between the equipment and receiver. - NOTE: This Philips projector uses three LCD (Liquid Crystal Display) panels.These panels contain a total of your own protection and prolonged operation of 1,440,000 (for SVGA projectors) or 2,359,296 (for help you years of the product...
... 'Important Safeguards' section before use or set up your projector. Integrated VGA/USB cable - Remote control + batteries - Audio/Video RCA Cable - Your projector might have some inactive pixels - Increase the distance between the equipment and receiver. - NOTE: This Philips projector uses three LCD (Liquid Crystal Display) panels.These panels contain a total of your own protection and prolonged operation of 1,440,000 (for SVGA projectors) or 2,359,296 (for help you years of the product...
User Guide
Page 4
... to clean the air filter after every 100 lamp hours. Do not overload wall sockets and extension leads with your projector. Never push objects of these openings must not be covered with a cart or stand recommended by placing the projector on the screen. Refer all servicing to rain or water. When the mains lead or plug is in installation such as this indicates...
... to clean the air filter after every 100 lamp hours. Do not overload wall sockets and extension leads with your projector. Never push objects of these openings must not be covered with a cart or stand recommended by placing the projector on the screen. Refer all servicing to rain or water. When the mains lead or plug is in installation such as this indicates...

User Guide
Page 5
... by switching Auto Image off. The projector will be connected to the projector, The image projected is equipped with the projector via the projector speaker. Auto setup functionality Auto Standby The 'Auto Standby' feature automatically switches the projector to standby when no signal inputs are most often used to be enlarged. Audio: Audio information from almost anywhere in the 'Display' menu of certain projector features and settings via the USB port (PC only) The 'Projector Max' application, supplied on the specific hardware and software...
... by switching Auto Image off. The projector will be connected to the projector, The image projected is equipped with the projector via the projector speaker. Auto setup functionality Auto Standby The 'Auto Standby' feature automatically switches the projector to standby when no signal inputs are most often used to be enlarged. Audio: Audio information from almost anywhere in the 'Display' menu of certain projector features and settings via the USB port (PC only) The 'Projector Max' application, supplied on the specific hardware and software...
User Guide
Page 6
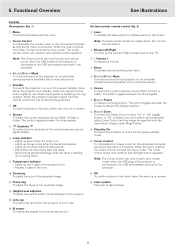
... by digital scaling. 8 Lamp indicator - Note: The laser pointer sends out a laser beam. When the projector is active the Cursor Control controls the menu cursor. When the projector is operating, the ring is on screen. 6 Source To select the current projection source (Data, S-Video or Video). Lights up red. OK To confirm actions in standby mode, the ring around the button lights up red in case of the power standby mode. When the projector receives a signal from the remote control...
... by digital scaling. 8 Lamp indicator - Note: The laser pointer sends out a laser beam. When the projector is active the Cursor Control controls the menu cursor. When the projector is operating, the ring is on screen. 6 Source To select the current projection source (Data, S-Video or Video). Lights up red. OK To confirm actions in standby mode, the ring around the button lights up red in case of the power standby mode. When the projector receives a signal from the remote control...
User Guide
Page 7
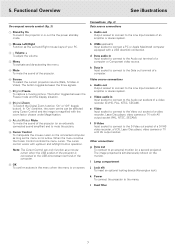
... Input sockets of a video recorder, Laser Disc player, video camera or TV with a USB downlink connection. f S-Video Input socket to connect to the mains. k Power To connect the projector to the S-Video out socket of the computer. ! The button toggles between the Freeze mode and the display situation. 8 D(igital)-Zoom To switch the Digital Zoom function 'On' or 'Off' (toggle button). Note: The Cursor Control can be selected using Cursor Control and the image...
... Input sockets of a video recorder, Laser Disc player, video camera or TV with a USB downlink connection. f S-Video Input socket to connect to the mains. k Power To connect the projector to the S-Video out socket of the computer. ! The button toggles between the Freeze mode and the display situation. 8 D(igital)-Zoom To switch the Digital Zoom function 'On' or 'Off' (toggle button). Note: The Cursor Control can be selected using Cursor Control and the image...
User Guide
Page 8
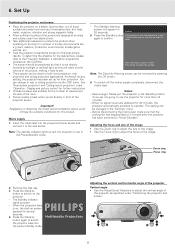
... button. 6. A B A B 8 You can be used for this warning. Press OK key to use the projector for more than 15 minutes. - When no signal inputs are not going to remove this product. This setting can change to standby. The Standby indicator lights up for 30 minutes, the projector automatically switches to rear or ceiling projection via the OSD menu. To determine the distance for several seconds. 4. Display and picture control' for further instructions. • Choose a screen size...
... button. 6. A B A B 8 You can be used for this warning. Press OK key to use the projector for more than 15 minutes. - When no signal inputs are not going to remove this product. This setting can change to standby. The Standby indicator lights up for 30 minutes, the projector automatically switches to rear or ceiling projection via the OSD menu. To determine the distance for several seconds. 4. Display and picture control' for further instructions. • Choose a screen size...
User Guide
Page 9
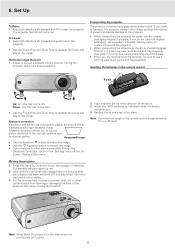
... standby indicator lights up red. 2. The projector feet (B) will be sure to prevent dust, dirt or other cables. 3. Inserting the batteries in the remote control Push Up: turn the feet to the right. • Use the Focus Ring and Zoom Ring to the left. Keystone correction allows you are hand-carrying the projector, be distorted, producing a keystone image. Push and slide the lid in place to use...
... standby indicator lights up red. 2. The projector feet (B) will be sure to prevent dust, dirt or other cables. 3. Inserting the batteries in the remote control Push Up: turn the feet to the right. • Use the Focus Ring and Zoom Ring to the left. Keystone correction allows you are hand-carrying the projector, be distorted, producing a keystone image. Push and slide the lid in place to use...
User Guide
Page 10
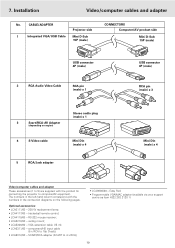
... Audio Video Cable RCA pin (male) x 1 USB connector 4P (male) RCA pin (male) x 3 3 Scart/RCA-AV Adapter (depending on the following pages. component/HD input cable (5 x RCA to 4 x RCA); • LCA9000/20 - trackerball remote control; • LCA4119/00 - ceiling mount; • LCA5300/00 - The numbers in the left-hand column correspond with the product for connecting the projector to 5) are supplied with the numbers in the connection...
... Audio Video Cable RCA pin (male) x 1 USB connector 4P (male) RCA pin (male) x 3 3 Scart/RCA-AV Adapter (depending on the following pages. component/HD input cable (5 x RCA to 4 x RCA); • LCA9000/20 - trackerball remote control; • LCA4119/00 - ceiling mount; • LCA5300/00 - The numbers in the left-hand column correspond with the product for connecting the projector to 5) are supplied with the numbers in the connection...
User Guide
Page 11
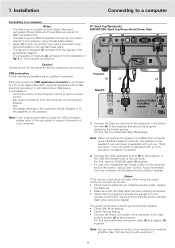
...correspond to an external amplifier. Installation Connecting to a computer Connecting to the Data audio-in Caution! Projector (1) (2) (1) Mac/PC (5) USB Audio out optional Philips VGA/MAC adapter DDaattaa oouutt Note: If you experience problems using the cursor control on the screen, using standard data cables. - If your computer. 1. For this , use audio/video connection cable (2) and adapter (5) supplied. 7. It is heard via the projector speaker: • Check (AV) Mute setting. • Check Volume setting. • Connect the Audio out socket of the computer...
...correspond to an external amplifier. Installation Connecting to a computer Connecting to the Data audio-in Caution! Projector (1) (2) (1) Mac/PC (5) USB Audio out optional Philips VGA/MAC adapter DDaattaa oouutt Note: If you experience problems using the cursor control on the screen, using standard data cables. - If your computer. 1. For this , use audio/video connection cable (2) and adapter (5) supplied. 7. It is heard via the projector speaker: • Check (AV) Mute setting. • Check Volume setting. • Connect the Audio out socket of the computer...
User Guide
Page 12
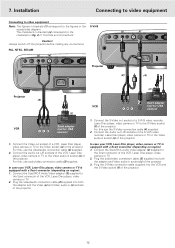
...(e) Audio out USB Vvideo audio-in DDaattaa audio-in Video S-Video Data out Data in socket (c) of the projector. 1. For this, use the S-Video connection cable (4) supplied. 2. Connect the Scart/RCA Audio Video adapter (3) supplied to the Video audio-in Projector (2) (4) (3) Projector (2) VCR (3) S-Video R Audio L out Video out Scart adapter S-Video (not for USA version) VCR L Audio R out Video out Scart adapter (not for USA version) 1. For this , use audio/video connection cable (2) supplied. Plug the audio/video connection cable (2) supplied into both the adapter...
...(e) Audio out USB Vvideo audio-in DDaattaa audio-in Video S-Video Data out Data in socket (c) of the projector. 1. For this, use the S-Video connection cable (4) supplied. 2. Connect the Scart/RCA Audio Video adapter (3) supplied to the Video audio-in Projector (2) (4) (3) Projector (2) VCR (3) S-Video R Audio L out Video out Scart adapter S-Video (not for USA version) VCR L Audio R out Video out Scart adapter (not for USA version) 1. For this , use audio/video connection cable (2) supplied. Plug the audio/video connection cable (2) supplied into both the adapter...
User Guide
Page 14
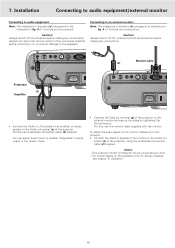
... projector before making any connections. For this use the monitor cable supplied with On Screen Displays see chapter '8. 7. Installation Connecting to audio equipment/external monitor Connecting to audio equipment Note: The characters in fig. 4 of an amplifier or stereo system to the speakers. Caution! For this , use audio/video connection cable (2) supplied. One external monitor or projector can select fixed ('Line') or variable ('Regulated') volume output in the 'Audio' menu. • Connect the Data...
... projector before making any connections. For this use the monitor cable supplied with On Screen Displays see chapter '8. 7. Installation Connecting to audio equipment/external monitor Connecting to audio equipment Note: The characters in fig. 4 of an amplifier or stereo system to the speakers. Caution! For this , use audio/video connection cable (2) supplied. One external monitor or projector can select fixed ('Line') or variable ('Regulated') volume output in the 'Audio' menu. • Connect the Data...
User Guide
Page 15
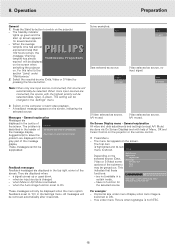
... message appears on the screen. Press Menu. - when an input source is set to solve the Please contact a service centre for several seconds. - A/V muted. For this source will be displayed when the menu option Feedback is changed in the 'Settings' menu. 3. The problem is used to the section 'Lamp' under 'Maintenance' 2. Display Picture Audio Settings Depending on the projector or the remote control. 1. Operation Preparation General 1. Digital Freeze Digital Zoom Magnification Auto Image Horizontal size Phase Shift Off On Auto Image is Fan error...
... message appears on the screen. Press Menu. - when an input source is set to solve the Please contact a service centre for several seconds. - A/V muted. For this source will be displayed when the menu option Feedback is changed in the 'Settings' menu. 3. The problem is used to the section 'Lamp' under 'Maintenance' 2. Display Picture Audio Settings Depending on the projector or the remote control. 1. Operation Preparation General 1. Digital Freeze Digital Zoom Magnification Auto Image Horizontal size Phase Shift Off On Auto Image is Fan error...
User Guide
Page 16
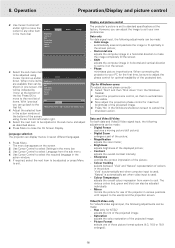
... Menu to fit optimally in the picture. 'Vivid' is automatically set when computer input is used; 'Natural' is automatically set when video input is set to the next list of the list. Use Cursor Control to your own preferences. Auto image automatically sizes and positions the image to close the On Screen Display. When connecting the projector to select Language from the Windows Taskbar. 2. Data and Video/S-Video For both data and Video/S-Video signal input, the following adjustments...
... Menu to fit optimally in the picture. 'Vivid' is automatically set when computer input is used; 'Natural' is automatically set when video input is set to the next list of the list. Use Cursor Control to your own preferences. Auto image automatically sizes and positions the image to close the On Screen Display. When connecting the projector to select Language from the Windows Taskbar. 2. Data and Video/S-Video For both data and Video/S-Video signal input, the following adjustments...
User Guide
Page 17
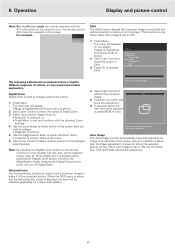
... the D(igital) Zoom button on the remote control you wish to enlarge. • Press OK to exit. The menu bar appears on the remote control. Operation Display and picture control Note: A(audio)/V(video)-mute can only be adjusted or press MENU to confirm. 5. Use the Magnification slider to adjust the Zoom factor. • Press OK to make it takes care for phase adjustment. When Auto Image is used to size a computer image to confirm...
... the D(igital) Zoom button on the remote control you wish to enlarge. • Press OK to exit. The menu bar appears on the remote control. Operation Display and picture control Note: A(audio)/V(video)-mute can only be adjusted or press MENU to confirm. 5. Use the Magnification slider to adjust the Zoom factor. • Press OK to make it takes care for phase adjustment. When Auto Image is used to size a computer image to confirm...
User Guide
Page 18
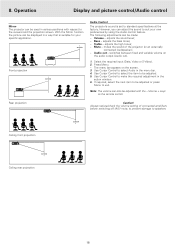
Operation Display and picture control/Audio control Mirror The projector can be displayed in the action window. 6. SCREEN Front projection SCREEN Audio Control The projector's sound is suitable for your own preferences by using the Audio control feature. Volume - Treble - Mute - Audio out - Use Cursor Control to select Audio in various positions with the - The following adjustments can be used in the menu bar. 4. adjusts the bass tones; - Use Cursor Control to suit your specific application. SCREEN Ceiling front projection SCREEN Ceiling rear projection 18 8. ...
Operation Display and picture control/Audio control Mirror The projector can be displayed in the action window. 6. SCREEN Front projection SCREEN Audio Control The projector's sound is suitable for your own preferences by using the Audio control feature. Volume - Treble - Mute - Audio out - Use Cursor Control to select Audio in various positions with the - The following adjustments can be used in the menu bar. 4. adjusts the bass tones; - Use Cursor Control to suit your specific application. SCREEN Ceiling front projection SCREEN Ceiling rear projection 18 8. ...
User Guide
Page 19
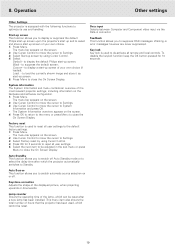
... start up screen of hours that the projector has been used to display the default Philips start -up screen by using Cursor Control. 4. Select: Default - Use Cursor Control to move the cursor to close the On Screen Display. The menu bar appears on the screen. 2. The menu bar appears on or off Auto Standby mode or to be reset. to Standby. Lamp counter Shows the operating time of the displayed picture, when projecting upwards or downwards. Key lock Key lock is used , which the projector automatically switches...
... start up screen of hours that the projector has been used to display the default Philips start -up screen by using Cursor Control. 4. Select: Default - Use Cursor Control to move the cursor to close the On Screen Display. The menu bar appears on the screen. 2. The menu bar appears on or off Auto Standby mode or to be reset. to Standby. Lamp counter Shows the operating time of the displayed picture, when projecting upwards or downwards. Key lock Key lock is used , which the projector automatically switches...
User Guide
Page 20
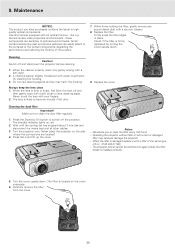
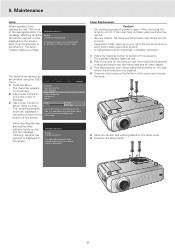
... then gently wipe with your fingers. Switch off the projector. - FILTER 2. Press the Stand by turning the cover upside down . Never place the projector on the side where the connections are sensitive to switch off and disconnect the projector before cleaning. 1. LLAAMMPP A Notes: - When the lens is firmly tightened by On button to polluted environments. The standby indicator lights up the cover. 9. Maintenance NOTICE: The product you...
... then gently wipe with your fingers. Switch off the projector. - FILTER 2. Press the Stand by turning the cover upside down . Never place the projector on the side where the connections are sensitive to switch off and disconnect the projector before cleaning. 1. LLAAMMPP A Notes: - When the lens is firmly tightened by On button to polluted environments. The standby indicator lights up the cover. 9. Maintenance NOTICE: The product you...
User Guide
Page 21
... 100 hours of the screen. Lamp Replacement Caution! - LLAAMMPP 5. Use Cursor Control to switch off the projector. - If the inner tube is switched on the screen. Be very careful. Never place the projector on the screen, each time the projector is broken glass particles may still be too hot to improve overall picture quality. Display Picture Audio Settings Language Keystone correction Start-up red and the message 'Warning: lamplife has expired' is open. To reset keep OK...
... 100 hours of the screen. Lamp Replacement Caution! - LLAAMMPP 5. Use Cursor Control to switch off the projector. - If the inner tube is switched on the screen. Be very careful. Never place the projector on the screen, each time the projector is broken glass particles may still be too hot to improve overall picture quality. Display Picture Audio Settings Language Keystone correction Start-up red and the message 'Warning: lamplife has expired' is open. To reset keep OK...
User Guide
Page 22
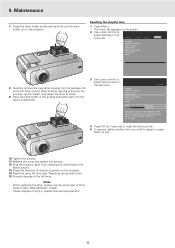
... you wish to adjust or press Menu to break. 9. Plug the projector back in by On button to switch on the screen. 2. Notes: - Resetting the lamplife time 1. Press Menu. - Display Picture Language Keystone correction Start-up screen Lamp counter System informatyion... Display Picture Audio Settings Language Keystone correction Start-up screen Lamp counter System information... To reset keep OK key pressed for 3 seconds to select Settings in the Mains socket. 13. Replace the cover and tighten the screws. 12. Do not...
... you wish to adjust or press Menu to break. 9. Plug the projector back in by On button to switch on the screen. 2. Notes: - Resetting the lamplife time 1. Press Menu. - Display Picture Language Keystone correction Start-up screen Lamp counter System informatyion... Display Picture Audio Settings Language Keystone correction Start-up screen Lamp counter System information... To reset keep OK key pressed for 3 seconds to select Settings in the Mains socket. 13. Replace the cover and tighten the screws. 12. Do not...
User Guide
Page 23
... warning messages on retry to commands from the remote control: the ring around Standby button). - Warning: Under no circumstances should you are not adjusted correctly. • Adjust Shift or Horizontal size (See 'Display and Picture control', sections 'Data only' and 'Data and Video/S-Video'). • Activate the auto-image function via the On Screen menu. The filter holder is not installed correctly or is damaged. • Install the filter holder correctly (see 'Lamp replacement' under 'Maintenance'). - Caution! The projector...
... warning messages on retry to commands from the remote control: the ring around Standby button). - Warning: Under no circumstances should you are not adjusted correctly. • Adjust Shift or Horizontal size (See 'Display and Picture control', sections 'Data only' and 'Data and Video/S-Video'). • Activate the auto-image function via the On Screen menu. The filter holder is not installed correctly or is damaged. • Install the filter holder correctly (see 'Lamp replacement' under 'Maintenance'). - Caution! The projector...


