
Leaflet
Page 1
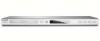
...; High quality outputs for analog and digital audio Plays it all • Movies: DVD, DVD+R/RW, DVD-R/RW, (S)VCD • Music: CD, CD-R/RW and MP3-CD • Photos: Picture CD (JPEG) Fits everywhere, goes anywhere • Ultra-slim design No complications! Introducing the best value DVD player. Philips DVD player DVP3500 See, hear, play everything Does size matter?
...; High quality outputs for analog and digital audio Plays it all • Movies: DVD, DVD+R/RW, DVD-R/RW, (S)VCD • Music: CD, CD-R/RW and MP3-CD • Photos: Picture CD (JPEG) Fits everywhere, goes anywhere • Ultra-slim design No complications! Introducing the best value DVD player. Philips DVD player DVP3500 See, hear, play everything Does size matter?

Leaflet
Page 2
... 12-bit/108MHz video DAC PICTURE 12-bit Video DAC is created instantaneously, using large screens and projectors. www.philips.com The limitation of the usual 10bit DAC become in the comfort of your eye perceives a sharper picture with...x D): 435 x 37 x 265 mm • Set weight: 2.03 kg • Packaging dimensions (W x H x D): 490 x 82 x 352 mm • Weight incl. DVD player Specifications DVP3500/37 Highlights Picture/Display • Aspect ratio: 16:9, 4:3 • D/A converter: 12 bit, 108 MHz • Picture enhancement: 3/2 - 2/2 motion pull down, Progressive Scan Sound ...
... 12-bit/108MHz video DAC PICTURE 12-bit Video DAC is created instantaneously, using large screens and projectors. www.philips.com The limitation of the usual 10bit DAC become in the comfort of your eye perceives a sharper picture with...x D): 435 x 37 x 265 mm • Set weight: 2.03 kg • Packaging dimensions (W x H x D): 490 x 82 x 352 mm • Weight incl. DVD player Specifications DVP3500/37 Highlights Picture/Display • Aspect ratio: 16:9, 4:3 • D/A converter: 12 bit, 108 MHz • Picture enhancement: 3/2 - 2/2 motion pull down, Progressive Scan Sound ...

User manual
Page 5
...THE USER SWITCH THE CONNECTION TO THE 'STANDARD DEFINITION' OUTPUT. IF THERE ARE QUESTIONS REGARDING OUR TV SET COMPATIBILITY WITH THIS MODEL 525p AND 625p DVD PLAYER, PLEASE CONTACT OUR CUSTOMER SERVICE CENTER.' 01-37 DVP3500_US3 5 14/07/05, 9:54 AMDVP3005/37_3 ATENCIÓN El uso de mando o ... any such CD-Audio discs, kindly refer them to guarantee that this DVD Player is fully compatible with such new discs. As DVD technology advances, these enhancements will become common and will be easy to www.philips.com/support for software upgrade. 'CONSUMERS SHOULD NOTE THAT NOT ALL HIGH...
...THE USER SWITCH THE CONNECTION TO THE 'STANDARD DEFINITION' OUTPUT. IF THERE ARE QUESTIONS REGARDING OUR TV SET COMPATIBILITY WITH THIS MODEL 525p AND 625p DVD PLAYER, PLEASE CONTACT OUR CUSTOMER SERVICE CENTER.' 01-37 DVP3500_US3 5 14/07/05, 9:54 AMDVP3005/37_3 ATENCIÓN El uso de mando o ... any such CD-Audio discs, kindly refer them to guarantee that this DVD Player is fully compatible with such new discs. As DVD technology advances, these enhancements will become common and will be easy to www.philips.com/support for software upgrade. 'CONSUMERS SHOULD NOTE THAT NOT ALL HIGH...
User manual
Page 6
Your DVD player consists of materials which can be authorized by Macrovision Corporation, and is intended for future reference. Laser safety This unit employs a laser. CAUTION (WARNING LOCATION: ...,942; 5,956,674; 5,974,380; 5,978,762; 6,226,616; 6,487,535 and other rights owners. Please observe the local regulations regarding the disposal of your DVD Player and enter below the Serial No. Reverse engineering or disassembly is protected by Macrovision Corporation. U.S. NOTE: PICTURES SHOWN MAY BE DIFFERENT BETWEEN COUNTRIES. Pat. All...
Your DVD player consists of materials which can be authorized by Macrovision Corporation, and is intended for future reference. Laser safety This unit employs a laser. CAUTION (WARNING LOCATION: ...,942; 5,956,674; 5,974,380; 5,978,762; 6,226,616; 6,487,535 and other rights owners. Please observe the local regulations regarding the disposal of your DVD Player and enter below the Serial No. Reverse engineering or disassembly is protected by Macrovision Corporation. U.S. NOTE: PICTURES SHOWN MAY BE DIFFERENT BETWEEN COUNTRIES. Pat. All...

User manual
Page 10
...AA batteries PREVIEW MUTE 10 cm (4 inches) 10 cm (4 inches) PHILIPS DVD Home Cinema System 10 cm (4 inches) G Care of free space all around the player for adequate ventilation. Use a soft cloth slightly moistened with a soft felttipped pen. - Place the player on the printed side of a CDR(W) and only with a mild... by its edge, do not touch the surface. 10 01-37 DVP3500_US3 10 14/07/05, 9:54 AMDVP3005/37_3 Do not operate the DVD Player in the warm environment until the moisture evaporates. When the system is switched to Standby mode, it is suddenly moved from cold to play ...
...AA batteries PREVIEW MUTE 10 cm (4 inches) 10 cm (4 inches) PHILIPS DVD Home Cinema System 10 cm (4 inches) G Care of free space all around the player for adequate ventilation. Use a soft cloth slightly moistened with a soft felttipped pen. - Place the player on the printed side of a CDR(W) and only with a mild... by its edge, do not touch the surface. 10 01-37 DVP3500_US3 10 14/07/05, 9:54 AMDVP3005/37_3 Do not operate the DVD Player in the warm environment until the moisture evaporates. When the system is switched to Standby mode, it is suddenly moved from cold to play ...

User manual
Page 11
...as Y Pb Pr) on the TV (cable not supplied). 2 To hear the sound of this DVD Player through your TV, use the audio cables (white/red) to connect AUDIO OUT (L/ R) jacks of the DVD Player to the corresponding AUDIO IN jacks on the capabilities of your TV, use the audio cables (white.../red) to connect AUDIO OUT (L/ R) jacks of this DVD Player through your TV system. - Using Composite Video jacks (CVBS) 1 Use the composite video cable (yellow) to connect the DVD Player's CVBS (VIDEO) jack to make one video connection from the following options, depending on the...
...as Y Pb Pr) on the TV (cable not supplied). 2 To hear the sound of this DVD Player through your TV, use the audio cables (white/red) to connect AUDIO OUT (L/ R) jacks of the DVD Player to the corresponding AUDIO IN jacks on the capabilities of your TV, use the audio cables (white.../red) to connect AUDIO OUT (L/ R) jacks of this DVD Player through your TV system. - Using Composite Video jacks (CVBS) 1 Use the composite video cable (yellow) to connect the DVD Player's CVBS (VIDEO) jack to make one video connection from the following options, depending on the...

User manual
Page 12
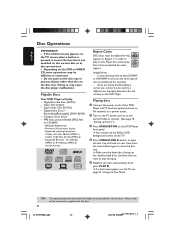
... the display panel. NO DISC 12 01-37 DVP3500_US3 12 14/07/05, 9:54 AMDVP3005/37_3 After everything is loaded, press STANDBY ON on the DVD Player front panel, "NO DISC" may appear on . When no disc is connected properly, plug in order to TV 2 Back of RF Modulator (example only... cord AUDIO OUT COMPONENT VIDEO IN S-VIDEO IN V (Pr/Cr) VIDEO IN U (Pb/Cb) Y ~ AC MAINS IMPORTANT! - If your electronics retailer or contact Philips for details on RF modulator availability and operations. See your TV only has a single Antenna In jack (or labeled as 75 ohm or RF In...
... the display panel. NO DISC 12 01-37 DVP3500_US3 12 14/07/05, 9:54 AMDVP3005/37_3 After everything is loaded, press STANDBY ON on the DVD Player front panel, "NO DISC" may appear on . When no disc is connected properly, plug in order to TV 2 Back of RF Modulator (example only... cord AUDIO OUT COMPONENT VIDEO IN S-VIDEO IN V (Pr/Cr) VIDEO IN U (Pb/Cb) Y ~ AC MAINS IMPORTANT! - If your electronics retailer or contact Philips for details on RF modulator availability and operations. See your TV only has a single Antenna In jack (or labeled as 75 ohm or RF In...

User manual
Page 13
... VIDEO IN) depending on the options available on your TV. 2 Connect the COAXIAL jack of the DVD Player to the corresponding Digital Audio In jack on your Receiver (cable not supplied). 3 Set the DVD Player's Digital Output to the corresponding AUDIO IN jacks on your receiver, the receiver will produce a strong... Output does not match the capabilities of your TV. 2 Use the audio cables (white/red) to connect AUDIO OUT (L/R) jacks of the DVD Player to PCM-ONLY or ALL depending on the capabilities of the video connections (CVBS VIDEO IN, COMPONENT VIDEO IN) depending on the options available ...
... VIDEO IN) depending on the options available on your TV. 2 Connect the COAXIAL jack of the DVD Player to the corresponding Digital Audio In jack on your Receiver (cable not supplied). 3 Set the DVD Player's Digital Output to the corresponding AUDIO IN jacks on your receiver, the receiver will produce a strong... Output does not match the capabilities of your TV. 2 Use the audio cables (white/red) to connect AUDIO OUT (L/R) jacks of the DVD Player to PCM-ONLY or ALL depending on the capabilities of the video connections (CVBS VIDEO IN, COMPONENT VIDEO IN) depending on the options available ...

User manual
Page 14
... rear panel. Connect to Standby mode or ON Disc tray OPEN/CLOSE / - To stop playback 2; To start or interrupt playback IR Sensor - To switch the DVD Player to coaxial AUDIO input of a digital audio equipment Caution: Do not touch the inner pins of an amplifier, receiver or stereo system COAXIAL (Digital audio... PREV S - English Functional Overview Front and Rear Panels STANDBY-ON B - To search or select previous chapter or track 9 STOP - Connect to YPbPr input of the DVD Player T NEXT -
... rear panel. Connect to Standby mode or ON Disc tray OPEN/CLOSE / - To stop playback 2; To start or interrupt playback IR Sensor - To switch the DVD Player to coaxial AUDIO input of a digital audio equipment Caution: Do not touch the inner pins of an amplifier, receiver or stereo system COAXIAL (Digital audio... PREV S - English Functional Overview Front and Rear Panels STANDBY-ON B - To search or select previous chapter or track 9 STOP - Connect to YPbPr input of the DVD Player T NEXT -

User manual
Page 15
...- To select next chapter or track SUBTITLE - To start playback PAUSE ( ; ) - Not applicable for VCD version 2.0 only) 1 2 3 4 - Selects a DVD camera angle ZOOM - Selects various repeat modes REPEAT (A-B) - To access subtitle language in disc menu 01-37 DVP3500_US3 15 15 14/07/05, 9:54 AMDVP3005.../37_3 To access audio language in disc menu ANGLE - To go back to standby mode or ON 0-9 numerical key pad - To switch the DVD player to previous menu / show title menu DISC MENU - Selects an item in a menu DISPLAY - English Remote Control RETURN / TITLE - Switches on...
...- To select next chapter or track SUBTITLE - To start playback PAUSE ( ; ) - Not applicable for VCD version 2.0 only) 1 2 3 4 - Selects a DVD camera angle ZOOM - Selects various repeat modes REPEAT (A-B) - To access subtitle language in disc menu 01-37 DVP3500_US3 15 15 14/07/05, 9:54 AMDVP3005.../37_3 To access audio language in disc menu ANGLE - To go back to standby mode or ON 0-9 numerical key pad - To switch the DVD player to previous menu / show title menu DISC MENU - Selects an item in a menu DISPLAY - English Remote Control RETURN / TITLE - Switches on...

User manual
Page 16
.... - You should be called FRONT, A/V IN, or VIDEO. See your TV, then press the Channel down button repeatedly until you see the Philips DVD background screen on the TV. 2 Usually these channels are using an RF modulator. 3 If you have a button or switch that chooses different video... Setting up the TV IMPORTANT! Using the Remote Control to the equipment owner's manual for the DVD Player output. Make sure you are between the Remote Control and the DVD Player while operating the DVD Player. Do not use old and new or different types of batteries in channel. English Getting Started...
.... - You should be called FRONT, A/V IN, or VIDEO. See your TV, then press the Channel down button repeatedly until you see the Philips DVD background screen on the TV. 2 Usually these channels are using an RF modulator. 3 If you have a button or switch that chooses different video... Setting up the TV IMPORTANT! Using the Remote Control to the equipment owner's manual for the DVD Player output. Make sure you are between the Remote Control and the DVD Player while operating the DVD Player. Do not use old and new or different types of batteries in channel. English Getting Started...
User manual
Page 17
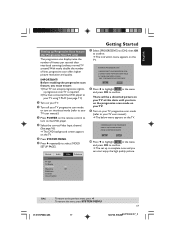
.... TIPS: To return to confirm. ➜ The instruction menu appears on the TV. English Getting Started Setting up is required. 2) You have connected the DVD player to your TV using Y Pb Pr (see page 11.) 1 Turn on your TV. 2 Turn off your TV progressive scan mode or turn on the... DVD player. 4 Select the correct Video Input channel. (See page 16). ➜ The DVD background screen appears on the TV. General Audio Video - - CONNECT USING YPBPR (GBR) VIDEO CABLE. 3. To remove the menu...
.... TIPS: To return to confirm. ➜ The instruction menu appears on the TV. English Getting Started Setting up is required. 2) You have connected the DVD player to your TV using Y Pb Pr (see page 11.) 1 Turn on your TV. 2 Turn off your TV progressive scan mode or turn on the... DVD player. 4 Select the correct Video Input channel. (See page 16). ➜ The DVD background screen appears on the TV. General Audio Video - - CONNECT USING YPBPR (GBR) VIDEO CABLE. 3. To remove the menu...
User manual
Page 18
...on to interlaced mode (refer to your TV user manual.) 2 Press OPEN/CLOSE on the DVD player to open the disc tray. 3 Press numeric keypad '1' on the remote control for a DVD disc to your TV This DVD Player is no proper picture on your TV supports the 'selected TV Type' system. - Select ...this Player, the colour system of the Disc, the TV and the DVD Player should match. Selecting the colour system that your TV, wait...
...on to interlaced mode (refer to your TV user manual.) 2 Press OPEN/CLOSE on the DVD player to open the disc tray. 3 Press numeric keypad '1' on the remote control for a DVD disc to your TV This DVD Player is no proper picture on your TV supports the 'selected TV Type' system. - Select ...this Player, the colour system of the Disc, the TV and the DVD Player should match. Selecting the colour system that your TV, wait...

User manual
Page 19
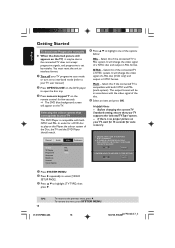
... languages. TIPS: To return to select a language and press OK. English Getting Started Step 3: Setting language preference You can choose your preferred language settings.This DVD Player will automatically switch to the language for you whenever you set it, regardless of the options below at a time, then press 2. - 'Audio' (disc's soundtrack) - 'Subtitle...
... languages. TIPS: To return to select a language and press OK. English Getting Started Step 3: Setting language preference You can choose your preferred language settings.This DVD Player will automatically switch to the language for you whenever you set it, regardless of the options below at a time, then press 2. - 'Audio' (disc's soundtrack) - 'Subtitle...
User manual
Page 20
...IMPORTANT! - It may not be labeled for ALL ALL regions or Region 1 in order to the type of disc or condition of the DVD Player and TV (and any objects other 1 regions. Playing discs 1 Connect the power cords of the recording. - Helpful Hints: - Improper...55 AMDVP3005/37_3 Playable Discs Your DVD Player will start automatically. Digital Video Discs + Recordable[Rewritable] (DVD+R[W]) - Always refer to close the disc tray. ➜ Make sure the label side is not available on the TV, see the Philips DVD background screen on this DVD Player. TIPS: 20 The operating ...
...IMPORTANT! - It may not be labeled for ALL ALL regions or Region 1 in order to the type of disc or condition of the DVD Player and TV (and any objects other 1 regions. Playing discs 1 Connect the power cords of the recording. - Helpful Hints: - Improper...55 AMDVP3005/37_3 Playable Discs Your DVD Player will start automatically. Digital Video Discs + Recordable[Rewritable] (DVD+R[W]) - Always refer to close the disc tray. ➜ Make sure the label side is not available on the TV, see the Philips DVD background screen on this DVD Player. TIPS: 20 The operating ...

User manual
Page 25
...3 4 to select a setting, then press OK to confirm your particular requirements. OFF Select this if you to customise the DVD Player to suit your selection. OFF Turn off the DVD Player after 60 minutes. For details, see page 19. General Setup Page - - To remove the menu, press SYSTEM MENU....In 'GENERAL SETUP PAGE', press 3 4 to highlight {SLEEP}, then press 2. 15 Mins Turn off the DVD Player after 15 minutes. 30 Mins Turn off the DVD Player after 30 minutes. 45 Mins Turn off the DVD Player after 45 minutes. 60 Mins Turn off the sleep function. 2 Press 3 4 to select a setting, ...
...3 4 to select a setting, then press OK to confirm your particular requirements. OFF Select this if you to customise the DVD Player to suit your selection. OFF Turn off the DVD Player after 60 minutes. For details, see page 19. General Setup Page - - To remove the menu, press SYSTEM MENU....In 'GENERAL SETUP PAGE', press 3 4 to highlight {SLEEP}, then press 2. 15 Mins Turn off the DVD Player after 15 minutes. 30 Mins Turn off the DVD Player after 30 minutes. 45 Mins Turn off the DVD Player after 45 minutes. 60 Mins Turn off the sleep function. 2 Press 3 4 to select a setting, ...

User manual
Page 26
... your receiver is set the stereo analog output of decoding multi-channel audio. If DIGITAL OUTPUT is not capable of your DVD Player. 1 In 'AUDIO SETUP PAGE', press 3 4 to confirm your DVD Player is connected to a Dolby Pro-Logic decoder. 2 Press 3 4 to select a setting, then press OK to highlight {...you to set to the previous menu, press 1. General Audio Video - - Digital Audio Setup The options included in Digital Audio Setup are invalid. English DVD Setup Menu Options Audio Setup Menu 1 In disc mode, press SYSTEM MENU. 2 Press 1 2 to select 'Audio Setup' icon. 3 Press OK ...
... your receiver is set the stereo analog output of decoding multi-channel audio. If DIGITAL OUTPUT is not capable of your DVD Player. 1 In 'AUDIO SETUP PAGE', press 3 4 to confirm your DVD Player is connected to a Dolby Pro-Logic decoder. 2 Press 3 4 to select a setting, then press OK to highlight {...you to set to the previous menu, press 1. General Audio Video - - Digital Audio Setup The options included in Digital Audio Setup are invalid. English DVD Setup Menu Options Audio Setup Menu 1 In disc mode, press SYSTEM MENU. 2 Press 1 2 to select 'Audio Setup' icon. 3 Press OK ...

User manual
Page 27
.... 3 Press OK to the previous menu, press 1. Video Setup Page - - For details, see page 18. TIPS: To return to confirm. English DVD Setup Menu Options LPCM Output If you connect the DVD Player to a PCM compatible receiver via the digital terminals, such as coaxial or optical etc, you may need to adjust 'LPCM'.
.... 3 Press OK to the previous menu, press 1. Video Setup Page - - For details, see page 18. TIPS: To return to confirm. English DVD Setup Menu Options LPCM Output If you connect the DVD Player to a PCM compatible receiver via the digital terminals, such as coaxial or optical etc, you may need to adjust 'LPCM'.

User manual
Page 28
... PAGE', press 3 4 to the previous menu, press 1. TIPS: 28 To return to highlight {PROGRESSIVE}, then press 2. English DVD Setup Menu Options Setting the TV Display Set the aspect ratio of the DVD Player according to the TV you have connected the DVD player's Y Pb Pr jacks to highlight one of the options below: 4:3 PAN SCAN -
... PAGE', press 3 4 to the previous menu, press 1. TIPS: 28 To return to highlight {PROGRESSIVE}, then press 2. English DVD Setup Menu Options Setting the TV Display Set the aspect ratio of the DVD Player according to the TV you have connected the DVD player's Y Pb Pr jacks to highlight one of the options below: 4:3 PAN SCAN -
User manual
Page 34
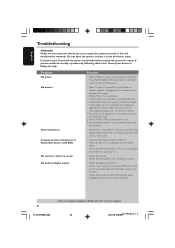
...Distorted picture Completely distorted picture or black/white picture with the DVD/ Player. - Check if the TV is switched on the disc being played back.This is compatible with DVD No sound or distorted sound No audio at www.usasupport.philips.com for correct Video In channel selection. Check if the.... - Press the STANDBY ON on the front of the Disc and your dealer or Philips for few seconds. - Ensure that the DVD Player's TV Type is a risk of electric shock. Check that of the DVD system to turn on to interlaced mode. 2) Press OPEN/CLOSE to remedy a problem by following these ...
...Distorted picture Completely distorted picture or black/white picture with the DVD/ Player. - Check if the TV is switched on the disc being played back.This is compatible with DVD No sound or distorted sound No audio at www.usasupport.philips.com for correct Video In channel selection. Check if the.... - Press the STANDBY ON on the front of the Disc and your dealer or Philips for few seconds. - Ensure that the DVD Player's TV Type is a risk of electric shock. Check that of the DVD system to turn on to interlaced mode. 2) Press OPEN/CLOSE to remedy a problem by following these ...


