
Leaflet
Page 2
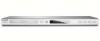
... to play most disc formats for maximum disc compatibility and listening pleasure. DVD player Specifications DVP3500/37 Highlights Picture/Display • Aspect ratio: 16:9, 4:3 • D/A converter: 12 bit, 108 MHz • Picture enhancement: 3/2 - 2/2 motion pull down, Progressive Scan Sound • D/A converter: 24 bit, 96 kHz • Signal to change without notice. or their respective owners. www.philips.com Packaging: 3.32 kg • Progressive Scan Progressive Scan doubles the vertical resolution of colors, resulting in a noticeably sharper picture. Instead...
... to play most disc formats for maximum disc compatibility and listening pleasure. DVD player Specifications DVP3500/37 Highlights Picture/Display • Aspect ratio: 16:9, 4:3 • D/A converter: 12 bit, 108 MHz • Picture enhancement: 3/2 - 2/2 motion pull down, Progressive Scan Sound • D/A converter: 24 bit, 96 kHz • Signal to change without notice. or their respective owners. www.philips.com Packaging: 3.32 kg • Progressive Scan Progressive Scan doubles the vertical resolution of colors, resulting in a noticeably sharper picture. Instead...

User manual
Page 5
... 625 PROGRESSIVE SCAN PICTURE PROBLEMS, IT IS RECOMMENDED THAT THE USER SWITCH THE CONNECTION TO THE 'STANDARD DEFINITION' OUTPUT. Important Note: Due to www.philips.com/support for software upgrade. 'CONSUMERS SHOULD NOTE THAT NOT ALL HIGH DEFINITION TELEVISION SETS ARE FULLY COMPATIBLE WITH THIS PRODUCT AND MAY CAUSE ARTIFACTS TO BE DISPLAYED IN THE PICTURE. IF THERE ARE QUESTIONS REGARDING OUR TV SET COMPATIBILITY WITH THIS MODEL...
... 625 PROGRESSIVE SCAN PICTURE PROBLEMS, IT IS RECOMMENDED THAT THE USER SWITCH THE CONNECTION TO THE 'STANDARD DEFINITION' OUTPUT. Important Note: Due to www.philips.com/support for software upgrade. 'CONSUMERS SHOULD NOTE THAT NOT ALL HIGH DEFINITION TELEVISION SETS ARE FULLY COMPATIBLE WITH THIS PRODUCT AND MAY CAUSE ARTIFACTS TO BE DISPLAYED IN THE PICTURE. IF THERE ARE QUESTIONS REGARDING OUR TV SET COMPATIBILITY WITH THIS MODEL...
User manual
Page 6
... at the rear of packaging materials, exhausted batteries and old equipment. CAUTION (WARNING LOCATION: ON THE BACKPLATE OF THE SET) NEVER MAKE OR CHANGE CONNECTIONS WITH THE POWER SWITCHED ON. Manufactured under license from Digital Theater Systems, Inc. All Right Reserved. and world-wide patents issued and pending. Please observe the local regulations regarding the disposal of your DVD Player and...
... at the rear of packaging materials, exhausted batteries and old equipment. CAUTION (WARNING LOCATION: ON THE BACKPLATE OF THE SET) NEVER MAKE OR CHANGE CONNECTIONS WITH THE POWER SWITCHED ON. Manufactured under license from Digital Theater Systems, Inc. All Right Reserved. and world-wide patents issued and pending. Please observe the local regulations regarding the disposal of your DVD Player and...
User manual
Page 8
... Region Codes 20 Playing discs 20 Basic playback controls 21 Selecting various repeat/shuffle functions 21 Repeat play mode 21 Repeating a section within a chapter/track 21 Operations for video playback 22 Using the Disc Menu 22 Zooming in 22 Resuming playback from the last stopped point 22 OSD (On-Screen Display 22 Special DVD features 23 Playing a Title 23 Camera Angle 23 Changing the Audio Language 23 Subtitles 23 Special VCD & SVCD Features 23 Playback Control (PBC 23 Playing MP3/JPEG (Kodak) Picture...
... Region Codes 20 Playing discs 20 Basic playback controls 21 Selecting various repeat/shuffle functions 21 Repeat play mode 21 Repeating a section within a chapter/track 21 Operations for video playback 22 Using the Disc Menu 22 Zooming in 22 Resuming playback from the last stopped point 22 OSD (On-Screen Display 22 Special DVD features 23 Playing a Title 23 Camera Angle 23 Changing the Audio Language 23 Subtitles 23 Special VCD & SVCD Features 23 Playback Control (PBC 23 Playing MP3/JPEG (Kodak) Picture...
User manual
Page 9
... Audio, Subtitle, Disc Menu 31 Restricting playback by Parental Control 31 Changing the Password 32 Restoring to original settings 32 Specifications 33 Troubleshooting 34-35 Glossary 36 Limited Warranty 37 Language Code 100 Contents 01-37 DVP3500_US3 9 9 14/07/05, 9:54 AMDVP3005/37_3 turning on /off 25 Audio Setup Menu 26-27 Setting the Downmix 26 Digital Audio Setup 26-27 Video Setup Menu 27-30 TV Type 27 Setting the TV Display 28 Progressive - English DVD Menu Options General Setup menu 25 Dimming system's display screen...
... Audio, Subtitle, Disc Menu 31 Restricting playback by Parental Control 31 Changing the Password 32 Restoring to original settings 32 Specifications 33 Troubleshooting 34-35 Glossary 36 Limited Warranty 37 Language Code 100 Contents 01-37 DVP3500_US3 9 9 14/07/05, 9:54 AMDVP3005/37_3 turning on /off 25 Audio Setup Menu 26-27 Setting the Downmix 26 Digital Audio Setup 26-27 Video Setup Menu 27-30 TV Type 27 Setting the TV Display 28 Progressive - English DVD Menu Options General Setup menu 25 Dimming system's display screen...

User manual
Page 12
... or Cable TV signal 1 Connecting the power cord AUDIO OUT COMPONENT VIDEO IN S-VIDEO IN V (Pr/Cr) VIDEO IN U (Pb/Cb) Y ~ AC MAINS IMPORTANT! - Never make or change any connections with the power switched on RF modulator availability and operations. When no disc is connected properly, plug in order to your TV's RF jack. Using an accessory RF modulator 1 Use the composite video cable (yellow) to connect the DVD Player's CVBS jack to the video input jack...
... or Cable TV signal 1 Connecting the power cord AUDIO OUT COMPONENT VIDEO IN S-VIDEO IN V (Pr/Cr) VIDEO IN U (Pb/Cb) Y ~ AC MAINS IMPORTANT! - Never make or change any connections with the power switched on RF modulator availability and operations. When no disc is connected properly, plug in order to your TV's RF jack. Using an accessory RF modulator 1 Use the composite video cable (yellow) to connect the DVD Player's CVBS jack to the video input jack...

User manual
Page 13
... your TV. 2 Use the audio cables (white/red) to connect AUDIO OUT (L/R) jacks of the DVD Player to PCM-ONLY or ALL depending on the capabilities of your Receiver (see page 26 "Digital Output"). Helpful Hint: - English Optional: Connecting to an Audio System STEREO AUDIO IN DIGITAL Connections Optional: Connecting Digital AV Receiver AV Receiver AUDIO IN DIGITAL Stereo system has Dolby Pro Logic or Right / Left Audio In jack 1 Select one of the video connections (CVBS VIDEO IN, COMPONENT VIDEO IN) depending...
... your TV. 2 Use the audio cables (white/red) to connect AUDIO OUT (L/R) jacks of the DVD Player to PCM-ONLY or ALL depending on the capabilities of your Receiver (see page 26 "Digital Output"). Helpful Hint: - English Optional: Connecting to an Audio System STEREO AUDIO IN DIGITAL Connections Optional: Connecting Digital AV Receiver AV Receiver AUDIO IN DIGITAL Stereo system has Dolby Pro Logic or Right / Left Audio In jack 1 Select one of the video connections (CVBS VIDEO IN, COMPONENT VIDEO IN) depending...

User manual
Page 14
English Functional Overview Front and Rear Panels STANDBY-ON B - To stop playback 2; Shows the current status of a TV YPbPr (Component Video Out) - To start or interrupt playback IR Sensor - Point the remote control towards this sensor Mains (AC Power Cord) - Connect to CVBS Video input of the DVD Player T NEXT - Electrostatic discharge may cause permanent damage to Standby mode or ON Disc tray OPEN/CLOSE / - To switch the DVD Player to the unit. 14 01-37 DVP3500_US3 14 14...
English Functional Overview Front and Rear Panels STANDBY-ON B - To stop playback 2; Shows the current status of a TV YPbPr (Component Video Out) - To start or interrupt playback IR Sensor - Point the remote control towards this sensor Mains (AC Power Cord) - Connect to CVBS Video input of the DVD Player T NEXT - Electrostatic discharge may cause permanent damage to Standby mode or ON Disc tray OPEN/CLOSE / - To switch the DVD Player to the unit. 14 01-37 DVP3500_US3 14 14...

User manual
Page 16
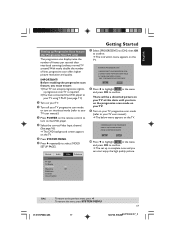
... button repeatedly until you see the Philips DVD background screen on the TV. 2 Usually these channels are between the Remote Control and the DVD Player while operating the DVD Player. Step 2: Setting up the TV IMPORTANT! You should be called FRONT, A/V IN, or VIDEO. PREVIEW MUTE CAUTION! - audio system or receiver), turn it on the TV and set the TV to the correct video-in combination. - English Getting Started Step 1: Inserting batteries...
... button repeatedly until you see the Philips DVD background screen on the TV. 2 Usually these channels are between the Remote Control and the DVD Player while operating the DVD Player. Step 2: Setting up the TV IMPORTANT! You should be called FRONT, A/V IN, or VIDEO. PREVIEW MUTE CAUTION! - audio system or receiver), turn it on the TV and set the TV to the correct video-in combination. - English Getting Started Step 1: Inserting batteries...
User manual
Page 17
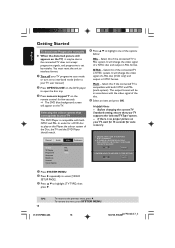
... PICTURE IS GOOD, PRESS OK BUTTON ON REMOTE OK Cancel 0 Press 1 to highlight OK in the menu and press OK to your TV user manual.) 3 Press POWER on the remote control to turn on the DVD player. 4 Select the correct Video Input channel. (See page 16). ➜ The DVD background screen appears on the TV. 5 Press SYSTEM MENU. 6 Press 2 repeatedly to confirm. ➜ The set up Progressive Scan feature (for Progressive Scan TV only) The progressive scan display...
... PICTURE IS GOOD, PRESS OK BUTTON ON REMOTE OK Cancel 0 Press 1 to highlight OK in the menu and press OK to your TV user manual.) 3 Press POWER on the remote control to turn on the DVD player. 4 Select the correct Video Input channel. (See page 16). ➜ The DVD background screen appears on the TV. 5 Press SYSTEM MENU. 6 Press 2 repeatedly to confirm. ➜ The set up Progressive Scan feature (for Progressive Scan TV only) The progressive scan display...
User manual
Page 18
... TV user manual.) 2 Press OPEN/CLOSE on the DVD player to highlight one of the Disc, the TV and the DVD Player should match. Helpful Hints: - OK CANCEL CONFIRM AGAIN TO USE NEW TV TYPE SETTING. TIPS: 18 To return to highlight {TV TYPE}, then press 2. TY Type TV Display Progressive Sharpness Brightness Contrast Closed Caption Black Level PAL Multi NTSC Preference 4 Press 3 4 to open the disc tray. 3 Press numeric keypad '1' on the remote control for auto...
... TV user manual.) 2 Press OPEN/CLOSE on the DVD player to highlight one of the Disc, the TV and the DVD Player should match. Helpful Hints: - OK CANCEL CONFIRM AGAIN TO USE NEW TV TYPE SETTING. TIPS: 18 To return to highlight {TV TYPE}, then press 2. TY Type TV Display Progressive Sharpness Brightness Contrast Closed Caption Black Level PAL Multi NTSC Preference 4 Press 3 4 to open the disc tray. 3 Press numeric keypad '1' on the remote control for auto...
User manual
Page 20
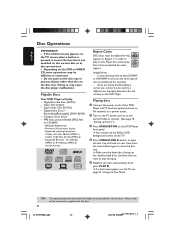
... 1 regions. Compact Discs (CDs) - Helpful Hints: - Playing discs 1 Connect the power cords of the recording. - Doing so may be labeled for other than disc on the TV screen when a button is pressed, it means the function is facing up. Maximum 30 characters display. - Depending on the DVD Player front panel. ➜ You should see page 22 "Using the Disc Menu". Playable Discs Your DVD Player will not play Discs that are having trouble playing a certain disc, remove the disc and...
... 1 regions. Compact Discs (CDs) - Helpful Hints: - Playing discs 1 Connect the power cords of the recording. - Doing so may be labeled for other than disc on the TV screen when a button is pressed, it means the function is facing up. Maximum 30 characters display. - Depending on the DVD Player front panel. ➜ You should see page 22 "Using the Disc Menu". Playable Discs Your DVD Player will not play Discs that are having trouble playing a certain disc, remove the disc and...

User manual
Page 24
... access different 'Play Mode'. ➜ SHUFFLE: all files in the current folder. Repeat G Press REPEAT continuously to select another track/ file in the selected folder. G To resume normal playback, press PLAY B. 3 Press 3 4 or use the numeric keypad (0-9) to highlight an option. 4 Press OK to confirm. ➜ Playback will begin. ➜ For JPEG disc, the picture menu appears on your TV and set to turn on the TV screen. You...
... access different 'Play Mode'. ➜ SHUFFLE: all files in the current folder. Repeat G Press REPEAT continuously to select another track/ file in the selected folder. G To resume normal playback, press PLAY B. 3 Press 3 4 or use the numeric keypad (0-9) to highlight an option. 4 Press OK to confirm. ➜ Playback will begin. ➜ For JPEG disc, the picture menu appears on your TV and set to turn on the TV screen. You...

User manual
Page 26
... sound from only the two front speakers. Downmix Digital Audio Preference Setting the Downmix This options allows you have connected your DVD Player. 1 In 'AUDIO SETUP PAGE', press 3 4 to highlight the selected item. Digital Output Set the Digital output according to your receiver is set the stereo analog output of decoding multi-channel audio. Helpful Hints: - TIPS: 26 To return to confirm. Digital Audio Setup The options included in Digital Audio Setup are invalid. To remove the menu, press SYSTEM MENU...
... sound from only the two front speakers. Downmix Digital Audio Preference Setting the Downmix This options allows you have connected your DVD Player. 1 In 'AUDIO SETUP PAGE', press 3 4 to highlight the selected item. Digital Output Set the Digital output according to your receiver is set the stereo analog output of decoding multi-channel audio. Helpful Hints: - TIPS: 26 To return to confirm. Digital Audio Setup The options included in Digital Audio Setup are invalid. To remove the menu, press SYSTEM MENU...

User manual
Page 28
... In the progressive scan mode, you select must be displayed. 16:9 - It only works when you have connected. TIPS: 28 To return to highlight {PROGRESSIVE}, then press 2. turning on the TV. English DVD Setup Menu Options Setting the TV Display Set the aspect ratio of the DVD Player according to the TV you have connected the DVD player's Y Pb Pr jacks to your TV that supports the progressive video input. If it is not, the setting for auto recovery...
... In the progressive scan mode, you select must be displayed. 16:9 - It only works when you have connected. TIPS: 28 To return to highlight {PROGRESSIVE}, then press 2. turning on the TV. English DVD Setup Menu Options Setting the TV Display Set the aspect ratio of the DVD Player according to the TV you have connected the DVD player's Y Pb Pr jacks to your TV that supports the progressive video input. If it is not, the setting for auto recovery...
User manual
Page 34
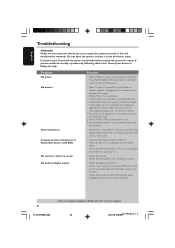
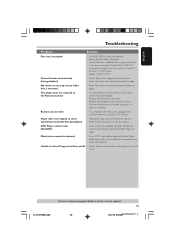
... Video In channel selection. Press the STANDBY ON on the front of the DVD system to turn on to interlaced mode. 2) Press OPEN/CLOSE to open the system as this will invalidate the warranty. Refer to remedy a problem by following these hints, consult your TV's manual for repair. Check if the TV is switched on the remote control for help. Problem No power No picture Distorted picture Completely distorted picture or black/white picture with the DVD/ Player...
... Video In channel selection. Press the STANDBY ON on the front of the DVD system to turn on to interlaced mode. 2) Press OPEN/CLOSE to open the system as this will invalidate the warranty. Refer to remedy a problem by following these hints, consult your TV's manual for repair. Check if the TV is switched on the remote control for help. Problem No power No picture Distorted picture Completely distorted picture or black/white picture with the DVD/ Player...
User manual
Page 35
... output of the video signal is defective by the disc. Aim the Remote Control directly at the sensor on /off , then on the disc availability, some - Replace the batteries in the Remote Control. - Buttons do not work - DVD Player cannot read CDs/DVDs - Press STOP twice before sending the DVD Player for 5-10 seconds. Reset the unit by switching the player off - signs) as indicated. Refer to the instructions of the player. - Use a commonly available cleaning CD/DVD...
... output of the video signal is defective by the disc. Aim the Remote Control directly at the sensor on /off , then on the disc availability, some - Replace the batteries in the Remote Control. - Buttons do not work - DVD Player cannot read CDs/DVDs - Press STOP twice before sending the DVD Player for 5-10 seconds. Reset the unit by switching the player off - signs) as indicated. Refer to the instructions of the player. - Use a commonly available cleaning CD/DVD...

User manual
Page 36
... used to six channels of digital audio (front left and right, surround left and right. It dramatically increases the vertical resolution. This unit will be played back only in kilobits per seconds, or kbps. one sound field. Parental Control: A function of the DVD to limit playback of the disc by Dolby Laboratories containing up to hold a given length of music; Region code: A system for allowing selection of images, sounds, subtitles, multi...
... used to six channels of digital audio (front left and right, surround left and right. It dramatically increases the vertical resolution. This unit will be played back only in kilobits per seconds, or kbps. one sound field. Parental Control: A function of the DVD to limit playback of the disc by Dolby Laboratories containing up to hold a given length of music; Region code: A system for allowing selection of images, sounds, subtitles, multi...
Quick start guide
Page 1
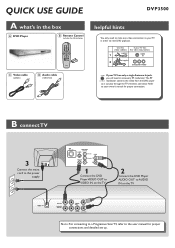
QUICK USE GUIDE A what's in order to view DVD playback. Refer to your TV in the box A DVD Player B Remote Control includes 2x AA batteries PREVIEW MUTE C Video cable (yellow) D Audio cable (red/white) DVP3500 helpful hints You only need an accessory RF modulator. B connect TV 3 Connect the mains cord to the power supply COMPONENT VIDEO IN S-VIDEO IN V (Pr/Cr) AUDIO OUT VIDEO IN U (Pb/Cb) Y COMPONENT VIDEO IN S-VIDEO IN V (Pr/Cr) AUDIO IN VIDEO IN U (Pb/Cb) Y 1 Connect the DVD Player VIDEO OUT to VIDEO IN...
QUICK USE GUIDE A what's in order to view DVD playback. Refer to your TV in the box A DVD Player B Remote Control includes 2x AA batteries PREVIEW MUTE C Video cable (yellow) D Audio cable (red/white) DVP3500 helpful hints You only need an accessory RF modulator. B connect TV 3 Connect the mains cord to the power supply COMPONENT VIDEO IN S-VIDEO IN V (Pr/Cr) AUDIO OUT VIDEO IN U (Pb/Cb) Y COMPONENT VIDEO IN S-VIDEO IN V (Pr/Cr) AUDIO IN VIDEO IN U (Pb/Cb) Y 1 Connect the DVD Player VIDEO OUT to VIDEO IN...
Quick start guide
Page 2
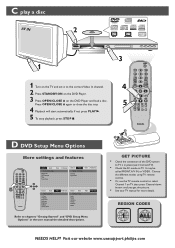
... General Audio Video - - Press OPEN/CLOSE / again to select Channel 1 on TV, then press Channel down button until you get the picture. • See your TV manual for more details. General Setup Page - - Downmix Digital Audio Preference General Audio Video - - REGION CODES 1 ALL NEEDS HELP? PREVIEW MUTE D DVD Setup Menu Options More settings and features 1 2 PREVIEW MUTE General Audio Video - - Speaker Setup Page - - Preference Page - - Choose the different modes using TV remote control. • Or, use the TV remote control to close the disc tray. 4 Playback will...
... General Audio Video - - Press OPEN/CLOSE / again to select Channel 1 on TV, then press Channel down button until you get the picture. • See your TV manual for more details. General Setup Page - - Downmix Digital Audio Preference General Audio Video - - REGION CODES 1 ALL NEEDS HELP? PREVIEW MUTE D DVD Setup Menu Options More settings and features 1 2 PREVIEW MUTE General Audio Video - - Speaker Setup Page - - Preference Page - - Choose the different modes using TV remote control. • Or, use the TV remote control to close the disc tray. 4 Playback will...


