
Leaflet
Page 2
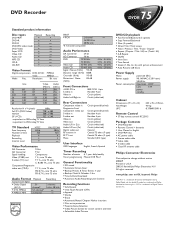
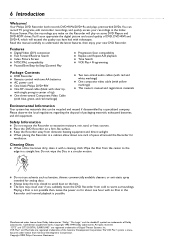
...Control Recording functions • Safe Record • One-Touch Record (OTR) • Append • Divide • Erase • Automatic/Manual Chapter Marker insertion • Disc write protection • Favorite Scene Selection • Index Picture Screen for instant content overview • Selectable ...8226; AC power cable • Stereo audio cable • Video cable • S-video cable • Coax RF antenna cable Philips Consumer Electronics Data subject to 250 analog TV lines TV Standard Scan frequency Number of lines Playback Recording Internal tuner NTSC 60Hz 525 &#...
...Control Recording functions • Safe Record • One-Touch Record (OTR) • Append • Divide • Erase • Automatic/Manual Chapter Marker insertion • Disc write protection • Favorite Scene Selection • Index Picture Screen for instant content overview • Selectable ...8226; AC power cable • Stereo audio cable • Video cable • S-video cable • Coax RF antenna cable Philips Consumer Electronics Data subject to 250 analog TV lines TV Standard Scan frequency Number of lines Playback Recording Internal tuner NTSC 60Hz 525 &#...

Quick start guide
Page 1
... R PR IN - Match the cable colors to the jack colors. 4 Because you see the blue Philips DVD background picture or the Initial Setup Screen on the TV (when the DVD Recorder is on). • If your TV manual for connection instructions. 1 Details are not using a Cable Box, you turn on the front...or 75 ohm input) jack, see the DVD Recorder's Initial Setup menu on the TV the first time you should see the DVD Recorder's owner's manual for details. EXT 1 COAX OUT G-LINK DIGITAL AUDIO OUT OPTICAL OUT 1 Connect your Antenna or Cable TV signal to the ANTENNA jack on the rear...
... R PR IN - Match the cable colors to the jack colors. 4 Because you see the blue Philips DVD background picture or the Initial Setup Screen on the TV (when the DVD Recorder is on). • If your TV manual for connection instructions. 1 Details are not using a Cable Box, you turn on the front...or 75 ohm input) jack, see the DVD Recorder's Initial Setup menu on the TV the first time you should see the DVD Recorder's owner's manual for details. EXT 1 COAX OUT G-LINK DIGITAL AUDIO OUT OPTICAL OUT 1 Connect your Antenna or Cable TV signal to the ANTENNA jack on the rear...

Quick start guide
Page 2
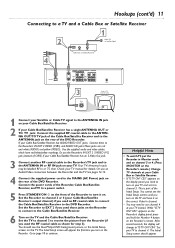
...with red/white markings) to the red/white, right/left AUDIO IN jacks. See the Cable Box owner's manual for details. 3 Connect the supplied video cable (with yellow markings) to the yellow VIDEO (CVBS) OUT ...on the DVD Recorder's power. 7 Press STANDBY y to your Cable Box. See the Cable Box owner's manual for details. 2 Connect an RF coaxial cable to the OUT jack of the Cable Box and to a power...and to the correct Audio/Video In channel. The G-Link cable's sensor should see the blue Philips DVD background picture or the Initial Setup Screen on the TV (when the DVD Recorder is still ...
...with red/white markings) to the red/white, right/left AUDIO IN jacks. See the Cable Box owner's manual for details. 3 Connect the supplied video cable (with yellow markings) to the yellow VIDEO (CVBS) OUT ...on the DVD Recorder's power. 7 Press STANDBY y to your Cable Box. See the Cable Box owner's manual for details. 2 Connect an RF coaxial cable to the OUT jack of the Cable Box and to a power...and to the correct Audio/Video In channel. The G-Link cable's sensor should see the blue Philips DVD background picture or the Initial Setup Screen on the TV (when the DVD Recorder is still ...
Quick start guide
Page 6
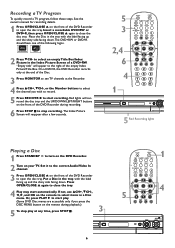
... UP DOWN RIGHT DVDR 80 OPEN The Index Picture Screen will appear to the right of the DVD Recorder to start automatically. See the owner's manual for recording details. 1 Press OPEN/CLOSE A on the remote during recording. 6 Press STOP C to stop play at the Recorder. 4 Press 8CH+, 9CH-, or the Number...
... UP DOWN RIGHT DVDR 80 OPEN The Index Picture Screen will appear to the right of the DVD Recorder to start automatically. See the owner's manual for recording details. 1 Press OPEN/CLOSE A on the remote during recording. 6 Press STOP C to stop play at the Recorder. 4 Press 8CH+, 9CH-, or the Number...
Quick start guide
Page 7
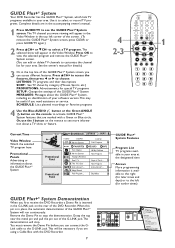
...a TV program. Paid Program Instructional T... Remove the Demo Pin to see more information about a TV show will appear in the accompanying owner's manual. 1 Press GUIDE/TV to stop . This may be necessary if you need assistance or service. Use it to select or record TV programs...Instructional T... Big Valley GUIDE Plus+® System Features Program List TV programs available in the top line of Our L... See the owner's manual for details.) 3 Or, in your area at the designated time Arrows More programming information is inserted in place, the automatic demonstration of ...
...a TV program. Paid Program Instructional T... Remove the Demo Pin to see more information about a TV show will appear in the accompanying owner's manual. 1 Press GUIDE/TV to stop . This may be necessary if you need assistance or service. Use it to select or record TV programs...Instructional T... Big Valley GUIDE Plus+® System Features Program List TV programs available in the top line of Our L... See the owner's manual for details.) 3 Or, in your area at the designated time Arrows More programming information is inserted in place, the automatic demonstration of ...
Quick start guide
Page 8
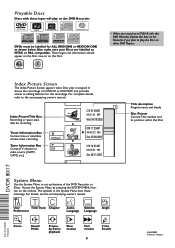
...Program name and details Disc Pointer Current Title number and its position within the Disc System Menu Use the System Menu to the accompanying owner's manual. W X YZ User Title/Track Chapter Preferences Audio Subtitle Language Language Angle ad HE Zoom Sound Mode Frameby-frame playback Slow motion Fast motion...will play on other DVD Players. M6 Sun 07/06/2003 L C10 12:01AM 00:58:53 . For details, see the accompanying owner's manual. Playable Discs Discs with this DVD Recorder, finalize the Disc at the Recorder if you plan to play the Disc on the DVD Recorder. ...
...Program name and details Disc Pointer Current Title number and its position within the Disc System Menu Use the System Menu to the accompanying owner's manual. W X YZ User Title/Track Chapter Preferences Audio Subtitle Language Language Angle ad HE Zoom Sound Mode Frameby-frame playback Slow motion Fast motion...will play on other DVD Players. M6 Sun 07/06/2003 L C10 12:01AM 00:58:53 . For details, see the accompanying owner's manual. Playable Discs Discs with this DVD Recorder, finalize the Disc at the Recorder if you plan to play the Disc on the DVD Recorder. ...

User manual
Page 1
CALL US! CALL US BEFORE YOU CONSIDER RETURNING THE PRODUCT. 1-800-531-0039 OR VISIT US ON THE WEB AT WWW.PHILIPS.COM NEED HELP? PHILIPS REPRESENTATIVES ARE READY TO HELP YOU WITH ANY QUESTIONS ABOUT YOUR NEW PRODUCT. See why inside. WE CAN GUIDE YOU THROUGH CONNECTIONS, FIRST-TIME SETUP, AND ANY OF THE FEATURES. WE WANT YOU TO START ENJOYING YOUR NEW PRODUCT RIGHT AWAY. Return your Warranty Registration Card within 10 days. Digital Video Disc Recorder Owner's Manual ® DVDR75 Important!
CALL US! CALL US BEFORE YOU CONSIDER RETURNING THE PRODUCT. 1-800-531-0039 OR VISIT US ON THE WEB AT WWW.PHILIPS.COM NEED HELP? PHILIPS REPRESENTATIVES ARE READY TO HELP YOU WITH ANY QUESTIONS ABOUT YOUR NEW PRODUCT. See why inside. WE CAN GUIDE YOU THROUGH CONNECTIONS, FIRST-TIME SETUP, AND ANY OF THE FEATURES. WE WANT YOU TO START ENJOYING YOUR NEW PRODUCT RIGHT AWAY. Return your Warranty Registration Card within 10 days. Digital Video Disc Recorder Owner's Manual ® DVDR75 Important!
User manual
Page 6
...latest features, then enjoy your recordings in center of space all around the Recorder for analog discs. Copyright 2003 Philips Consumer Electronics. Please observe the local regulations regarding the disposal of the Gemstar Development Corporation. Confidential unpublished works. ... Two two-strand audio cables (with red and white markings) q One composite video cable (with yellow markings) q This owner's manual and registration materials Environmental Information Your system has materials that can be recycled and reused if disassembled by -Step/Zoomed Play q Progressive...
...latest features, then enjoy your recordings in center of space all around the Recorder for analog discs. Copyright 2003 Philips Consumer Electronics. Please observe the local regulations regarding the disposal of the Gemstar Development Corporation. Confidential unpublished works. ... Two two-strand audio cables (with red and white markings) q One composite video cable (with yellow markings) q This owner's manual and registration materials Environmental Information Your system has materials that can be recycled and reused if disassembled by -Step/Zoomed Play q Progressive...
User manual
Page 8
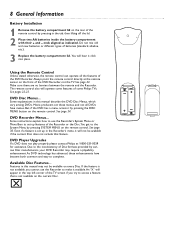
...Menus, which vary among DVDs. As DVD technology has advanced, these menus, and not all the features of the DVD Recorder. Features in this manual may require a playability enhancement. An "X" will appear in the Recorder's menu, it by various Disc manufacturers, your DVD Recorder may not be ... the battery compartment with their + and - The remote control also will hear it available. You will operate some features of some Philips TVs. See page 34. + DVD Recorder Menus... See page 30. DVD Player Upgrades If a DVD does not play properly, please contact...
...Menus, which vary among DVDs. As DVD technology has advanced, these menus, and not all the features of the DVD Recorder. Features in this manual may require a playability enhancement. An "X" will appear in the Recorder's menu, it by various Disc manufacturers, your DVD Recorder may not be ... the battery compartment with their + and - The remote control also will hear it available. You will operate some features of some Philips TVs. See page 34. + DVD Recorder Menus... See page 30. DVD Player Upgrades If a DVD does not play properly, please contact...
User manual
Page 9
... that lets you chose. Your existing equipment, especially your TV, will not use it only if the TV has Progressive Scan. Determine how to the manuals of your TV manual for details. Once you can see the blue Philips DVD background picture on page 10.
... that lets you chose. Your existing equipment, especially your TV, will not use it only if the TV has Progressive Scan. Determine how to the manuals of your TV manual for details. Once you can see the blue Philips DVD background picture on page 10.
User manual
Page 10
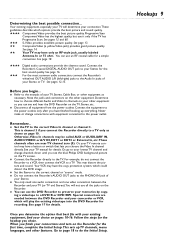
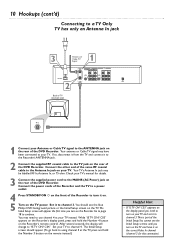
Connect the other end of the same RF coaxial cable to the Antenna In jack on your TV's manual for this connection). Your TV's Antenna In jack may need to turn on the TV and have been connected to your Antenna or Cable TV ... channel (channel 3 for details. 3 Connect the supplied power cord to the TV jack on the rear of the Initial Setup.You cannot see the blue Philips DVD background picture or the Initial Setup screen on the rear of the DVD Recorder. The Initial Setup screen will change to channel 3.This is...
Connect the other end of the same RF coaxial cable to the Antenna In jack on your TV's manual for this connection). Your TV's Antenna In jack may need to turn on the TV and have been connected to your Antenna or Cable TV ... channel (channel 3 for details. 3 Connect the supplied power cord to the TV jack on the rear of the Initial Setup.You cannot see the blue Philips DVD background picture or the Initial Setup screen on the rear of the DVD Recorder. The Initial Setup screen will change to channel 3.This is...
User manual
Page 11
... "IS TV ON? If your Cable Box/Satellite Receiver has AUDIO/VIDEO OUT jacks: Connect them to continue. Check your TV manual for step 3). You cannot see the blue Philips DVD background picture or the Initial Setup screen on the TV. Use the supplied audio and video cables, which have it on...
... "IS TV ON? If your Cable Box/Satellite Receiver has AUDIO/VIDEO OUT jacks: Connect them to continue. Check your TV manual for step 3). You cannot see the blue Philips DVD background picture or the Initial Setup screen on the TV. Use the supplied audio and video cables, which have it on...
User manual
Page 12
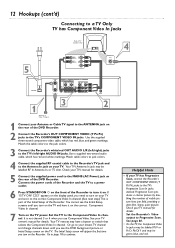
...DVD background picture or Initial Setup screen on the rear of the DVD Recorder. See your TV owner's manual for details. See page 60. • On the TV, the Component Video In jacks may be ... go to your lowest TV channel and change channels down until you use Component Video. Check your TV's manual for details. 5 Connect the supplied power cord to the MAINS (AC Power) jack on the TV. ... STANDBY-ON y on the front of the Recorder to continue. 4 Helpful Hints • If your TV manual for details. Set the TV to the TV's Progressive Scan In jacks instead. It is part of the ...
...DVD background picture or Initial Setup screen on the rear of the DVD Recorder. See your TV owner's manual for details. See page 60. • On the TV, the Component Video In jacks may be ... go to your lowest TV channel and change channels down until you use Component Video. Check your TV's manual for details. 5 Connect the supplied power cord to the MAINS (AC Power) jack on the TV. ... STANDBY-ON y on the front of the Recorder to continue. 4 Helpful Hints • If your TV manual for details. Set the TV to the TV's Progressive Scan In jacks instead. It is part of the ...
User manual
Page 13
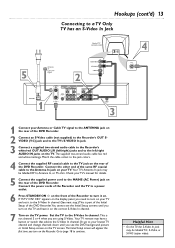
... you see the Initial Setup screens until you are using S-Video. The supplied two-strand audio cable has red and white markings. Check your TV's manual for details. 5 Connect the supplied power cord to the MAINS (AC Power) jack on the Recorder. The Initial Setup screen will appear the first time...
... you see the Initial Setup screens until you are using S-Video. The supplied two-strand audio cable has red and white markings. Check your TV's manual for details. 5 Connect the supplied power cord to the MAINS (AC Power) jack on the Recorder. The Initial Setup screen will appear the first time...
User manual
Page 14
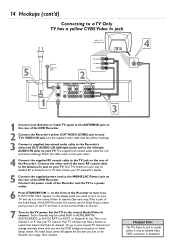
... other end of the same RF coaxial cable to the left /right) jacks and to the Antenna In jack on your TV. Check your TV manual for details. 5 Connect the supplied power cord to the correct Audio/Video In channel. This is usually yellow. The Initial Setup screen will appear the... Initial Setup of the DVD Recorder.You cannot see the DVD background picture or Initial Setup screen. Such channels may have it to your TV manual. CO3" appears on the display panel, you turn on the TV and have a button or switch that has yellow markings. 3 Connect a supplied two-strand audio...
... other end of the same RF coaxial cable to the left /right) jacks and to the Antenna In jack on your TV. Check your TV manual for details. 5 Connect the supplied power cord to the correct Audio/Video In channel. This is usually yellow. The Initial Setup screen will appear the... Initial Setup of the DVD Recorder.You cannot see the DVD background picture or Initial Setup screen. Such channels may have it to your TV manual. CO3" appears on the display panel, you turn on the TV and have a button or switch that has yellow markings. 3 Connect a supplied two-strand audio...
User manual
Page 15
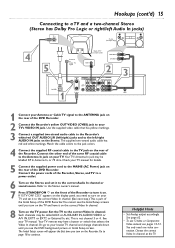
Connect the other end of the same RF coaxial cable to the Antenna In jack on your TV manual for details. 5 Connect the supplied power cord to the MAINS (AC Power) jack on the rear of ...of the Recorder to turn on the Recorder. Check your TV. Or, go to your TV manual. Match the cable colors to the jack colors. 4 Connect the supplied RF coaxial cable to continue. Refer to the ...Stereo owner's manual. 7 Press STANDBY-ON y on the front of the Recorder. If "IS TV ON? See your lowest ...
Connect the other end of the same RF coaxial cable to the Antenna In jack on your TV manual for details. 5 Connect the supplied power cord to the MAINS (AC Power) jack on the rear of ...of the Recorder to turn on the Recorder. Check your TV. Or, go to your TV manual. Match the cable colors to the jack colors. 4 Connect the supplied RF coaxial cable to continue. Refer to the ...Stereo owner's manual. 7 Press STANDBY-ON y on the front of the Recorder. If "IS TV ON? See your lowest ...
User manual
Page 16
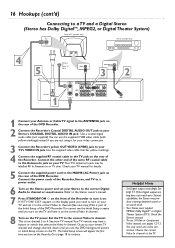
... Antenna In jack may produce a strong, distorted sound or no sound at the TV. Helpful Hints • Set Digital output accordingly. Check the Stereo's manual. • To use the supplied CVBS video cable (with yellow markings) instead if you turn on the TV and have a button or switch that has... The Initial Setup screen will appear the first time you are not using it for details. 5 Connect the supplied power cord to the Stereo owner's manual. 7 Press STANDBY-ON y on the display panel, you see pages 12-13. If the Digital output setting does not match your lowest TV channel...
... Antenna In jack may produce a strong, distorted sound or no sound at the TV. Helpful Hints • Set Digital output accordingly. Check the Stereo's manual. • To use the supplied CVBS video cable (with yellow markings) instead if you turn on the TV and have a button or switch that has... The Initial Setup screen will appear the first time you are not using it for details. 5 Connect the supplied power cord to the Stereo owner's manual. 7 Press STANDBY-ON y on the display panel, you see pages 12-13. If the Digital output setting does not match your lowest TV channel...
User manual
Page 17
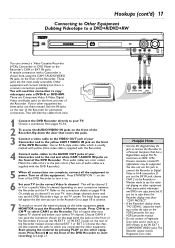
... which is usually marked with yellow. (One video cable is supplied with a Camcorder is located after your highest TV channel and before your VCR/Camcorder manual. • Do not connect a Progressive Scan video source (such as a DVD Player) to the IN EXT 1 COMPONENT VIDEO jacks.The Recorder cannot receive Progressive Scan...
... which is usually marked with yellow. (One video cable is supplied with a Camcorder is located after your highest TV channel and before your VCR/Camcorder manual. • Do not connect a Progressive Scan video source (such as a DVD Player) to the IN EXT 1 COMPONENT VIDEO jacks.The Recorder cannot receive Progressive Scan...
User manual
Page 18
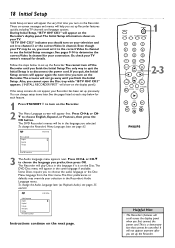
....The screens will appear on the Recorder's display panel.The Initial Setup information shows on your TV. "IS TV ON? Or, check your TV owner's manual for your connection. If you quit, the Initial Setup screens will appear again the next time you turn on your television and set up the...
....The screens will appear on the Recorder's display panel.The Initial Setup information shows on your TV. "IS TV ON? Or, check your TV owner's manual for your connection. If you quit, the Initial Setup screens will appear again the next time you turn on your television and set up the...
User manual
Page 28
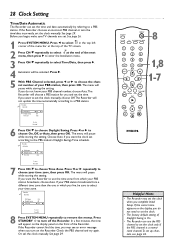
...4 Automatic will choose a PBS station for you begin, make sure TV channels are set according to remove the menus. Or, set the clock manually. or : to choose Daylight Saving. The menu will pause while storing the setting. The menu will pause while storing the setting. See page ...know your PBS station broadcasts, choose Auto. If the Recorder chooses an incorrect PBS channel or sets the time/date incorrectly, set the clock manually. Press ; B To store Press OK 8 Press SYSTEM MENU repeatedly to the PBS station's Daylight Savings Time schedule. If the Recorder cannot...
...4 Automatic will choose a PBS station for you begin, make sure TV channels are set according to remove the menus. Or, set the clock manually. or : to choose Daylight Saving. The menu will pause while storing the setting. The menu will pause while storing the setting. See page ...know your PBS station broadcasts, choose Auto. If the Recorder chooses an incorrect PBS channel or sets the time/date incorrectly, set the clock manually. Press ; B To store Press OK 8 Press SYSTEM MENU repeatedly to the PBS station's Daylight Savings Time schedule. If the Recorder cannot...

