
Leaflet
Page 2
... Parental Control • Ease of sending a field comprising the odd lines to the screen first, followed by the field with i.LINK digital input DVDR615/37 Specifications Picture/Display • Aspect ratio: 4:3, 16:9 • D/A converter: 10 bit, 54 MHz • A/D converter: 10 bit, 54...kHz • A/D converter: 24 bit, 96 kHz • Signal to watch. Coaxial digital audio output Date of Koninklijke Philips Electronics N.V. All Rights reserved. Philips DVD Recorders store audio in the same format, so it carries all audio and video signals via a single cable.With i.LINK Digital...
... Parental Control • Ease of sending a field comprising the odd lines to the screen first, followed by the field with i.LINK digital input DVDR615/37 Specifications Picture/Display • Aspect ratio: 4:3, 16:9 • D/A converter: 10 bit, 54 MHz • A/D converter: 10 bit, 54...kHz • A/D converter: 24 bit, 96 kHz • Signal to watch. Coaxial digital audio output Date of Koninklijke Philips Electronics N.V. All Rights reserved. Philips DVD Recorders store audio in the same format, so it carries all audio and video signals via a single cable.With i.LINK Digital...

User manual
Page 7
English Recording Discs for recording 37 Recording settings 37 Recording mode 38 Recording language 38 Inserting chapter markers 38 Filter mode 39 Manual recording 39-40 Manual recording with automatic turn-off (one touch recording 40 Deleting a recording 40 YesDVDTM Creating a YesDVD disc 41 Printing a YesDVD customized case coversheet 41 YesDVD setup and software registration 42-43 Timer Recording Introduction 44 Programming recordings 44...
English Recording Discs for recording 37 Recording settings 37 Recording mode 38 Recording language 38 Inserting chapter markers 38 Filter mode 39 Manual recording 39-40 Manual recording with automatic turn-off (one touch recording 40 Deleting a recording 40 YesDVDTM Creating a YesDVD disc 41 Printing a YesDVD customized case coversheet 41 YesDVD setup and software registration 42-43 Timer Recording Introduction 44 Programming recordings 44...
User manual
Page 37
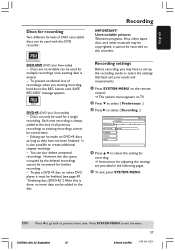
... for recording Two different formats of DVD recordable discs can be used for multiple recordings once existing data is erased. - Discs are provided in the following pages. 5 To exit, press SYSTEM-MENU. exit the menu. 37 DVDR610_615_37_Engfinal434 37 8/16/04, 4:06 PM 3139 246 14221 TIPS: PTorepssla1y atoDgVoDb+aRckotnooptrheevrioDuVsDmepnlauyeitresm, s.eeP"reFsinsaSlizYinSgTdEisMc -(MDVEDN+UR)t"o. DVD+RW (DVD 'plus ' Recordable) - DVD+R (DVD 'plus...
... for recording Two different formats of DVD recordable discs can be used for multiple recordings once existing data is erased. - Discs are provided in the following pages. 5 To exit, press SYSTEM-MENU. exit the menu. 37 DVDR610_615_37_Engfinal434 37 8/16/04, 4:06 PM 3139 246 14221 TIPS: PTorepssla1y atoDgVoDb+aRckotnooptrheevrioDuVsDmepnlauyeitresm, s.eeP"reFsinsaSlizYinSgTdEisMc -(MDVEDN+UR)t"o. DVD+RW (DVD 'plus ' Recordable) - DVD+R (DVD 'plus...
User manual
Page 45
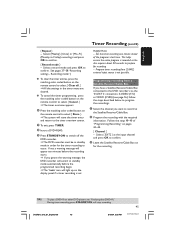
.... 3 Leave the Satellite Receiver/Cable Box on for the timer recording to prepare for recording. - Follow the steps 1~9 of the program's start time. See pages 37~38 "Recording settings - Helpful Hints: - Programming recording from {CAM2} external input source is not possible. Select { ...the timer entries, press the matching color coded button on the remote control to the DVD recorder's via the 'IN-EXT 2' connection, S-VIDEO (Y/C) or VIDEO (CVBS) (see "Finalizing disc (DVD+R)." English Timer Recording (cont'd) { Repeat } - G To cancel the timer programming, press the matching...
.... 3 Leave the Satellite Receiver/Cable Box on for the timer recording to prepare for recording. - Follow the steps 1~9 of the program's start time. See pages 37~38 "Recording settings - Helpful Hints: - Programming recording from {CAM2} external input source is not possible. Select { ...the timer entries, press the matching color coded button on the remote control to the DVD recorder's via the 'IN-EXT 2' connection, S-VIDEO (Y/C) or VIDEO (CVBS) (see "Finalizing disc (DVD+R)." English Timer Recording (cont'd) { Repeat } - G To cancel the timer programming, press the matching...
User manual
Page 57
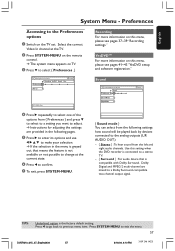
... DVD recorder is connected to a stereo TV. - { Surround } : For audio device that means the feature is not available or not possible to change at the TV. 2 Press SYSTEM-MENU on the remote control. ➜ The system menu appears on this menu, please see pages 37~39 "Recording... settings." TIPS: Underlined option is compatible with Dolby Surround. Navigate to menu item Recording YesDVD Sound Disc Preferences STOP Set-up [SYSTEM] = Exit Sound DVD-VIDEO-TITLE 04|CO1 Sound Preferences Sound Mode Night Mode STOP...
... DVD recorder is connected to a stereo TV. - { Surround } : For audio device that means the feature is not available or not possible to change at the TV. 2 Press SYSTEM-MENU on the remote control. ➜ The system menu appears on this menu, please see pages 37~39 "Recording... settings." TIPS: Underlined option is compatible with Dolby Surround. Navigate to menu item Recording YesDVD Sound Disc Preferences STOP Set-up [SYSTEM] = Exit Sound DVD-VIDEO-TITLE 04|CO1 Sound Preferences Sound Mode Night Mode STOP...


