
Leaflet
Page 3
or their respective owners. All Rights reserved. www.philips.com Trademarks are subject to change without notice. DVD player/recorder Specifications DVDR3400/37 Picture/Display • D/A converter: 10 bit, 54 MHz • A/D converter: 10 bit,...: 120V, 60Hz • Standby power consumption: < 3 W • Power consumption: 27 W (Typical) W Accessories • Included Accessories: Remote Control, User Manual, Quick start guide, RF antenna cable, Warranty Leaflet, 2 x AAA Batteries, Audio/Video cable • Remote Control 12NC: 242254900926 Dimensions • Set dimensions (W ...
or their respective owners. All Rights reserved. www.philips.com Trademarks are subject to change without notice. DVD player/recorder Specifications DVDR3400/37 Picture/Display • D/A converter: 10 bit, 54 MHz • A/D converter: 10 bit,...: 120V, 60Hz • Standby power consumption: < 3 W • Power consumption: 27 W (Typical) W Accessories • Included Accessories: Remote Control, User Manual, Quick start guide, RF antenna cable, Warranty Leaflet, 2 x AAA Batteries, Audio/Video cable • Remote Control 12NC: 242254900926 Dimensions • Set dimensions (W ...
User manual
Page 6
... recording...34 Watching another TV program during recording 34 Timer Recording ...35 About timer recording...35 Timer recording (VCR Plus+® System)...35 Timer recording (manually)...36 Changing/ Deleting a timer recording ...38 6
... recording...34 Watching another TV program during recording 34 Timer Recording ...35 About timer recording...35 Timer recording (VCR Plus+® System)...35 Timer recording (manually)...36 Changing/ Deleting a timer recording ...38 6

User manual
Page 9
... regions of the world, thus all regions ('ALL'.) DVDs from other devices Step 3: Basic installation and set -up Please take time to read this user manual before they can be played back on the rear or bottom of copy-protected material, including computer programs, files, broadcasts and sound recordings, may be...±RW or DVD±R and play Region 1 DVDs or DVDs manufactured to be played on DVD players and DVD-ROM drives. English Introduction Your Philips recorder allows you make with this recorder will only play pre-recorded DVDs.
... regions of the world, thus all regions ('ALL'.) DVDs from other devices Step 3: Basic installation and set -up Please take time to read this user manual before they can be played back on the rear or bottom of copy-protected material, including computer programs, files, broadcasts and sound recordings, may be...±RW or DVD±R and play Region 1 DVDs or DVDs manufactured to be played on DVD players and DVD-ROM drives. English Introduction Your Philips recorder allows you make with this recorder will only play pre-recorded DVDs.

User manual
Page 20
... (CVBS) PR COMPONENT Y VIDEO L L R R S-VIDEO (Y/C) COAXIAL PB (DIGITAL AUDIO) AUDIO C TV AU D IO O UT S-V ID E O IN V ID E O IN Connecting to the respective connected device's user manual for the complete connections to your Cable Box/Satellite Receiver has video/audio output jacks, A Keep the existing antenna connection from the Antenna/Cable TV...
... (CVBS) PR COMPONENT Y VIDEO L L R R S-VIDEO (Y/C) COAXIAL PB (DIGITAL AUDIO) AUDIO C TV AU D IO O UT S-V ID E O IN V ID E O IN Connecting to the respective connected device's user manual for the complete connections to your Cable Box/Satellite Receiver has video/audio output jacks, A Keep the existing antenna connection from the Antenna/Cable TV...
User manual
Page 21
... replace the VCR for all the connections from video tape to a DVD±R/±RW and allows the VCR to the respective connected device's user manual for playback if the recorder is a VCR or an additional device in between, the picture quality may be recorded. - Just unplug all your VCR. If...
... replace the VCR for all the connections from video tape to a DVD±R/±RW and allows the VCR to the respective connected device's user manual for playback if the recorder is a VCR or an additional device in between, the picture quality may be recorded. - Just unplug all your VCR. If...

User manual
Page 22
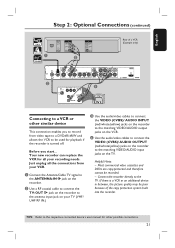
... panel of a VCR (Example only) Connecting to a VCR and Cable Box/Satellite Receiver A Connect the Antenna/Cable TV signal to the respective connected device's user manual for other possible connections. 22 English Step 2: Optional Connections (continued) A IN CABLE SATELLITE ANTENNA Front Panel of recorder F OUT RF VIDEO AUDIO R L S-VIDEO Rear of...
... panel of a VCR (Example only) Connecting to a VCR and Cable Box/Satellite Receiver A Connect the Antenna/Cable TV signal to the respective connected device's user manual for other possible connections. 22 English Step 2: Optional Connections (continued) A IN CABLE SATELLITE ANTENNA Front Panel of recorder F OUT RF VIDEO AUDIO R L S-VIDEO Rear of...

User manual
Page 23
... Video, CVBS.) A Use a video cable (not supplied) to connect the CAM 1 jack on the front panel of the recorder to the respective connected device's user manual for other possible connections. 23 English Step 2: Optional Connections (continued) DV OUT L AR B OR Connecting a camcorder to the front jacks You can use the front...
... Video, CVBS.) A Use a video cable (not supplied) to connect the CAM 1 jack on the front panel of the recorder to the respective connected device's user manual for other possible connections. 23 English Step 2: Optional Connections (continued) DV OUT L AR B OR Connecting a camcorder to the front jacks You can use the front...

User manual
Page 24
Archiving from the USB port. Helpful Hints: - TIPS: Refer to the respective connected device's user manual for other USB devices except to view the files stored in the above illustration.) B Press USB on the remote control to a USB flash drive / USB ...
Archiving from the USB port. Helpful Hints: - TIPS: Refer to the respective connected device's user manual for other USB devices except to view the files stored in the above illustration.) B Press USB on the remote control to a USB flash drive / USB ...

User manual
Page 25
When you complete the connections and turn on the recorder for this recorder's on the user manual. You may not correspond to Channel 1 on your TV, then press the Channel Down button on your country or region. The setup menu appears... Usually this recorder. Setup Menu - TIPS: Press X to go to the illustrations shown on -screen display. It may press ° button repeatedly on your TV manual for more details. Please see the blue DVD background screen. Language settings can only be called FRONT, A/V IN, VIDEO. B Turn on . English Step 3: Installation...
When you complete the connections and turn on the recorder for this recorder's on the user manual. You may not correspond to Channel 1 on your TV, then press the Channel Down button on your country or region. The setup menu appears... Usually this recorder. Setup Menu - TIPS: Press X to go to the illustrations shown on -screen display. It may press ° button repeatedly on your TV manual for more details. Please see the blue DVD background screen. Language settings can only be called FRONT, A/V IN, VIDEO. B Turn on . English Step 3: Installation...

User manual
Page 27
... (mm / dd / yy) Time (hh : mm : ss) Date-Time Setting Time Zone Day Light Saving 01 / 01 / 06 01 : 05 : 08 PM Manual Hawaii Off Adjust date and time manually A Use ST keys to highlight { Date-Time Setting } and press OK to edit the fields. The basic installation is complete. To adjust... to access its options. Press SETUP to confirm. Use ST keys to change number and use ST keys to confirm. B Use ST keys to highlight { Manual } press OK to confirm. B Use ST keys to confirm. B Use ST keys to highlight { On } press OK to confirm. C Press SETUP to access its options...
... (mm / dd / yy) Time (hh : mm : ss) Date-Time Setting Time Zone Day Light Saving 01 / 01 / 06 01 : 05 : 08 PM Manual Hawaii Off Adjust date and time manually A Use ST keys to highlight { Date-Time Setting } and press OK to edit the fields. The basic installation is complete. To adjust... to access its options. Press SETUP to confirm. Use ST keys to change number and use ST keys to confirm. B Use ST keys to highlight { Manual } press OK to confirm. B Use ST keys to confirm. B Use ST keys to highlight { On } press OK to confirm. C Press SETUP to access its options...

User manual
Page 35
.... You can find this recorder, you can schedule up to the correct viewing channel for programming is not possible. Before you wish to record. Using manual timer schedule. All the information required by this recorder for the recorder (e.g. 'EXT', '0', 'AV'.) B Press VCR Plus+ on the DVD±R/±RW before recording...
.... You can find this recorder, you can schedule up to the correct viewing channel for programming is not possible. Before you wish to record. Using manual timer schedule. All the information required by this recorder for the recorder (e.g. 'EXT', '0', 'AV'.) B Press VCR Plus+ on the DVD±R/±RW before recording...

User manual
Page 36
E Press TIMER to the correct viewing channel for more information. Timer recording (manually) A Turn on the TV to exit the menu. Before you will have used to connect the external device. { Rec Mode } Select the mode of the ...TV program has not been assigned to the PlusCode. G Press STANDBY-ON to turn off the recorder to manually key in the menu and press OK. RECORD settings - The VCR Plus+® program information will be shown on the TV. The timer editor menu...
E Press TIMER to the correct viewing channel for more information. Timer recording (manually) A Turn on the TV to exit the menu. Before you will have used to connect the external device. { Rec Mode } Select the mode of the ...TV program has not been assigned to the PlusCode. G Press STANDBY-ON to turn off the recorder to manually key in the menu and press OK. RECORD settings - The VCR Plus+® program information will be shown on the TV. The timer editor menu...

User manual
Page 37
... page. Set the timer recording one minute ahead of the program's start time of recording (hours : minutes.) { End } Enter the end time of "Timer Recording (manually)" on other DVD players". 37 F Press TIMER to standby mode. TIPS: Ensure that there is recorded as the input source for recording. To cancel the...
... page. Set the timer recording one minute ahead of the program's start time of recording (hours : minutes.) { End } Enter the end time of "Timer Recording (manually)" on other DVD players". 37 F Press TIMER to standby mode. TIPS: Ensure that there is recorded as the input source for recording. To cancel the...

User manual
Page 43
... reader into the USB port. B Press PLAY/PAUSE u to play, then press OK. Playing from the USB port. The content menu appears on this user manual. For more playback information, refer to first select the subtitle file from your computer onto a CD-R/RW, DVD±R/±RW or USB flash drive...
... reader into the USB port. B Press PLAY/PAUSE u to play, then press OK. Playing from the USB port. The content menu appears on this user manual. For more playback information, refer to first select the subtitle file from your computer onto a CD-R/RW, DVD±R/±RW or USB flash drive...
User manual
Page 56
... chapter - Clock Date (mm / dd / yy) Time (hh : mm : ss) Date-Time Setting Time Zone Day Light Saving 01 / 01 / 06 01 : 05 : 08 PM Manual Hawaii Off See this chapter "CLOCK Settings"
... chapter - Clock Date (mm / dd / yy) Time (hh : mm : ss) Date-Time Setting Time Zone Day Light Saving 01 / 01 / 06 01 : 05 : 08 PM Manual Hawaii Off See this chapter "CLOCK Settings"
User manual
Page 59
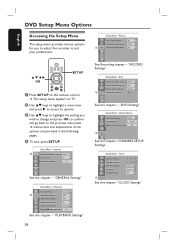
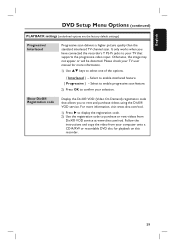
... code that supports the progressive video input. Please check your TV that allows you have connected the recorder's Y Pb Pr jacks to your TV user manual for playback on this recorder. 59 English DVD Setup Menu Options (continued) PLAYBACK settings (underlined options are the factory default settings) Progressive/ Interlaced Progressive scan...
... code that supports the progressive video input. Please check your TV that allows you have connected the recorder's Y Pb Pr jacks to your TV user manual for playback on this recorder. 59 English DVD Setup Menu Options (continued) PLAYBACK settings (underlined options are the factory default settings) Progressive/ Interlaced Progressive scan...

User manual
Page 62
... press t to return to the antenna wall outlet. Press OK on the recorder. Use WX keys to enter the frequency. - Use the numeric keypad 0-9 to manually search through the frequency. - Channel Search 2) Press OK to confirm your preference and improve the reception and the sound quality of that you wish to...
... press t to return to the antenna wall outlet. Press OK on the recorder. Use WX keys to enter the frequency. - Use the numeric keypad 0-9 to manually search through the frequency. - Channel Search 2) Press OK to confirm your preference and improve the reception and the sound quality of that you wish to...

User manual
Page 63
... control. { Fine-Tune } - The TV channel can only be accessed using the CH+- Select this to set the channel to fine-tune the TV channel manually if the reception is poor. Select this to be skipped. { No } -
... control. { Fine-Tune } - The TV channel can only be accessed using the CH+- Select this to set the channel to fine-tune the TV channel manually if the reception is poor. Select this to be skipped. { No } -

User manual
Page 64
...-time settings. { On } - Select an appropriate setting to adjust the automatic date-time settings: { Hawaii }, { Alaska }, { Pacific }, { Mountain }, { Central }, { Eastern } or { Alantic }. Select this to manually set the date and time. Select to activate summer time setting. { Off } - Select this to deactivate summer time setting. 64 Select this to activate automatic... different entry fields, then press OK to enable/disable the automatic setting of date and time. - This feature is dependent on your local broadcaster. { Auto } { Manual } -
...-time settings. { On } - Select an appropriate setting to adjust the automatic date-time settings: { Hawaii }, { Alaska }, { Pacific }, { Mountain }, { Central }, { Eastern } or { Alantic }. Select this to manually set the date and time. Select to activate summer time setting. { Off } - Select this to deactivate summer time setting. 64 Select this to activate automatic... different entry fields, then press OK to enable/disable the automatic setting of date and time. - This feature is dependent on your local broadcaster. { Auto } { Manual } -
User manual
Page 70
... eject the disc. A DVD disc contains Titles and Chapters, which are compatible with any more recordings. You can connect a DV-equipped camcorder to these recordings manually or have them automatically inserted at 5-minute intervals. Finalizing a disc locks the disc so it can only record on a single disc at the highest quality...
... eject the disc. A DVD disc contains Titles and Chapters, which are compatible with any more recordings. You can connect a DV-equipped camcorder to these recordings manually or have them automatically inserted at 5-minute intervals. Finalizing a disc locks the disc so it can only record on a single disc at the highest quality...

