
Leaflet
Page 3
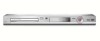
...NC: 8622 810 12854 UPC: 6 09585 11468 5 © 2009 Koninklijke Philips Electronics N.V. or their respective owners. www.philips.com All Rights reserved. DVD player/recorder Specifications DVDR3400/37 Picture/Display • D/A converter: 10 bit, 54 MHz •...consumption: < 3 W • Power consumption: 27 W (Typical) W Accessories • Included Accessories: Remote Control, User Manual, Quick start guide, RF antenna cable, Warranty Leaflet, 2 x AAA Batteries, Audio/Video cable • Remote Control 12NC: 242254900926 Dimensions • Set dimensions (W x H x D): 435 x 43 x 322 mm...
...NC: 8622 810 12854 UPC: 6 09585 11468 5 © 2009 Koninklijke Philips Electronics N.V. or their respective owners. www.philips.com All Rights reserved. DVD player/recorder Specifications DVDR3400/37 Picture/Display • D/A converter: 10 bit, 54 MHz •...consumption: < 3 W • Power consumption: 27 W (Typical) W Accessories • Included Accessories: Remote Control, User Manual, Quick start guide, RF antenna cable, Warranty Leaflet, 2 x AAA Batteries, Audio/Video cable • Remote Control 12NC: 242254900926 Dimensions • Set dimensions (W x H x D): 435 x 43 x 322 mm...
User manual
Page 6
... 8 Setup precautions...8 Cleaning discs ...8 About recycling...8 Product Information ...9 Introduction ...9 Accessories supplied ...9 Region codes...9 Copyright notice...9 Special features ...10 Product Overview Main Unit ...11 Remote Control ...12 Using the remote control ...14 Connections Step 1: Basic Recorder Connections 15 Connecting the antenna cables ...15 Connecting the video cable...16 Connecting the audio cables ...18...
... 8 Setup precautions...8 Cleaning discs ...8 About recycling...8 Product Information ...9 Introduction ...9 Accessories supplied ...9 Region codes...9 Copyright notice...9 Special features ...10 Product Overview Main Unit ...11 Remote Control ...12 Using the remote control ...14 Connections Step 1: Basic Recorder Connections 15 Connecting the antenna cables ...15 Connecting the video cable...16 Connecting the audio cables ...18...

User manual
Page 9
... ('ALL'.) DVDs from other DVD players. If you need further assistance, please call the customer support service for identification and supply ratings. Remote control and batteries - English Introduction Your Philips recorder allows you to record TV programs or duplicate camcorder recordings to a specific region code. Audio/video cables - ALL 1 Copyright notice The...
... ('ALL'.) DVDs from other DVD players. If you need further assistance, please call the customer support service for identification and supply ratings. Remote control and batteries - English Introduction Your Philips recorder allows you to record TV programs or duplicate camcorder recordings to a specific region code. Audio/video cables - ALL 1 Copyright notice The...

User manual
Page 11
.../closes the disc tray. Show information about the current status of the USB flash drive/ USB memory card reader. 11 f (RECORD) - Press SOURCE on the remote control to select 'CAM2' in order to view the input source. Input for camcorders or video recorders. b Disc tray c OPEN/CLOSE ç - d System... panel - Jacks behind the flap Flip down the door as indicated by the OPEN X label at 30, 60 or 90 minutes interval. Turns on the remote control to select 'CAM1' in order to view the input source. Press repeatedly to make a forward/ reverse search. É(PLAY) - g VIDEO - Video ...
.../closes the disc tray. Show information about the current status of the USB flash drive/ USB memory card reader. 11 f (RECORD) - Press SOURCE on the remote control to select 'CAM2' in order to view the input source. Input for camcorders or video recorders. b Disc tray c OPEN/CLOSE ç - d System... panel - Jacks behind the flap Flip down the door as indicated by the OPEN X label at 30, 60 or 90 minutes interval. Turns on the remote control to select 'CAM1' in order to view the input source. Press repeatedly to make a forward/ reverse search. É(PLAY) - g VIDEO - Video ...

User manual
Page 12
English Remote Control SOURCE REPEAT USB SELECT TOOLS CLEAR OPEN/CLOSE ç ZOOM DISC MENU PLAY/PAUSE REC MODE TIMER EDIT a b c d e f g h i j k l m n o a 2 - c OPEN/CLOSEç - f SETUP - ST : Cursor ...
English Remote Control SOURCE REPEAT USB SELECT TOOLS CLEAR OPEN/CLOSE ç ZOOM DISC MENU PLAY/PAUSE REC MODE TIMER EDIT a b c d e f g h i j k l m n o a 2 - c OPEN/CLOSEç - f SETUP - ST : Cursor ...

User manual
Page 13
Accesses the contents of the TV set (Philips TV only.) z TV MUTE H - u OK - Pauses the playback or recording. Press repeatedly to access the VCD disc menu when PBC is turned on a DVD±R/&#... 30, 60 or 90 minutes interval. x REC - e; Plays a disc. - Enters/exits the video editing menu. 13 Selects a DVD subtitle language. Remote Control (continued) English p USB - Repeat playback of a DVD±R/±RW. - Press to set (Philips TV only.) wj SUBTITLE - Starts recording the current TV channel or the current video input source. -
Accesses the contents of the TV set (Philips TV only.) z TV MUTE H - u OK - Pauses the playback or recording. Press repeatedly to access the VCD disc menu when PBC is turned on a DVD±R/&#... 30, 60 or 90 minutes interval. x REC - e; Plays a disc. - Enters/exits the video editing menu. 13 Selects a DVD subtitle language. Remote Control (continued) English p USB - Repeat playback of a DVD±R/±RW. - Press to set (Philips TV only.) wj SUBTITLE - Starts recording the current TV channel or the current video input source. -

User manual
Page 14
... C A CAUTION! - Do not mix batteries (old and new or carbon and alkaline, etc..) - Batteries contain chemical substances, so they are exhausted or if the remote control is not to control by pressing the SOURCE button on the front panel. C Close the cover. F Select the desired function (for a long time. - Remove ... to be disposed of type R03 or AAA, following the indications (+-) inside the compartment. B A Open the battery compartment. B Insert two batteries of properly. D Aim the remote control directly at the remote sensor (IR) on the...
... C A CAUTION! - Do not mix batteries (old and new or carbon and alkaline, etc..) - Batteries contain chemical substances, so they are exhausted or if the remote control is not to control by pressing the SOURCE button on the front panel. C Close the cover. F Select the desired function (for a long time. - Remove ... to be disposed of type R03 or AAA, following the indications (+-) inside the compartment. B A Open the battery compartment. B Insert two batteries of properly. D Aim the remote control directly at the remote sensor (IR) on the...

User manual
Page 23
... select 'CAM1' or 'CAM2' as the input channel. Before you have a Digital Video or Digital 8 camcorder. These jacks are located behind the flap on the remote control repeatedly to copy camcorder recordings. Option 2: Using the VIDEO In or S-VIDEO In jacks Use this connection if you start operating, press SOURCE on...
... select 'CAM1' or 'CAM2' as the input channel. Before you have a Digital Video or Digital 8 camcorder. These jacks are located behind the flap on the remote control repeatedly to copy camcorder recordings. Option 2: Using the VIDEO In or S-VIDEO In jacks Use this connection if you start operating, press SOURCE on...

User manual
Page 24
... JPEG/MP3/WMA files. - Archiving from the USB port. A Connect the USB flash drive / USB memory card reader directly to the USB port on the remote control to a USB flash drive / USB memory card reader. - See the chapter "Recording - Helpful Hints: -
... JPEG/MP3/WMA files. - Archiving from the USB port. A Connect the USB flash drive / USB memory card reader directly to the USB port on the remote control to a USB flash drive / USB memory card reader. - See the chapter "Recording - Helpful Hints: -

User manual
Page 25
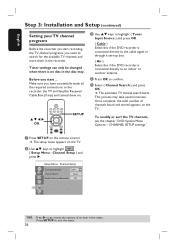
You may press ° button repeatedly on your TV's remote control. You may go access the options of this channel is between the lowest and highest channels and may not correspond to Channel 3 or 4 if ... and press OK to highlight { Setup Menu - TIPS: Press X to go to Channel 1 on your TV, then press the Channel Down button on your TV's remote control until you are different depending on using a RF modulator. Language settings can only be called FRONT, A/V IN, VIDEO. Usually this recorder. Setup Menu - Press...
You may press ° button repeatedly on your TV's remote control. You may go access the options of this channel is between the lowest and highest channels and may not correspond to Channel 3 or 4 if ... and press OK to highlight { Setup Menu - TIPS: Press X to go to Channel 1 on your TV, then press the Channel Down button on your TV's remote control until you are different depending on using a RF modulator. Language settings can only be called FRONT, A/V IN, VIDEO. Usually this recorder. Setup Menu - Press...
User manual
Page 26
... Input Source Cable Channel Search Search Modify Channel Information Edit TIPS: Press X to go access the options of channels found and stored appears on the remote control. Setup Menu - The setup menu appears on . CHANNEL SETUP settings." Channel Setup } and RECMODE TIMER EDIT VCR Plus+ press X. This process may take several...
... Input Source Cable Channel Search Search Modify Channel Information Edit TIPS: Press X to go access the options of channels found and stored appears on the remote control. Setup Menu - The setup menu appears on . CHANNEL SETUP settings." Channel Setup } and RECMODE TIMER EDIT VCR Plus+ press X. This process may take several...

User manual
Page 27
... press X. Press SETUP to confirm. If the recorder has not set the time and date correctly, you can also use the numeric keypad 0-9 on the remote control to confirm. Setup Menu - B Use ST keys to highlight the zone of an item in the numbers. Enable Day Light Saving mode A Use ST...
... press X. Press SETUP to confirm. If the recorder has not set the time and date correctly, you can also use the numeric keypad 0-9 on the remote control to confirm. Setup Menu - B Use ST keys to highlight the zone of an item in the numbers. Enable Day Light Saving mode A Use ST...

User manual
Page 29
... will be recorded on another player, finalize the disc. Record } and press X to select { Setup Menu - The setup menu appears on the remote control. SOURCE REPEAT USB SELECT TOOLS CLEAR OPEN/CLOSE ç ZOOM DISC MENU SETUP Setup Menu - Recording settings The default recording settings allow you to...Mode On Tuner SP C Use ST keys to select the setting you playback the DVD±R on this recorder. Any changes made using the remote control will remain unchanged for the next recording. D To exit, press SETUP. OK PLAY CH REC MODE TIMER EDIT VCR Plus+ TIPS: Ensure...
... will be recorded on another player, finalize the disc. Record } and press X to select { Setup Menu - The setup menu appears on the remote control. SOURCE REPEAT USB SELECT TOOLS CLEAR OPEN/CLOSE ç ZOOM DISC MENU SETUP Setup Menu - Recording settings The default recording settings allow you to...Mode On Tuner SP C Use ST keys to select the setting you playback the DVD±R on this recorder. Any changes made using the remote control will remain unchanged for the next recording. D To exit, press SETUP. OK PLAY CH REC MODE TIMER EDIT VCR Plus+ TIPS: Ensure...

User manual
Page 30
... the device connected to the CAM2 and AUDIO L/R jacks on the front panel. { CAM2 } - Chapter markers will switch to the EXT1 VIDEO jack on the remote control. Input source from the device connected to access a specific point in the recording quickly. { On } - Note: To change the current recording source without changing...
... the device connected to the CAM2 and AUDIO L/R jacks on the front panel. { CAM2 } - Chapter markers will switch to the EXT1 VIDEO jack on the remote control. Input source from the device connected to access a specific point in the recording quickly. { On } - Note: To change the current recording source without changing...
User manual
Page 31
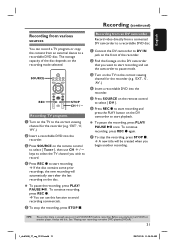
...'.) B Insert a recordable DVD into the recorder. A Connect the DV camcorder to a recordable DVD disc. A new title will automatically start after the last recording on the remote control to select { Tuner }, then use this function to start playback. F Press REC z to avoid recording commercials. See "Playing your recordings on the DV camcorder... STOP x. English Recording (continued) Recording from various sources You can use CH +/- keys to select the TV channel you playback the DVD±R on the remote control to record.
...'.) B Insert a recordable DVD into the recorder. A Connect the DV camcorder to a recordable DVD disc. A new title will automatically start after the last recording on the remote control to select { Tuner }, then use this function to start playback. F Press REC z to avoid recording commercials. See "Playing your recordings on the DV camcorder... STOP x. English Recording (continued) Recording from various sources You can use CH +/- keys to select the TV channel you playback the DVD±R on the remote control to record.

User manual
Page 33
... 3 Song1.mp3 4 NATURE-1.JPG 5 BUTTER-1.JPG 6 P1022500.JPG 7 Music.mp3 8 MERLIO-1.JPG Copy List 1 Picture2.jpg 2 Music.mp3 REC PLAY CH OK A Turn on the remote control to proceed. The USB port supports the playback of the recorder. The USB drive content menu appears. D Press USB on the TV to a recordable.../DivX files. - E Press TOOLS on another player, finalize the disc. I Once the copy list selection is required. - Before you playback the DVD±R on the remote control.
... 3 Song1.mp3 4 NATURE-1.JPG 5 BUTTER-1.JPG 6 P1022500.JPG 7 Music.mp3 8 MERLIO-1.JPG Copy List 1 Picture2.jpg 2 Music.mp3 REC PLAY CH OK A Turn on the remote control to proceed. The USB port supports the playback of the recorder. The USB drive content menu appears. D Press USB on the TV to a recordable.../DivX files. - E Press TOOLS on another player, finalize the disc. I Once the copy list selection is required. - Before you playback the DVD±R on the remote control.

User manual
Page 34
... the DVD±R/±RW before the scheduled time, press STOP x. Helpful hint: - TIPS: 34 Ensure that there is in progress by using the TV's remote control to make a recording with a preset length easily without using the timer programming. A Press REC repeatedly to standby mode automatically.
... the DVD±R/±RW before the scheduled time, press STOP x. Helpful hint: - TIPS: 34 Ensure that there is in progress by using the TV's remote control to make a recording with a preset length easily without using the timer programming. A Press REC repeatedly to standby mode automatically.

User manual
Page 35
...PlusCode programming, use it, enter the PlusCode programming number associated with your television program. Before you playback the DVD±R on the remote control. The recorder will tune to the correct viewing channel for the show you can find this recorder for the show wish to... Plus+® system. - All the information required by this number in '53124'.) To clear the PlusCode programming number, press CLEAR on the remote control. TIMER REC MODE TIMER EDIT VCR Plus+ Timer recording (VCR Plus+® System) This is not possible. TOOLS SELECT CLEAR REPEAT DISC...
...PlusCode programming, use it, enter the PlusCode programming number associated with your television program. Before you playback the DVD±R on the remote control. The recorder will tune to the correct viewing channel for the show you can find this recorder for the show wish to... Plus+® system. - All the information required by this number in '53124'.) To clear the PlusCode programming number, press CLEAR on the remote control. TIMER REC MODE TIMER EDIT VCR Plus+ Timer recording (VCR Plus+® System) This is not possible. TOOLS SELECT CLEAR REPEAT DISC...

User manual
Page 36
... (continued) D To confirm your recordings (DVD±R) on other DVD players". Follow the instructions on the timer editor menu. Timer recording (manually) A Turn on the remote control. TIPS: 36 Ensure that is not in standby mode, a notification message will have to exit the menu. G Press STANDBY-ON to turn off the...
... (continued) D To confirm your recordings (DVD±R) on other DVD players". Follow the instructions on the timer editor menu. Timer recording (manually) A Turn on the remote control. TIPS: 36 Ensure that is not in standby mode, a notification message will have to exit the menu. G Press STANDBY-ON to turn off the...

User manual
Page 38
..., finalize the disc. Before you want to change the timer schedule, press OK to select a timer program which you playback the DVD±R on the remote control. TIPS: 38 Ensure that there is enough space on other DVD players". E To change / delete. The timer schedule appears. See "Playing your recordings (DVD... complete, select OK in the menu and press OK. H Press TIMER to the correct viewing channel for the recorder (e.g. 'EXT', '0', 'AV'.) B Press TIMER on the remote control.
..., finalize the disc. Before you want to change the timer schedule, press OK to select a timer program which you playback the DVD±R on the remote control. TIPS: 38 Ensure that there is enough space on other DVD players". E To change / delete. The timer schedule appears. See "Playing your recordings (DVD... complete, select OK in the menu and press OK. H Press TIMER to the correct viewing channel for the recorder (e.g. 'EXT', '0', 'AV'.) B Press TIMER on the remote control.


