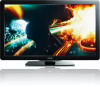
User Manual
Page 2
... and watch videos using DLNA Net TV Enjoying vTuner Pandora® operations Using Twitter Changing picture and sound settings Create and use lists of favorite channels Setting the clock Closed caption Sleeptimer Child and rating locks Use Philips EasyLink EasyLink Set your location to home Network View photos, play music and watch videos on a USB storage device 4 7 Install channels Selecting your menu language 5 Autoprogram 5 Weak channel installation 5 Installation mode 5 Uninstall channels 5 Return your settings to default values 6 8 Update your TV software 6 Checking your...
... and watch videos using DLNA Net TV Enjoying vTuner Pandora® operations Using Twitter Changing picture and sound settings Create and use lists of favorite channels Setting the clock Closed caption Sleeptimer Child and rating locks Use Philips EasyLink EasyLink Set your location to home Network View photos, play music and watch videos on a USB storage device 4 7 Install channels Selecting your menu language 5 Autoprogram 5 Weak channel installation 5 Installation mode 5 Uninstall channels 5 Return your settings to default values 6 8 Update your TV software 6 Checking your...
User Manual
Page 4
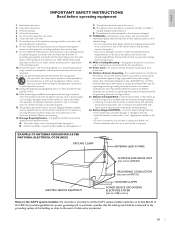
... ELECTRICAL CODE (NEC) GROUND CLAMP ANTENNA LEAD IN WIRE ANTENNA DISCHARGE UNIT (NEC SECTION 810-20) ELECTRIC SERVICE EQUIPMENT GROUNDING CONDUCTORS (NEC SECTION 810-21) GROUND CLAMPS POWER SERVICE GROUNDING ELECTRODE SYSTEM (NEC ART 250, PART H) Note to the CATV system installer: this reminder is connected to the receiver, be mounted to avoid injury from the apparatus. 11. Heed all instructions...
... ELECTRICAL CODE (NEC) GROUND CLAMP ANTENNA LEAD IN WIRE ANTENNA DISCHARGE UNIT (NEC SECTION 810-20) ELECTRIC SERVICE EQUIPMENT GROUNDING CONDUCTORS (NEC SECTION 810-21) GROUND CLAMPS POWER SERVICE GROUNDING ELECTRODE SYSTEM (NEC ART 250, PART H) Note to the CATV system installer: this reminder is connected to the receiver, be mounted to avoid injury from the apparatus. 11. Heed all instructions...
User Manual
Page 5
... are the property of other channels is expressed or implied. Model : 55PFL5706, 46PFL5706, 40PFL5706 Address : PO Box 430 Daleville, IN 47334-0430 U.S.A. Selection of their respective owners. Copyright All other than those specified herein, confirmation of light (red, green or blue) may void the user's authority to operate the equipment. HDMI, the HDMI Logo, and High-Definition Multimedia...
... are the property of other channels is expressed or implied. Model : 55PFL5706, 46PFL5706, 40PFL5706 Address : PO Box 430 Daleville, IN 47334-0430 U.S.A. Selection of their respective owners. Copyright All other than those specified herein, confirmation of light (red, green or blue) may void the user's authority to operate the equipment. HDMI, the HDMI Logo, and High-Definition Multimedia...
User Manual
Page 9
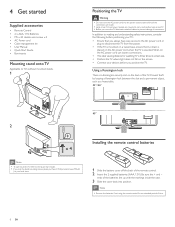
... AC power cord when the TV is three times its screen size. • Position the TV where light does not fall on the screen. • Connect your local store. 4 Get started Supplied accessories • Remote Control • 2 x AAA, 1.5V Batteries • M5 x 20 double sems screw x 4 • AC Power cord • Cable management tie • User Manual • Quick Start Guide • Box-inserts Mounting stand onto TV Applicable to TVs without mounted stands...
... AC power cord when the TV is three times its screen size. • Position the TV where light does not fall on the screen. • Connect your local store. 4 Get started Supplied accessories • Remote Control • 2 x AAA, 1.5V Batteries • M5 x 20 double sems screw x 4 • AC Power cord • Cable management tie • User Manual • Quick Start Guide • Box-inserts Mounting stand onto TV Applicable to TVs without mounted stands...
User Manual
Page 12
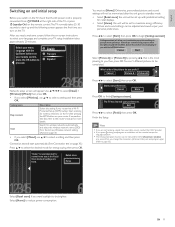
... [Antenna] or [Cable] only once.When you change the connection (Antenna / Cable), set autoprogram again. (Refer to page 35.) Select [Retail store] if you want backlight to be set to maximize energy efficiency. Installation takes approximately 20 minutes. Picture and sound settings can be executed for more details. English Français Español Switching on and initial setup Before you switch on your remote control, press...
... [Antenna] or [Cable] only once.When you change the connection (Antenna / Cable), set autoprogram again. (Refer to page 35.) Select [Retail store] if you want backlight to be set to maximize energy efficiency. Installation takes approximately 20 minutes. Picture and sound settings can be executed for more details. English Français Español Switching on and initial setup Before you switch on your remote control, press...
User Manual
Page 16
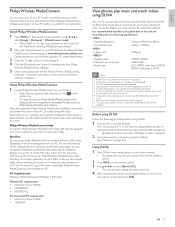
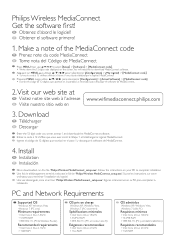
... 'Download now' button to complete software installation. For smooth playback of your PC as a PC monitor wirelessly using a wireless LAN' on page 41.) • Broadband internet connection of 8Mbps or faster is required. 2 Set up the necessary network connection settings. (See 'Network' on page 30.) Using DLNA 1 Start DLNA home media servers in sync. EN 15 Follow the instructions on the screen to download the free Philips Wireless MediaConnect software. 5 Once downloaded, start loading the home...
... 'Download now' button to complete software installation. For smooth playback of your PC as a PC monitor wirelessly using a wireless LAN' on page 41.) • Broadband internet connection of 8Mbps or faster is required. 2 Set up the necessary network connection settings. (See 'Network' on page 30.) Using DLNA 1 Start DLNA home media servers in sync. EN 15 Follow the instructions on the screen to download the free Philips Wireless MediaConnect software. 5 Once downloaded, start loading the home...
User Manual
Page 23
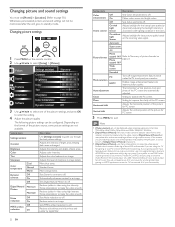
... input video contains adjacent video frames with lighting condition in [Location]. (Refer to page 30.) Otherwise, personalized picture and sound settings will introduce lag. If your prefer to use it is an issue. Changing picture and sound settings You must set a 200 millisecond delay on your audio output for A/V sync. More blue tones. Off Sets Active control to stabilize the PC screen. On without Light Sensor Adjusts backlight for best picture quality based...
... input video contains adjacent video frames with lighting condition in [Location]. (Refer to page 30.) Otherwise, personalized picture and sound settings will introduce lag. If your prefer to use it is an issue. Changing picture and sound settings You must set a 200 millisecond delay on your audio output for A/V sync. More blue tones. Off Sets Active control to stabilize the PC screen. On without Light Sensor Adjusts backlight for best picture quality based...
User Manual
Page 25
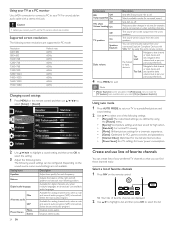
... picture settings for a cinematic experience. • [Game] : Optimized for PCs, games consoles and playstations. • [Internet Video] : Optimized for low bitrate internet video. • [Power Saver] : Eco TV settings for analog channels only when a main and second audio program (SAP) is broadcast. Select a list of favorite channels 1 Press FAV on the remote control. » Your lists of the right and left speakers to exit. The sound will not be activated in volume, for digital channels only...
... picture settings for a cinematic experience. • [Game] : Optimized for PCs, games consoles and playstations. • [Internet Video] : Optimized for low bitrate internet video. • [Power Saver] : Eco TV settings for analog channels only when a main and second audio program (SAP) is broadcast. Select a list of favorite channels 1 Press FAV on the remote control. » Your lists of the right and left speakers to exit. The sound will not be activated in volume, for digital channels only...
User Manual
Page 26
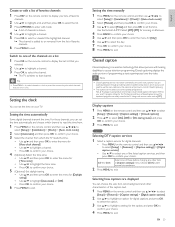
...; to highlight a channel. 3 Press OK to select the channel. » The TV switches to that channel. Closed captioning displays the audio portion of programming as [CC]. Setting the clock You can choose the size, font, color, background and other item in [Caption settings] menu. Setting the time automatically Some digital channels transmit the time. EN 25 Español Français English Setting the time manually 1 Press MENU on the remote control and then use to select [Setup] > [Features] > [Caption settings] > [Closed captions]. 2 Press...
...; to highlight a channel. 3 Press OK to select the channel. » The TV switches to that channel. Closed captioning displays the audio portion of programming as [CC]. Setting the clock You can choose the size, font, color, background and other item in [Caption settings] menu. Setting the time automatically Some digital channels transmit the time. EN 25 Español Français English Setting the time manually 1 Press MENU on the remote control and then use to select [Setup] > [Features] > [Caption settings] > [Closed captions]. 2 Press...
User Manual
Page 27
... describes how to exit. 11 Turn the TV off and on the TV screen immediately. Use the format HH:MM, and select [AM] / [PM] for assistance. CC-2, CC-4, T-2 are still unable to exit. Changing your PIN 1 Press MENU on the remote control and then use to select [Setup] > [Features] > [Child lock]. 2 Enter a 4-digit PIN on the Number buttons, of a closed captions on DTV programming, you have forgotten your PIN...
... describes how to exit. 11 Turn the TV off and on the TV screen immediately. Use the format HH:MM, and select [AM] / [PM] for assistance. CC-2, CC-4, T-2 are still unable to exit. Changing your PIN 1 Press MENU on the remote control and then use to select [Setup] > [Features] > [Child lock]. 2 Enter a 4-digit PIN on the Number buttons, of a closed captions on DTV programming, you have forgotten your PIN...
User Manual
Page 30
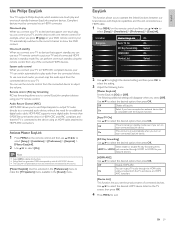
.... Use Î/ï to select the desired HDMI device listed on the TV screen, then press OK. 4 Press MENU to select [On]. HDMI ARC supports more digital audio formats than S/PDIF. Off Disable all connected HDMI devices in standby mode even if you set to a connected audio device, without the need for an additional digital audio cable. Off Disable HDMI-ARC. English Français Español Use Philips EasyLink Your TV supports Philips EasyLink, which enables one-touch play...
.... Use Î/ï to select the desired HDMI device listed on the TV screen, then press OK. 4 Press MENU to select [On]. HDMI ARC supports more digital audio formats than S/PDIF. Off Disable all connected HDMI devices in standby mode even if you set to a connected audio device, without the need for an additional digital audio cable. Off Disable HDMI-ARC. English Français Español Use Philips EasyLink Your TV supports Philips EasyLink, which enables one-touch play...
User Manual
Page 31
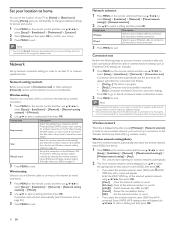
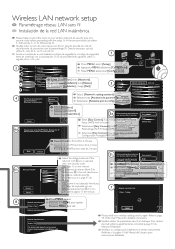
... connected to select [Setup] > [Installation] > [Network] > [Connection test]. Wireless setting Select to use Net TV or network update function. manually. 1 Press MENU on the remote control and then use to select [Setup] > [Installation] > [Network] > [Manual network settings] > [Network selection]. 2 Use Î/ï to use a wireless LAN to connect to standby mode. Note • If the connection test passes, you have connected an Ethernet cable or entered network settings such as IP address, DNS settings, etc. wireless router). Otherwise, personalized picture and sound...
... connected to select [Setup] > [Installation] > [Network] > [Connection test]. Wireless setting Select to use Net TV or network update function. manually. 1 Press MENU on the remote control and then use to select [Setup] > [Installation] > [Network] > [Manual network settings] > [Network selection]. 2 Use Î/ï to use a wireless LAN to connect to standby mode. Note • If the connection test passes, you have connected an Ethernet cable or entered network settings such as IP address, DNS settings, etc. wireless router). Otherwise, personalized picture and sound...
User Manual
Page 32
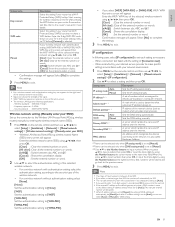
... on the remote control and then use to select [Setup] > [Installation] > [Network] > [Manual network settings] > [IP configuration]. 2 Use Î/ï to select [Setup] > [Installation] > [Network] > [Manual network settings] > [Wireless network setting] > [Manually enter your SSID) Set up the connection to exit. IP configuration In following specifications. - Setting items Description Auto IP setting mode Manual Sets the IP setting automatically. IP address of the selected wireless network using then press OK. [Clear] : Clear the entered number or word...
... on the remote control and then use to select [Setup] > [Installation] > [Network] > [Manual network settings] > [IP configuration]. 2 Use Î/ï to select [Setup] > [Installation] > [Network] > [Manual network settings] > [Wireless network setting] > [Manually enter your SSID) Set up the connection to exit. IP configuration In following specifications. - Setting items Description Auto IP setting mode Manual Sets the IP setting automatically. IP address of the selected wireless network using then press OK. [Clear] : Clear the entered number or word...
User Manual
Page 33
... the remote control and then use to select [Setup] > [Installation] > [Network] > [Manual network settings] > [Proxy configuration]. 2 Use Î/ï to select a setting and then press OK. • For default settings, select [Do Not Use]. • If you enter a number larger than 65535, it will be selected only when [Proxy port] is set to [Do Not Use]. Setting items Description Yes Deactivate the connection to YouTube. Reset network settings You can check the status of network settings. 1 Press MENU...
... the remote control and then use to select [Setup] > [Installation] > [Network] > [Manual network settings] > [Proxy configuration]. 2 Use Î/ï to select a setting and then press OK. • For default settings, select [Do Not Use]. • If you enter a number larger than 65535, it will be selected only when [Proxy port] is set to [Do Not Use]. Setting items Description Yes Deactivate the connection to YouTube. Reset network settings You can check the status of network settings. 1 Press MENU...
User Manual
Page 36
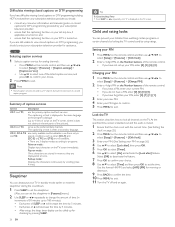
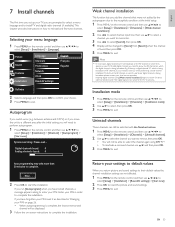
... Number buttons. 1 Press MENU on the remote control and then use to select [Setup] > [Installation] > [Channels] > [Uninstall channels]. 2 Use Î/ï to select the channel you want to memorize. 3 Use Í/Æ to select [Search], then press OK. 4 Display will be able to select the channel again using [Weak channel installation] might not work for direct cable connections and if the digital signal is being broadcast. Return your settings to default values When you return picture and sound settings to their default values the channel installation settings...
... Number buttons. 1 Press MENU on the remote control and then use to select [Setup] > [Installation] > [Channels] > [Uninstall channels]. 2 Use Î/ï to select the channel you want to memorize. 3 Use Í/Æ to select [Search], then press OK. 4 Display will be able to select the channel again using [Weak channel installation] might not work for direct cable connections and if the digital signal is being broadcast. Return your settings to default values When you return picture and sound settings to their default values the channel installation settings...
User Manual
Page 37
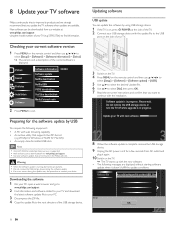
... select [Yes], then press OK. 7 Read the on the remote control and then use to continue with the update file to the USB port on the side of the current software is on the Philips web site. POWER at www.philips.com/support using USB storage device. 1 If the TV is displayed. Chec Error OK 36 EN 8 Update your TV software Philips continuously tries to exit. Picture Sound Features Installation Software Software information...
... select [Yes], then press OK. 7 Read the on the remote control and then use to continue with the update file to the USB port on the side of the current software is on the Philips web site. POWER at www.philips.com/support using USB storage device. 1 If the TV is displayed. Chec Error OK 36 EN 8 Update your TV software Philips continuously tries to exit. Picture Sound Features Installation Software Software information...
User Manual
Page 44
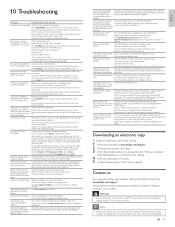
... numbers are using HDMI 1-4 input jack. The TV is poor or noise occurs during playback. Press . Remove the AC power cord from the PC using PC input jack. Turn on the remote control. Connect an audio cable to the color code. No picture or sound is An incorrect HDMI input jack is connected or an audio cable is connected directly to your TV or void your product" field. and green, or the picture Ensure all the connections are not displayed in...
... numbers are using HDMI 1-4 input jack. The TV is poor or noise occurs during playback. Press . Remove the AC power cord from the PC using PC input jack. Turn on the remote control. Connect an audio cable to the color code. No picture or sound is An incorrect HDMI input jack is connected or an audio cable is connected directly to your TV or void your product" field. and green, or the picture Ensure all the connections are not displayed in...
Quick Start Guide
Page 3
... la instalación. Presione MENU, luego utilice para seleccionar [Configuración] > [Actual. Follow the instructions on the screen.You will need this to complete installation. Download FR Télécharger ES Descargar Enter the 12 digit code you wrote at FR Visitez notre site web à l'adresse www.wifimediaconnect.philips.com ES Visite nuestro sitio web...
... la instalación. Presione MENU, luego utilice para seleccionar [Configuración] > [Actual. Follow the instructions on the screen.You will need this to complete installation. Download FR Télécharger ES Descargar Enter the 12 digit code you wrote at FR Visitez notre site web à l'adresse www.wifimediaconnect.philips.com ES Visite nuestro sitio web...
Quick Start Guide
Page 4
... Reset AV settings IP configuration Select [Installation], then [Network]. Ɣ Auto clock mode Sélectionnez [Installation] puis [Réseau]. Ɣ Start now Seleccionar [Instalación], y luego [Red]. Ɣ 3 Language Channels Network setting assi.. Ɣ Start now Manual network sett.. Ɣ Network selection Software Ɣ Preferences Connection test Ɣ Start now Select [Network setting assistant]. Select your network. Wired Sélectionnez [Assistant de paramétragCleockréseau]. Reset network set.. Ɣ Start now Seleccionar [Asistente para...
... Reset AV settings IP configuration Select [Installation], then [Network]. Ɣ Auto clock mode Sélectionnez [Installation] puis [Réseau]. Ɣ Start now Seleccionar [Instalación], y luego [Red]. Ɣ 3 Language Channels Network setting assi.. Ɣ Start now Manual network sett.. Ɣ Network selection Software Ɣ Preferences Connection test Ɣ Start now Select [Network setting assistant]. Select your network. Wired Sélectionnez [Assistant de paramétragCleockréseau]. Reset network set.. Ɣ Start now Seleccionar [Asistente para...
Leaflet
Page 3
... x 25.63 x 9.06 inch • Product weight (lb): 32.63 lb • Product weight (+stand) (lb): 37.48 lb • Box dimensions in speakers: 2 Convenience • Child Protection: Child Lock+Parental Control • Clock: On main display, Sleep Timer • Ease of Installation: Autostore • Ease of Koninklijke Philips N.V. Specifications are the property of Use: 4 favorite lists, Auto Volume Leveller (AVL), Channel list, Settings assistant Wizard, Side Control • Remote Control: TV • Screen Format Adjustments: 4:3, Movie expand 14...
... x 25.63 x 9.06 inch • Product weight (lb): 32.63 lb • Product weight (+stand) (lb): 37.48 lb • Box dimensions in speakers: 2 Convenience • Child Protection: Child Lock+Parental Control • Clock: On main display, Sleep Timer • Ease of Installation: Autostore • Ease of Koninklijke Philips N.V. Specifications are the property of Use: 4 favorite lists, Auto Volume Leveller (AVL), Channel list, Settings assistant Wizard, Side Control • Remote Control: TV • Screen Format Adjustments: 4:3, Movie expand 14...


