
User Guide
Page 4
... set . • Insert the mains plug into a wall socket (220-240V / 50/60Hz). Pull out the plastic insulation sheet from the battery to enable the remote control to the connection guide "CONNECT". • To switch on and the screen lights up. • If the TV set - Preparation / Getting started 1 Positioning the TV...
... set . • Insert the mains plug into a wall socket (220-240V / 50/60Hz). Pull out the plastic insulation sheet from the battery to enable the remote control to the connection guide "CONNECT". • To switch on and the screen lights up. • If the TV set - Preparation / Getting started 1 Positioning the TV...

User Guide
Page 7
Remote Control keys 1 2 AUX 3 4 5 6 7 8 9 10 11 12 1 Standby To set on or off the ... to select TV or peripheral equipment connected to AV, SIDE/SVHS, CVI 1, CVI 2/VGA, HDMI 1 or HDMI 2. 7 Active Control (See page 15). 8 MENU To call up or exit the TV menus. 9 Cursors These 4 keys are further apart. Press ...Used to , P - / + or key. 2 Pixel Plus Offers a unique combination of predefined picture and sound settings (see "Remote Control (DVD or AUX) on page 8). 4 Surround Sound To turn on again, press , to access a series of ultimate sharpness, increased depth impression...
Remote Control keys 1 2 AUX 3 4 5 6 7 8 9 10 11 12 1 Standby To set on or off the ... to select TV or peripheral equipment connected to AV, SIDE/SVHS, CVI 1, CVI 2/VGA, HDMI 1 or HDMI 2. 7 Active Control (See page 15). 8 MENU To call up or exit the TV menus. 9 Cursors These 4 keys are further apart. Press ...Used to , P - / + or key. 2 Pixel Plus Offers a unique combination of predefined picture and sound settings (see "Remote Control (DVD or AUX) on page 8). 4 Surround Sound To turn on again, press , to access a series of ultimate sharpness, increased depth impression...

User Guide
Page 8
...18 Sound mode Used to force programmes in -Picture To display a PIP window on the TV screen (see page 14). 20 DVD / AUX (See "Remote Control (DVD or AUX) on screen. For a 2 digit channel number, the 2nd digit must be entered before the dash disappears. 14 Screen information To ...mode are watching. 13 / Numerical keys For direct selection of the screen. 23 Previous/Present programme To alternate between TV, DVD and AUX mode (see "Remote Control (DVD or AUX) on sound again. 22 Selecting TV programmes (P - / +) To select the next or previous programme. Press key for bilingual programmes...
...18 Sound mode Used to force programmes in -Picture To display a PIP window on the TV screen (see page 14). 20 DVD / AUX (See "Remote Control (DVD or AUX) on screen. For a 2 digit channel number, the 2nd digit must be entered before the dash disappears. 14 Screen information To ...mode are watching. 13 / Numerical keys For direct selection of the screen. 23 Previous/Present programme To alternate between TV, DVD and AUX mode (see "Remote Control (DVD or AUX) on sound again. 22 Selecting TV programmes (P - / +) To select the next or previous programme. Press key for bilingual programmes...

User Guide
Page 9
... operate the set, do Auto Store of some Philips DVD players. TV Menu Picture Sound Features Install Install Language Æ Auto Store Æ Manual Store Æ Sort Æ Name Æ Channel Edit Æ English 1 Press key on the remote control to access the TV menu on the equipment:... will now appear in the TV menu is highlighted). 4 Press Í Æ keys to select your preferred language : - Remote Control keys (DVD or AUX) The remote control also allows you to install the TV channels automatically. 8 Press the key to DVD-R device. The following to bring you back to...
... operate the set, do Auto Store of some Philips DVD players. TV Menu Picture Sound Features Install Install Language Æ Auto Store Æ Manual Store Æ Sort Æ Name Æ Channel Edit Æ English 1 Press key on the remote control to access the TV menu on the equipment:... will now appear in the TV menu is highlighted). 4 Press Í Æ keys to select your preferred language : - Remote Control keys (DVD or AUX) The remote control also allows you to install the TV channels automatically. 8 Press the key to DVD-R device. The following to bring you back to...

User Guide
Page 13
... and will automatically come on at the Stop Time. Stop Time : enter the standby time. Display : select On option to display current time on the remote control to put the TV set in standby mode. NR (Noise Reduction) : - Timer The Timer feature allows you to set the timer to switch to another...
... and will automatically come on at the Stop Time. Stop Time : enter the standby time. Display : select On option to display current time on the remote control to put the TV set in standby mode. NR (Noise Reduction) : - Timer The Timer feature allows you to set the timer to switch to another...

User Guide
Page 23
...; Press keys to enter PIP menu. Accessing PIP with the PIP key & Press key on the TV screen. A small PIP screen will appear on the remote control to a Side-by the Off option. PIP PIP Size Æ Horizontal Æ Vertical Æ HDMI Æ HDMI 1 PIP PIP Size Æ Horizontal Æ Vertical Æ...
...; Press keys to enter PIP menu. Accessing PIP with the PIP key & Press key on the TV screen. A small PIP screen will appear on the remote control to a Side-by the Off option. PIP PIP Size Æ Horizontal Æ Vertical Æ HDMI Æ HDMI 1 PIP PIP Size Æ Horizontal Æ Vertical Æ...
User Guide
Page 24
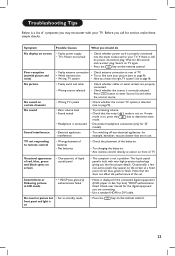
...correctly selected. Troubleshooting Tips Below is properly connected into the mains socket and to DVI cable. • Press the key on the remote control. 23 Occasionally, a few non-active pixels may encounter with very high precision technology giving you are in use. • Wrong placement... of batteries • Flat batteries • Check the placement of the batteries. • Try changing the batteries. • Aim remote control directly at sensor on front of TV Occasional appearance of red, blue, green and black spots on screen • Characteristic of liquid crystal...
...correctly selected. Troubleshooting Tips Below is properly connected into the mains socket and to DVI cable. • Press the key on the remote control. 23 Occasionally, a few non-active pixels may encounter with very high precision technology giving you are in use. • Wrong placement... of batteries • Flat batteries • Check the placement of the batteries. • Try changing the batteries. • Aim remote control directly at sensor on front of TV Occasional appearance of red, blue, green and black spots on screen • Characteristic of liquid crystal...

User Guide
Page 25
... recorded separately on connection to enter Source list and select the correct source. • Check whether you should do a channel down. Black bar on the remote control to 60 Hz. HDMI supports enhanced or high-definition video plus two-channel digital audio. Press button to the PC equipment, see map...
... recorded separately on connection to enter Source list and select the correct source. • Check whether you should do a channel down. Black bar on the remote control to 60 Hz. HDMI supports enhanced or high-definition video plus two-channel digital audio. Press button to the PC equipment, see map...


