
Leaflet
Page 3
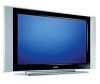
...Philips Electronics N.V. Trademarks are subject to change without notice. Flat TV with base) (W x H x D): 804.5 x 477 x 222 mm • Set dimensions (W x H x D): 804.5 x 436 x 114 mm • Box dimensions (W x H x D): 876 x 209 x 601 mm Accessories • Included accessories: Power cord, Quick start guide, Registration card, Remote...damage your hearing. All Rights reserved. Packaging: 17.6 kg • Dimensions (with Digital Crystal Clear 26" LCD HDTV monitor Specifications 26PF5320/28 Picture/Display • Aspect ratio: 16:9, Widescreen • Brightness: 500 cd/m² •...
...Philips Electronics N.V. Trademarks are subject to change without notice. Flat TV with base) (W x H x D): 804.5 x 477 x 222 mm • Set dimensions (W x H x D): 804.5 x 436 x 114 mm • Box dimensions (W x H x D): 876 x 209 x 601 mm Accessories • Included accessories: Power cord, Quick start guide, Registration card, Remote...damage your hearing. All Rights reserved. Packaging: 17.6 kg • Dimensions (with Digital Crystal Clear 26" LCD HDTV monitor Specifications 26PF5320/28 Picture/Display • Aspect ratio: 16:9, Widescreen • Brightness: 500 cd/m² •...
User manual
Page 5
... are available to you when you to set controls (Voice, Music and Theatre) enable you to tailor the TV sound so as sports, movies, multimedia (games), or weak signals with Philips accessory devices .. 28 SETTING UP THE PC (PERSONAL COMPUTER) MODE How to use the Picture Controls 29 How...25 How to use the Pixel Plus™ Control (depending on model 25 How to use the AutoPicture™ Control 26 How to use the AutoSound™ Control 26 Remote Control Accessory Device Related Buttons 27 How to use the PIP Control 34 IMPORTANT INFORMATION Troubleshooting Tips 35 Cleaning and Care...
... are available to you when you to set controls (Voice, Music and Theatre) enable you to tailor the TV sound so as sports, movies, multimedia (games), or weak signals with Philips accessory devices .. 28 SETTING UP THE PC (PERSONAL COMPUTER) MODE How to use the Picture Controls 29 How...25 How to use the Pixel Plus™ Control (depending on model 25 How to use the AutoPicture™ Control 26 How to use the AutoSound™ Control 26 Remote Control Accessory Device Related Buttons 27 How to use the PIP Control 34 IMPORTANT INFORMATION Troubleshooting Tips 35 Cleaning and Care...
User manual
Page 6
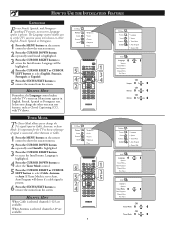
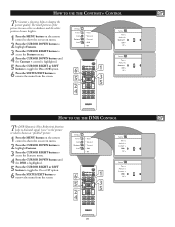
... LEFT button to select Cable, Antenna, or Auto. It's important for the TV to know what type of signal is connected, either English, French, Spanish or Portuguese. 1 Press the MENU button on the remote control to show the onscreen menu. 2 Press the CURSOR DOWN button repeatedly until... enables you to access the Install menu. HELPFUL HINT Remember, the Language control makes only the TV's onscreen Menu items appear in either Antenna or Cable. 1 Press the MENU button on the remote control to show the onscreen menu. 2 Press the CURSOR DOWN button repeatedly until Install is highlighted...
... LEFT button to select Cable, Antenna, or Auto. It's important for the TV to know what type of signal is connected, either English, French, Spanish or Portuguese. 1 Press the MENU button on the remote control to show the onscreen menu. 2 Press the CURSOR DOWN button repeatedly until... enables you to access the Install menu. HELPFUL HINT Remember, the Language control makes only the TV's onscreen Menu items appear in either Antenna or Cable. 1 Press the MENU button on the remote control to show the onscreen menu. 2 Press the CURSOR DOWN button repeatedly until Install is highlighted...
User manual
Page 7
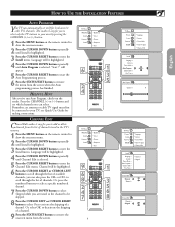
...to select On to activate the skipping of channels stored in your TV, see which channels you can automatically set itself for you to select only the TV stations in the TV's memory. 1 Press the MENU button on the remote control to show the onscreen menu. 2 Press the CURSOR DOWN ... enter the Install menu. Language will be connected to your area by pressing the CHANNEL (+) or (-) button. 1 Press the MENU button on the remote control to show the onscreen menu. 2 Press the CURSOR DOWN button repeatedly until Channel Edit is highlighted. 3 Press the CURSOR RIGHT button to deactivate...
...to select On to activate the skipping of channels stored in your TV, see which channels you can automatically set itself for you to select only the TV stations in the TV's memory. 1 Press the MENU button on the remote control to show the onscreen menu. 2 Press the CURSOR DOWN ... enter the Install menu. Language will be connected to your area by pressing the CHANNEL (+) or (-) button. 1 Press the MENU button on the remote control to show the onscreen menu. 2 Press the CURSOR DOWN button repeatedly until Channel Edit is highlighted. 3 Press the CURSOR RIGHT button to deactivate...
User manual
Page 8
...enter the Install menu. Select appropriate system if the reception is poor when Auto is selected. 1 Press the MENU button on the remote control to show the onscreen menu. 2 Press the CURSOR DOWN button repeatedly until Fine Tune is highlighted. 3 Press the CURSOR RIGHT...LEFT buttons to fine tune. 7 Press the STATUS/EXIT button to select the desired TV System. TV Menu Picture Sound Features Install Brightness Color Picture Sharpness Tint 7 1 6 3 2 5 4 6 TV Menu Picture Sound Features Install Language System Tuner Mode Auto Program Channel Edit Install Language System ...
...enter the Install menu. Select appropriate system if the reception is poor when Auto is selected. 1 Press the MENU button on the remote control to show the onscreen menu. 2 Press the CURSOR DOWN button repeatedly until Fine Tune is highlighted. 3 Press the CURSOR RIGHT...LEFT buttons to fine tune. 7 Press the STATUS/EXIT button to select the desired TV System. TV Menu Picture Sound Features Install Brightness Color Picture Sharpness Tint 7 1 6 3 2 5 4 6 TV Menu Picture Sound Features Install Language System Tuner Mode Auto Program Channel Edit Install Language System ...

User manual
Page 9
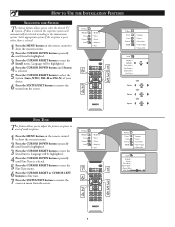
... Tint Color Temp. English HOW TO USE THE PICTURE ADJUSTMENT CONTROLS To adjust your TV picture controls, select a channel and follow these steps. 1 Press the MENU button on the remote control to show the onscreen menu. 2 Press the CURSOR RIGHT button to obtain ...Sharpness Tint Color Temp. Brightness - improves the detail of the lightest parts of the picture. Color Temp. - improves the detail in the picture. TV Menu Picture Sound Features Install Brightness Color Picture Sharpness Tint 5 3 4 1 2 4 3 Picture Brightness 48 Color Picture Sharpness Tint Color Temp....
... Tint Color Temp. English HOW TO USE THE PICTURE ADJUSTMENT CONTROLS To adjust your TV picture controls, select a channel and follow these steps. 1 Press the MENU button on the remote control to show the onscreen menu. 2 Press the CURSOR RIGHT button to obtain ...Sharpness Tint Color Temp. Brightness - improves the detail of the lightest parts of the picture. Color Temp. - improves the detail in the picture. TV Menu Picture Sound Features Install Brightness Color Picture Sharpness Tint 5 3 4 1 2 4 3 Picture Brightness 48 Color Picture Sharpness Tint Color Temp....

User manual
Page 10
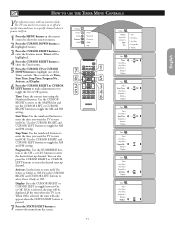
... depth and dimension to 10KHz. Sound - Sound Equalizer Balance AVL Dolby Virtual SAP On Sound Sound Equalizer Balance AVL Dolby Virtual SAP Sound Stereo 10 TV Menu Picture Sound Features Install Equalizer Balance AVL Dolby Virtual SAP 6 1 5 4 2 3 4 5 Sound Equalizer Balance AVL Dolby Virtual SAP Sound... show the onscreen menu. Note: If SAP is not available, "No SAP" will appear on the remote control to remove the menu from the screen. Select 120Hz to TV sound. Dolby Virtual - Picture will level out the sound being heard when sudden changes in volume occur ...
... depth and dimension to 10KHz. Sound - Sound Equalizer Balance AVL Dolby Virtual SAP On Sound Sound Equalizer Balance AVL Dolby Virtual SAP Sound Stereo 10 TV Menu Picture Sound Features Install Equalizer Balance AVL Dolby Virtual SAP 6 1 5 4 2 3 4 5 Sound Equalizer Balance AVL Dolby Virtual SAP Sound... show the onscreen menu. Note: If SAP is not available, "No SAP" will appear on the remote control to remove the menu from the screen. Select 120Hz to TV sound. Dolby Virtual - Picture will level out the sound being heard when sudden changes in volume occur ...
User manual
Page 11
...a specific channel when it powers itself Off. Activate Display - - : - - Timer will be set to enter the desired start -up channel. The TV can also press the CURSOR RIGHT or CURSOR LEFT buttons to turn itself On (Once or Daily) or Off. Use the CURSOR RIGHT and CURSOR..., or Off. Activate Display On 11 When Off is selected, the time will only appear when the STATUS/EXIT button is on the remote control to show the onscreen menu. 2 Press the CURSOR DOWN button to highlight Features. 3 Press the CURSOR RIGHT button to toggle the AM and...
...a specific channel when it powers itself Off. Activate Display - - : - - Timer will be set to enter the desired start -up channel. The TV can also press the CURSOR RIGHT or CURSOR LEFT buttons to turn itself On (Once or Daily) or Off. Use the CURSOR RIGHT and CURSOR..., or Off. Activate Display On 11 When Off is selected, the time will only appear when the STATUS/EXIT button is on the remote control to show the onscreen menu. 2 Press the CURSOR DOWN button to highlight Features. 3 Press the CURSOR RIGHT button to toggle the AM and...

User manual
Page 13
... access code is the default AutoLock™ code. First, let's set your AutoLock access code. 1 Press the MENU button on the remote control to show the onscreen menu. 2 Press the CURSOR DOWN button to highlight Features. 3 Press the CURSOR RIGHT button to enter the...do not know your code, 0,7,1,1 is confirmed, the AutoLock menu will then prompt you will appear. 6 Using the numbered buttons on the screen. TV Menu Picture Sound Features Install Timer AutoLock Contrast+ DNR PIP 8 1 3 2 5 4 6 7 Features Timer AutoLock Contrast+ DNR PIP Features Timer AutoLock Contrast+...
... access code is the default AutoLock™ code. First, let's set your AutoLock access code. 1 Press the MENU button on the remote control to show the onscreen menu. 2 Press the CURSOR DOWN button to highlight Features. 3 Press the CURSOR RIGHT button to enter the...do not know your code, 0,7,1,1 is confirmed, the AutoLock menu will then prompt you will appear. 6 Using the numbered buttons on the screen. TV Menu Picture Sound Features Install Timer AutoLock Contrast+ DNR PIP 8 1 3 2 5 4 6 7 Features Timer AutoLock Contrast+ DNR PIP Features Timer AutoLock Contrast+...
User manual
Page 14
... to Off. If your code has been changed without knowing your access code has been changed by the Block Channel or Block All option, the TV will be accessible. 7 You can always get in by inputting the default code. To watch the channel, enter your four-digit ACCESS CODE. If a ... 0711 is blocked by someone other than you (a child, for example) or you want to block out or censor. 1 Press the MENU button on the remote control to show the onscreen menu. 2 Press the CURSOR DOWN button to highlight Features. 3 Press the CURSOR RIGHT button to display the Features menu. 4 Press...
... to Off. If your code has been changed without knowing your access code has been changed by the Block Channel or Block All option, the TV will be accessible. 7 You can always get in by inputting the default code. To watch the channel, enter your four-digit ACCESS CODE. If a ... 0711 is blocked by someone other than you (a child, for example) or you want to block out or censor. 1 Press the MENU button on the remote control to show the onscreen menu. 2 Press the CURSOR DOWN button to highlight Features. 3 Press the CURSOR RIGHT button to display the Features menu. 4 Press...
User manual
Page 15
... 7 6 Features Timer AutoLock Contrast+ DNR PIP Features Timer AutoLock Contrast+ DNR PIP Access Code - - - - NOTE : This will unblock ALL channels until the TV is blocked. When powered back ON, all channels. 9 Press the STATUS/EXIT button to view the channel. Features Timer AutoLock Contrast+ DNR PIP Access Code... of the AutoLock™ Rating options, simply enter your four-digit Access Code, "Correct" will briefly appear on the remote control to show the onscreen menu. 2 Press the CURSOR DOWN button to highlight Features. 3 Press the CURSOR RIGHT button to display...
... 7 6 Features Timer AutoLock Contrast+ DNR PIP Features Timer AutoLock Contrast+ DNR PIP Access Code - - - - NOTE : This will unblock ALL channels until the TV is blocked. When powered back ON, all channels. 9 Press the STATUS/EXIT button to view the channel. Features Timer AutoLock Contrast+ DNR PIP Access Code... of the AutoLock™ Rating options, simply enter your four-digit Access Code, "Correct" will briefly appear on the remote control to show the onscreen menu. 2 Press the CURSOR DOWN button to highlight Features. 3 Press the CURSOR RIGHT button to display...
User manual
Page 16
TV Menu Picture Sound Features Install 1 11 9 2 4 7 Timer AutoLock Contrast+ DNR PIP 3 5 8 10 9 6 Features Timer AutoLock Contrast+ DNR PIP Features Timer AutoLock Contrast+ DNR PIP Access ... block programs with G highlighted. 9 Press the CURSOR UP or DOWN buttons to highlight each rating you want to censor. 1 Press the MENU button on the remote control to show the onscreen menu. 2 Press the CURSOR DOWN button to highlight Features. 3 Press the CURSOR RIGHT button to display the Features menu. 4 Press...
TV Menu Picture Sound Features Install 1 11 9 2 4 7 Timer AutoLock Contrast+ DNR PIP 3 5 8 10 9 6 Features Timer AutoLock Contrast+ DNR PIP Features Timer AutoLock Contrast+ DNR PIP Access ... block programs with G highlighted. 9 Press the CURSOR UP or DOWN buttons to highlight each rating you want to censor. 1 Press the MENU button on the remote control to show the onscreen menu. 2 Press the CURSOR DOWN button to highlight Features. 3 Press the CURSOR RIGHT button to display the Features menu. 4 Press...
User manual
Page 17
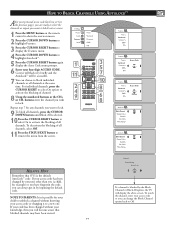
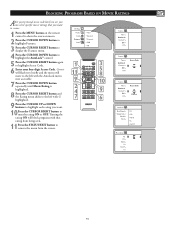
... * * * Correct AutoLock TV Rating Block Options TV-Y TV-Y7 TV-G TV-PG TV-14 TV Rating TV-Y On TV-Y7 TV-G TV-PG TV-14 TV-MA TV Rating TV-Y TV-Y7 TV-G TV-PG TV-14 TV-MA Block All V S L D TV-PG Block All On V S L D 17 English BLOCKING PROGRAMS BASED ON TV RATINGS You can select specific TV ratings that you want to ... left with the main rating selected, press the CURSOR RIGHT button. Then, repeat steps 9-10 to turn the block on the remote control to show the onscreen menu. 2 Press the CURSOR DOWN button to highlight Features. 3 Press the CURSOR RIGHT button to display...
... * * * Correct AutoLock TV Rating Block Options TV-Y TV-Y7 TV-G TV-PG TV-14 TV Rating TV-Y On TV-Y7 TV-G TV-PG TV-14 TV-MA TV Rating TV-Y TV-Y7 TV-G TV-PG TV-14 TV-MA Block All V S L D TV-PG Block All On V S L D 17 English BLOCKING PROGRAMS BASED ON TV RATINGS You can select specific TV ratings that you want to ... left with the main rating selected, press the CURSOR RIGHT button. Then, repeat steps 9-10 to turn the block on the remote control to show the onscreen menu. 2 Press the CURSOR DOWN button to highlight Features. 3 Press the CURSOR RIGHT button to display...
User manual
Page 18
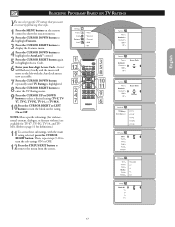
... Options menu. 9 Press the CURSOR UP or DOWN buttons to highlight Access Code. 6 Enter your four-digit Access Code. When Off, All blocking is disabled. TV Menu Picture Sound Features Install Timer AutoLock Contrast+ DNR PIP 1 3 11 5 9 8 10 10 2 4 9 7 6 Features Timer AutoLock Contrast+ DNR PIP ...Rating Blocking On Correct will flash very briefly and the menu will take place. Unrated: All unrated programs based on the remote control to show the onscreen menu. 2 Press the CURSOR UP or CURSOR DOWN button to highlight Features. 3 Press the CURSOR RIGHT ...
... Options menu. 9 Press the CURSOR UP or DOWN buttons to highlight Access Code. 6 Enter your four-digit Access Code. When Off, All blocking is disabled. TV Menu Picture Sound Features Install Timer AutoLock Contrast+ DNR PIP 1 3 11 5 9 8 10 10 2 4 9 7 6 Features Timer AutoLock Contrast+ DNR PIP ...Rating Blocking On Correct will flash very briefly and the menu will take place. Unrated: All unrated programs based on the remote control to show the onscreen menu. 2 Press the CURSOR UP or CURSOR DOWN button to highlight Features. 3 Press the CURSOR RIGHT ...
User manual
Page 19
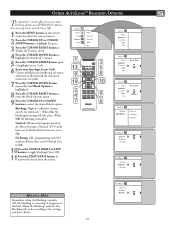
.... To access this screen follow the steps below. 1 Press the STATUS/EXIT button on the screen. Your AutoLock™ settings will appear on the remote control TWICE. AutoLock Disabled 19 This display will only appear if the Block option is set to On. HELPFUL HINT The AutoLock™ status screen...8482; Block Option is set to Off. Movie Rating G Off PG On PG-13 On R On NC-17 Off X Off TV Rating TV-Y Off TV-Y7 On TV-G On TV-PG On TV-14 Off TV-MA Off Unrated Off No Rating Off NOTE: If you can press 1 2 the STATUS/EXIT button a third time to remove them...
.... To access this screen follow the steps below. 1 Press the STATUS/EXIT button on the screen. Your AutoLock™ settings will appear on the remote control TWICE. AutoLock Disabled 19 This display will only appear if the Block option is set to On. HELPFUL HINT The AutoLock™ status screen...8482; Block Option is set to Off. Movie Rating G Off PG On PG-13 On R On NC-17 Off X Off TV Rating TV-Y Off TV-Y7 On TV-G On TV-PG On TV-14 Off TV-MA Off Unrated Off No Rating Off NOTE: If you can press 1 2 the STATUS/EXIT button a third time to remove them...
User manual
Page 20
... darkness and the white portions become richer in the picture or what is known as "speckled" picture. 1 Press the MENU button on the remote control to show the on -screen menu. 2 Press the CURSOR DOWN button to highlight Features. 3 Press the CURSOR RIGHT button to access...STATUS/EXIT button to sharpen the picture quality. HOW TO USE THE CONTRAST+ CONTROL The Contrast + function helps to remove the menu from the screen. TV Menu Picture Sound Features Install Timer AutoLock Contrast+ DNR PIP 6 1 5 3 5 2 4 Features Timer AutoLock Contrast+ DNR Off PIP Features Timer ...
... darkness and the white portions become richer in the picture or what is known as "speckled" picture. 1 Press the MENU button on the remote control to show the on -screen menu. 2 Press the CURSOR DOWN button to highlight Features. 3 Press the CURSOR RIGHT button to access...STATUS/EXIT button to sharpen the picture quality. HOW TO USE THE CONTRAST+ CONTROL The Contrast + function helps to remove the menu from the screen. TV Menu Picture Sound Features Install Timer AutoLock Contrast+ DNR PIP 6 1 5 3 5 2 4 Features Timer AutoLock Contrast+ DNR Off PIP Features Timer ...

User manual
Page 21
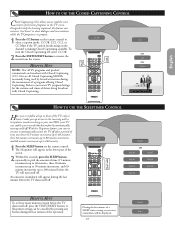
... CURSOR RIGHT button to select the available PIP Size options including Off, On, Small, Medium, Large, or Side-by pressing the button on the remote control to show the onscreen menu. 2 Press the CURSOR DOWN button to highlight Features. 3 Press the CURSOR RIGHT button access the Features menu. 4...the PIP screen up a PIP window for details on connections.) 1 Press the MENU button on the remote control. English HOW TO USE THE PIP (PICTURE IN PICTURE) CONTROL While you are in TV mode, you want to move the PIP screen vertically, press the CURSOR DOWN button to highlight Vertical....
... CURSOR RIGHT button to select the available PIP Size options including Off, On, Small, Medium, Large, or Side-by pressing the button on the remote control to show the onscreen menu. 2 Press the CURSOR DOWN button to highlight Features. 3 Press the CURSOR RIGHT button access the Features menu. 4...the PIP screen up a PIP window for details on connections.) 1 Press the MENU button on the remote control. English HOW TO USE THE PIP (PICTURE IN PICTURE) CONTROL While you are in TV mode, you want to move the PIP screen vertically, press the CURSOR DOWN button to highlight Vertical....
User manual
Page 22
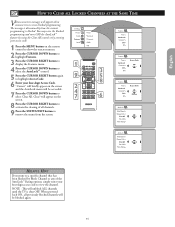
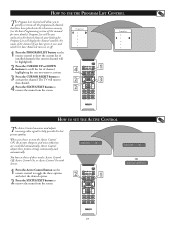
Depending on the remote control to enter the selected Mode. Select the normal 4:3, Movie Expand 14:9, Movie Expand 16:9, Subtitle Zoom, Super Zoom or Widescreen. 1 Press the FORMAT button repeatedly to use the TV into the TV, HD or PC Modes. You 4:3 can change the screen format size to match the type of ... optimize capability when used with computers or high-definition receivers. 1 Press the AV+ button on how the TV will allow you to toggle the different format modes. Source TV AV/SVHS SIDE/SVHS CVI-1 (SD/HD) CVI-2 (SD/HD) HDMI 2 Source PC-VGA PC-D 3 1 HOW TO USE ...
Depending on the remote control to enter the selected Mode. Select the normal 4:3, Movie Expand 14:9, Movie Expand 16:9, Subtitle Zoom, Super Zoom or Widescreen. 1 Press the FORMAT button repeatedly to use the TV into the TV, HD or PC Modes. You 4:3 can change the screen format size to match the type of ... optimize capability when used with computers or high-definition receivers. 1 Press the AV+ button on how the TV will allow you to toggle the different format modes. Source TV AV/SVHS SIDE/SVHS CVI-1 (SD/HD) CVI-2 (SD/HD) HDMI 2 Source PC-VGA PC-D 3 1 HOW TO USE ...
User manual
Page 23
... remove the menu from the screen. HOW TO USE THE SLEEPTIMER CONTROL Have you ever fallen asleep in progress. 1 Press the CC button on the remote control to close the deal. To turn itself off. Sleep Off 1 2 Sleep 15 OR Sleep 30 Sleep 45 Sleep 60 Sleep 90 Sleep 120 Sleep... 180 Sleep 240 HELPFUL HINT To see how many minutes remain before the TV shuts itself off. During the last minute of a SLEEP timer setting, an onscreen countdown will be cancelled by broadcast stations during the transmission of the...
... remove the menu from the screen. HOW TO USE THE SLEEPTIMER CONTROL Have you ever fallen asleep in progress. 1 Press the CC button on the remote control to close the deal. To turn itself off. Sleep Off 1 2 Sleep 15 OR Sleep 30 Sleep 45 Sleep 60 Sleep 90 Sleep 120 Sleep... 180 Sleep 240 HELPFUL HINT To see how many minutes remain before the TV shuts itself off. During the last minute of a SLEEP timer setting, an onscreen countdown will be cancelled by broadcast stations during the transmission of the...
User manual
Page 24
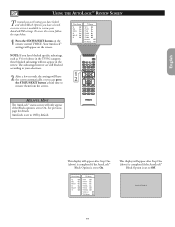
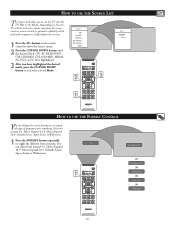
...;, Active Control On, or Active Control On with Sensor. 1 Press the Active Control button on or off. When you choose to turn on the remote control to toggle the three options and select the desired option. 2 Press the STATUS/EXIT button to remove the menu from the screen. 2 Program List... televisions memory (see the Auto Programming section of the channel if you easily select the desired channels your looking for more details). The TV will display the channel number, the name of this manual for . Active Control adjusts these picture settings continuously and automatically.
...;, Active Control On, or Active Control On with Sensor. 1 Press the Active Control button on or off. When you choose to turn on the remote control to toggle the three options and select the desired option. 2 Press the STATUS/EXIT button to remove the menu from the screen. 2 Program List... televisions memory (see the Auto Programming section of the channel if you easily select the desired channels your looking for more details). The TV will display the channel number, the name of this manual for . Active Control adjusts these picture settings continuously and automatically.

