Leaflet
Page 1
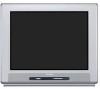
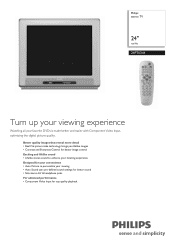
... Control for better image control Exciting and lifelike sound • Lifelike stereo sound to enhance your listening experience Designed for your convenience • Auto Picture to personalize your favorite DVDs is made better and easier with Component Video Input, optimizing the digital picture quality. Philips stereo TV 24" real flat 24PT6341 Turn up your viewing experience Watching all your viewing • Auto Sound uses pre-defined sound settings for better sound • Side stereo AV & headphone jacks...
... Control for better image control Exciting and lifelike sound • Lifelike stereo sound to enhance your listening experience Designed for your convenience • Auto Picture to personalize your favorite DVDs is made better and easier with Component Video Input, optimizing the digital picture quality. Philips stereo TV 24" real flat 24PT6341 Turn up your viewing experience Watching all your viewing • Auto Sound uses pre-defined sound settings for better sound • Side stereo AV & headphone jacks...
Leaflet
Page 2
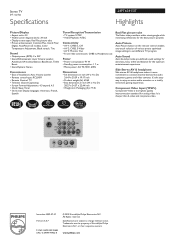
... easy way to connect external devices like audio equipment, games and video cameras. www.philips.com Specifications are the property of Koninklijke Philips Electronics N.V. All Rights reserved. Stereo TV 24" real flat Specifications 24PT6341/37 Highlights Picture/Display • Aspect ratio: 4:3 • Visible screen diagonal (inch): 24 inch • Display screen type: Real Flat picture tube • Picture enhancement: Contrast Plus, Comb Filter Digital, AutoPicture (5 modes), Color Temperature Adjustment, Black stretch, Tint Sound • Output power (RMS): 2 x 3W •...
... easy way to connect external devices like audio equipment, games and video cameras. www.philips.com Specifications are the property of Koninklijke Philips Electronics N.V. All Rights reserved. Stereo TV 24" real flat Specifications 24PT6341/37 Highlights Picture/Display • Aspect ratio: 4:3 • Visible screen diagonal (inch): 24 inch • Display screen type: Real Flat picture tube • Picture enhancement: Contrast Plus, Comb Filter Digital, AutoPicture (5 modes), Color Temperature Adjustment, Black stretch, Tint Sound • Output power (RMS): 2 x 3W •...

User manual
Page 2
... all of saying welcome - in PHILIPS.You've selected one of plug to wide slot, fully insert. P.S. NO USER-SERVICEABLE PARTS INSIDE. directly from our convenient home shopping network. As a member of the PHILIPS "family," you're entitled to protection by one of everyone in our power to keep you should not be placed on the rear of this information for many...
... all of saying welcome - in PHILIPS.You've selected one of plug to wide slot, fully insert. P.S. NO USER-SERVICEABLE PARTS INSIDE. directly from our convenient home shopping network. As a member of the PHILIPS "family," you're entitled to protection by one of everyone in our power to keep you should not be placed on the rear of this information for many...

User manual
Page 3
.... Use only with a cart, stand, tripod, bracket, or table specified by the manufacturer. 12. or B. To prevent battery leakage that the cable ground shall be taken so that produce heat. 9. The power supply cord or the plug has been damaged; The wide blade or third prong are not spilled into the appliance; or C. The appliance should be connected to...
.... Use only with a cart, stand, tripod, bracket, or table specified by the manufacturer. 12. or B. To prevent battery leakage that the cable ground shall be taken so that produce heat. 9. The power supply cord or the plug has been damaged; The wide blade or third prong are not spilled into the appliance; or C. The appliance should be connected to...
User manual
Page 4
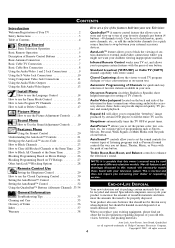
... Basic Television Operation 5 Basic Remote Operation 5 Description of Remote Control Buttons 6 Basic Antenna Connection 7 Basic Cable TV Connection 7 Basic Cable Box Connection 8 Using the Audio/Video 1 and 2 Jack Connections 9 Using the S-Video Jack Connections 10 Using Component Video Jack Connections 11 Using the Audio/Video Outputs 12 Using the Side Audio/Video Inputs 13 Install Menu How to use the Language Control 14 How to use the Tuner Mode Control 15 How to Auto Program TV Channels 16 How to Add or Delete Channels 17 Picture Menu How to use the Closed Captioning Control...
... Basic Television Operation 5 Basic Remote Operation 5 Description of Remote Control Buttons 6 Basic Antenna Connection 7 Basic Cable TV Connection 7 Basic Cable Box Connection 8 Using the Audio/Video 1 and 2 Jack Connections 9 Using the S-Video Jack Connections 10 Using Component Video Jack Connections 11 Using the Audio/Video Outputs 12 Using the Side Audio/Video Inputs 13 Install Menu How to use the Language Control 14 How to use the Tuner Mode Control 15 How to Auto Program TV Channels 16 How to Add or Delete Channels 17 Picture Menu How to use the Closed Captioning Control...

User manual
Page 7
... first need to attach the antenna wires to the 75Ω input on the TV. If so, this connection is only one 75Ω (ohm) antenna plug on the back of the round Cable Company supplied cable to the screws on the back of TV 7 Screw it down finger tight. BASIC ANTENNA TELEVISION CONNECTION Acombination antenna receives normal broadcast channels (VHF 2-13 and UHF 14-69). Jack Panel...
... first need to attach the antenna wires to the 75Ω input on the TV. If so, this connection is only one 75Ω (ohm) antenna plug on the back of the round Cable Company supplied cable to the screws on the back of TV 7 Screw it down finger tight. BASIC ANTENNA TELEVISION CONNECTION Acombination antenna receives normal broadcast channels (VHF 2-13 and UHF 14-69). Jack Panel...

User manual
Page 8
... connection will supply Stereo sound to the AUDIO Pb R Pr COMPONENT VIDEO INPUT Jack Panel Back of the television. Round 75Ω Coaxial Cable 3 3 Connect the other end to the Jack Panel Back of Cable Box Cable Box with Audio/Video Outputs): NEL SWITCH on VIDEO the TV. buttons on the TV. BASIC CABLE BOX/DECODER CONNECTION If you cable signal uses a cable box or decoder, follow the easy steps below to the AV1 channel for the cable box signal. ding channel. NOTE: Use the Channel +, or - Once tuned, change channels...
... connection will supply Stereo sound to the AUDIO Pb R Pr COMPONENT VIDEO INPUT Jack Panel Back of the television. Round 75Ω Coaxial Cable 3 3 Connect the other end to the Jack Panel Back of Cable Box Cable Box with Audio/Video Outputs): NEL SWITCH on VIDEO the TV. buttons on the TV. BASIC CABLE BOX/DECODER CONNECTION If you cable signal uses a cable box or decoder, follow the easy steps below to the AV1 channel for the cable box signal. ding channel. NOTE: Use the Channel +, or - Once tuned, change channels...

User manual
Page 9
... AV2 channel for information about purchasing the needed for direct picture and sound connections NOTE: Repeatedly pressing the AV button on the remote control will not be connected 24 BACK OF TV alone. ANT/CABLE S-VIDEO OUT OUT 4 R L AUDIO OUT VIDEO OUT 3 c CHECK IT OUT The S-VIDEO and VIDEO AV2 in(puts) are in use. Both the (side inputs), then back to select the AV1 channel for accessory device number one...
... AV2 channel for information about purchasing the needed for direct picture and sound connections NOTE: Repeatedly pressing the AV button on the remote control will not be connected 24 BACK OF TV alone. ANT/CABLE S-VIDEO OUT OUT 4 R L AUDIO OUT VIDEO OUT 3 c CHECK IT OUT The S-VIDEO and VIDEO AV2 in(puts) are in use. Both the (side inputs), then back to select the AV1 channel for accessory device number one...
User manual
Page 10
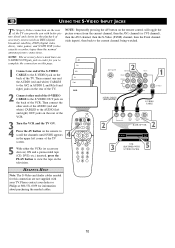
... as DBS (digital broadcast satellite), DVD (digital video discs), video games, and S-VHS VCR (video cassette recorder) tapes than the normal antenna picture connections. AUDIO CABLE (RED/WHITE) S-VIDEO CABLE 2 L R AUDIO OUT VIDEO OUT S-VIDEO ANT/CABLE OUT OUT BACK OF VCR 2 3 VCR (EQUIPPED WITH 5 S-VIDEO JACKS) HELPFUL HINT Note: The S-Video and Audio cables needed cables. 10 VOL 5 With either the VCRs (or accessory devices) ON and a prerecorded tape (CD, DVD, etc.) inserted, press the PLAY button to the current channel being watched. NOTE...
... as DBS (digital broadcast satellite), DVD (digital video discs), video games, and S-VHS VCR (video cassette recorder) tapes than the normal antenna picture connections. AUDIO CABLE (RED/WHITE) S-VIDEO CABLE 2 L R AUDIO OUT VIDEO OUT S-VIDEO ANT/CABLE OUT OUT BACK OF VCR 2 3 VCR (EQUIPPED WITH 5 S-VIDEO JACKS) HELPFUL HINT Note: The S-Video and Audio cables needed cables. 10 VOL 5 With either the VCRs (or accessory devices) ON and a prerecorded tape (CD, DVD, etc.) inserted, press the PLAY button to the current channel being watched. NOTE...
User manual
Page 11
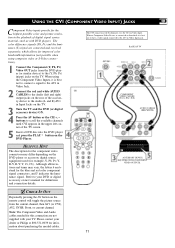
... blue and red color component signal connectors, and Y indicates the luminance signal. c CHECK IT OUT Repeatedly pressing the AV button on the remote control will be dominate over the AV1 in the upper left and right) output jacks on the DVD player or accessory digital source equipment used (for definitions and connection details. Note: The Component Video and Audio cables needed cables. The CVI connection will toggle the picture source from the DVD player (or...
... blue and red color component signal connectors, and Y indicates the luminance signal. c CHECK IT OUT Repeatedly pressing the AV button on the remote control will be dominate over the AV1 in the upper left and right) output jacks on the DVD player or accessory digital source equipment used (for definitions and connection details. Note: The Component Video and Audio cables needed cables. The CVI connection will toggle the picture source from the DVD player (or...
User manual
Page 12
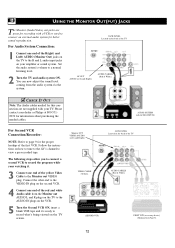
.... Set the audio system's volume to page 9 for recording with your amplifier or sound system. You can now adjust the sound level coming from Page 9) 12 Monitor OUT VIDEO &AUDIO L(eft) and R(ight) VIDEO CABLE (Yellow) SECOND VCR JACK PANEL Located on the TV screen. For Audio System Connection: 1 Connect one end of the red and white Audio cable from the Monitor out AUDIO L and R plugs on the TV to the AUDIO IN plugs on the VCR. 5 Turn...
.... Set the audio system's volume to page 9 for recording with your amplifier or sound system. You can now adjust the sound level coming from Page 9) 12 Monitor OUT VIDEO &AUDIO L(eft) and R(ight) VIDEO CABLE (Yellow) SECOND VCR JACK PANEL Located on the TV screen. For Audio System Connection: 1 Connect one end of the red and white Audio cable from the Monitor out AUDIO L and R plugs on the TV to the AUDIO IN plugs on the VCR. 5 Turn...

User manual
Page 13
... television. 3 Turn the TV and the accessory device ON. 4 Press the AV button on the remote control to tune the TV to the side input jacks. Video Cable (yellow) Audio Cables (red & white) Jack Panel of Accessory Device Jack Panel located on the Side of TV When headphones are not supplied with your dealer or Philips at 800-531-0039 for information about purchasing the needed for a quick connection of a VCR, to playback video...
... television. 3 Turn the TV and the accessory device ON. 4 Press the AV button on the remote control to tune the TV to the side input jacks. Video Cable (yellow) Audio Cables (red & white) Jack Panel of Accessory Device Jack Panel located on the Side of TV When headphones are not supplied with your dealer or Philips at 800-531-0039 for information about purchasing the needed for a quick connection of a VCR, to playback video...
User manual
Page 16
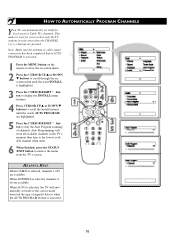
... antenna or cable signal connection has been completed before AUTO PROGRAM is activated. 1 Press the MENU button on the remote to show the on the type of channels. HOW TO AUTOMATICALLY PROGRAM CHANNELS Your TV can automatically set itself for you to remove the menu from the TV's screen. This makes it detects when the AUTO PROGRAM feature is activated. 16 HELPFUL HINT When CABLE is selected, channels 269 are available. When AUTO is selected...
... antenna or cable signal connection has been completed before AUTO PROGRAM is activated. 1 Press the MENU button on the remote to show the on the type of channels. HOW TO AUTOMATICALLY PROGRAM CHANNELS Your TV can automatically set itself for you to remove the menu from the TV's screen. This makes it detects when the AUTO PROGRAM feature is activated. 16 HELPFUL HINT When CABLE is selected, channels 269 are available. When AUTO is selected...
User manual
Page 19
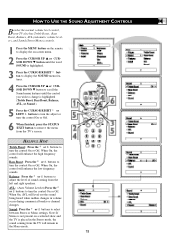
... mode. 19 Bass Boost: Press the © or ß buttons to remove the menu from the TV will remain in volume occur during commercial breaks or channel changes. AVL: (Auto Volume Leveler) Press the © or ß buttons to turn the control On or Off. 6 When finished, press the STATUS /EXIT button to turn the control On or Off. Sound: Press the © or ß buttons to adjust...
... mode. 19 Bass Boost: Press the © or ß buttons to remove the menu from the TV will remain in volume occur during commercial breaks or channel changes. AVL: (Auto Volume Leveler) Press the © or ß buttons to turn the control On or Off. 6 When finished, press the STATUS /EXIT button to turn the control On or Off. Sound: Press the © or ß buttons to adjust...

User manual
Page 28
... OFF. 28 UNRATED: ALL unrated programs based on the remote. Features AutoLock Format Access Code - - - - AutoLock menu options will take place. Main Picture Sound Features Install AutoLock Format Features AutoLock Format Features AutoLock Format Access Code - - - - With these Blocking Options, the censoring can be turned ON or OFF using the CURSOR RIGHT Æ or LEFT Í buttons on the Movie Ratings or Parental (TV) Guidelines can be blocked if...
... OFF. 28 UNRATED: ALL unrated programs based on the remote. Features AutoLock Format Access Code - - - - AutoLock menu options will take place. Main Picture Sound Features Install AutoLock Format Features AutoLock Format Features AutoLock Format Access Code - - - - With these Blocking Options, the censoring can be turned ON or OFF using the CURSOR RIGHT Æ or LEFT Í buttons on the Movie Ratings or Parental (TV) Guidelines can be blocked if...

User manual
Page 30
... and times of Closed Caption shows. HELPFUL HINT Not all TV programs and product commercials are all Closed Caption modes (CC1, or CC2) necessarily being used to set the TV to your area's TV program listings for the action on the captioned TV program will appear on-screen if the tuned program is in progress. 1 Press the CC button on the TV screen. Neither are made with Closed Caption (CC...
... and times of Closed Caption shows. HELPFUL HINT Not all TV programs and product commercials are all Closed Caption modes (CC1, or CC2) necessarily being used to set the TV to your area's TV program listings for the action on the captioned TV program will appear on-screen if the tuned program is in progress. 1 Press the CC button on the TV screen. Neither are made with Closed Caption (CC...

User manual
Page 32
The current Auto Sound setting will appear in the main on the remote control. MUSIC - Note: Only the PERSONAL control can be changed by the user), Theatre (for movie viewing), Music (for programming where heavy dialogue is present. 32 VOICE - This changes the settings in the middle of the options follow the directions below. 1 Press the AUTO SOUND button on -screen menu's sound controls. Preset sound options for watching movies. Preset sound options...
The current Auto Sound setting will appear in the main on the remote control. MUSIC - Note: Only the PERSONAL control can be changed by the user), Theatre (for movie viewing), Music (for programming where heavy dialogue is present. 32 VOICE - This changes the settings in the middle of the options follow the directions below. 1 Press the AUTO SOUND button on -screen menu's sound controls. Preset sound options for watching movies. Preset sound options...

User manual
Page 35
... using the CHANNEL EDIT control) into the TV's memory. • Check to be DVD disks, laser disks, video games, CD-i disks, videotapes, digital television boxes, broadcast channels, cable channels, satellite channels, and others in a solution of time, or to scratch or damage the screen surface. No Picture • Check antenna connections. No Sound • Check the VOLUME buttons. • Check the MUTE button on the remote control. • If you may be sure the TUNER MODES...
... using the CHANNEL EDIT control) into the TV's memory. • Check to be DVD disks, laser disks, video games, CD-i disks, videotapes, digital television boxes, broadcast channels, cable channels, satellite channels, and others in a solution of time, or to scratch or damage the screen surface. No Picture • Check antenna connections. No Sound • Check the VOLUME buttons. • Check the MUTE button on the remote control. • If you may be sure the TUNER MODES...

User manual
Page 36
... channel numbers and skips over any unwanted channel numbers. Menu • An on-screen listing of feature controls shown on the Television or VCR. Side Audio/Video Inputs • Located on screen displays or information (rather than waiting for the displays to show dialogue and conversations while the TV program is currently being viewed. Tuner Mode • Feature control settings made available for the input of audio and video signals. Designed for easy use . In this type of antenna...
... channel numbers and skips over any unwanted channel numbers. Menu • An on-screen listing of feature controls shown on the Television or VCR. Side Audio/Video Inputs • Located on screen displays or information (rather than waiting for the displays to show dialogue and conversations while the TV program is currently being viewed. Tuner Mode • Feature control settings made available for the input of audio and video signals. Designed for easy use . In this type of antenna...

User manual
Page 37
...Program Control 16 Auto Sound Control 32 AVL Control 19 Balance Control 19 Bass Boost Control 19 Brightness Control 18 Cable Box Connection 8 Cable TV Connection (Basic Connection 7 Care and Cleaning 35 Channel Edit Control 17 Closed Caption Control 30 Color Control 18 Color Temperature Control 18 Component Video Inputs 11 Contrast + Control 18 Noise Reduction (NR) Control 18 Format (Expand 4:3) Control 20 Glossary of Terms 36 Index 37 Language Control 14 Picture Control 18 Remote Control Buttons 6 Remote Control Operation (Basic 5 S-Video Inputs 10 Safety Instructions...
...Program Control 16 Auto Sound Control 32 AVL Control 19 Balance Control 19 Bass Boost Control 19 Brightness Control 18 Cable Box Connection 8 Cable TV Connection (Basic Connection 7 Care and Cleaning 35 Channel Edit Control 17 Closed Caption Control 30 Color Control 18 Color Temperature Control 18 Component Video Inputs 11 Contrast + Control 18 Noise Reduction (NR) Control 18 Format (Expand 4:3) Control 20 Glossary of Terms 36 Index 37 Language Control 14 Picture Control 18 Remote Control Buttons 6 Remote Control Operation (Basic 5 S-Video Inputs 10 Safety Instructions...


