
Operation Manual
Page 3
...camera immediately, remove the battery or disconnect the AC adapter and contact your neck is possible that the user may experience serious difficulties if the warnings are not heeded. About the Camera.... Please take the camera apart or remodel the camera. High voltages are ...camera should become exposed as a result of, for exclusive use of the camera may cause fire or electric shocks. • If the camera...camera, and there is a danger of receiving an electric shock. • Wrapping the strap of the camera...voltage specified for example, the camera being swallowed by the following ...
...camera immediately, remove the battery or disconnect the AC adapter and contact your neck is possible that the user may experience serious difficulties if the warnings are not heeded. About the Camera.... Please take the camera apart or remodel the camera. High voltages are ...camera should become exposed as a result of, for exclusive use of the camera may cause fire or electric shocks. • If the camera...camera, and there is a danger of receiving an electric shock. • Wrapping the strap of the camera...voltage specified for example, the camera being swallowed by the following ...

Operation Manual
Page 4
... contact with skin or clothes, wash the affected areas thoroughly with water. • Remove the battery from the camera immediately if it may explode. • Do not charge any of the battery leakage should come in fire, as it becomes hot or begins to smoke. Also, do not rub them. Be careful ...not to disassemble or short the battery. Of the batteries that can be used in this camera, only the Ni-MH battery can be recharged. • Do not place your finger on your skin or eyes or in your mouth. 2 ...
... contact with skin or clothes, wash the affected areas thoroughly with water. • Remove the battery from the camera immediately if it may explode. • Do not charge any of the battery leakage should come in fire, as it becomes hot or begins to smoke. Also, do not rub them. Be careful ...not to disassemble or short the battery. Of the batteries that can be used in this camera, only the Ni-MH battery can be recharged. • Do not place your finger on your skin or eyes or in your mouth. 2 ...

Operation Manual
Page 8
... 9 Checking the Contents of the Package 10 Names of Parts 11 Names of Operating Parts 12 Getting Started 13 Attaching the Strap 13 Powering the Camera 14 Installing the Batteries 14 Using the AC Adapter (optional 16 Installing the SD Memory Card 17 Recorded Pixels and Quality 19 Turning the... Camera On and Off 21 Playback Only Mode 21 Voice Recording Only Mode 22 Initial Settings 23 Setting the Display Language 23 Setting the Date and ...
... 9 Checking the Contents of the Package 10 Names of Parts 11 Names of Operating Parts 12 Getting Started 13 Attaching the Strap 13 Powering the Camera 14 Installing the Batteries 14 Using the AC Adapter (optional 16 Installing the SD Memory Card 17 Recorded Pixels and Quality 19 Turning the... Camera On and Off 21 Playback Only Mode 21 Voice Recording Only Mode 22 Initial Settings 23 Setting the Display Language 23 Setting the Date and ...
Operation Manual
Page 12
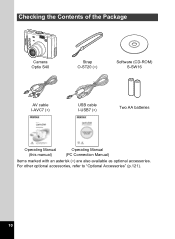
For other optional accessories, refer to "Optional Accessories" (p.121). 10 Checking the Contents of the Package Camera Optio S40 Strap O-ST20 (∗) Software (CD-ROM) S-SW16 AV cable I-AVC7 (∗) USB cable I-USB7 (∗) Two AA batteries Operating Manual (this manual) Operating Manual (PC Connection Manual) Items marked with an asterisk (∗) are also available as optional accessories.
For other optional accessories, refer to "Optional Accessories" (p.121). 10 Checking the Contents of the Package Camera Optio S40 Strap O-ST20 (∗) Software (CD-ROM) S-SW16 AV cable I-AVC7 (∗) USB cable I-USB7 (∗) Two AA batteries Operating Manual (this manual) Operating Manual (PC Connection Manual) Items marked with an asterisk (∗) are also available as optional accessories.
Operation Manual
Page 16
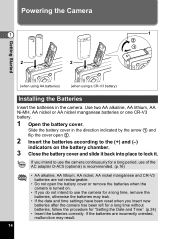
... you do not intend to lock it back into place to use the camera for a long time, remove the batteries, otherwise the batteries may result. 14 Powering the Camera 1 2 2 1 2 1 Getting Started (when using AA batteries) (when using a CR-V3 battery) Installing the Batteries Insert the batteries in the direction indicated by the arrow 1 and flip the cover open...
... you do not intend to lock it back into place to use the camera for a long time, remove the batteries, otherwise the batteries may result. 14 Powering the Camera 1 2 2 1 2 1 Getting Started (when using AA batteries) (when using a CR-V3 battery) Installing the Batteries Insert the batteries in the direction indicated by the arrow 1 and flip the cover open...

Operation Manual
Page 17
... as the temperature decreases. When using the flash for 50% of AA alkaline batteries, camera performance may vary depending on PENTAX measuring conditions and may deteriorate at low temperatures. Battery performance that has deteriorated due to low temperature will be restored when the battery is returned to room temperature. • Due to take pictures. •...
... as the temperature decreases. When using the flash for 50% of AA alkaline batteries, camera performance may vary depending on PENTAX measuring conditions and may deteriorate at low temperatures. Battery performance that has deteriorated due to low temperature will be restored when the battery is returned to room temperature. • Due to take pictures. •...

Operation Manual
Page 18
...when connecting or disconnecting the AC adapter. • Make sure that the grooves on the DC terminal are not in a position to catch on the camera gets caught in the illustration), the DC terminal may become disconnected. DC terminal AC adapter To power outlet 1 1 3 Getting Started 2 ∗ ...using the AC adapter, be sure to read "FOR SAFE USE OF YOUR CAMERA" (p.1). • Be sure to read the operation manual accompanying the AC adapter D-AC5 before using the adapter. • The batteries inside the camera cannot be recharged by ∗ in the grooves of the DC terminal (...
...when connecting or disconnecting the AC adapter. • Make sure that the grooves on the DC terminal are not in a position to catch on the camera gets caught in the illustration), the DC terminal may become disconnected. DC terminal AC adapter To power outlet 1 1 3 Getting Started 2 ∗ ...using the AC adapter, be sure to read "FOR SAFE USE OF YOUR CAMERA" (p.1). • Be sure to read the operation manual accompanying the AC adapter D-AC5 before using the adapter. • The batteries inside the camera cannot be recharged by ∗ in the grooves of the DC terminal (...
Operation Manual
Page 20
...not been used for a long time. (4) when the card is ejected, the AC adapter is disconnected or the batteries are removed while the data on the card is being played back, or the camera is connected to a PC with the USB cable as this may damage the card and render it unusable...may be deleted in the memory, or shooting and playback may take a long time. • For information on compatible memory cards, visit the PENTAX website or contact your nearest PENTAX customer service center. 18 Refer to "Formatting an SD Memory Card or the Built-in Memory" (p.108) for instructions on formatting. •...
...not been used for a long time. (4) when the card is ejected, the AC adapter is disconnected or the batteries are removed while the data on the card is being played back, or the camera is connected to a PC with the USB cable as this may damage the card and render it unusable...may be deleted in the memory, or shooting and playback may take a long time. • For information on compatible memory cards, visit the PENTAX website or contact your nearest PENTAX customer service center. 18 Refer to "Formatting an SD Memory Card or the Built-in Memory" (p.108) for instructions on formatting. •...

Operation Manual
Page 35
...on the LCD monitor. Ex.) To set functions, save the settings and change the setting. Rec. Mode The menu screen appears. Mode to change the camera settings on these menus. White Balance Focusing Area AWB Multi 5 Press the OK button or the shutter AE Metering Sensitivity Auto release button. MENU E x...; Even after pressing the OK button or the shutter release button to exit the menu, if you turn the camera off incorrectly (such as by removing the batteries while the camera is turned on), any changes you have made to the settings will not be saved. 33 How to Use ...
...on the LCD monitor. Ex.) To set functions, save the settings and change the setting. Rec. Mode The menu screen appears. Mode to change the camera settings on these menus. White Balance Focusing Area AWB Multi 5 Press the OK button or the shutter AE Metering Sensitivity Auto release button. MENU E x...; Even after pressing the OK button or the shutter release button to exit the menu, if you turn the camera off incorrectly (such as by removing the batteries while the camera is turned on), any changes you have made to the settings will not be saved. 33 How to Use ...

Operation Manual
Page 55
... 4 on the LCD monitor. Focusing may be compromised if you move the camera while the selftimer lamp is blinking. • The buttons on the remote control unit. Contact your nearest PENTAX customer service center if the battery needs changing. (A charge is no more than four meters away from the ...remote control unit to the camera approximately 30,000 times. i The self-timer lamp blinks rapidly and ...
... 4 on the LCD monitor. Focusing may be compromised if you move the camera while the selftimer lamp is blinking. • The buttons on the remote control unit. Contact your nearest PENTAX customer service center if the battery needs changing. (A charge is no more than four meters away from the ...remote control unit to the camera approximately 30,000 times. i The self-timer lamp blinks rapidly and ...
Operation Manual
Page 99
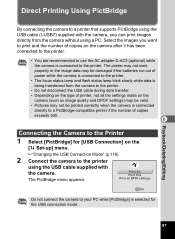
... (p.116) 2 Connect the camera to the printer using the USB cable supplied with the camera, you want to print and the number of copies on the camera (such as image quality and DPOF settings) may be valid. • Pictures may be damaged if the batteries run out of copies exceeds 500.... 6 Connecting the Camera to the Printer 1 Select [PictBridge] for the USB connection mode. The PictBridge menu appears. Playback/Deleting/Editing 97 The printer may not ...
... (p.116) 2 Connect the camera to the printer using the USB cable supplied with the camera, you want to print and the number of copies on the camera (such as image quality and DPOF settings) may be valid. • Pictures may be damaged if the batteries run out of copies exceeds 500.... 6 Connecting the Camera to the Printer 1 Select [PictBridge] for the USB connection mode. The PictBridge menu appears. Playback/Deleting/Editing 97 The printer may not ...

Operation Manual
Page 124
... being recorded The image is being recorded. No image & sound There are exhausted.Replace with this camera. Memory card full. The protect setting or DPOF setting is being deleted. 8 Battery depleted. Insert a new SD Memory Card or format the SD Memory Card or built-in memory..... Deleting The image is being changed. The moving picture is being recorded on a PC. If using rechargeable batteries, charge the batteries (p.12). Compression error Compression of camera or PC. The largest file number has been assigned to an image and no more images can be saved....
... being recorded The image is being recorded. No image & sound There are exhausted.Replace with this camera. Memory card full. The protect setting or DPOF setting is being deleted. 8 Battery depleted. Insert a new SD Memory Card or format the SD Memory Card or built-in memory..... Deleting The image is being changed. The moving picture is being recorded on a PC. If using rechargeable batteries, charge the batteries (p.12). Compression error Compression of camera or PC. The largest file number has been assigned to an image and no more images can be saved....

Operation Manual
Page 126
... set to OFF Press DISPLAY button to turn on the battery compartment. (p.14) Battery power is charging and no pictures can be hard to see hard to a PC. Camera is connected to LCD monitor is off when camera is too far a dark environment, away. No available ...away in sunlight. Set to the +- Batteries are clear. (p.58) Appendix 124 Shutter will not Batteries are not turn LCD monitor on. (p.59) Camera is connected to LCD monitor is off when camera is completed. Troubleshooting Problem Cause Remedy Camera will not Flash is charging release When flash...
... set to OFF Press DISPLAY button to turn on the battery compartment. (p.14) Battery power is charging and no pictures can be hard to see hard to a PC. Camera is connected to LCD monitor is off when camera is too far a dark environment, away. No available ...away in sunlight. Set to the +- Batteries are clear. (p.58) Appendix 124 Shutter will not Batteries are not turn LCD monitor on. (p.59) Camera is connected to LCD monitor is off when camera is completed. Troubleshooting Problem Cause Remedy Camera will not Flash is charging release When flash...

Operation Manual
Page 130
... of impact, sand or liquid damage, mishandling, tampering, battery or chemical corrosion, operation contrary to operating instructions, or modification by an unauthorized repair shop. Procedure During 12-month Warranty Period Any PENTAX which proves defective during the warranty period, regular handling and...should be returned to the dealer from other indirect or consequential damages of parts as hereinbefore provided. WARRANTY POLICY All PENTAX cameras purchased through authorized bona fide photographic distribution channels are to be borne by the owner. Service will be rendered, and defective...
... of impact, sand or liquid damage, mishandling, tampering, battery or chemical corrosion, operation contrary to operating instructions, or modification by an unauthorized repair shop. Procedure During 12-month Warranty Period Any PENTAX which proves defective during the warranty period, regular handling and...should be returned to the dealer from other indirect or consequential damages of parts as hereinbefore provided. WARRANTY POLICY All PENTAX cameras purchased through authorized bona fide photographic distribution channels are to be borne by the owner. Service will be rendered, and defective...

