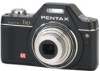

Optio I-10 Black Optio I-10
Page 7
... Before Using Your Camera • When traveling, take the Worldwide Service Network listing that it with this camera is not possible due to a computer, etc. Pictures and sound cannot be guaranteed if recording, playback or transferring your data to a malfunction of your camera or recording media (SD Memory Card), etc. Seek medical attention immediately if an accessory is included in a vehicle, as the battery or SD Memory Cards...
... Before Using Your Camera • When traveling, take the Worldwide Service Network listing that it with this camera is not possible due to a computer, etc. Pictures and sound cannot be guaranteed if recording, playback or transferring your data to a malfunction of your camera or recording media (SD Memory Card), etc. Seek medical attention immediately if an accessory is included in a vehicle, as the battery or SD Memory Cards...
Optio I-10 Black Optio I-10
Page 11
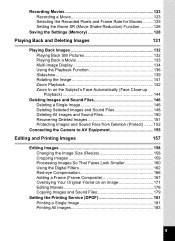
... Sound Files 150 Recovering Deleted Images 151 Protecting Images and Sound Files from Deletion (Protect) ........152 Connecting the Camera to AV Equipment 155 Editing and Printing Images 157 Editing Images 158 Changing the Image Size (Resize 158 Cropping Images 159 Processing Images So That Faces Look Smaller 160 Using the Digital Filters 162 Red-eye Compensation 166 Adding a Frame (Frame Composite 167 Overlaying Your Original Frame on an Image 171 Editing Movies 176 Copying Images and Sound Files 179 Setting the Printing Service...
... Sound Files 150 Recovering Deleted Images 151 Protecting Images and Sound Files from Deletion (Protect) ........152 Connecting the Camera to AV Equipment 155 Editing and Printing Images 157 Editing Images 158 Changing the Image Size (Resize 158 Cropping Images 159 Processing Images So That Faces Look Smaller 160 Using the Digital Filters 162 Red-eye Compensation 166 Adding a Frame (Frame Composite 167 Overlaying Your Original Frame on an Image 171 Editing Movies 176 Copying Images and Sound Files 179 Setting the Printing Service...

Optio I-10 Black Optio I-10
Page 12
... to Images 190 Recording a Voice Memo 190 Playing Back a Voice Memo 191 Settings 193 Camera Settings 194 Formatting an SD Memory Card 194 Changing the Sound Settings 195 Changing the Date and Time 196 Setting the World Time 198 Setting the Text Size on the Menu 201 Changing the Display Language 202 Changing the Naming System of the Folder 203 Changing the Video Output Format 204 Setting the Eye-Fi Communication 205 Adjusting the Brightness of the Display 206 Using the Power Saving Function 206 Setting Auto Power Off...
... to Images 190 Recording a Voice Memo 190 Playing Back a Voice Memo 191 Settings 193 Camera Settings 194 Formatting an SD Memory Card 194 Changing the Sound Settings 195 Changing the Date and Time 196 Setting the World Time 198 Setting the Text Size on the Menu 201 Changing the Display Language 202 Changing the Naming System of the Folder 203 Changing the Video Output Format 204 Setting the Eye-Fi Communication 205 Adjusting the Brightness of the Display 206 Using the Power Saving Function 206 Setting Auto Power Off...

Optio I-10 Black Optio I-10
Page 23
...:25 17 1 Shooting mode (p.67) 2 Battery level indicator (p.34) 3 Face Detection icon (p.70) 4 Date Imprint setting (p.119) 5 EV Compensation (p.108) 6 Shutter speed 7 Aperture 8 Camera shake reduction icon (p.116) 9 Memory status (p.41) 10 Remaining image storage capacity 11 Flash Mode (p.100) 12 Drive Mode (p.90, p.91) 13 Focus Mode (p.102) 14 Eye-Fi communication status (p.205) 15 Digital Zoom/Intelligent Zoom icon (p.76) 16 Focus frame (p.64) 17 Date and time (p.47) 18 World Time setting (p.198) 19 D-Range Setting (p.109) * 6 and...
...:25 17 1 Shooting mode (p.67) 2 Battery level indicator (p.34) 3 Face Detection icon (p.70) 4 Date Imprint setting (p.119) 5 EV Compensation (p.108) 6 Shutter speed 7 Aperture 8 Camera shake reduction icon (p.116) 9 Memory status (p.41) 10 Remaining image storage capacity 11 Flash Mode (p.100) 12 Drive Mode (p.90, p.91) 13 Focus Mode (p.102) 14 Eye-Fi communication status (p.205) 15 Digital Zoom/Intelligent Zoom icon (p.76) 16 Focus frame (p.64) 17 Date and time (p.47) 18 World Time setting (p.198) 19 D-Range Setting (p.109) * 6 and...

Optio I-10 Black Optio I-10
Page 25
...) A4 Date Imprint setting (p.119) A5 EV Compensation (p.108) A6 Camera shake reduction icon (p.116) A7 Memory status (p.41) A8 Remaining image storage capacity A9 Flash Mode (p.100) A10 Drive Mode (p.90, p.91) A11 Focus Mode (p.102) A12 Eye-Fi communication status (p.205) A13 Digital Zoom/ Intelligent Zoom icon (p.76) A14 Histogram (p.28) A15 Sensitivity (p.114) A16 World time setting (p.198) A17 D-Range Setting (p.109) A18 Recorded Pixels (p.106) A19 White Balance...
...) A4 Date Imprint setting (p.119) A5 EV Compensation (p.108) A6 Camera shake reduction icon (p.116) A7 Memory status (p.41) A8 Remaining image storage capacity A9 Flash Mode (p.100) A10 Drive Mode (p.90, p.91) A11 Focus Mode (p.102) A12 Eye-Fi communication status (p.205) A13 Digital Zoom/ Intelligent Zoom icon (p.76) A14 Histogram (p.28) A15 Sensitivity (p.114) A16 World time setting (p.198) A17 D-Range Setting (p.109) A18 Recorded Pixels (p.106) A19 White Balance...

Optio I-10 Black Optio I-10
Page 34
... its service life when it in the camera for charging the battery is provided with a new battery. Replace it with the camera. Installing the Battery Use the rechargeable lithium-ion battery D-LI92 that is 0°C to 40°C (32°F to light, the battery may vary depending on the ambient temperature and charging conditions.) The appropriate ambient temperature for the first time. Slide the battery/card cover...
... its service life when it in the camera for charging the battery is provided with a new battery. Replace it with the camera. Installing the Battery Use the rechargeable lithium-ion battery D-LI92 that is 0°C to 40°C (32°F to light, the battery may vary depending on the ambient temperature and charging conditions.) The appropriate ambient temperature for the first time. Slide the battery/card cover...

Optio I-10 Black Optio I-10
Page 39
... SD Memory Card that the camera is turned off before inserting or removing the SD Memory Card. • The still picture storage capacity varies depending on other cameras or digital devices. Getting Started Installing the SD Memory Card This camera uses either an SD Memory Card or an SDHC Memory Card. (Both cards are referred to as SD Memory Cards hereafter.) Captured 1 images and sound files are saved in the built-in the camera. Backing Up Data The camera may...
... SD Memory Card that the camera is turned off before inserting or removing the SD Memory Card. • The still picture storage capacity varies depending on other cameras or digital devices. Getting Started Installing the SD Memory Card This camera uses either an SD Memory Card or an SDHC Memory Card. (Both cards are referred to as SD Memory Cards hereafter.) Captured 1 images and sound files are saved in the built-in the camera. Backing Up Data The camera may...

Optio I-10 Black Optio I-10
Page 41
... data on the display when the card is Write-protect switch write-protected. • Care should be taken when removing the SD Memory Card immediately after using the camera, as the card may be hot. • Keep the card cover closed and do not accept any liability for data that are taking movies even when there is adequate space in direct sunlight or where it to format SD Memory Cards that is deleted...
... data on the display when the card is Write-protect switch write-protected. • Care should be taken when removing the SD Memory Card immediately after using the camera, as the card may be hot. • Keep the card cover closed and do not accept any liability for data that are taking movies even when there is adequate space in direct sunlight or where it to format SD Memory Cards that is deleted...

Optio I-10 Black Optio I-10
Page 55
... using the Frame Composite function (p.167). Changes to the Delete screen (p.146). Common Operations 5 I button Zooms in on the display (p.25). Fast-forwards, fast-reverses, frame forwards, frame reverses, reverses a movie and makes a movie play forwards during six-/twelve-image display or zoom display (p.134, p.142). Adjusts the position of the selected date during single-image display (p.132). Returns to the next index in sound file playback (p.188). 2345 Selects an image in six-/twelve-image display, a folder...
... using the Frame Composite function (p.167). Changes to the Delete screen (p.146). Common Operations 5 I button Zooms in on the display (p.25). Fast-forwards, fast-reverses, frame forwards, frame reverses, reverses a movie and makes a movie play forwards during six-/twelve-image display or zoom display (p.134, p.142). Adjusts the position of the selected date during single-image display (p.132). Returns to the next index in sound file playback (p.188). 2345 Selects an image in six-/twelve-image display, a folder...

Optio I-10 Black Optio I-10
Page 56
... this manual, the capture mode, such as for displaying captured images on the captured images. The camera switches to Q mode. The camera switches to A mode. 54 Common Operations 9 3 button Displays the [W Setting] menu during Playback Mode Palette display (p.136). To Switch from Q Mode to as "A mode" (the capture mode). Returns to twelve-image display of the selected date during six-/twelve-image display or zoom display (p.134). The playback mode, such as for taking still pictures, is referred to A Mode 1 Press the Q button or the shutter release button...
... this manual, the capture mode, such as for displaying captured images on the captured images. The camera switches to Q mode. The camera switches to A mode. 54 Common Operations 9 3 button Displays the [W Setting] menu during Playback Mode Palette display (p.136). To Switch from Q Mode to as "A mode" (the capture mode). Returns to twelve-image display of the selected date during six-/twelve-image display or zoom display (p.134). The playback mode, such as for taking still pictures, is referred to A Mode 1 Press the Q button or the shutter release button...

Optio I-10 Black Optio I-10
Page 61
... Menu Operations 6 Press the 3 button. The setting is taken. When the [W Setting] menu is displayed from A mode, the setting is displayed from Q mode, you can switch to capture status. To Cancel the Changes and Continue with the current setting. MENU Cancel Cancels the current selection, exits the menu and returns to the guide indications. MENU Exit Exits the menu and returns to playback status. When the shutter release button is pressed fully, the picture is saved...
... Menu Operations 6 Press the 3 button. The setting is taken. When the [W Setting] menu is displayed from A mode, the setting is displayed from Q mode, you can switch to capture status. To Cancel the Changes and Continue with the current setting. MENU Cancel Cancels the current selection, exits the menu and returns to the guide indications. MENU Exit Exits the menu and returns to playback status. When the shutter release button is pressed fully, the picture is saved...

Optio I-10 Black Optio I-10
Page 75
...) mode, the camera automatically sets the shutter speed and aperture for taking still pictures. Taking Pictures 5 Press the shutter release button fully. The following restrictions apply in b mode: • You cannot turn the Face Detection function off. • The focusing area setting is fixed at J (Multiple). • The (Flower) mode cannot be selected when using Digital Zoom or Intelligent Zoom. • If the (Night Scene) mode is selected when the flash mode is , (Auto) or c (Auto + Red-eye), the flash mode automatically changes to a (Flash...
...) mode, the camera automatically sets the shutter speed and aperture for taking still pictures. Taking Pictures 5 Press the shutter release button fully. The following restrictions apply in b mode: • You cannot turn the Face Detection function off. • The focusing area setting is fixed at J (Multiple). • The (Flower) mode cannot be selected when using Digital Zoom or Intelligent Zoom. • If the (Night Scene) mode is selected when the flash mode is , (Auto) or c (Auto + Red-eye), the flash mode automatically changes to a (Flash...

Optio I-10 Black Optio I-10
Page 85
... using four-way controller (2) and press the 4 button, the Pet registration screen picture of the display and the camera returns to Register this image? 3 the capture status. The pet registration screen appears. However, the camera will be canceled and the camera returns to three pets. 38 Selection / Registry Capture status screen • When you press the 3 button on the shooting situation. • Digital Zoom and Intelligent Zoom...
... using four-way controller (2) and press the 4 button, the Pet registration screen picture of the display and the camera returns to Register this image? 3 the capture status. The pet registration screen appears. However, the camera will be canceled and the camera returns to three pets. 38 Selection / Registry Capture status screen • When you press the 3 button on the shooting situation. • Digital Zoom and Intelligent Zoom...

Optio I-10 Black Optio I-10
Page 140
... Protect Protects images and sounds from a movie as a still Image picture. p.178 Z Red-eye Compensation For compensating red-eye. Screen or sound effects can be set. p.151 ^ Start-up Screen. Divide Movies For dividing a movie into two. p.208 n Resize Changes Recorded Pixels and Quality Level to the size you like. p.159 p Image/Sound Copy For copying images and sounds between the builtin memory and SD Memory Card. p.179 \ Voice Memo Attaches sound to your favorite frame type and color. Playing Back and Deleting Images Playback Mode Palette Playback...
... Protect Protects images and sounds from a movie as a still Image picture. p.178 Z Red-eye Compensation For compensating red-eye. Screen or sound effects can be set. p.151 ^ Start-up Screen. Divide Movies For dividing a movie into two. p.208 n Resize Changes Recorded Pixels and Quality Level to the size you like. p.159 p Image/Sound Copy For copying images and sounds between the builtin memory and SD Memory Card. p.179 \ Voice Memo Attaches sound to your favorite frame type and color. Playing Back and Deleting Images Playback Mode Palette Playback...

Optio I-10 Black Optio I-10
Page 172
... to "Connecting to the computer using large numbers of the camera (removable disk), create the folder. 7 Copy the desired files from the FRAME folder in memory. 2 Connect the camera to a Computer" (p.213) for instructions on connecting the camera to a computer. 5 3 When the device detection window opens, click [Cancel]. 4 Insert the CD-ROM (S-SW102) into the built-in the Optio I -USB7). To Copy Frames 1 Remove the SD Memory Card from the camera. Editing and Printing Images Optional...
... to "Connecting to the computer using large numbers of the camera (removable disk), create the folder. 7 Copy the desired files from the FRAME folder in memory. 2 Connect the camera to a Computer" (p.213) for instructions on connecting the camera to a computer. 5 3 When the device detection window opens, click [Cancel]. 4 Insert the CD-ROM (S-SW102) into the built-in the Optio I -USB7). To Copy Frames 1 Remove the SD Memory Card from the camera. Editing and Printing Images Optional...

Optio I-10 Black Optio I-10
Page 200
... controller (5). When you can display the time in A mode, press the four-way controller (5) once. Date Adjustment Date Format mm/dd/yy 24h Date 01/01/2010 Time 00:00 Settings complete MENU Cancel OK OK 15 Press the 4 button. When you selected [12h] in "Setting the Date and Time" (p.47) and "Changing the Date and Time" (p.196) serve as in Step 15, the camera clock is useful when taking pictures in Q mode. This is reset...
... controller (5). When you can display the time in A mode, press the four-way controller (5) once. Date Adjustment Date Format mm/dd/yy 24h Date 01/01/2010 Time 00:00 Settings complete MENU Cancel OK OK 15 Press the 4 button. When you selected [12h] in "Setting the Date and Time" (p.47) and "Changing the Date and Time" (p.196) serve as in Step 15, the camera clock is useful when taking pictures in Q mode. This is reset...

Optio I-10 Black Optio I-10
Page 210
... • Auto Power Off does not function in Eye-Fi communication. The image selection screen appears. 208 While recording a movie - While the camera is saved. One of your own images (compatible images only) 1 In Q mode, press the four-way controller (3). The setting is connected to select D (Subscreen Input). While recording sound in j (Continuous Shooting) mode - During a slideshow or movie/sound playback - One of the 3 pre-installed screens - Subscreen Input 1/2 Set to select the time until the camera turns off automatically. Settings Registering...
... • Auto Power Off does not function in Eye-Fi communication. The image selection screen appears. 208 While recording a movie - While the camera is saved. One of your own images (compatible images only) 1 In Q mode, press the four-way controller (3). The setting is connected to select D (Subscreen Input). While recording sound in j (Continuous Shooting) mode - During a slideshow or movie/sound playback - One of the 3 pre-installed screens - Subscreen Input 1/2 Set to select the time until the camera turns off automatically. Settings Registering...
Optio I-10 Black Optio I-10
Page 218
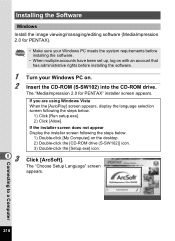
... Setup Language" screen appears. If the installer screen does not appear Display the installer screen following the steps below . 1) Double-click [My Computer] on . If you are using Windows Vista When the [AutoPlay] screen appears, display the language selection screen following the steps below . 1) Click [Run setup.exe]. 2) Click [Allow]. Insert the CD-ROM (S-SW102) into the CD-ROM drive. Connecting to a Computer 216 Installing the Software Windows Install the image viewing...
... Setup Language" screen appears. If the installer screen does not appear Display the installer screen following the steps below . 1) Double-click [My Computer] on . If you are using Windows Vista When the [AutoPlay] screen appears, display the language selection screen following the steps below . 1) Click [Run setup.exe]. 2) Click [Allow]. Insert the CD-ROM (S-SW102) into the CD-ROM drive. Connecting to a Computer 216 Installing the Software Windows Install the image viewing...

Optio I-10 Black Optio I-10
Page 222
... simply connecting a device that supports USB Mass Storage Class, you can transfer image data between devices that support PTP without installing a dedicated driver. PTP (Picture Transfer Protocol) A protocol that allows transfer of digital images and control of digital cameras via USB as ISO 15740. Also indicates a standard for controlling USB devices with this driver. You can copy, read, and write files from a computer without installing a device driver. Unless otherwise specified, select MSC when connecting the Optio I-10 to your computer. 8 220 Connecting...
... simply connecting a device that supports USB Mass Storage Class, you can transfer image data between devices that support PTP without installing a dedicated driver. PTP (Picture Transfer Protocol) A protocol that allows transfer of digital images and control of digital cameras via USB as ISO 15740. Also indicates a standard for controlling USB devices with this driver. You can copy, read, and write files from a computer without installing a device driver. Unless otherwise specified, select MSC when connecting the Optio I-10 to your computer. 8 220 Connecting...

Optio I-10 Black Optio I-10
Page 245
... processed No card in the camera The built-in memory is not enough to copy images/sounds Cannot process correctly Display image/sound from built-in memory Not enough battery power remaining to activate Pixel Mapping Description The image or sound file you try to switch to Q mode while an image is still being recorded, or when the protect setting or DPOF setting is insufficient. Replace the battery with a fully charged one or use an AC...
... processed No card in the camera The built-in memory is not enough to copy images/sounds Cannot process correctly Display image/sound from built-in memory Not enough battery power remaining to activate Pixel Mapping Description The image or sound file you try to switch to Q mode while an image is still being recorded, or when the protect setting or DPOF setting is insufficient. Replace the battery with a fully charged one or use an AC...

