Operation Manual
Page 7
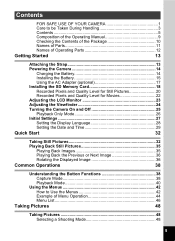
... Operating Parts 12 Getting Started 13 Attaching the Strap 13 Powering the Camera 14 Charging the Battery 14 Installing the Battery 15 Using the AC Adapter (optional 17 Installing the SD Memory Card 18 Recorded Pixels and Quality Level for Still Pictures 20 Recorded Pixels and Quality Level for Movies 22 Adjusting the LCD Monitor 23 Adjusting the Viewfinder 24 Turning the Camera On and Off 25 Playback Only Mode 26 Initial Settings 27 Setting the Display Language 28 Setting...
... Operating Parts 12 Getting Started 13 Attaching the Strap 13 Powering the Camera 14 Charging the Battery 14 Installing the Battery 15 Using the AC Adapter (optional 17 Installing the SD Memory Card 18 Recorded Pixels and Quality Level for Still Pictures 20 Recorded Pixels and Quality Level for Movies 22 Adjusting the LCD Monitor 23 Adjusting the Viewfinder 24 Turning the Camera On and Off 25 Playback Only Mode 26 Initial Settings 27 Setting the Display Language 28 Setting...
Operation Manual
Page 8
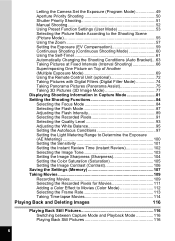
... Shooting (Continuous Shooting Mode 60 Using the Self-Timer 61 Automatically Changing the Shooting Conditions (Auto Bracket)...63 Taking Pictures at Fixed Intervals (Interval Shooting 66 Superimposing One Picture on Top of Another (Multiple Exposure Mode 69 Using the Remote Control Unit (optional 72 Taking Pictures with Digital Filters (Digital Filter Mode 74 Taking Panorama Pictures (Panorama Assist 75 Taking 3D Pictures (3D Image Mode 77 Displaying Shooting Information in Capture Mode 81 Setting the Shooting Functions 84 Selecting the Focus Mode 84 Selecting the Flash Mode...
... Shooting (Continuous Shooting Mode 60 Using the Self-Timer 61 Automatically Changing the Shooting Conditions (Auto Bracket)...63 Taking Pictures at Fixed Intervals (Interval Shooting 66 Superimposing One Picture on Top of Another (Multiple Exposure Mode 69 Using the Remote Control Unit (optional 72 Taking Pictures with Digital Filters (Digital Filter Mode 74 Taking Panorama Pictures (Panorama Assist 75 Taking 3D Pictures (3D Image Mode 77 Displaying Shooting Information in Capture Mode 81 Setting the Shooting Functions 84 Selecting the Focus Mode 84 Selecting the Flash Mode...

Operation Manual
Page 9
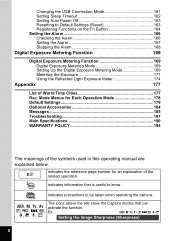
... Images 143 Printing All Images 144 Printing Images Using the DPOF Settings 145 Disconnecting the Camera from the Printer 145 Recording and Playing Back Sound 146 Recording Sound (Voice Recording Mode 146 Playing Back Sound 147 Adding a Voice Memo to Images 148 Recording a Voice Memo 148 Playing Back a Voice Memo 149 Settings 150 Camera Settings 150 Formatting an SD Memory Card 150 Changing the Date and Time 151 Changing the Sound Settings 152 Setting the World Time 154 Changing the Display Language 155 Changing the Image Folder Name 156 Changing the Start-up Screen...
... Images 143 Printing All Images 144 Printing Images Using the DPOF Settings 145 Disconnecting the Camera from the Printer 145 Recording and Playing Back Sound 146 Recording Sound (Voice Recording Mode 146 Playing Back Sound 147 Adding a Voice Memo to Images 148 Recording a Voice Memo 148 Playing Back a Voice Memo 149 Settings 150 Camera Settings 150 Formatting an SD Memory Card 150 Changing the Date and Time 151 Changing the Sound Settings 152 Setting the World Time 154 Changing the Display Language 155 Changing the Image Folder Name 156 Changing the Start-up Screen...
Operation Manual
Page 10
indicates information that can E, a, b, c, activate the function. Changing the USB Connection Mode 161 Setting Sleep Timeout 162 Setting Auto Power Off 163 Resetting to know. The icons above the title show the Capture modes that is useful to Default Settings (Reset 163 Registering Functions on the Fn Button 164 Setting the Alarm 166 Checking the Alarm 166 Setting the Alarm 167 Stopping the Alarm 168 Digital Exposure Metering Function 169 Digital Exposure Metering Function 169 Digital Exposure Metering Mode 169 Setting Up...
indicates information that can E, a, b, c, activate the function. Changing the USB Connection Mode 161 Setting Sleep Timeout 162 Setting Auto Power Off 163 Resetting to know. The icons above the title show the Capture modes that is useful to Default Settings (Reset 163 Registering Functions on the Fn Button 164 Setting the Alarm 166 Checking the Alarm 166 Setting the Alarm 167 Stopping the Alarm 168 Digital Exposure Metering Function 169 Digital Exposure Metering Function 169 Digital Exposure Metering Mode 169 Setting Up...
Operation Manual
Page 16
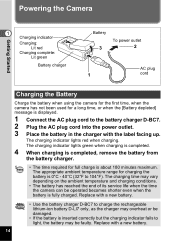
Powering the Camera Getting Started 1 Charging indicator Charging: Lit red Charging complete: Lit green Battery charger Battery 3 To power outlet 2 AC plug 1 cord Charging the Battery Charge the battery when using the camera for the first time, when the camera has not been used for a long time, or when the [Battery depleted] message is displayed. 1 Connect the AC plug cord to light, the battery may be faulty. The charging indicator lights red when charging. Replace with a new battery. • Use the battery charger D-BC7 to charge the rechargeable lithium-ion battery D-LI7 ...
Powering the Camera Getting Started 1 Charging indicator Charging: Lit red Charging complete: Lit green Battery charger Battery 3 To power outlet 2 AC plug 1 cord Charging the Battery Charge the battery when using the camera for the first time, when the camera has not been used for a long time, or when the [Battery depleted] message is displayed. 1 Connect the AC plug cord to light, the battery may be faulty. The charging indicator lights red when charging. Replace with a new battery. • Use the battery charger D-BC7 to charge the rechargeable lithium-ion battery D-LI7 ...
Operation Manual
Page 21
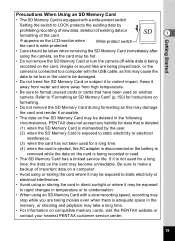
... using or storing the card in direct sunlight or where it may be exposed to rapid changes in the memory, or shooting and playback may become unreadable. Be sure to make a backup of the card. 1 r appears on the LCD monitor when Write-protect switch the card is write-protected. • Care should be hot. • Do not remove the SD Memory Card or turn the camera off while data is being recorded or...
... using or storing the card in direct sunlight or where it may be exposed to rapid changes in the memory, or shooting and playback may become unreadable. Be sure to make a backup of the card. 1 r appears on the LCD monitor when Write-protect switch the card is write-protected. • Care should be hot. • Do not remove the SD Memory Card or turn the camera off while data is being recorded or...

Operation Manual
Page 34
... 2 Shutter release button Zoom/w/x button The standard procedure for taking pictures with a 4:3 aspect ratio regardless of the aspect ratio setting of automatic Focus frame focusing. The flash fires automatically depending on the light conditions. 1 Press the power switch. 38 The camera turns on. 2 Set the mode dial to 3:2. 4 Press the shutter release button halfway. You can check the captured area by pressing the Zoom/w/x button to the right or left. The image...
... 2 Shutter release button Zoom/w/x button The standard procedure for taking pictures with a 4:3 aspect ratio regardless of the aspect ratio setting of automatic Focus frame focusing. The flash fires automatically depending on the light conditions. 1 Press the power switch. 38 The camera turns on. 2 Set the mode dial to 3:2. 4 Press the shutter release button halfway. You can check the captured area by pressing the Zoom/w/x button to the right or left. The image...

Operation Manual
Page 40
... take a still picture. (1p.33) Starts and stops movie recording in C mode. (1p.109) Starts and stops voice recording in O mode. (1p.146) Zoom/w/x button Changes the shooting area. (1p.57) Adjust the focus manually when the Focus mode is set to focus on the Fn guide screen in d mode. (1p.55) Shutter release button Press down halfway to z. Common Operations Understanding the Button Functions 1 6 7 8 2 3 3 9 10 4 11 5 Common Operations Capture Mode 1 2 3 4 38 Front lever Adjusts the exposure. Four-way controller (23) Adjusts the aperture in c mode...
... take a still picture. (1p.33) Starts and stops movie recording in C mode. (1p.109) Starts and stops voice recording in O mode. (1p.146) Zoom/w/x button Changes the shooting area. (1p.57) Adjust the focus manually when the Focus mode is set to focus on the Fn guide screen in d mode. (1p.55) Shutter release button Press down halfway to z. Common Operations Understanding the Button Functions 1 6 7 8 2 3 3 9 10 4 11 5 Common Operations Capture Mode 1 2 3 4 38 Front lever Adjusts the exposure. Four-way controller (23) Adjusts the aperture in c mode...
Operation Manual
Page 41
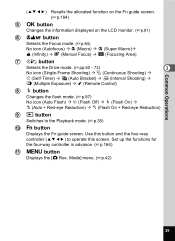
...Mode] menu. (1p.42) 39 Common Operations (2345) Recalls the allocated function on the Fn guide screen. (1p.164) 5 4 button Changes the information displayed on the LCD monitor. (1p.81) 6 ) button Selects the Focus mode. (1p.84) No icon (Autofocus) ´ q (Macro) ´ r (Super Macro)´ s (Infinity) ´ z (Manual Focus) ´ 1 (Focusing Area) 7 ( button Selects the Drive mode. (1pp.60 - 73) 3 No icon (Single-Frame Shooting) ´ j (Continuous Shooting) ´ g (Self-Timer) ´ a (Auto Bracket) ´ k (Interval Shooting) ´ R (Multiple Exposure) ´ < (Remote...
...Mode] menu. (1p.42) 39 Common Operations (2345) Recalls the allocated function on the Fn guide screen. (1p.164) 5 4 button Changes the information displayed on the LCD monitor. (1p.81) 6 ) button Selects the Focus mode. (1p.84) No icon (Autofocus) ´ q (Macro) ´ r (Super Macro)´ s (Infinity) ´ z (Manual Focus) ´ 1 (Focusing Area) 7 ( button Selects the Drive mode. (1pp.60 - 73) 3 No icon (Single-Frame Shooting) ´ j (Continuous Shooting) ´ g (Self-Timer) ´ a (Auto Bracket) ´ k (Interval Shooting) ´ R (Multiple Exposure) ´ < (Remote...

Operation Manual
Page 45
... screen (Capture or Playback mode). 43 To Cancel the Changes and Continue with Menu Operations 6 Press the 4 button or four-way controller (4). When the shutter release button is pressd fully, the setting is saved and the picture is saved and the screen returns to that in Step 3. Refer to the main menu screen. MENU : Save the current setting and return to the guide indications. Common Operations To Save the Setting and Start Taking Pictures 6 Press the shutter release button halfway or turn...
... screen (Capture or Playback mode). 43 To Cancel the Changes and Continue with Menu Operations 6 Press the 4 button or four-way controller (4). When the shutter release button is pressd fully, the setting is saved and the picture is saved and the screen returns to that in Step 3. Refer to the main menu screen. MENU : Save the current setting and return to the guide indications. Common Operations To Save the Setting and Start Taking Pictures 6 Press the shutter release button halfway or turn...
Operation Manual
Page 48
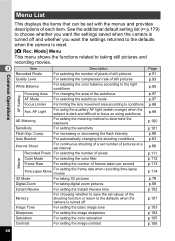
... shooting function or return to the defaults when the camera is turned off and whether you want the settings returned to the defaults when the camera is reset. [A Rec. For increasing or decreasing the flash intensity p.89 Auto Bracket For automatically changing the shooting conditions p.63 Interval Shoot For continuous shooting of a set number of pictures at a set interval p.66 Recorded Pixels For selecting the number of pixels p.111 Movie Color Mode For selecting the color...
... shooting function or return to the defaults when the camera is turned off and whether you want the settings returned to the defaults when the camera is reset. [A Rec. For increasing or decreasing the flash intensity p.89 Auto Bracket For automatically changing the shooting conditions p.63 Interval Shoot For continuous shooting of a set number of pictures at a set interval p.66 Recorded Pixels For selecting the number of pixels p.111 Movie Color Mode For selecting the color...

Operation Manual
Page 49
... controller USER Setting For registering and saving shooting modes or functions you use most frequently Reset For returning the settings other than the date adjust, language and world time to the TV monitor USB Connection For changing the USB connection mode Sleep Timeout For setting the power-saving function Auto Power Off For turning off the power automatically after another p.123 Resize For changing the size of images p.133 Trimming For deleting the unneeded part of the LCD monitor Video Out For setting the output format to defaults...
... controller USER Setting For registering and saving shooting modes or functions you use most frequently Reset For returning the settings other than the date adjust, language and world time to the TV monitor USB Connection For changing the USB connection mode Sleep Timeout For setting the power-saving function Auto Power Off For turning off the power automatically after another p.123 Resize For changing the size of images p.133 Trimming For deleting the unneeded part of the LCD monitor Video Out For setting the output format to defaults...

Operation Manual
Page 52
... in focus. 4 Press the shutter release button fully. The camera adjusts the shutter speed accordingly. The camera 4 automatically sets the shutter speed to obtain the optimal exposure at a slower shutter speed, because the noise reduction function activates to change the aperture. If the appropriate exposure cannot be longer when the picture is taken at the aperture you have chosen. Increasing the aperture will be obtained, the shutter speed displayed on the LCD monitor turns red. Use this mode, you...
... in focus. 4 Press the shutter release button fully. The camera adjusts the shutter speed accordingly. The camera 4 automatically sets the shutter speed to obtain the optimal exposure at a slower shutter speed, because the noise reduction function activates to change the aperture. If the appropriate exposure cannot be longer when the picture is taken at the aperture you have chosen. Increasing the aperture will be obtained, the shutter speed displayed on the LCD monitor turns red. Use this mode, you...
Operation Manual
Page 53
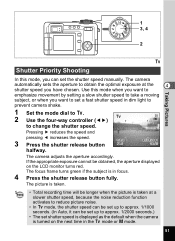
.... 1 Set the mode dial to b. 38 2 Use the four-way controller (45) to change the shutter speed. The picture is taken. • Total recording time will be longer when the picture is taken at the 4 shutter speed you can be obtained, the aperture displayed on the next time in focus. 4 Press the shutter release button fully. The camera automatically sets the aperture to obtain the optimal exposure at a slower shutter speed, because the noise reduction function...
.... 1 Set the mode dial to b. 38 2 Use the four-way controller (45) to change the shutter speed. The picture is taken. • Total recording time will be longer when the picture is taken at the 4 shutter speed you can be obtained, the aperture displayed on the next time in focus. 4 Press the shutter release button fully. The camera automatically sets the aperture to obtain the optimal exposure at a slower shutter speed, because the noise reduction function...
Operation Manual
Page 70
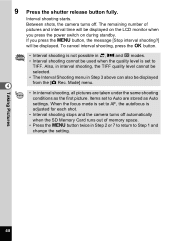
... the power switch on during standby. Mode] menu. • In interval shooting, all pictures are stored as the first picture. When the focus mode is set to Step 1 and change the setting. Taking Pictures 68 The remaining number of memory space. • Press the 3 button twice in Step 3 above can also be displayed. Between shots, the camera turns off automatically when the SD Memory Card runs out of pictures and interval time will be displayed from...
... the power switch on during standby. Mode] menu. • In interval shooting, all pictures are stored as the first picture. When the focus mode is set to Step 1 and change the setting. Taking Pictures 68 The remaining number of memory space. • Press the 3 button twice in Step 3 above can also be displayed. Between shots, the camera turns off automatically when the SD Memory Card runs out of pictures and interval time will be displayed from...

Operation Manual
Page 97
...of shooting. 4 White Balance Settings F Auto The camera adjusts the white balance automatically. I Tungsten Light Use this mode when adjusting the white balance manually. 1 Press the 3 button in sunlight. The [A Rec. Mode] menu appears. 2 Use the four-way controller (23) to change the setting. K Manual Use this mode when taking pictures outside in Capture mode. W MENU Cancel OK OK 95 White Balance The White Balance screen appears. 4 Use the four-way controller (23) to select [White Balance]. 3 Press the four-way controller (5). G Daylight Use this mode...
...of shooting. 4 White Balance Settings F Auto The camera adjusts the white balance automatically. I Tungsten Light Use this mode when adjusting the white balance manually. 1 Press the 3 button in sunlight. The [A Rec. Mode] menu appears. 2 Use the four-way controller (23) to change the setting. K Manual Use this mode when taking pictures outside in Capture mode. W MENU Cancel OK OK 95 White Balance The White Balance screen appears. 4 Use the four-way controller (23) to select [White Balance]. 3 Press the four-way controller (5). G Daylight Use this mode...
Operation Manual
Page 163
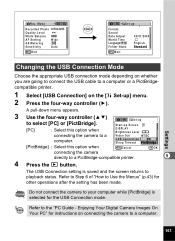
...) Set-up Format Sound Date Adjust World Time Folder Name 09/01/2004 English Standard MENU Exit Changing the USB Connection Mode Choose the appropriate USB connection mode depending on whether you are going to connect the USB cable to a computer or a PictBridgecompatible printer. 1 Select [USB Connection] on connecting the camera to a computer. Start-up ] menu. 2 Press the four-way controller (5). Do not connect the camera to your computer while [PictBridge] is saved and the screen returns to a PictBridge-compatible printer. 8 4 Press the Q button...
...) Set-up Format Sound Date Adjust World Time Folder Name 09/01/2004 English Standard MENU Exit Changing the USB Connection Mode Choose the appropriate USB connection mode depending on whether you are going to connect the USB cable to a computer or a PictBridgecompatible printer. 1 Select [USB Connection] on connecting the camera to a computer. Start-up ] menu. 2 Press the four-way controller (5). Do not connect the camera to your computer while [PictBridge] is saved and the screen returns to a PictBridge-compatible printer. 8 4 Press the Q button...

Operation Manual
Page 165
... Format Sound Date Adjust World Time Folder Name 09/01/2004 English Standard MENU Exit Settings Setting Auto Power Off You can reset all the settings other operations after the setting has been made. Rec. The Reset screen appears. 3 Use the four-way controller (2) to select [5min], [3min] or [Off]. 4 Press the shutter release button. The Auto Power Off function will not work during a slideshow or movie playback. 8 Resetting to Default Settings (Reset) You can set the camera to the default setting list (p.179) for a fixed time. 1 Select [Auto Power...
... Format Sound Date Adjust World Time Folder Name 09/01/2004 English Standard MENU Exit Settings Setting Auto Power Off You can reset all the settings other operations after the setting has been made. Rec. The Reset screen appears. 3 Use the four-way controller (2) to select [5min], [3min] or [Off]. 4 Press the shutter release button. The Auto Power Off function will not work during a slideshow or movie playback. 8 Resetting to Default Settings (Reset) You can set the camera to the default setting list (p.179) for a fixed time. 1 Select [Auto Power...
Operation Manual
Page 187
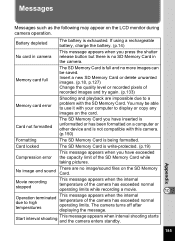
... Memory Card while taking pictures. Appendix No image and sound There are impossible due to display or copy any images on the LCD monitor during camera operation. Card locked The SD Memory Card is write-protected. (p.19) Compression error This message appears when you press the shutter release button but there is being formatted. Battery depleted The battery is full and no more images can be able to use it with this camera. (p.150) Formatting The SD Memory Card is no image/sound files...
... Memory Card while taking pictures. Appendix No image and sound There are impossible due to display or copy any images on the LCD monitor during camera operation. Card locked The SD Memory Card is write-protected. (p.19) Compression error This message appears when you press the shutter release button but there is being formatted. Battery depleted The battery is full and no more images can be able to use it with this camera. (p.150) Formatting The SD Memory Card is no image/sound files...
Operation Manual
Page 194
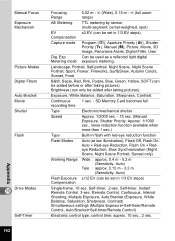
...Tele : approx. 0.15 m - 3.2 m (Sensitivity: Auto) Flash Exposure ±1/2 EV (can be set in 1/3 EV steps) Compensation Capture mode Program (R), Aperture Priority (c), Shutter Priority (b), Manual (a), Picture, Movie, 3D Image, Panorama Assist, Digital Filter, User Dig. Exp. Remote Control, Continuous, Interval Shooting, Multiple Exposure, Auto Bracket (Exposure, White Balance, Saturation, Sharpness, Contrast) Simultaneous settings (Multiple Exposure+Self-timer/Remote Control, Auto Bracket+Self-timer/Remote Control) Electronic control type, control time: approx. 10 sec., 2 sec...
...Tele : approx. 0.15 m - 3.2 m (Sensitivity: Auto) Flash Exposure ±1/2 EV (can be set in 1/3 EV steps) Compensation Capture mode Program (R), Aperture Priority (c), Shutter Priority (b), Manual (a), Picture, Movie, 3D Image, Panorama Assist, Digital Filter, User Dig. Exp. Remote Control, Continuous, Interval Shooting, Multiple Exposure, Auto Bracket (Exposure, White Balance, Saturation, Sharpness, Contrast) Simultaneous settings (Multiple Exposure+Self-timer/Remote Control, Auto Bracket+Self-timer/Remote Control) Electronic control type, control time: approx. 10 sec., 2 sec...


