Operation Manual
Page 1
Digital Camera Operating Manual To ensure the best performance from your camera, please read the Operating Manual before using the camera.
Digital Camera Operating Manual To ensure the best performance from your camera, please read the Operating Manual before using the camera.
Operation Manual
Page 2
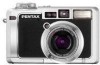
... enjoyment during demonstrations, industrial enterprise or as laid out in this has no effect on taking pictures even for buying the PENTAX Optio 750Z Digital Camera. However, this manual are more faithful to their respective companies. All Rights Reserved. Copyright 2001 Seiko Epson Corporation. Combination .... Although the level of functioning pixels is manufactured using the Optio 750Z that the illustrations and the display screen of use of the copyright as items for the direct printout of all the camera's capabilities. You can be taken here also. Please read ...
... enjoyment during demonstrations, industrial enterprise or as laid out in this has no effect on taking pictures even for buying the PENTAX Optio 750Z Digital Camera. However, this manual are more faithful to their respective companies. All Rights Reserved. Copyright 2001 Seiko Epson Corporation. Combination .... Although the level of functioning pixels is manufactured using the Optio 750Z that the illustrations and the display screen of use of the copyright as items for the direct printout of all the camera's capabilities. You can be taken here also. Please read ...
Operation Manual
Page 6
... from becoming moldy during storage. • Do not use the camera where it off immediately with rain, water or any other liquid, because the camera is not weather, water, or liquid resistant. LED Safety Standard This device is a digital still camera that the camera is not subjected to substantial vibrations, shocks or pressure. This could...
... from becoming moldy during storage. • Do not use the camera where it off immediately with rain, water or any other liquid, because the camera is not weather, water, or liquid resistant. LED Safety Standard This device is a digital still camera that the camera is not subjected to substantial vibrations, shocks or pressure. This could...
Operation Manual
Page 8
Letting the Camera Set the Exposure (Program Mode 49 Aperture Priority Shooting 50 Shutter Priority Shooting 51 Manual Shooting 52 Using Preset Function Settings (User Mode 53 Selecting ... (Interval Shooting 66 Superimposing One Picture on Top of Another (Multiple Exposure Mode 69 Using the Remote Control Unit (optional 72 Taking Pictures with Digital Filters (Digital Filter Mode 74 Taking Panorama Pictures (Panorama Assist 75 Taking 3D Pictures (3D Image Mode 77 Displaying Shooting Information in Capture Mode 81 Setting the...
Letting the Camera Set the Exposure (Program Mode 49 Aperture Priority Shooting 50 Shutter Priority Shooting 51 Manual Shooting 52 Using Preset Function Settings (User Mode 53 Selecting ... (Interval Shooting 66 Superimposing One Picture on Top of Another (Multiple Exposure Mode 69 Using the Remote Control Unit (optional 72 Taking Pictures with Digital Filters (Digital Filter Mode 74 Taking Panorama Pictures (Panorama Assist 75 Taking 3D Pictures (3D Image Mode 77 Displaying Shooting Information in Capture Mode 81 Setting the...

Operation Manual
Page 9
... Still Pictures 133 Editing Still Pictures 133 Changing the Image Size and Quality (Resize 133 Trimming Images 135 Editing Pictures with Digital Filters 137 Setting the Printing Service (DPOF 139 Printing Single Images 139 Printing All Images 141 Direct Printing Using PictBridge 142 Connecting the... Playing Back Sound 147 Adding a Voice Memo to Images 148 Recording a Voice Memo 148 Playing Back a Voice Memo 149 Settings 150 Camera Settings 150 Formatting an SD Memory Card 150 Changing the Date and Time 151 Changing the Sound Settings 152 Setting the World Time 154 ...
... Still Pictures 133 Editing Still Pictures 133 Changing the Image Size and Quality (Resize 133 Trimming Images 135 Editing Pictures with Digital Filters 137 Setting the Printing Service (DPOF 139 Printing Single Images 139 Printing All Images 141 Direct Printing Using PictBridge 142 Connecting the... Playing Back Sound 147 Adding a Voice Memo to Images 148 Recording a Voice Memo 148 Playing Back a Voice Memo 149 Settings 150 Camera Settings 150 Formatting an SD Memory Card 150 Changing the Date and Time 151 Changing the Sound Settings 152 Setting the World Time 154 ...
Operation Manual
Page 10
... the Alarm 166 Setting the Alarm 167 Stopping the Alarm 168 Digital Exposure Metering Function 169 Digital Exposure Metering Function 169 Digital Exposure Metering Mode 169 Setting Up the Digital Exposure Metering Mode 169 Metering the Exposure 171 Using the Reflected ...Light Exposure Meter 174 Appendix 177 List of the related operation. The icons above the title show the Capture modes that is useful to be taken when operating the camera. R, d, F, G, D, C, O, 7 Ex. E...
... the Alarm 166 Setting the Alarm 167 Stopping the Alarm 168 Digital Exposure Metering Function 169 Digital Exposure Metering Function 169 Digital Exposure Metering Mode 169 Setting Up the Digital Exposure Metering Mode 169 Metering the Exposure 171 Using the Reflected ...Light Exposure Meter 174 Appendix 177 List of the related operation. The icons above the title show the Capture modes that is useful to be taken when operating the camera. R, d, F, G, D, C, O, 7 Ex. E...
Operation Manual
Page 11
... the various ways of taking still pictures and how to set the camera-related functions. 10 9 Digital Exposure Metering Function This chapter explains how to use the camera as the functions of the buttons and how to use the menus. Enjoying Your Digital Camera 8 Images On Your PC". 7 Recording and Playing Back Sound This chapter...
... the various ways of taking still pictures and how to set the camera-related functions. 10 9 Digital Exposure Metering Function This chapter explains how to use the camera as the functions of the buttons and how to use the menus. Enjoying Your Digital Camera 8 Images On Your PC". 7 Recording and Playing Back Sound This chapter...

Operation Manual
Page 22
When printing an image with the camera. D Better Standard compression rate. The default setting is 3056×2296 with the recorded pixels 3056×2296 and 2592×1944. Suitable for editing ... is sufficient for printing a postcard-size print. 4:3 is a normal aspect ratio of the images captured with more of the original image. Suitable for prints with a digital camera. Suitable for attaching to e-mails The default setting is D. 20 Appropriate Number of Recorded Pixels According to Use Aspect Ratio of Image Use 4:3 3:2 3056×...
When printing an image with the camera. D Better Standard compression rate. The default setting is 3056×2296 with the recorded pixels 3056×2296 and 2592×1944. Suitable for editing ... is sufficient for printing a postcard-size print. 4:3 is a normal aspect ratio of the images captured with more of the original image. Suitable for prints with a digital camera. Suitable for attaching to e-mails The default setting is D. 20 Appropriate Number of Recorded Pixels According to Use Aspect Ratio of Image Use 4:3 3:2 3056×...

Operation Manual
Page 38
... lever to the 2 "PC Guide - The image is rotated 90 degrees clockwise each time the button is pressed. 3 Press the 4 button or 3 button. Enjoying Your Digital Camera Images On Your PC". Rotating the Displayed Image 1 Press the Q button after taking a picture. The previous or next image appears. Quick Start • If there...
... lever to the 2 "PC Guide - The image is rotated 90 degrees clockwise each time the button is pressed. 3 Press the 4 button or 3 button. Enjoying Your Digital Camera Images On Your PC". Rotating the Displayed Image 1 Press the Q button after taking a picture. The previous or next image appears. Quick Start • If there...
Operation Manual
Page 48
... This menu shows the functions related to taking digital zoom pictures p.58 Instant Review For setting the Instant Review time p.102 Memory For choosing whether to save the set values of the shooting function or return to the defaults when the camera is reset. [A Rec. Menu List Common ...second p.113 Time-Lapse Movie For setting the frame rate when recording time-lapse movies p.114 3D Mode For taking 3D pictures p.78 Digital Zoom For taking still pictures and recording movies. 3 Item Description Page Recorded Pixels For selecting the number of pixels of still pictures ...
... This menu shows the functions related to taking digital zoom pictures p.58 Instant Review For setting the Instant Review time p.102 Memory For choosing whether to save the set values of the shooting function or return to the defaults when the camera is reset. [A Rec. Menu List Common ...second p.113 Time-Lapse Movie For setting the frame rate when recording time-lapse movies p.114 3D Mode For taking 3D pictures p.78 Digital Zoom For taking still pictures and recording movies. 3 Item Description Page Recorded Pixels For selecting the number of pixels of still pictures ...

Operation Manual
Page 49
... Common Operations [Q Playback] Menu Item Description Page Slideshow For playing back recorded images one after a fixed time Fn Setting For setting up screen when the camera is turned on DISPLAY For selecting the information displayed on the LCD monitor Brightness Level For changing the brightness of a picture p.135...
... Common Operations [Q Playback] Menu Item Description Page Slideshow For playing back recorded images one after a fixed time Fn Setting For setting up screen when the camera is turned on DISPLAY For selecting the information displayed on the LCD monitor Brightness Level For changing the brightness of a picture p.135...
Operation Manual
Page 50
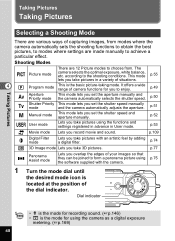
... software supplied with an artistic feel by adding a digital filter. Taking Pictures Taking Pictures Taking Pictures Selecting a Shooting Mode There are made manually to the shooting conditions. It offers a wide range of camera functions for you set the shutter speed and aperture ...• 7 is the basic picture-taking mode. p.52 E User mode Lets you take pictures using the camera as a digital exposure metering. (1p.169) 48 p.109 D Digital Filter mode Lets you overlap the edges of capturing images, from . according to achieve a particular effect. Shooting ...
... software supplied with an artistic feel by adding a digital filter. Taking Pictures Taking Pictures Taking Pictures Selecting a Shooting Mode There are made manually to the shooting conditions. It offers a wide range of camera functions for you set the shutter speed and aperture ...• 7 is the basic picture-taking mode. p.52 E User mode Lets you take pictures using the camera as a digital exposure metering. (1p.169) 48 p.109 D Digital Filter mode Lets you overlap the edges of capturing images, from . according to achieve a particular effect. Shooting ...
Operation Manual
Page 59
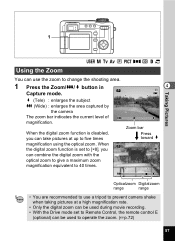
... in Capture mode. 4 38 x (Tele) : enlarges the subject w (Wide) : enlarges the area captured by the camera The zoom bar indicates the current level of magnification. When 38 the digital zoom function is disabled, you can combine the digital zoom with the optical zoom to give a maximum zoom magnification equivalent to 40 times. Zoom...
... in Capture mode. 4 38 x (Tele) : enlarges the subject w (Wide) : enlarges the area captured by the camera The zoom bar indicates the current level of magnification. When 38 the digital zoom function is disabled, you can combine the digital zoom with the optical zoom to give a maximum zoom magnification equivalent to 40 times. Zoom...

Operation Manual
Page 66
... any other auto bracketing option is selected and the shutter release button is pressed down menu appears. Also, in F, G, C and d modes, or when digital filter is set to TIFF. Use the four-way controller (23) to take pictures. Taking Pictures 3 4 5 6 47 8 9 Press the 4 button... while the setting is set to SOFT. • Auto bracketing cannot be selected. (1p.93) 64 Press the 4 button. 38 The camera is ready to choose the bracketing steps. The Auto bracketing options screen appears. Press the shutter release button halfway. A pull-down fully in Step 9, and...
... any other auto bracketing option is selected and the shutter release button is pressed down menu appears. Also, in F, G, C and d modes, or when digital filter is set to TIFF. Use the four-way controller (23) to take pictures. Taking Pictures 3 4 5 6 47 8 9 Press the 4 button... while the setting is set to SOFT. • Auto bracketing cannot be selected. (1p.93) 64 Press the 4 button. 38 The camera is ready to choose the bracketing steps. The Auto bracketing options screen appears. Press the shutter release button halfway. A pull-down fully in Step 9, and...
Operation Manual
Page 78
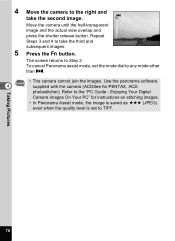
... the second image. The screen returns to the "PC Guide - Enjoying Your Digital Camera Images On Your PC" for PENTAX, ACD photostitcher). Refer to Step 2. Press the { button. Taking Pictures 76 To cancel Panorama assist mode, set to TIFF. 4 5 4 Move the camera to the right and take the third and subsequent images. Use the...
... the second image. The screen returns to the "PC Guide - Enjoying Your Digital Camera Images On Your PC" for PENTAX, ACD photostitcher). Refer to Step 2. Press the { button. Taking Pictures 76 To cancel Panorama assist mode, set to TIFF. 4 5 4 Move the camera to the right and take the third and subsequent images. Use the...

Operation Manual
Page 83
...12 EV compensation (p.59) OK 13 Aperture (p.50) 14 Shutter speed (p.51) 81 Normal Display 4 Shooting information appears when the camera is turned on the LCD monitor. When the histogram (image brightness distribution) appears, bright portions are displayed in red and dark ... 2 User mode (p.53) 1 2 3 4 5 6 7 8 9 10 3 Flash mode (p.87) 38 4 Drive mode (pp.60 - 73) 5 Focus mode (p.84) 6 Card status (p.25) 7 Digital zoom display (p.57) 8 Focus frame (p.32) 9 Number of pixels. As the default setting, Setting 1 displays all information and Setting 2 displays no information.
...12 EV compensation (p.59) OK 13 Aperture (p.50) 14 Shutter speed (p.51) 81 Normal Display 4 Shooting information appears when the camera is turned on the LCD monitor. When the histogram (image brightness distribution) appears, bright portions are displayed in red and dark ... 2 User mode (p.53) 1 2 3 4 5 6 7 8 9 10 3 Flash mode (p.87) 38 4 Drive mode (pp.60 - 73) 5 Focus mode (p.84) 6 Card status (p.25) 7 Digital zoom display (p.57) 8 Focus frame (p.32) 9 Number of pixels. As the default setting, Setting 1 displays all information and Setting 2 displays no information.

Operation Manual
Page 93
... attaching to 3:2 for prints with more than the required number of recorded pixels. 1024×768 is a normal aspect ratio of the images captured with a digital camera. 4 When printing an image with no border and an aspect ratio of 4:3, part of the image may not appear on the image quality, exposure control...
... attaching to 3:2 for prints with more than the required number of recorded pixels. 1024×768 is a normal aspect ratio of the images captured with a digital camera. 4 When printing an image with no border and an aspect ratio of 4:3, part of the image may not appear on the image quality, exposure control...
Operation Manual
Page 163
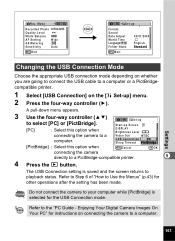
... on whether you are going to connect the USB cable to a computer or a PictBridgecompatible printer. 1 Select [USB Connection] on connecting the camera to your computer while [PictBridge] is saved and the screen returns to the "PC Guide - Do not connect the... operations after the setting has been made. Start-up Screen [PC] : Select this option when MENU Cancel OK OK connecting the camera directly to select [PC] or [PictBridge]. Enjoying Your Digital Camera Images On Your PC" for instructions on the [B Set-up to a PictBridge-compatible printer. 8 4 Press the Q button.
... on whether you are going to connect the USB cable to a computer or a PictBridgecompatible printer. 1 Select [USB Connection] on connecting the camera to your computer while [PictBridge] is saved and the screen returns to the "PC Guide - Do not connect the... operations after the setting has been made. Start-up Screen [PC] : Select this option when MENU Cancel OK OK connecting the camera directly to select [PC] or [PictBridge]. Enjoying Your Digital Camera Images On Your PC" for instructions on the [B Set-up to a PictBridge-compatible printer. 8 4 Press the Q button.
Operation Manual
Page 171
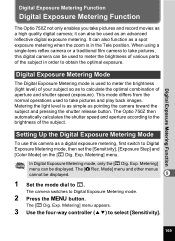
... can be displayed. 9 1 Set the mode dial to take pictures and play back images. Digital Exposure Metering Function Digital Exposure Metering Function Digital Exposure Metering Function The Optio 750Z not only enables you take pictures and record movies as pointing the camera toward the subject and pressing the shutter release button. It can also be displayed...
... can be displayed. 9 1 Set the mode dial to take pictures and play back images. Digital Exposure Metering Function Digital Exposure Metering Function Digital Exposure Metering Function The Optio 750Z not only enables you take pictures and record movies as pointing the camera toward the subject and pressing the shutter release button. It can also be displayed...
Operation Manual
Page 176
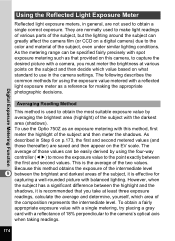
... value with a single metering, try placing a gray card with balanced lighting. This is effective for making the appropriate photographic decisions. Digital Exposure Metering Function Using the Reflected Light Exposure Meter Reflected light exposure meters, in general, are not used to obtain the most suitable... to use the Optio 750Z as a reference for capturing a well-rounded picture with a reflectance of the two values. To use in Step 6 on p.173, the first and second metered values (and those values can greatly affect the camera film (or CCD on a digital camera) due to make...
... value with a single metering, try placing a gray card with balanced lighting. This is effective for making the appropriate photographic decisions. Digital Exposure Metering Function Using the Reflected Light Exposure Meter Reflected light exposure meters, in general, are not used to obtain the most suitable... to use the Optio 750Z as a reference for capturing a well-rounded picture with a reflectance of the two values. To use in Step 6 on p.173, the first and second metered values (and those values can greatly affect the camera film (or CCD on a digital camera) due to make...


