Setup Information
Page 1
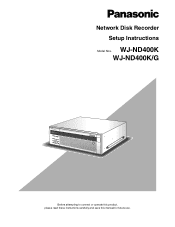
WJ-ND400K WJ-ND400K/G 1 2 3 4 5 6 7 8 9 Before attempting to connect or operate this product, please read these instructions carefully and save this manual for future use. Network Disk Recorder Setup Instructions Model Nos.
WJ-ND400K WJ-ND400K/G 1 2 3 4 5 6 7 8 9 Before attempting to connect or operate this product, please read these instructions carefully and save this manual for future use. Network Disk Recorder Setup Instructions Model Nos.
Setup Information
Page 3
...47 Camera ...48 NW camera ...48 Automatically detecting and registering cameras 48 Switch cameras (4-screen display setting 50 Checking and changing a camera (Manually setting 50 Group ...52 Sequence ...53 Server ...55 NTP ...55 FTP ...56 Mail ...58 Proxy...60 Network ...61 Basics ...61 DDNS...65... SNMP...66 Panasonic alarm protocol ...67 User management...68 Basics ...68 Administrator ...69 Users...70 Editing user information ...71 Deleting user information ...71 Hosts...72 Editing...
...47 Camera ...48 NW camera ...48 Automatically detecting and registering cameras 48 Switch cameras (4-screen display setting 50 Checking and changing a camera (Manually setting 50 Group ...52 Sequence ...53 Server ...55 NTP ...55 FTP ...56 Mail ...58 Proxy...60 Network ...61 Basics ...61 DDNS...65... SNMP...66 Panasonic alarm protocol ...67 User management...68 Basics ...68 Administrator ...69 Users...70 Editing user information ...71 Deleting user information ...71 Hosts...72 Editing...

Setup Information
Page 4
Contents Formatting disks ...86 Format...86 Pre-event recording area formatting ...88 Attachments About mail notification ...90 Alarm mail notification ...90 Warning mail notification ...90 Troubleshooting...93 Problems...93 Message display ...96 Glossary...97 Words used in the manual ...97 Index...100 4
Contents Formatting disks ...86 Format...86 Pre-event recording area formatting ...88 Attachments About mail notification ...90 Alarm mail notification ...90 Warning mail notification ...90 Troubleshooting...93 Problems...93 Message display ...96 Glossary...97 Words used in the manual ...97 Index...100 4
Setup Information
Page 5
...174; XP Professional SP2, and Microsoft® Windows® XP Home Edition SP2 are used functions. About these Operating Instructions There are shown as WJ-ND400. A web browser must also be done to perform operations from a PC over a network. Refer to perform operations from a PC. ... up to 64 cameras over a network. : How to the "readme.txt" file on the screen, the ND400 and the recorder are four manuals, they include the Installation Guide, Setup Instructions (PDF file), Operating Instructions (PDF file), and the Quick Reference Guide. • Installation Guide &#...
...174; XP Professional SP2, and Microsoft® Windows® XP Home Edition SP2 are used functions. About these Operating Instructions There are shown as WJ-ND400. A web browser must also be done to perform operations from a PC over a network. Refer to perform operations from a PC. ... up to 64 cameras over a network. : How to the "readme.txt" file on the screen, the ND400 and the recorder are four manuals, they include the Installation Guide, Setup Instructions (PDF file), Operating Instructions (PDF file), and the Quick Reference Guide. • Installation Guide &#...

Setup Information
Page 13
...] window. 4 Click [Network Connections]. This will display the [Local Area Connection Status] window. 3 Click [Network and Internet Connections]. In order to 254. 1 Log in this manual are using the basic settings of the PC to; 192.168.1.XXX, where XXX is any value except 250 (which is used by the recorder...
...] window. 4 Click [Network Connections]. This will display the [Local Area Connection Status] window. 3 Click [Network and Internet Connections]. In order to 254. 1 Log in this manual are using the basic settings of the PC to; 192.168.1.XXX, where XXX is any value except 250 (which is used by the recorder...

Setup Information
Page 22
Important: • When displaying the [Recording] or [Recording stop ] button : Stops recording manually. About operating windows Playback point operation area (1) (2) (3) (1) Displays the time and date for the download start point/ending point. [...] button Plays recorded images. (5) [NEXT RECORD] button Skips forward to hide the [Recording] and [Recording stop] buttons. [Recording] button : Starts recording manually. [Recording stop ] buttons, click and hold [Up] button until displayed. 22 Clicking during pause restarts playback. (9) [STOP] button Stops playback and displays ...
Important: • When displaying the [Recording] or [Recording stop ] button : Stops recording manually. About operating windows Playback point operation area (1) (2) (3) (1) Displays the time and date for the download start point/ending point. [...] button Plays recorded images. (5) [NEXT RECORD] button Skips forward to hide the [Recording] and [Recording stop] buttons. [Recording] button : Starts recording manually. [Recording stop ] buttons, click and hold [Up] button until displayed. 22 Clicking during pause restarts playback. (9) [STOP] button Stops playback and displays ...
Setup Information
Page 27
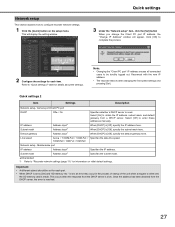
..., the error is [Off], specify the IP address here. Click [OK] to write onto the SD memory card is slow. Refer to enter these addresses manually. Select [On] to configure recorder network settings. 1 Click the [Quick] button on initial default settings. IP address Address input*1 When [DHCP] is resolved. 27 Maintenance...
..., the error is [Off], specify the IP address here. Click [OK] to write onto the SD memory card is slow. Refer to enter these addresses manually. Select [On] to configure recorder network settings. 1 Click the [Quick] button on initial default settings. IP address Address input*1 When [DHCP] is resolved. 27 Maintenance...

Setup Information
Page 28
... and MAC address will automatically detect blank IP addresses for setting, but depending on the network environment, the IP address may be assigned if it manually. • When [Register the IP address automatically given by this unit to 64 cameras can be displayed in progress. Also, the camera's subnet mask and...
... and MAC address will automatically detect blank IP addresses for setting, but depending on the network environment, the IP address may be assigned if it manually. • When [Register the IP address automatically given by this unit to 64 cameras can be displayed in progress. Also, the camera's subnet mask and...
Setup Information
Page 30
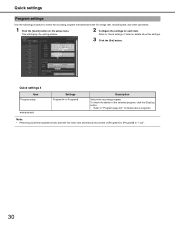
Quick settings Program settings Use the following procedure to select the recording program that determines the live video rate and manual record rate of the selected program, click the [Display] button. • Refer to "Program (page 42)" for details about the settings. 3 Click the [Set] button. ...
Quick settings Program settings Use the following procedure to select the recording program that determines the live video rate and manual record rate of the selected program, click the [Display] button. • Refer to "Program (page 42)" for details about the settings. 3 Click the [Set] button. ...

Setup Information
Page 34
... button to change the contents of 8 seconds. • Selecting [Continue] causes recording to "Checking and changing a camera (Manually setting) (page 50)" for about compression method settings. 34 For details about compression method settings. Emergency recording settings Item Recording ...Recording rate Settings Description 2s / 5s / 10s♦ / 20s / 30s / 1min / 3min / 5min / 10min / 30min / Manual / Continue Specifies the duration of the emergency recording input signal. Emergency recording Emergency recording Sets the recording duration or recording rate when performing ...
... button to change the contents of 8 seconds. • Selecting [Continue] causes recording to "Checking and changing a camera (Manually setting) (page 50)" for about compression method settings. 34 For details about compression method settings. Emergency recording settings Item Recording ...Recording rate Settings Description 2s / 5s / 10s♦ / 20s / 30s / 1min / 3min / 5min / 10min / 30min / Manual / Continue Specifies the duration of the emergency recording input signal. Emergency recording Emergency recording Sets the recording duration or recording rate when performing ...
Setup Information
Page 43
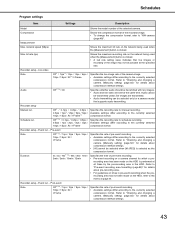
...-event recording. • Available settings differ according to the currently selected compression format. Recorder setup - Measurement Max. Recorder setup Manual rec. Off*1*2*3 / 0.1ips / 0.2ips / 0.3ips / Specifies the recording rate for details about compression method settings. &#...*1*2*3 / 1ips / 2ips / 3ips / 5ips / 10ips / 15ips / All / I -Frame compression format. Refer to "Checking and changing a camera (Manually setting) (page 50)" for schedule recording. 0.5ips / 1ips / 2ips / 3ips / 5ips / Available settings differ according to the currently selected 10ips / ...
...-event recording. • Available settings differ according to the currently selected compression format. Recorder setup - Measurement Max. Recorder setup Manual rec. Off*1*2*3 / 0.1ips / 0.2ips / 0.3ips / Specifies the recording rate for details about compression method settings. &#...*1*2*3 / 1ips / 2ips / 3ips / 5ips / 10ips / 15ips / All / I -Frame compression format. Refer to "Checking and changing a camera (Manually setting) (page 50)" for schedule recording. 0.5ips / 1ips / 2ips / 3ips / 5ips / Available settings differ according to the currently selected 10ips / ...

Setup Information
Page 44
... Settings Description Duration Recorder setup Audio rec. (Audio recording) 2s / 5s / 10s / 20s / 30s*1*2*3 / 1min / 2min / 3min / 5min / 10min / 15min / Manual / Continue Specifies the time of post-event recording. • When [Manual] is selected, recording is performed only while the alarm signal is clicked. Also, set the cameras audio bit rate to...
... Settings Description Duration Recorder setup Audio rec. (Audio recording) 2s / 5s / 10s / 20s / 30s*1*2*3 / 1min / 2min / 3min / 5min / 10min / 15min / Manual / Continue Specifies the time of post-event recording. • When [Manual] is selected, recording is performed only while the alarm signal is clicked. Also, set the cameras audio bit rate to...
Setup Information
Page 49
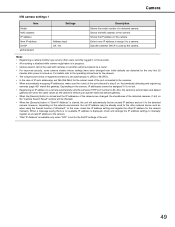
... registration is in step 3 on "Automatically detecting and registering cameras (page 48)" match the gateway. Specifies whether DHCP is used for the camera manually. Note: • Registering a camera forcibly logs out any other network device such as the camera's network port subnet mask and default gateway. ...function of the unit. 49 Shows the MAC address of registered cameras is displayed, check and arrange the IP address settings to manually register an unused IP address to 80. For details refer to the operating instructions for the camera. • The compression format ...
... registration is in step 3 on "Automatically detecting and registering cameras (page 48)" match the gateway. Specifies whether DHCP is used for the camera manually. Note: • Registering a camera forcibly logs out any other network device such as the camera's network port subnet mask and default gateway. ...function of the unit. 49 Shows the MAC address of registered cameras is displayed, check and arrange the IP address settings to manually register an unused IP address to 80. For details refer to the operating instructions for the camera. • The compression format ...

Setup Information
Page 50
... to 61 to change the sequence of a camera that is not shown on the setup menu. 2 Click the [NW camera] tab. Checking and changing a camera (Manually setting) 1 Click the [Camera] button on the display, click the applicable camera number range above the [Set] button to 64. For information about camera settings...
... to 61 to change the sequence of a camera that is not shown on the setup menu. 2 Click the [NW camera] tab. Checking and changing a camera (Manually setting) 1 Click the [Camera] button on the display, click the applicable camera number range above the [Set] button to 64. For information about camera settings...

Setup Information
Page 63
...to validate the static route setting. Maintenance port IP address Address input*1 Specifies the IP address. DNS setup DNS Off♦ / Auto / Manual Specifies whether a DNS is 80. • Depending on network settings, changing the HTTP port number may make communication impossible. Bandwidth control Unlimited&#... setting is available only when [On] is selected for the [DHCP] setting of the Client PC port (page 61). • When [Manual] is selected, a primary address and secondary address can be specified for data transmitted to the network. • The transmission amount is used...
...to validate the static route setting. Maintenance port IP address Address input*1 Specifies the IP address. DNS setup DNS Off♦ / Auto / Manual Specifies whether a DNS is 80. • Depending on network settings, changing the HTTP port number may make communication impossible. Bandwidth control Unlimited&#... setting is available only when [On] is selected for the [DHCP] setting of the Client PC port (page 61). • When [Manual] is selected, a primary address and secondary address can be specified for data transmitted to the network. • The transmission amount is used...
Setup Information
Page 75
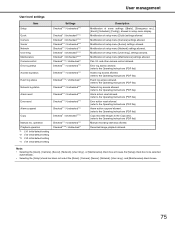
...], [Network], [User mng.], or [Maintenance] check box will cause the [Setup] check box to the Operating Instructions (PDF file)) Manual recording start/stop allowed. Maintenance Camera control Error log status Checked*1 / Unchecked*2*3*4 Checked*1 / Unchecked*2*3*4 Checked*1*2 / Unchecked*3*4 Checked*1*2 /... Checked*1*2 / Unchecked*3*4 Error reset Checked*1*2 / Unchecked*3*4 Alarm suspend Checked*1*2 / Unchecked*3*4 Copy Checked*1 / Unchecked*2*3*4 Manual rec. Recorded image playback allowed. Modification of setup menu [Server] settings allowed. Modification of setup menu [User mng.]...
...], [Network], [User mng.], or [Maintenance] check box will cause the [Setup] check box to the Operating Instructions (PDF file)) Manual recording start/stop allowed. Maintenance Camera control Error log status Checked*1 / Unchecked*2*3*4 Checked*1 / Unchecked*2*3*4 Checked*1*2 / Unchecked*3*4 Checked*1*2 /... Checked*1*2 / Unchecked*3*4 Error reset Checked*1*2 / Unchecked*3*4 Alarm suspend Checked*1*2 / Unchecked*3*4 Copy Checked*1 / Unchecked*2*3*4 Manual rec. Recorded image playback allowed. Modification of setup menu [Server] settings allowed. Modification of setup menu [User mng.]...

Setup Information
Page 78
... Remain capacity Hour meter Recorded time range Description Shows the capacity of recording. Event recording area Shows the storage area capacity of images recorded by manual recording and schedule recording. Pre-event recording area Shows the storage area capacity of images recorded by the HDD capacity indicates the HDD that is...
... Remain capacity Hour meter Recorded time range Description Shows the capacity of recording. Event recording area Shows the storage area capacity of images recorded by manual recording and schedule recording. Pre-event recording area Shows the storage area capacity of images recorded by the HDD capacity indicates the HDD that is...
Setup Information
Page 81
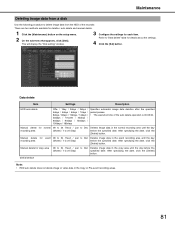
... the date, click the [Delete] button. This will display the "Disk setting" window. 3 Configure the settings for deletion: auto delete and manual delete. 1 Click the [Maintenance] button on the setup menu. 2 On the sub-menu that appears, click [Disk]. After specifying the date...60days / 90days / 120days / 150days / 180days Specifies automatic image data deletion after the specified period passes. • The execution time of the recorder. Manual delete for normal 08 to 34 (Year) / Jan to Dec Deletes image data in the event recording area until the day recording area (Month) /...
... the date, click the [Delete] button. This will display the "Disk setting" window. 3 Configure the settings for deletion: auto delete and manual delete. 1 Click the [Maintenance] button on the setup menu. 2 On the sub-menu that appears, click [Disk]. After specifying the date...60days / 90days / 120days / 150days / 180days Specifies automatic image data deletion after the specified period passes. • The execution time of the recorder. Manual delete for normal 08 to 34 (Year) / Jan to Dec Deletes image data in the event recording area until the day recording area (Month) /...

Setup Information
Page 83
...are recorded to format HDDs. However, if you remove an HDD operating in an area other than normal video and audio recording (see the basic manual), any unformatted HDD inserted into the recorder are automatically initialized as normal recording area. Create either one area for each HDD. (1) Normal recording ... The HDDs in the 4 image areas shown below. Note: • The HDD provided in the recorder at the factory is not created, manual and schedule recordings are virtually divided in the recorder are recorded to the HDD. You can set only one normal recording area or event recording...
...are recorded to format HDDs. However, if you remove an HDD operating in an area other than normal video and audio recording (see the basic manual), any unformatted HDD inserted into the recorder are automatically initialized as normal recording area. Create either one area for each HDD. (1) Normal recording ... The HDDs in the 4 image areas shown below. Note: • The HDD provided in the recorder at the factory is not created, manual and schedule recordings are virtually divided in the recorder are recorded to the HDD. You can set only one normal recording area or event recording...
Setup Information
Page 85
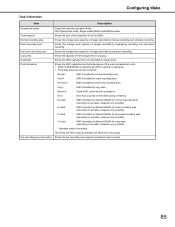
... area (recording not possible, playback only possible) C-Used : HDD formatted on different ND400 for copying. Undefined Shows the HDD capacity that is recording. The (R) by manual recording and schedule recording. Copy area Shows the capacity of the storage area for copy area (recording not possible, playback only possible) * Indicates order of...
... area (recording not possible, playback only possible) C-Used : HDD formatted on different ND400 for copying. Undefined Shows the HDD capacity that is recording. The (R) by manual recording and schedule recording. Copy area Shows the capacity of the storage area for copy area (recording not possible, playback only possible) * Indicates order of...

