

PVD4732 User Guide
Page 4
... is not properly placed. Accessories Remote Control LSSQ0345 (PV-D4732) LSSQ0352 (PV-D4732S) Batteries 2 "AA" RF Coaxial Cable VJAS0196 Disc formats supported by edges as marked. 3) Close cover. other solvent. • Be careful not to : consumerproducts@panasonic.com is brought from the center...free cloth before using disc. (See above.) Improper disc storage Discs could be played • DVD with manganese batteries. Disc Handling Handling precautions • Only hold disc by this DECK DECK can cause skipping and distortion. • Do not write on label side of disc. •...
... is not properly placed. Accessories Remote Control LSSQ0345 (PV-D4732) LSSQ0352 (PV-D4732S) Batteries 2 "AA" RF Coaxial Cable VJAS0196 Disc formats supported by edges as marked. 3) Close cover. other solvent. • Be careful not to : consumerproducts@panasonic.com is brought from the center...free cloth before using disc. (See above.) Improper disc storage Discs could be played • DVD with manganese batteries. Disc Handling Handling precautions • Only hold disc by this DECK DECK can cause skipping and distortion. • Do not write on label side of disc. •...
PVD4732 User Guide
Page 6
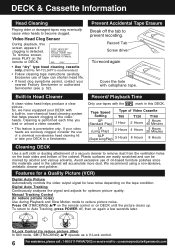
... on again a few seconds later. DECK & Cassette Information Head Cleaning Playing older or damaged tapes may eventually cause video heads to : consumerproducts@panasonic.com So, we have equipped your...clear picture. Video Head Clog Sensor During playback, this DECK. Excessive use of the cabinet. Features for a Quality Picture (VCR) Digital Auto Picture Automatically controls the video output signal... head cleaning cassette only. (Part No. Press CH (TRACKING) / on the remote control or on the remote or DECK. Cleaning is performed each time you load or unload a video cassette. •...
... on again a few seconds later. DECK & Cassette Information Head Cleaning Playing older or damaged tapes may eventually cause video heads to : consumerproducts@panasonic.com So, we have equipped your...clear picture. Video Head Clog Sensor During playback, this DECK. Excessive use of the cabinet. Features for a Quality Picture (VCR) Digital Auto Picture Automatically controls the video output signal... head cleaning cassette only. (Part No. Press CH (TRACKING) / on the remote control or on the remote or DECK. Cleaning is performed each time you load or unload a video cassette. •...

PVD4732 User Guide
Page 8
... for easy button location. EJECT button: When this button is pressed in VCR mode, the tape is inoperative if pressed during recording. Location of Controls Remote Control Bold: VCR Function Italic: DVD Function Bold Italic: VCR and DVD Functions Normal: Others EJECT/ OPEN/CLOSE pp. 20, 22 POWER LIGHT ...37 AUDIO (SAP/ Hi-Fi) pp. 27, 36 VOLUME +/- This button is ejected. If pressed in 5 seconds, the light goes out to : consumerproducts@panasonic.com p. 28 COUNTER RESET p. 32 DISPLAY p. 11, 41 CHANNEL / TRACKING/V-LOCK pp. 21, 6 TAPE POSITION/ AUDIO CONTROL p. 34, 40 RECORD ...
... for easy button location. EJECT button: When this button is pressed in VCR mode, the tape is inoperative if pressed during recording. Location of Controls Remote Control Bold: VCR Function Italic: DVD Function Bold Italic: VCR and DVD Functions Normal: Others EJECT/ OPEN/CLOSE pp. 20, 22 POWER LIGHT ...37 AUDIO (SAP/ Hi-Fi) pp. 27, 36 VOLUME +/- This button is ejected. If pressed in 5 seconds, the light goes out to : consumerproducts@panasonic.com p. 28 COUNTER RESET p. 32 DISPLAY p. 11, 41 CHANNEL / TRACKING/V-LOCK pp. 21, 6 TAPE POSITION/ AUDIO CONTROL p. 34, 40 RECORD ...

PVD4732 User Guide
Page 9
... inches Cassette Compartment Disc Tray Audio/Video Input Connector 2 (LINE 2) p. 35 CHANNEL / TRACKING/V-LOCK pp. 21, 6 Multi Function Display p. 11 Remote Sensor VCR/TV p. 21 REC p. 21 For assistance, call 1-800-211-PANA(7262) OPEN/CLOSE p. 22 PAUSE p. 23 PLAY p. 22 SKIP SKIP p. 23... STOP p. 22 9 Initial Setup (Connection) FFrroonnttVVieiwewofoDfEDCEKCK Bold: VCR Function Italic: DVD Function Bold Italic: VCR and DVD Functions Normal: Others STOP/EJECT p. 20 FAST FORWARD/SEARCH p. 20 If the disc cannot be removed... an extended paper ...
... inches Cassette Compartment Disc Tray Audio/Video Input Connector 2 (LINE 2) p. 35 CHANNEL / TRACKING/V-LOCK pp. 21, 6 Multi Function Display p. 11 Remote Sensor VCR/TV p. 21 REC p. 21 For assistance, call 1-800-211-PANA(7262) OPEN/CLOSE p. 22 PAUSE p. 23 PLAY p. 22 SKIP SKIP p. 23... STOP p. 22 9 Initial Setup (Connection) FFrroonnttVVieiwewofoDfEDCEKCK Bold: VCR Function Italic: DVD Function Bold Italic: VCR and DVD Functions Normal: Others STOP/EJECT p. 20 FAST FORWARD/SEARCH p. 20 If the disc cannot be removed... an extended paper ...
PVD4732 User Guide
Page 10
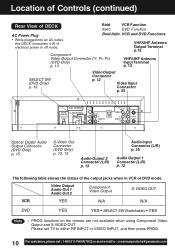
... on the remote are not available when using Component Video Output and S-VIDEO OUT. Location of Controls (continued) Rear View of DECK Bold: Italic: VCR Function DVD Function AC Power Plug Bold Italic: VCR and DVD Functions • While plugged into an AC outlet, this DECK consumes 4 ...mail to : consumerproducts@panasonic.com VHF/UHF Antenna Output Terminal p.12 Component Video Output Connector (Y, PB, PR) (DVD Only) p. 13 VHF/UHF Antenna Input Terminal p. 12 SELECT SW (DVD Only) p. 13 Video Output Connector p. 12 Video Input Connector p. 35 DVD OUTPUT COMPONENT VIDEO OUT ...
... on the remote are not available when using Component Video Output and S-VIDEO OUT. Location of Controls (continued) Rear View of DECK Bold: Italic: VCR Function DVD Function AC Power Plug Bold Italic: VCR and DVD Functions • While plugged into an AC outlet, this DECK consumes 4 ...mail to : consumerproducts@panasonic.com VHF/UHF Antenna Output Terminal p.12 Component Video Output Connector (Y, PB, PR) (DVD Only) p. 13 VHF/UHF Antenna Input Terminal p. 12 SELECT SW (DVD Only) p. 13 Video Output Connector p. 12 Video Input Connector p. 35 DVD OUTPUT COMPONENT VIDEO OUT ...

PVD4732 User Guide
Page 13
... 2 If your TV does not have COMPONENT VIDEO INPUT but has S-VIDEO INPUT, set to your TV. • PROG functions on the Cable Box. DVD/VCR DECK You Can You Cannot ANT or Cable Box CATV IN OUT OUT IN1 IN FROM ANT. Note • The picture will not be displayed if...; do a Timer recording of the TV. (audio input for any (including scrambled) channel. • record scrambled channels. • use Remote Control to S-VIDEO OUT. Notes • You can watch DVDs through the S-VIDEO or COMPONENT VIDEO, VHF/UHF OUT TO TV, and VIDEO OUT connections to your TV to either COMPONENT...
... 2 If your TV does not have COMPONENT VIDEO INPUT but has S-VIDEO INPUT, set to your TV. • PROG functions on the Cable Box. DVD/VCR DECK You Can You Cannot ANT or Cable Box CATV IN OUT OUT IN1 IN FROM ANT. Note • The picture will not be displayed if...; do a Timer recording of the TV. (audio input for any (including scrambled) channel. • record scrambled channels. • use Remote Control to S-VIDEO OUT. Notes • You can watch DVDs through the S-VIDEO or COMPONENT VIDEO, VHF/UHF OUT TO TV, and VIDEO OUT connections to your TV to either COMPONENT...
PVD4732 User Guide
Page 16
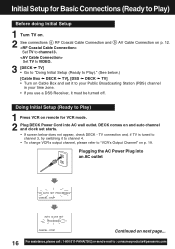
... tuned to channel 3, try switching it must be turned off. Set TV to : consumerproducts@panasonic.com Plugging the AC Power Plug into AC wall outlet. Doing Initial Setup (Ready to Play) 1 Press VCR on remote for Basic Connections (Ready to Play) Before doing Initial Setup 1 Turn TV on. 2 ...starts. • If screen below .) [Cable Box ➛ DECK ➛ TV], [DSS ➛ DECK ➛ TV] • Turn on next page... 16 For assistance, please call : 1-800-211-PANA(7262) or send e-mail to channel 3. Set TV to VIDEO. 3 [DECK ➛ TV] • Go to "Doing Initial Setup ...
... tuned to channel 3, try switching it must be turned off. Set TV to : consumerproducts@panasonic.com Plugging the AC Power Plug into AC wall outlet. Doing Initial Setup (Ready to Play) 1 Press VCR on remote for Basic Connections (Ready to Play) Before doing Initial Setup 1 Turn TV on. 2 ...starts. • If screen below .) [Cable Box ➛ DECK ➛ TV], [DSS ➛ DECK ➛ TV] • Turn on next page... 16 For assistance, please call : 1-800-211-PANA(7262) or send e-mail to channel 3. Set TV to VIDEO. 3 [DECK ➛ TV] • Go to "Doing Initial Setup ...
PVD4732 User Guide
Page 17
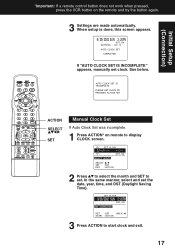
... MONTH SELECT : SET :SET EXIT : ACT I ON KEY ACTION SELECT SET Manual Clock Set If Auto Clock Set was incomplete. 1 Press ACTION* on the remote and try the button again. 3 Settings are made automatically. AUTO CLOCK SET IS I NCOMPLETE PLEASE SET CLOCK BY PRESSING ACT I ON 2 Press to select the... month and SET to display CLOCK screen. See below. Initial Setup (Connection) *Important: If a remote control button does not work when pressed, press the VCR button on remote to set the date, year, time, and DST (Daylight Saving Time).
... MONTH SELECT : SET :SET EXIT : ACT I ON KEY ACTION SELECT SET Manual Clock Set If Auto Clock Set was incomplete. 1 Press ACTION* on the remote and try the button again. 3 Settings are made automatically. AUTO CLOCK SET IS I NCOMPLETE PLEASE SET CLOCK BY PRESSING ACT I ON 2 Press to select the... month and SET to display CLOCK screen. See below. Initial Setup (Connection) *Important: If a remote control button does not work when pressed, press the VCR button on remote to set the date, year, time, and DST (Daylight Saving Time).

PVD4732 User Guide
Page 19
...SET EXIT : ACTION • To Make Corrections, repeat steps 1) ~ 3). Autumn (Last Sunday in mind when programming DECK for timer recordings. 19 MENU SET UP VCR SET CLOCK SET UP CHANNEL IDIOMA/LANGUE : ENGLISH VCR'S OUTPUT CH:3 SELECT : SET : SET EXIT : ACTION SELECT : SET : SET EXIT : ACTION 2) Press ...press ADD/DLT. POWER VCR Basic Operation Time Zone Adjust (Only when Auto Clock is set .) 1) Press to "0" if clock is set manually. VCR's Output Channel *Important: If a remote control button does not work when pressed, press the VCR button on the remote and try the button again...
...SET EXIT : ACTION • To Make Corrections, repeat steps 1) ~ 3). Autumn (Last Sunday in mind when programming DECK for timer recordings. 19 MENU SET UP VCR SET CLOCK SET UP CHANNEL IDIOMA/LANGUE : ENGLISH VCR'S OUTPUT CH:3 SELECT : SET : SET EXIT : ACTION SELECT : SET : SET EXIT : ACTION 2) Press ...press ADD/DLT. POWER VCR Basic Operation Time Zone Adjust (Only when Auto Clock is set .) 1) Press to "0" if clock is set manually. VCR's Output Channel *Important: If a remote control button does not work when pressed, press the VCR button on the remote and try the button again...

PVD4732 User Guide
Page 20
...up on . REW/SLOWVCR/TV STOP 2 Press PLAY* to : consumerproducts@panasonic.com TV and DECK are made (pp. 12 ~ 15). Remote is in VCR mode. (Press VCR.) EJECT Playback a Tape 1 Insert a tape. • DECK power comes on Multi Function Display. Playback using DECK buttons 2 Press PLAY. 1 Insert a tape. 3 Press STOP to ...eject a tape. Press EJECT on remote, or STOP/EJECT on DECK to stop and/ or eject a tape. 20 For assistance, please call : 1-800-211-PANA(7262) or send e-mail to play begins. Frame by Frame Picture ➛ Press PAUSE/STILL in . DVD PLAY FF/SLOW+ PAUSE/ STILL...
...up on . REW/SLOWVCR/TV STOP 2 Press PLAY* to : consumerproducts@panasonic.com TV and DECK are made (pp. 12 ~ 15). Remote is in VCR mode. (Press VCR.) EJECT Playback a Tape 1 Insert a tape. • DECK power comes on Multi Function Display. Playback using DECK buttons 2 Press PLAY. 1 Insert a tape. 3 Press STOP to ...eject a tape. Press EJECT on remote, or STOP/EJECT on DECK to stop and/ or eject a tape. 20 For assistance, please call : 1-800-211-PANA(7262) or send e-mail to play begins. Frame by Frame Picture ➛ Press PAUSE/STILL in . DVD PLAY FF/SLOW+ PAUSE/ STILL...

PVD4732 User Guide
Page 21
... key then press the remaining 2 digits. 3 Press SPEED to VHS tape using DECK. • Watching one station, watch another channel during recording, ➛ press DVD, and then press PLAY. 1Insert a tape. Select Channels at DECK (In STOP or Record using Cable Box or DSS Receiver. • After ... (30 min. ~ 4 hours). • DECK shuts off after the preset record length. Only use in progress), ➛ Press REC repeatedly to start recording. (The VCR REC indicator lights up on the remote and try the button again. The VCR mode and "VCR" indicator light up on . Only tapes tested ...
... key then press the remaining 2 digits. 3 Press SPEED to VHS tape using DECK. • Watching one station, watch another channel during recording, ➛ press DVD, and then press PLAY. 1Insert a tape. Select Channels at DECK (In STOP or Record using Cable Box or DSS Receiver. • After ... (30 min. ~ 4 hours). • DECK shuts off after the preset record length. Only use in progress), ➛ Press REC repeatedly to start recording. (The VCR REC indicator lights up on the remote and try the button again. The VCR mode and "VCR" indicator light up on . Only tapes tested ...
PVD4732 User Guide
Page 22
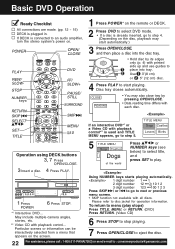
... Press TITLE, MENU, or RETURN. (DVD) Press RETURN. (Video CD) 6 Press STOP to stop playing. 7 Press OPEN/CLOSE to eject the disc. 22 For assistance, please call : 1-800-211-PANA(7262) or send e-mail to : consumerproducts@panasonic.com Particular scenes or information can be .... 3 Insert a disc. 4 Press PLAY. 1 Press POWER 6 Press STOP. *1 Interactive DVD... If DECK is connected to an audio amplifier, turn the stereo system's power on. 1 Press POWER* on the remote or DECK. 2 Press DVD to select DVD mode. • If a disc is already inserted, go to step 5. Using NUMBER keys starts...
... Press TITLE, MENU, or RETURN. (DVD) Press RETURN. (Video CD) 6 Press STOP to stop playing. 7 Press OPEN/CLOSE to eject the disc. 22 For assistance, please call : 1-800-211-PANA(7262) or send e-mail to : consumerproducts@panasonic.com Particular scenes or information can be .... 3 Insert a disc. 4 Press PLAY. 1 Press POWER 6 Press STOP. *1 Interactive DVD... If DECK is connected to an audio amplifier, turn the stereo system's power on. 1 Press POWER* on the remote or DECK. 2 Press DVD to select DVD mode. • If a disc is already inserted, go to step 5. Using NUMBER keys starts...

PVD4732 User Guide
Page 23
... Enjoy Video CDs featuring • DVD/Video CD : DECK will enter still picture mode. • CD : DECK will be displayed. Press FF/SLOW+ or REW/SLOWin still mode. Press STOP to 5 levels. *Important: If a remote control button does not work when pressed, press the DVD button on the screen while a ...button up to 5 levels. • Reverse slow motion is not available for Video CDs. • When appears on the remote and try the button again. Each press skips a chapter (DVD) or track (Video CD/CD). • Pressing | SKIP once midway through a chapter/track returns to release. When menu...
... Enjoy Video CDs featuring • DVD/Video CD : DECK will enter still picture mode. • CD : DECK will be displayed. Press FF/SLOW+ or REW/SLOWin still mode. Press STOP to 5 levels. *Important: If a remote control button does not work when pressed, press the DVD button on the screen while a ...button up to 5 levels. • Reverse slow motion is not available for Video CDs. • When appears on the remote and try the button again. Each press skips a chapter (DVD) or track (Video CD/CD). • Pressing | SKIP once midway through a chapter/track returns to release. When menu...

PVD4732 User Guide
Page 24
...or LINE input (p. 35), and tape speed (SP, LP, SLP). TV and DECK are made (pp. 12 ~ 15). Tape has rec.tab. (p. 6) Remote is in DVD mode, no message appears, but the VCR REC Indicator, the VCR mode indicator and "REC" will flash on -screen for rec time. 1 Press...DECK. • You can do Timer Recording with the power on or off. • "TIMER REC WILL START SOON" appears on Multi function Display. 24 For assistance, please call : 1-800-211-PANA(7262) or send e-mail to : consumerproducts@panasonic.com Timer Recording Ready Checklist All connections are plugged in VCR mode. (Press VCR...
...or LINE input (p. 35), and tape speed (SP, LP, SLP). TV and DECK are made (pp. 12 ~ 15). Tape has rec.tab. (p. 6) Remote is in DVD mode, no message appears, but the VCR REC Indicator, the VCR mode indicator and "REC" will flash on -screen for rec time. 1 Press...DECK. • You can do Timer Recording with the power on or off. • "TIMER REC WILL START SOON" appears on Multi function Display. 24 For assistance, please call : 1-800-211-PANA(7262) or send e-mail to : consumerproducts@panasonic.com Timer Recording Ready Checklist All connections are plugged in VCR mode. (Press VCR...

PVD4732 User Guide
Page 25
... : SET EXIT : PROG Press to select number and press SET to display. 3 To Replace program... Be sure a cassette with record tab is loaded and DECK is performed, "PLEASE PREPARE FOR TIMER REC" appears and Timer Indicator flashes. DT START STOP CH SPD 8 10 : 00P 12 : 00P 02 SP 10... If the start time for a few seconds to the desired channel. VCR Operation Review, Replace or Clear Program Contents: (Recording is not in progress... *Important: If a remote control button does not work when pressed, press the VCR button on Multi Function Display.) • Any future daily or weekly ...
... : SET EXIT : PROG Press to select number and press SET to display. 3 To Replace program... Be sure a cassette with record tab is loaded and DECK is performed, "PLEASE PREPARE FOR TIMER REC" appears and Timer Indicator flashes. DT START STOP CH SPD 8 10 : 00P 12 : 00P 02 SP 10... If the start time for a few seconds to the desired channel. VCR Operation Review, Replace or Clear Program Contents: (Recording is not in progress... *Important: If a remote control button does not work when pressed, press the VCR button on Multi Function Display.) • Any future daily or weekly ...

PVD4732 User Guide
Page 27
.... See p. 20. 2 Press AUDIO (SAP/Hi-Fi) to stereo recordings in monaural sound. • To listen to Hi-Fi stereo playback, the DECK AUDIO (L/R) jacks must be connected to a stereo TV or an external stereo amplifier and speakers. (See pp. 12, 14, 15.) • If ...• Refer to normal audio. • Hi-Fi and normal audio playback volume level may differ. 27 *Important: If a remote control button does not work when pressed, press the VCR button on p. 26. • Arrow indicates selection. 3 Do a recording. Standard stereo tapes will playback with true stereo sound. ...
.... See p. 20. 2 Press AUDIO (SAP/Hi-Fi) to stereo recordings in monaural sound. • To listen to Hi-Fi stereo playback, the DECK AUDIO (L/R) jacks must be connected to a stereo TV or an external stereo amplifier and speakers. (See pp. 12, 14, 15.) • If ...• Refer to normal audio. • Hi-Fi and normal audio playback volume level may differ. 27 *Important: If a remote control button does not work when pressed, press the VCR button on p. 26. • Arrow indicates selection. 3 Do a recording. Standard stereo tapes will playback with true stereo sound. ...

PVD4732 User Guide
Page 28
... selection. 28 For assistance, please call : 1-800-211-PANA(7262) or send e-mail to : consumerproducts@panasonic.com POWER VCR DSS/ CABLE TV DVD NUMBER keys 3 Confirm code entry, ➛ press POWER to press ENTER after remote battery replacement. • Remote will not control every TV, Cable Box, or DSS made by the manufacturer listed. Setup...
... selection. 28 For assistance, please call : 1-800-211-PANA(7262) or send e-mail to : consumerproducts@panasonic.com POWER VCR DSS/ CABLE TV DVD NUMBER keys 3 Confirm code entry, ➛ press POWER to press ENTER after remote battery replacement. • Remote will not control every TV, Cable Box, or DSS made by the manufacturer listed. Setup...

PVD4732 User Guide
Page 30
...that index mark may not be counted in Stop or Play mode. 2 PROGRAM END SEARCH SEARCH START : FF EXIT :SEARCH Press FF/SLOW+ on the remote to start PROGRAM END SEARCH. • To cancel, press PLAY or STOP. Press FF/SLOW+ or REW/SLOW- before end point, ➛ tape ...plays to : consumerproducts@panasonic.com Index Search Program End Search 1 INDEX SEARCH ENTER INDEX NUMBER :1 USING 1- 9 KEYS FORWARD SEARCH :FF REVERSE SEARCH :REW NEXT :SEARCH EXIT :STOP 2 ...
...that index mark may not be counted in Stop or Play mode. 2 PROGRAM END SEARCH SEARCH START : FF EXIT :SEARCH Press FF/SLOW+ on the remote to start PROGRAM END SEARCH. • To cancel, press PLAY or STOP. Press FF/SLOW+ or REW/SLOW- before end point, ➛ tape ...plays to : consumerproducts@panasonic.com Index Search Program End Search 1 INDEX SEARCH ENTER INDEX NUMBER :1 USING 1- 9 KEYS FORWARD SEARCH :FF REVERSE SEARCH :REW NEXT :SEARCH EXIT :STOP 2 ...

PVD4732 User Guide
Page 31
... Auto Eject (Repeat Play must be off) Play ➛ Tape end ➛ Rewind ➛ Tape ejects if there is no record tab Commercial Skip VCR fast forwards (skips) over 1~3 minutes of recorded tape. 1 Press CM/ZERO in Play mode. • The skip time can be changed by pressing...Press 2 min Skip 3rd Press 3 min Skip • No indication appears on the remote and try the button again. *Important: If a remote control button does not work when pressed, press the VCR button on -screen. VCR Operation 31 REW/SLOWPLAY FF/SLOW+ STOP NUMBER keys SEARCH CM/ZERO Auto Operation Functions ...
... Auto Eject (Repeat Play must be off) Play ➛ Tape end ➛ Rewind ➛ Tape ejects if there is no record tab Commercial Skip VCR fast forwards (skips) over 1~3 minutes of recorded tape. 1 Press CM/ZERO in Play mode. • The skip time can be changed by pressing...Press 2 min Skip 3rd Press 3 min Skip • No indication appears on the remote and try the button again. *Important: If a remote control button does not work when pressed, press the VCR button on -screen. VCR Operation 31 REW/SLOWPLAY FF/SLOW+ STOP NUMBER keys SEARCH CM/ZERO Auto Operation Functions ...

PVD4732 User Guide
Page 32
... : ACTION 3 SET UP VCR REPEAT PLAY REMOTE WARN I NG AUTO SHUT-OFF : OFF : ON : OFF SELECT : SET: SET END : ACT I ON Press to select "REPEAT PLAY," and press SET to set to 0:00:00. 32 For assistance, please call : 1-800-211-PANA(7262) or send e-mail to : consumerproducts@panasonic.com Zero Search To...; DECK will go into FF or REW mode and stop at the last point the Counter was set "ON" or "OFF." • Play repeats at desired position to reset to "0:00:00". 3 Continue to record, playback etc. 4 Press STOP. 5 REW 12 : 3 0AM CH 02 0 : 30 : 30 Press CM/ZERO in DVD mode...
... : ACTION 3 SET UP VCR REPEAT PLAY REMOTE WARN I NG AUTO SHUT-OFF : OFF : ON : OFF SELECT : SET: SET END : ACT I ON Press to select "REPEAT PLAY," and press SET to set to 0:00:00. 32 For assistance, please call : 1-800-211-PANA(7262) or send e-mail to : consumerproducts@panasonic.com Zero Search To...; DECK will go into FF or REW mode and stop at the last point the Counter was set "ON" or "OFF." • Play repeats at desired position to reset to "0:00:00". 3 Continue to record, playback etc. 4 Press STOP. 5 REW 12 : 3 0AM CH 02 0 : 30 : 30 Press CM/ZERO in DVD mode...


