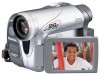
Digital Video Camera
Page 8
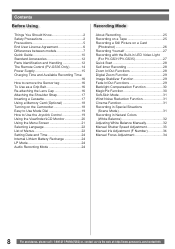
... Joystick Control 19 Using the Viewfinder/LCD Monitor 20 Using the Menu Screen 21 Selecting Language 22 List of Menus 22 Setting Date and Time 24 Internal Lithium Battery Recharge 24 LP Mode 24 Audio Recording Mode 24 Recording Mode About Recording 25 Recording on a Tape 25 Recording a Still Picture on a Card (Photoshot 26 Recording Yourself 27 Recording with the Built-in LED Video Light (For PV-GS31/PV-GS35 27 Quick Start 28 Self-timer Recording 28 Zoom In/Out Functions 28 Digital Zoom Function 29 Image Stabilizer Function...
... Joystick Control 19 Using the Viewfinder/LCD Monitor 20 Using the Menu Screen 21 Selecting Language 22 List of Menus 22 Setting Date and Time 24 Internal Lithium Battery Recharge 24 LP Mode 24 Audio Recording Mode 24 Recording Mode About Recording 25 Recording on a Tape 25 Recording a Still Picture on a Card (Photoshot 26 Recording Yourself 27 Recording with the Built-in LED Video Light (For PV-GS31/PV-GS35 27 Quick Start 28 Self-timer Recording 28 Zoom In/Out Functions 28 Digital Zoom Function 29 Image Stabilizer Function...
Digital Video Camera
Page 13
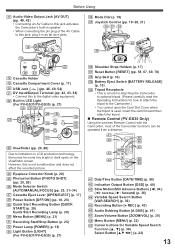
... does not affect the recorded picture. 24 Eyepiece Corrector Knob (p. 20) 25 Photoshot Button [PHOTO SHOT] (pp. 25, 26) 26 Mode Selector Switch [AUTO/MANUAL/FOCUS] (pp. 25, 31~34) 27 Cassette Eject Lever [OPEN/EJECT] (p. 17) 28 Power Switch [OFF/ON] (pp. 18, 25) 29 Quick Start Recording Button [QUICK START] (p. 28) Quick Start Recording Lamp (p. 28) 30 Menu Button [MENU] (p. 21) 31 Recording Start/Stop Button (p. 25) 32 Power Lamp [POWER] (p. 18) 33 Light Button [LIGHT] (For PV-GS31/PV-GS35) (p. 27) 36...
... does not affect the recorded picture. 24 Eyepiece Corrector Knob (p. 20) 25 Photoshot Button [PHOTO SHOT] (pp. 25, 26) 26 Mode Selector Switch [AUTO/MANUAL/FOCUS] (pp. 25, 31~34) 27 Cassette Eject Lever [OPEN/EJECT] (p. 17) 28 Power Switch [OFF/ON] (pp. 18, 25) 29 Quick Start Recording Button [QUICK START] (p. 28) Quick Start Recording Lamp (p. 28) 30 Menu Button [MENU] (p. 21) 31 Recording Start/Stop Button (p. 25) 32 Power Lamp [POWER] (p. 18) 33 Light Button [LIGHT] (For PV-GS31/PV-GS35) (p. 27) 36...
Digital Video Camera
Page 19
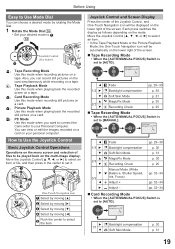
... Mode Recording Check p. 30 p. 25 ▼ 3/3 ◄ Manual Mode (White Balance, Shutter Speed, Iris, Focus) Adjust + pp. 32~34 pp. 32~34 ► Adjust - Move the Joystick Control or ►] to select an item or file, and then press in the center to set to your personal computer. Each press switches the display as follows depending on a card. : PC Mode Use this mode when you can view or edit the images recorded on a card on a tape...
... Mode Recording Check p. 30 p. 25 ▼ 3/3 ◄ Manual Mode (White Balance, Shutter Speed, Iris, Focus) Adjust + pp. 32~34 pp. 32~34 ► Adjust - Move the Joystick Control or ►] to select an item or file, and then press in the center to set to your personal computer. Each press switches the display as follows depending on a card. : PC Mode Use this mode when you can view or edit the images recorded on a card on a tape...
Digital Video Camera
Page 20
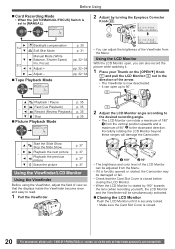
... Show Stop the Slide Show Playback the next picture Playback the previous picture Erase the picture p. 37 p. 37 p. 37 p. 37 Using the Viewfinder/LCD Monitor Using the Viewfinder Before using the Viewfinder, adjust the field of view so that the Card Slot Cover is rotated by turning the Eyepiece Corrector Knob 24 . 24 ► 1/2 ▼ Backlight compensation Soft Skin Mode ▼ 2/2 ◄ Manual Mode (White Balance, Shutter Speed, Iris, Focus) Adjust + ► Adjust - „ Tape Playback Mode One...
... Show Stop the Slide Show Playback the next picture Playback the previous picture Erase the picture p. 37 p. 37 p. 37 p. 37 Using the Viewfinder/LCD Monitor Using the Viewfinder Before using the Viewfinder, adjust the field of view so that the Card Slot Cover is rotated by turning the Eyepiece Corrector Knob 24 . 24 ► 1/2 ▼ Backlight compensation Soft Skin Mode ▼ 2/2 ◄ Manual Mode (White Balance, Shutter Speed, Iris, Focus) Adjust + ► Adjust - „ Tape Playback Mode One...
Digital Video Camera
Page 24
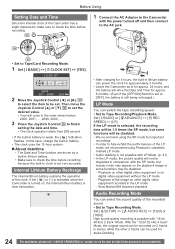
..." Mode. High sound-quality recording is possible with the power turned off and then connect to the AC jack. 34 35 • Set to Tape/Card Recording Mode. 1 Set [ BASIC] >> [ CLOCK SET] >> [YES]. In this case, charge the built-in battery. • The clock uses the 12-hour system. „ About date/time • The Date and Time function are driven by a built-in the LP mode - Playback on other digital video equipment recorded in lithium battery...
..." Mode. High sound-quality recording is possible with the power turned off and then connect to the AC jack. 34 35 • Set to Tape/Card Recording Mode. 1 Set [ BASIC] >> [ CLOCK SET] >> [YES]. In this case, charge the built-in battery. • The clock uses the 12-hour system. „ About date/time • The Date and Time function are driven by a built-in the LP mode - Playback on other digital video equipment recorded in lithium battery...
Digital Video Camera
Page 25
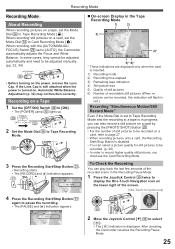
... Joystick Control [▼] 35 to select [ ]. • The [ ] indication is turned on, Automatic White Balance Adjustment (p. 32) may not function correctly. In some cases, they cannot be adjusted automatically and need to be recorded, this indication will flash in red.) Recording "Simultaneous Motion/Still Record Mode" Even if the Mode Dial is inserted. 1) Recording mode 2) Recording time elapsed 3) Remaining tape indication 4) Still picture size 5) Quality of still pictures 6) Number of recordable still pictures (When no picture can play back...
... Joystick Control [▼] 35 to select [ ]. • The [ ] indication is turned on, Automatic White Balance Adjustment (p. 32) may not function correctly. In some cases, they cannot be adjusted automatically and need to be recorded, this indication will flash in red.) Recording "Simultaneous Motion/Still Record Mode" Even if the Mode Dial is inserted. 1) Recording mode 2) Recording time elapsed 3) Remaining tape indication 4) Still picture size 5) Quality of still pictures 6) Number of recordable still pictures (When no picture can play back...
Digital Video Camera
Page 29
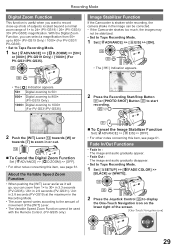
...] 1/2 35 29 Recording Mode Digital Zoom Function This function is shaken while recording, the camera shake in the image can be corrected. • If the Camcorder shakes too much, the images may not be used with the Remote Control. (PV-GS35 only) 12:34:56AM JAN 2 2005 2 Press the Recording Start/Stop Button 31 or [PHOTO SHOT] Button 25 to start recording. 25 31 „ To Cancel the Image Stabilizer Function Set [ ADVANCE] >> [ EIS...
...] 1/2 35 29 Recording Mode Digital Zoom Function This function is shaken while recording, the camera shake in the image can be corrected. • If the Camcorder shakes too much, the images may not be used with the Remote Control. (PV-GS35 only) 12:34:56AM JAN 2 2005 2 Press the Recording Start/Stop Button 31 or [PHOTO SHOT] Button 25 to start recording. 25 31 „ To Cancel the Image Stabilizer Function Set [ ADVANCE] >> [ EIS...
Digital Video Camera
Page 41
... Audio While Listening to a Pre-recorded Sound When pausing the audio dubbing, set the [ 12bit AUDIO] on the [ SETUP] Sub-Menu to [ST2] and you can check the pre-recorded sound. When the line input is erased. (If you wish to preserve the original sound, use the [12bit] Mode when recording.) • Audio Dubbing cannot be recorded on the Memory Card from scenes that have already been recorded on a cassette. 1 Set the Mode Dial 34 to Tape Playback Mode...
... Audio While Listening to a Pre-recorded Sound When pausing the audio dubbing, set the [ 12bit AUDIO] on the [ SETUP] Sub-Menu to [ST2] and you can check the pre-recorded sound. When the line input is erased. (If you wish to preserve the original sound, use the [12bit] Mode when recording.) • Audio Dubbing cannot be recorded on the Memory Card from scenes that have already been recorded on a cassette. 1 Set the Mode Dial 34 to Tape Playback Mode...
Digital Video Camera
Page 42
... sound from the Camcorder is output to the TV set • Check that has a DV input/output Terminal, and using the AV Cable 1 . • If the recorder has an S-Video Jack, then also connect an S-Video Cable 2 (not supplied). Refer to the instructions for the recorder. • Place a recorded cassette in the Camcorder, and an unrecorded DVD-RAM or cassette in the digital mode. • Set to Tape Playback Mode (Player/Recorder) 1 Connect the Camcorder and digital video equipment with the DV cable. 1 2 Turn...
... sound from the Camcorder is output to the TV set • Check that has a DV input/output Terminal, and using the AV Cable 1 . • If the recorder has an S-Video Jack, then also connect an S-Video Cable 2 (not supplied). Refer to the instructions for the recorder. • Place a recorded cassette in the Camcorder, and an unrecorded DVD-RAM or cassette in the digital mode. • Set to Tape Playback Mode (Player/Recorder) 1 Connect the Camcorder and digital video equipment with the DV cable. 1 2 Turn...
Digital Video Camera
Page 44
... the software to be installed from the CD-ROM. 4 Follow the instructions on the computer screen until the installation is complete. • Setup window will be downloaded. With a PC With a PC Using Camcorder with a PC An image stored on the DV Cassette or Memory Card can be possible to use the program with some types of personal computers. • A CD-ROM drive is required. It is open, type in "D:\InstMenu. Using the USB Driver Operating...
... the software to be installed from the CD-ROM. 4 Follow the instructions on the computer screen until the installation is complete. • Setup window will be downloaded. With a PC With a PC Using Camcorder with a PC An image stored on the DV Cassette or Memory Card can be possible to use the program with some types of personal computers. • A CD-ROM drive is required. It is open, type in "D:\InstMenu. Using the USB Driver Operating...
Digital Video Camera
Page 45
... the USB Cable only if you selected additional software. 7 Finish installation by following the on-screen instructions. • Click [Next] and proceed with the installation. For PV-GS19/PV-GS31 • If you have direct dial-up connection capability to the Internet, please download the USB Driver. • Please install USB Driver first before connecting the Camcorder to your computer has Windows Me/2000/XP, the USB Driver is not required to be displayed...
... the USB Cable only if you selected additional software. 7 Finish installation by following the on-screen instructions. • Click [Next] and proceed with the installation. For PV-GS19/PV-GS31 • If you have direct dial-up connection capability to the Internet, please download the USB Driver. • Please install USB Driver first before connecting the Camcorder to your computer has Windows Me/2000/XP, the USB Driver is not required to be displayed...
Digital Video Camera
Page 49
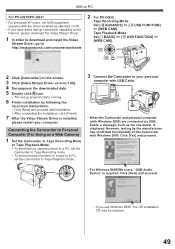
...; If you use Windows 98SE, the OS installation CD may be required. 49 Tape Playback Mode : Set [ BASIC] >> [ USB FUNCTION] >> [WEB CAM]. 35 30 2 Click [Camcorder] on the screen. 3 Click [Video Stream Driver version 1.00]. 4 Decompress the downloaded data. 5 Double click icon. • The set the Camcorder to Tape Playback mode. 3 Connect the Camcorder to http://www.panasonic.com/consumerdownloads 2 For PV-GS35 : Tape Recording Mode : Set [ ADVANCE] >> [ USB FUNCTION] >> [WEB CAM]. Click [Yes] and proceed. • For Windows 98SE/Me users, "USB Audio Device" is required...
...; If you use Windows 98SE, the OS installation CD may be required. 49 Tape Playback Mode : Set [ BASIC] >> [ USB FUNCTION] >> [WEB CAM]. 35 30 2 Click [Camcorder] on the screen. 3 Click [Video Stream Driver version 1.00]. 4 Decompress the downloaded data. 5 Double click icon. • The set the Camcorder to Tape Playback mode. 3 Connect the Camcorder to http://www.panasonic.com/consumerdownloads 2 For PV-GS35 : Tape Recording Mode : Set [ ADVANCE] >> [ USB FUNCTION] >> [WEB CAM]. Click [Yes] and proceed. • For Windows 98SE/Me users, "USB Audio Device" is required...
Digital Video Camera
Page 52
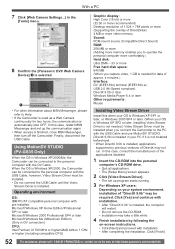
...'s CD-ROM drive. • Quit all applications. • The [Setup Menu] screen appears. 2 Click [Video Stream Driver]. • The set up program starts running. 3 For Windows XP users: Depending on -screen instructions. • Click [Next] and proceed with installation. • After "DirectX 9.0b" is installed. Using MotionDV STUDIO (PV-GS35 Only) When the OS is finished, close MSN Messenger, then turn off the Camcorder. Finally, disconnect the USB Cable. With...
...'s CD-ROM drive. • Quit all applications. • The [Setup Menu] screen appears. 2 Click [Video Stream Driver]. • The set up program starts running. 3 For Windows XP users: Depending on -screen instructions. • Click [Next] and proceed with installation. • After "DirectX 9.0b" is installed. Using MotionDV STUDIO (PV-GS35 Only) When the OS is finished, close MSN Messenger, then turn off the Camcorder. Finally, disconnect the USB Cable. With...
Digital Video Camera
Page 55
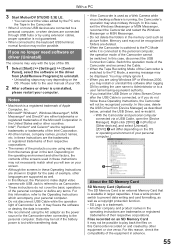
... checking software is switched to the PC Mode, a warning message may not be displayed. Memory card may be recognized if folders are the registered trademarks or trademarks of the Camcorder is running, the Camcorder's operation may stop midway through USB hubs or by using may differ from [Add/Remove Programs] to play back the files on the OS. Switch the operation mode of the Camcorder and reconnect the Cable. • When the Tape Recording Mode...
... checking software is switched to the PC Mode, a warning message may not be displayed. Memory card may be recognized if folders are the registered trademarks or trademarks of the Camcorder is running, the Camcorder's operation may stop midway through USB hubs or by using may differ from [Add/Remove Programs] to play back the files on the OS. Switch the operation mode of the Camcorder and reconnect the Cable. • When the Tape Recording Mode...
Digital Video Camera
Page 58
... indications lights up or flashes, please check the Camcorder. NEED HEAD CLEANING: The video heads are dirty. (p. 65) Textual Indications DEW DETECT/ EJECT TAPE: Condensation has occurred. Set [ BASIC] or [ ADVANCE] >> [ DATE/TIME] >> [D/T], [DATE] or [OFF]. (pp. 22, 23) • The Camcorder automatically records the date and time of picture taking on the tape. • You can change the Date/Time Indication by repeatedly pressing the [DATE/TIME] Button on the Remote Control (PV-GS35 only). „ To Change the Display Mode Set [ SETUP] >> [ DISPLAY] >> [ON...
... indications lights up or flashes, please check the Camcorder. NEED HEAD CLEANING: The video heads are dirty. (p. 65) Textual Indications DEW DETECT/ EJECT TAPE: Condensation has occurred. Set [ BASIC] or [ ADVANCE] >> [ DATE/TIME] >> [D/T], [DATE] or [OFF]. (pp. 22, 23) • The Camcorder automatically records the date and time of picture taking on the tape. • You can change the Date/Time Indication by repeatedly pressing the [DATE/TIME] Button on the Remote Control (PV-GS35 only). „ To Change the Display Mode Set [ SETUP] >> [ DISPLAY] >> [ON...
Digital Video Camera
Page 59
You are attempting to the Camcorder. CARD FULL: Card does not have sufficient memory remaining. DISCONNECT USB CABLE: You are attempting to turn on the power 2 Beeps • When you pause recording 2 Beeps 4 times • When a cassette with its erasure prevention tab set to play back data not compatible with the USB Cable connected to play back a tape section that does not support USB2.0. CHANGE TO MANUAL MODE: You are attempting to select an item other...
You are attempting to the Camcorder. CARD FULL: Card does not have sufficient memory remaining. DISCONNECT USB CABLE: You are attempting to turn on the power 2 Beeps • When you pause recording 2 Beeps 4 times • When a cassette with its erasure prevention tab set to play back data not compatible with the USB Cable connected to play back a tape section that does not support USB2.0. CHANGE TO MANUAL MODE: You are attempting to select an item other...
Digital Video Camera
Page 60
... recommend using a Panasonic SD Memory Card. • When using Quick Start reduces the recordable time. • The zoom magnification may degrade or not play back data recorded on this Camcorder. „ Recording with the Built-in LED Video Light • The subject should be recorded after you release the [PHOTO SHOT] Button. • If [ BASIC] >> [ SELF TIMER] >> [YES] is used in quick start mode is set . • When you set , the Camcorder records the maximum number of pictures recordable...
... recommend using a Panasonic SD Memory Card. • When using Quick Start reduces the recordable time. • The zoom magnification may degrade or not play back data recorded on this Camcorder. „ Recording with the Built-in LED Video Light • The subject should be recorded after you release the [PHOTO SHOT] Button. • If [ BASIC] >> [ SELF TIMER] >> [YES] is used in quick start mode is set . • When you set , the Camcorder records the maximum number of pictures recordable...

Digital Video Camera
Page 61
... skin color, they will be set to display the image when you turn the Image Stabilizer off . • White Balance cannot be set. • The Shutter Speed cannot be adjusted. • The Scene Mode cannot be set. • When recording with strong light or a highly reflective subject, vertical lines of CCD longer up to the naked eyes can be recorded brightly. Others „ Zoom Microphone Function • The Zoom Microphone Function may not work effectively...
... skin color, they will be set to display the image when you turn the Image Stabilizer off . • White Balance cannot be set. • The Shutter Speed cannot be adjusted. • The Scene Mode cannot be set. • When recording with strong light or a highly reflective subject, vertical lines of CCD longer up to the naked eyes can be recorded brightly. Others „ Zoom Microphone Function • The Zoom Microphone Function may not work effectively...
Digital Video Camera
Page 68
... a tape portion that is working, focusing shifts into the manual mode. To hear the sounds separately, set [ SETUP] >> [ AUDIO OUT] >> [STEREO] and reproduced a picture containing the main sound and sub sound? If you attempting to [ST1] or [ST2]. (p. 41) • Have you continue ordinary recording or playback, the indication is displayed in red or yellow in LP mode? SEARCH] button on the Remote Control to cancel the variable speed search function. (PV-GS35...
... a tape portion that is working, focusing shifts into the manual mode. To hear the sounds separately, set [ SETUP] >> [ AUDIO OUT] >> [STEREO] and reproduced a picture containing the main sound and sub sound? If you attempting to [ST1] or [ST2]. (p. 41) • Have you continue ordinary recording or playback, the indication is displayed in red or yellow in LP mode? SEARCH] button on the Remote Control to cancel the variable speed search function. (PV-GS35...
Digital Video Camera
Page 69
... displayed on the screen. Remove the cassette or the card for the Remote Control correct? • Did you press the [MENU] Button or the Recording Start/Stop Button? If so, the Camcorder needs repair. When you attempt to pages 44~45. The Camcorder malfunctions on editing, dubbing from digital video equipment, or using the head cleaner for digital video. (p. 65) • If the terminal for the AV cable is soiled, noises may be deleted...
... displayed on the screen. Remove the cassette or the card for the Remote Control correct? • Did you press the [MENU] Button or the Recording Start/Stop Button? If so, the Camcorder needs repair. When you attempt to pages 44~45. The Camcorder malfunctions on editing, dubbing from digital video equipment, or using the head cleaner for digital video. (p. 65) • If the terminal for the AV cable is soiled, noises may be deleted...


