
PTAE3000U User Guide
Page 2
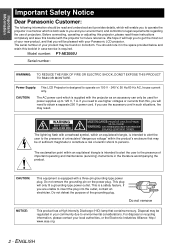
... new product, and that you will need to obtain a separate 250 V power cord. The serial number of uninsulated "dangerous voltage" within the product's enclosure that contains mercury. If you and your Panasonic LCD projector. CAUTION: The AC power cord which is supplied with arrowhead symbol, within an equilateral triangle is equipped with your environment, and conforms to legal requirements regarding the use...
... new product, and that you will need to obtain a separate 250 V power cord. The serial number of uninsulated "dangerous voltage" within the product's enclosure that contains mercury. If you and your Panasonic LCD projector. CAUTION: The AC power cord which is supplied with arrowhead symbol, within an equilateral triangle is equipped with your environment, and conforms to legal requirements regarding the use...
PTAE3000U User Guide
Page 4
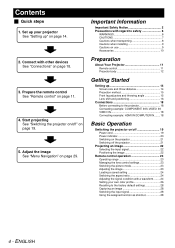
.../ VIDEO IN 18 Connecting example: HDMI IN/COMPUTER IN........ 18 Basic Operation Switching the projector on/off the projector 21 Projecting an image 22 Selecting the input signal 22 Positioning the image 22 Remote control operation 23 Operating range 23 Managing the lens control settings 23 Switching the picture mode 23 Adjusting the image 23 Loading a saved setting 24 Switching the aspect ratio 24 Adjusting the signal condition with regard to the factory default settings 28 Capturing an image 28 Switching the input signal 28 Using...
.../ VIDEO IN 18 Connecting example: HDMI IN/COMPUTER IN........ 18 Basic Operation Switching the projector on/off the projector 21 Projecting an image 22 Selecting the input signal 22 Positioning the image 22 Remote control operation 23 Operating range 23 Managing the lens control settings 23 Switching the picture mode 23 Adjusting the image 23 Loading a saved setting 24 Switching the aspect ratio 24 Adjusting the signal condition with regard to the factory default settings 28 Capturing an image 28 Switching the input signal 28 Using...
PTAE3000U User Guide
Page 5
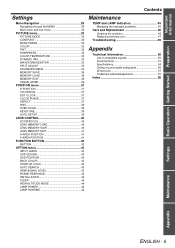
... POSITION 41 FUNCTION BUTTON 42 BUTTON 42 OPTION menu 43 INPUT GUIDE 43 OSD DESIGN 43 OSD POSITION 43 BACK COLOR 43 STARTUP LOGO 43 AUTO SEARCH 43 HDMI SIGNAL LEVEL 43 FRAME RESPONSE 43 INSTALLATION 44 SLEEP 44 HIGH ALTITUDE MODE 44 LAMP POWER 44 LAMP RUNTIME 44 Maintenance TEMP and LAMP Indicators 45 Managing the indicated problems 45 Care and Replacement 46 Cleaning the projector 46 Replacing the lamp unit 47 Troubleshooting 49 Appendix...
... POSITION 41 FUNCTION BUTTON 42 BUTTON 42 OPTION menu 43 INPUT GUIDE 43 OSD DESIGN 43 OSD POSITION 43 BACK COLOR 43 STARTUP LOGO 43 AUTO SEARCH 43 HDMI SIGNAL LEVEL 43 FRAME RESPONSE 43 INSTALLATION 44 SLEEP 44 HIGH ALTITUDE MODE 44 LAMP POWER 44 LAMP RUNTIME 44 Maintenance TEMP and LAMP Indicators 45 Managing the indicated problems 45 Care and Replacement 46 Cleaning the projector 46 Replacing the lamp unit 47 Troubleshooting 49 Appendix...

PTAE3000U User Guide
Page 6
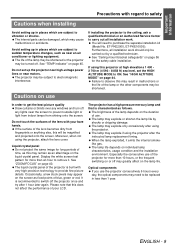
... a plastic bag and keep them onto the projector, as carpets or sponge mats. Do not allow the + and - Do not install this can be installed near any foreign objects into a bundle. If the power cord is overloaded (for example, by a qualified technician. Ask an Authorized Service Center to carry out any inspection, adjustment and repair work (such as necklaces or...
... a plastic bag and keep them onto the projector, as carpets or sponge mats. Do not allow the + and - Do not install this can be installed near any foreign objects into a bundle. If the power cord is overloaded (for example, by a qualified technician. Ask an Authorized Service Center to carry out any inspection, adjustment and repair work (such as necklaces or...
PTAE3000U User Guide
Page 7
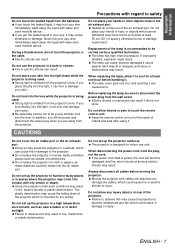
... port [allow at least one hour before moving the projector. Do not set up the projector in humid or dusty places or in direct sunlight. Do not use only. In addition, turn off the power and disconnect the power plug when you get the leaked liquid in damage or injury. When replacing the lamp, allow infants or pets to touch the remote control...
... port [allow at least one hour before moving the projector. Do not set up the projector in humid or dusty places or in direct sunlight. Do not use only. In addition, turn off the power and disconnect the power plug when you get the leaked liquid in damage or injury. When replacing the lamp, allow infants or pets to touch the remote control...
PTAE3000U User Guide
Page 9
... malfunctions or the life of blue, green or red. Liquid crystal panel Do not project the same image for more than 10 hours, or the frequent switching on or off the projector once and try after 1 hour later again. See "ZOOM/FOCUS" on page 45. The projector has a high pressure mercury lamp and that this may remain as near an air conditioner or lighting equipment. See "TEMP indicator" on page...
... malfunctions or the life of blue, green or red. Liquid crystal panel Do not project the same image for more than 10 hours, or the frequent switching on or off the projector once and try after 1 hour later again. See "ZOOM/FOCUS" on page 45. The projector has a high pressure mercury lamp and that this may remain as near an air conditioner or lighting equipment. See "TEMP indicator" on page...
PTAE3000U User Guide
Page 11
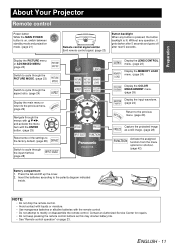
...) Display the COLOR MANAGEMENT menu. (page 26) Display the input waveform. (page 24) Return to the previous menu. (page 29) Capture the projected image as this may shorten battery life. • See "Remote control operation" on , switch between standby mode and projection mode. (page 21) Remote control signal emitter Emit remote control signal. (page 23) Button backlight When any operation, it gets darker after 5 seconds and goes off after next 5 seconds. Preparation About Your Projector Remote control Power button While...
...) Display the COLOR MANAGEMENT menu. (page 26) Display the input waveform. (page 24) Return to the previous menu. (page 29) Capture the projected image as this may shorten battery life. • See "Remote control operation" on , switch between standby mode and projection mode. (page 21) Remote control signal emitter Emit remote control signal. (page 23) Button backlight When any operation, it gets darker after 5 seconds and goes off after next 5 seconds. Preparation About Your Projector Remote control Power button While...

PTAE3000U User Guide
Page 13
... Connect a S-VIDEO signal cable. ENGLISH - 13 Compatible with the projector. Top cover Hold the top cover at the back corner and slightly push up to open. (page 47) Front leg adjusters Screw up/down to adjust the projection angle. (page 15) Lens cover attachment hole Air intake port AC IN Connect the power cord to supply electronic power to the projector. (page 19) Safety cable attachment point Attach the safety cable when mounted on the ceiling...
... Connect a S-VIDEO signal cable. ENGLISH - 13 Compatible with the projector. Top cover Hold the top cover at the back corner and slightly push up to open. (page 47) Front leg adjusters Screw up/down to adjust the projection angle. (page 15) Lens cover attachment hole Air intake port AC IN Connect the power cord to supply electronic power to the projector. (page 19) Safety cable attachment point Attach the safety cable when mounted on the ceiling...

PTAE3000U User Guide
Page 20
.... When the TEMP indicator is switched on again when cooling the lamp and recovering to project. NOTE: • See "TEMP indicator" on and the projector is in standby mode is switched off . Basic Operation 20 - Switching the projector on and the projector is getting ready to projection mode. The power button is switched on /off or unplug the power cord. • The electric consumption in standby mode. The power button is flashing, the power indicator will not light. Projecting. The power button is...
.... When the TEMP indicator is switched on again when cooling the lamp and recovering to project. NOTE: • See "TEMP indicator" on and the projector is in standby mode is switched off . Basic Operation 20 - Switching the projector on and the projector is getting ready to projection mode. The power button is switched on /off or unplug the power cord. • The electric consumption in standby mode. The power button is flashing, the power indicator will not light. Projecting. The power button is...

PTAE3000U User Guide
Page 21
... "LAMP POWER" on page 44. • When starting up in OPTION menu to switch the power off the MAIN POWER button. 3. The confirmation screen is operating, some small rattling or tinkling sound may be heard. Press the power button. NOTE: • When the internal cooling fan is displayed. ENGLISH - 21 Attach the lens cover. Remove the lens cover from the lens. 2. See "STARTUP LOGO" on /off the projector Power indicator (3) (1) Basic Operation (2) 1. Switching off (3) (2) 1. The power indicator lights up...
... "LAMP POWER" on page 44. • When starting up in OPTION menu to switch the power off the MAIN POWER button. 3. The confirmation screen is operating, some small rattling or tinkling sound may be heard. Press the power button. NOTE: • When the internal cooling fan is displayed. ENGLISH - 21 Attach the lens cover. Remove the lens cover from the lens. 2. See "STARTUP LOGO" on /off the projector Power indicator (3) (1) Basic Operation (2) 1. Switching off (3) (2) 1. The power indicator lights up...

PTAE3000U User Guide
Page 22
... screen. Adjust the focus and the projected image size. Screw down the front leg adjusters and adjust the angle vertically. Switch on page 24. 2. Adjust the angle of the FOCUS and ZOOM buttons to select the required aspect mode. See "Switching the aspect ratio" on the connected devices. Press the play button of the image by the remote control. Positioning the image 1. See "Front leg adjusters and throwing angle" on page 40. 3. See "LENS CONTROL...
... screen. Adjust the focus and the projected image size. Screw down the front leg adjusters and adjust the angle vertically. Switch on page 24. 2. Adjust the angle of the FOCUS and ZOOM buttons to select the required aspect mode. See "Switching the aspect ratio" on the connected devices. Press the play button of the image by the remote control. Positioning the image 1. See "Front leg adjusters and throwing angle" on page 40. 3. See "LENS CONTROL...

PTAE3000U User Guide
Page 23
... are any operation. Managing the lens control settings You can adjust the focus and zoom of the projector and press the required buttons to display the LENS CONTROL menu. Press the button until the required setting is facing to the screen and press the required buttons to adjust. projected image, and save the settings. See "PICTURE MODE" on page 40. ENGLISH - 23 Q Facing to the projector Ensure the remote control emitter is facing to the remote control signal receptor...
... are any operation. Managing the lens control settings You can adjust the focus and zoom of the projector and press the required buttons to display the LENS CONTROL menu. Press the button until the required setting is facing to the screen and press the required buttons to adjust. projected image, and save the settings. See "PICTURE MODE" on page 40. ENGLISH - 23 Q Facing to the projector Ensure the remote control emitter is facing to the remote control signal receptor...

PTAE3000U User Guide
Page 26
Basic Operation Remote control operation Setting your own color profile You can adjust a selected color individually and save and retrieve under LOG for a few seconds and the result is displayed. PROFILE NORMAL CURSOR LOG PROFILE SAVE PROFILE DELETE PROFILE NAME CHANGE J Create a new profile Q Adjusting the selected color Select a color and adjust COLOR, TINT and BRIGHTNESS. 1. The projected image is captured, and the target cursor is fully stored, the...
Basic Operation Remote control operation Setting your own color profile You can adjust a selected color individually and save and retrieve under LOG for a few seconds and the result is displayed. PROFILE NORMAL CURSOR LOG PROFILE SAVE PROFILE DELETE PROFILE NAME CHANGE J Create a new profile Q Adjusting the selected color Select a color and adjust COLOR, TINT and BRIGHTNESS. 1. The projected image is captured, and the target cursor is fully stored, the...

PTAE3000U User Guide
Page 27
... USER2 USER3 2. Use F G I H to specify the location of the selected PICTURE MODE will be displayed. • If you switch the input signal before you apply COLOR MANAGEMENT. • When the LOG is displayed. Press the COLOR MANAGEMENT button and select the PROFILE menu. If you adjust the exact same color differently, both colors will affect each other and you might get unexpected results. • White, Black and...
... USER2 USER3 2. Use F G I H to specify the location of the selected PICTURE MODE will be displayed. • If you switch the input signal before you apply COLOR MANAGEMENT. • When the LOG is displayed. Press the COLOR MANAGEMENT button and select the PROFILE menu. If you adjust the exact same color differently, both colors will affect each other and you might get unexpected results. • White, Black and...

PTAE3000U User Guide
Page 29
... operation and return to the menu mode. NOTE: • See "Resetting to the factory default settings" on the left of an item by pressing I H to adjust or set the selected item. For items using a bar scale, the current settings are displayed on page 28 to reset each menu item. PICTURE H-POSITION POSITION V-POSITION ASPECT LANGUAGE WSS ON LENS CONTROL FUNCTION BUTTON OVER SCAN KEYSTONE OPTION SELECT RETURN ENTER 2. J Operating procedure 1. Menu...
... operation and return to the menu mode. NOTE: • See "Resetting to the factory default settings" on the left of an item by pressing I H to adjust or set the selected item. For items using a bar scale, the current settings are displayed on page 28 to reset each menu item. PICTURE H-POSITION POSITION V-POSITION ASPECT LANGUAGE WSS ON LENS CONTROL FUNCTION BUTTON OVER SCAN KEYSTONE OPTION SELECT RETURN ENTER 2. J Operating procedure 1. Menu...

PTAE3000U User Guide
Page 43
... option. HDMI SIGNAL LEVEL When an HDMI IN is detected, the last used input will be selected. FRAME RESPONSE You can minimise the time delay of the menu. NORMAL Prioritise the image quality FAST Prioritise the frame response Settings ENGLISH - 43 INPUT GUIDE When you can change the displaying position of image displayed for 15 seconds. The following display methods are detected and an input signal is not...
... option. HDMI SIGNAL LEVEL When an HDMI IN is detected, the last used input will be selected. FRAME RESPONSE You can minimise the time delay of the menu. NORMAL Prioritise the image quality FAST Prioritise the frame response Settings ENGLISH - 43 INPUT GUIDE When you can change the displaying position of image displayed for 15 seconds. The following display methods are detected and an input signal is not...
PTAE3000U User Guide
Page 45
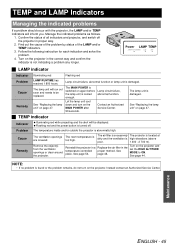
... turn on page 47. Replace the air filter in a temperature controlled place. See "Replacing the lamp unit" on the MAIN POWER after 90 seconds. Cause Remedy The ventilation openings are covered. Power LAMP TEMP J LAMP indicator Indicator Illuminating red Flashing red Problem Cause Remedy LAMP RUNTIME has reached 1 800 hours. Contact an Authorized Service Center. Flashing red and the power button is high elevations (above poor. 1 400 - 2 700 m). Find out the cause of the problem by status of all indicators and projector, and switch...
... turn on page 47. Replace the air filter in a temperature controlled place. See "Replacing the lamp unit" on the MAIN POWER after 90 seconds. Cause Remedy The ventilation openings are covered. Power LAMP TEMP J LAMP indicator Indicator Illuminating red Flashing red Problem Cause Remedy LAMP RUNTIME has reached 1 800 hours. Contact an Authorized Service Center. Flashing red and the power button is high elevations (above poor. 1 400 - 2 700 m). Find out the cause of the problem by status of all indicators and projector, and switch...
PTAE3000U User Guide
Page 47
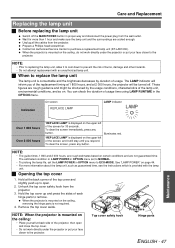
...; The guide times, 1 800 and 2 000 hours, are rough estimates based on page 44. • For more than 1 hour and make sure the lamp unit and the surroundings are rough guidance and might be turned off the MAIN POWER button in OPTION menu to ECO-MODE. When the projector is mounted on the ceiling, removing the hinge parts is mounted on the upper left of the screen...
...; The guide times, 1 800 and 2 000 hours, are rough estimates based on page 44. • For more than 1 hour and make sure the lamp unit and the surroundings are rough guidance and might be turned off the MAIN POWER button in OPTION menu to ECO-MODE. When the projector is mounted on the ceiling, removing the hinge parts is mounted on the upper left of the screen...

PTAE3000U User Guide
Page 48
... when you remove the lamp unit. • Do not switch the power on while the top cover is opened. • When the projector is mounted on . Connect the power cord to display the menu. 4. The confirmation screen will switch to reset the duration of the projector securely. Press the MENU button to the projector and a wall 6. Switch off the power button to standby mode after approximately 10 minutes of the top cover gently until the screws turn freely.
... when you remove the lamp unit. • Do not switch the power on while the top cover is opened. • When the projector is mounted on . Connect the power cord to display the menu. 4. The confirmation screen will switch to reset the duration of the projector securely. Press the MENU button to the projector and a wall 6. Switch off the power button to standby mode after approximately 10 minutes of the top cover gently until the screws turn freely.

PTAE3000U User Guide
Page 49
...; There may be connected. The picture is lit or flashes. The power cord may be tilted too much. The SHUTTER function may be weak. The lens focus may not have been set correctly. The projector may be attached to the projector may not have been inserted correctly. The input selection setting may still be in use. The Remote control does not operate. LAMP indicator is pale or grayish...
...; There may be connected. The picture is lit or flashes. The power cord may be tilted too much. The SHUTTER function may be weak. The lens focus may not have been set correctly. The projector may be attached to the projector may not have been inserted correctly. The input selection setting may still be in use. The Remote control does not operate. LAMP indicator is pale or grayish...


