Operating Instructions
Page 3
... Using the PJLink™ protocol 105 Using the serial terminals 106 Using the Remote 2 terminal 110 Special Features Information Monitor Lamp Indicators 111 Cleaning and replacement of air filter 112 Replacement of lamp unit 114 Notes when installing the ceiling mount bracket 116 Before asking for service ʜ try to check the following points...
... Using the PJLink™ protocol 105 Using the serial terminals 106 Using the Remote 2 terminal 110 Special Features Information Monitor Lamp Indicators 111 Cleaning and replacement of air filter 112 Replacement of lamp unit 114 Notes when installing the ceiling mount bracket 116 Before asking for service ʜ try to check the following points...
Operating Instructions
Page 7
... catch fire or explode. „ Replacement of the lamp unit should be sure to use the projector while the projection lens cover is still attached to observe this may result in fire or electric shocks. „ Do not disassemble the lamp unit. • If the lamp section breaks, it may cause injury.... „ Do not place liquid containers on top of children. • The battery can cause death by a qualified technician. • The lamp unit has high internal pressure. Getting Started „ Do not place the projector on top of surfaces which are unstable. • If the projector is...
... catch fire or explode. „ Replacement of the lamp unit should be sure to use the projector while the projection lens cover is still attached to observe this may result in fire or electric shocks. „ Do not disassemble the lamp unit. • If the lamp section breaks, it may cause injury.... „ Do not place liquid containers on top of children. • The battery can cause death by a qualified technician. • The lamp unit has high internal pressure. Getting Started „ Do not place the projector on top of surfaces which are unstable. • If the projector is...

Operating Instructions
Page 8
Do not bring your hands or face, or objects which cannot withstand heat. „ Do not use the old lamp unit. • The lamp section may break. „ Replacement of the lamp unit should only be carried out after it may explode or leak, and fire, injury or contamination of the battery .... • Failure to observe this may cause the projector to become unbalanced and fall, which could result. „ Do not bring your dealer to replace the lamp unit and check the inside of the projector. 8 - Precautions with regard to safety (continued) CAUTION „ Do not set up the projector in...
Do not bring your hands or face, or objects which cannot withstand heat. „ Do not use the old lamp unit. • The lamp section may break. „ Replacement of the lamp unit should only be carried out after it may explode or leak, and fire, injury or contamination of the battery .... • Failure to observe this may cause the projector to become unbalanced and fall, which could result. „ Do not bring your dealer to replace the lamp unit and check the inside of the projector. 8 - Precautions with regard to safety (continued) CAUTION „ Do not set up the projector in...
Operating Instructions
Page 11
... security measures. (pp. 88-94) • Use a password that somebody does make a direct inquiry, do not let the person know your password regularly. • Panasonic and its life cycle by the warm air from the set or other proper measures. • In rare cases, wafture can log in warm water...use the network function of the projection lens with bare hand. If dust adheres to the lens, it may appear like smoke. • Provide a lamp for replacement in advance. „ Maintenance Be sure to remove the power cord plug from the lens. Use a soft and clean cloth to clean the cabinet ...
... security measures. (pp. 88-94) • Use a password that somebody does make a direct inquiry, do not let the person know your password regularly. • Panasonic and its life cycle by the warm air from the set or other proper measures. • In rare cases, wafture can log in warm water...use the network function of the projection lens with bare hand. If dust adheres to the lens, it may appear like smoke. • Provide a lamp for replacement in advance. „ Maintenance Be sure to remove the power cord plug from the lens. Use a soft and clean cloth to clean the cabinet ...

Operating Instructions
Page 14
... to these vents to " l ". ENGLISH Centering the lens first may ease removal. n Air exhaust vents During installation do not allow these vents. s Lamp unit cover p. 115) This hinged panel swings down for "Error Condition". 5 Temperature monitor (TEMP p. 111) These LEDs illuminate and flash to indicate... burglar prevention cable to this hook port. 9 Adjustable feet p. 20) Use these feet to adjust the tilt of -Life", and BLINKING RED for lamp replacement. 14 - q Remote control receiver window (bottom p. 17) This also receives the signal beam coming from the remote control.
... to these vents to " l ". ENGLISH Centering the lens first may ease removal. n Air exhaust vents During installation do not allow these vents. s Lamp unit cover p. 115) This hinged panel swings down for "Error Condition". 5 Temperature monitor (TEMP p. 111) These LEDs illuminate and flash to indicate... burglar prevention cable to this hook port. 9 Adjustable feet p. 20) Use these feet to adjust the tilt of -Life", and BLINKING RED for lamp replacement. 14 - q Remote control receiver window (bottom p. 17) This also receives the signal beam coming from the remote control.

Operating Instructions
Page 18
...site operation is blocked. • The Remote Control receiver may not function properly in the light path or where devices are connected as fluorescent lamps. Setting projector ID number to simultaneously control multiple main units with a single remote control through the REMOTE1 IN/OUT terminal. Attention • Do... to "ALL" or from "1" to match the Remote's ID number with a length of the remote control are left exhausted. When the batteries are replaced, set the same ID number again. • The ID number can be set to match the intended projector. (p. 77) The ID number of ...
...site operation is blocked. • The Remote Control receiver may not function properly in the light path or where devices are connected as fluorescent lamps. Setting projector ID number to simultaneously control multiple main units with a single remote control through the REMOTE1 IN/OUT terminal. Attention • Do... to "ALL" or from "1" to match the Remote's ID number with a length of the remote control are left exhausted. When the batteries are replaced, set the same ID number again. • The ID number can be set to match the intended projector. (p. 77) The ID number of ...

Operating Instructions
Page 79
... 2. Press ENTER. Furthermore, the characters may flash depending on should still be installed to the projector. • When it is time to replace the lamp, the number of the lamps that illuminate will be greater than 2 000 hours will be turned on . TRIPLE QUAD DUAL L1 SINGLE L2 L2/L3/L4 L3 L1...
... 2. Press ENTER. Furthermore, the characters may flash depending on should still be installed to the projector. • When it is time to replace the lamp, the number of the lamps that illuminate will be greater than 2 000 hours will be turned on . TRIPLE QUAD DUAL L1 SINGLE L2 L2/L3/L4 L3 L1...

Operating Instructions
Page 97
... dealer. „ Error information page When is displayed on the status information screen, click it is now time to replace the lamp. LAMP STATUS The lamp has failed to display the error details. • Depending on the nature of trouble Parameter Description MAIN CPU BUS Trouble... environment where the temperature is high such as near a heating appliance. Consult your dealer. OUTPUT AIR TEMPERATURE The temperature around the lamp is not installed. APERTURE (CONTRAST-SHUTTER) Trouble has occurred in the shutter circuitry. Consult your dealer. ENGLISH - 97 It may...
... dealer. „ Error information page When is displayed on the status information screen, click it is now time to replace the lamp. LAMP STATUS The lamp has failed to display the error details. • Depending on the nature of trouble Parameter Description MAIN CPU BUS Trouble... environment where the temperature is high such as near a heating appliance. Consult your dealer. OUTPUT AIR TEMPERATURE The temperature around the lamp is not installed. APERTURE (CONTRAST-SHUTTER) Trouble has occurred in the shutter circuitry. Consult your dealer. ENGLISH - 97 It may...

Operating Instructions
Page 111
...lamp unit used hours have reached 1 800 hours. These lamps indicate the degree of abnormality by combination of the lamp replacement time and unusual internal temperature. LAMP 4 monitor (LAMP 4) LAMP 2 monitor (LAMP 2) Temperature monitor (TEMP) FILTER CLEANING OPEN CLOSE LAMP 1 monitor (LAMP 1) LAMP 3 monitor (LAMP 3) Name of monitor lamp Lamp... • Turn off the power and take a measure to the indication of 10 % to replace the lamp unit. ENGLISH - 111 Information LAMP monitor Blinking in red (3 times) Error is blocking the ventilation port. • Move the ...
...lamp unit used hours have reached 1 800 hours. These lamps indicate the degree of abnormality by combination of the lamp replacement time and unusual internal temperature. LAMP 4 monitor (LAMP 4) LAMP 2 monitor (LAMP 2) Temperature monitor (TEMP) FILTER CLEANING OPEN CLOSE LAMP 1 monitor (LAMP 1) LAMP 3 monitor (LAMP 3) Name of monitor lamp Lamp... • Turn off the power and take a measure to the indication of 10 % to replace the lamp unit. ENGLISH - 111 Information LAMP monitor Blinking in red (3 times) Error is blocking the ventilation port. • Move the ...

Operating Instructions
Page 113
Install the new static electric mesh filter to replace the static electric mesh filter. If the projector is used without any oil from the movable metal mesh filter. Consult the dealer. Pin guide Filter ... • The air filter must be installed in reverse. Movable metal mesh filter Rail Brush cover fixing screws (4 places) 9. In addition, when the lamp unit is replaced, also replace the static electric mesh filter. • Do not wash the static electric mesh filter with position A. • Hook the movable metal mesh filter onto...
Install the new static electric mesh filter to replace the static electric mesh filter. If the projector is used without any oil from the movable metal mesh filter. Consult the dealer. Pin guide Filter ... • The air filter must be installed in reverse. Movable metal mesh filter Rail Brush cover fixing screws (4 places) 9. In addition, when the lamp unit is replaced, also replace the static electric mesh filter. • Do not wash the static electric mesh filter with position A. • Hook the movable metal mesh filter onto...
Operating Instructions
Page 114
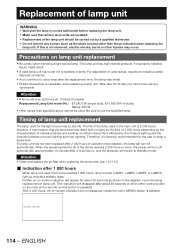
... lamp unit has high internal pressure. Timing of individual lamps and working conditions (lamp life is necessary when replacing a lamp unit. REPLACE THE LAMP 114 - If improperly handled, failure might result. • A used for all four lamp units are installed. • Replacement of the lamp ... will switch to standby mode. For disposition of used . Replacement Lamp Unit model No.: ET-LAD12K (single bulb), ET-LAD12KF (4 bulbs) Rating: 300 W • Other lamps than those indicated when replacing the lamp unit. Be sure to slip your hand when using a screwdriver...
... lamp unit has high internal pressure. Timing of individual lamps and working conditions (lamp life is necessary when replacing a lamp unit. REPLACE THE LAMP 114 - If improperly handled, failure might result. • A used for all four lamp units are installed. • Replacement of the lamp ... will switch to standby mode. For disposition of used . Replacement Lamp Unit model No.: ET-LAD12K (single bulb), ET-LAD12KF (4 bulbs) Rating: 300 W • Other lamps than those indicated when replacing the lamp unit. Be sure to slip your hand when using a screwdriver...
Operating Instructions
Page 115
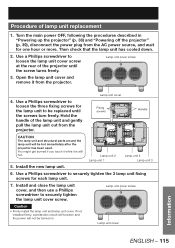
... the power plug from the projector. 4. Install the new lamp unit. 6. Hold the handle of the projector until the screws turn freely. Lamp unit 2 Lamp unit 1 Lamp unit 4 Lamp unit 3 5. Procedure of lamp unit replacement 1. Use a Phillips screwdriver to loosen the three fixing screws... for each lamp unit. 7. Use a Phillips screwdriver to securely tighten the lamp unit cover screw. If not...
... the power plug from the projector. 4. Install the new lamp unit. 6. Hold the handle of the projector until the screws turn freely. Lamp unit 2 Lamp unit 1 Lamp unit 4 Lamp unit 3 5. Procedure of lamp unit replacement 1. Use a Phillips screwdriver to loosen the three fixing screws... for each lamp unit. 7. Use a Phillips screwdriver to securely tighten the lamp unit cover screw. If not...

Operating Instructions
Page 118
...; Ambient temperature is too high. • Ambient temperature is not closed • Close the lamp unit cover. U41 Lamp 1 operating time warning U42 Lamp 2 operating time warning U43 Lamp 3 operating time warning • The lamp replacement period has arrived. Wait for the lamp to cool down and then turn on again does not clear the error display...
...; Ambient temperature is too high. • Ambient temperature is not closed • Close the lamp unit cover. U41 Lamp 1 operating time warning U42 Lamp 2 operating time warning U43 Lamp 3 operating time warning • The lamp replacement period has arrived. Wait for the lamp to cool down and then turn on again does not clear the error display...
Operating Instructions
Page 121
PT-D12000U PT-DZ12000U RGB2 input terminal 1 set each product. *3 When the projector is used , the ambient ...lens: DVI-D input module: SD-SDI input module: HD/SD-SDI input module: Dual link HD/SD-SDI input module: Replacement Lamp Unit: ET-PKD100H ET-PKD100S ET-D75LE1, ET-D75LE2, ET-D75LE3, ET-D75LE4, ET-D75LE5, ET-D75LE6, ET-D75LE8 ... VD: TTL, high-impedance, positive/negative polarity automatically adjusted • HD/SYNC, and VD terminals are not compliant with lamp 4 lit, light output may differ depending on each for M3 pin jack Wired remote control, used for link control Remote2 ...
PT-D12000U PT-DZ12000U RGB2 input terminal 1 set each product. *3 When the projector is used , the ambient ...lens: DVI-D input module: SD-SDI input module: HD/SD-SDI input module: Dual link HD/SD-SDI input module: Replacement Lamp Unit: ET-PKD100H ET-PKD100S ET-D75LE1, ET-D75LE2, ET-D75LE3, ET-D75LE4, ET-D75LE5, ET-D75LE6, ET-D75LE8 ... VD: TTL, high-impedance, positive/negative polarity automatically adjusted • HD/SYNC, and VD terminals are not compliant with lamp 4 lit, light output may differ depending on each for M3 pin jack Wired remote control, used for link control Remote2 ...
Operating Instructions
Page 126
... 53 Before asking for service 117 Blanking adjustment 64 C Changing the security password 89 Changing the text 89 Cleaning and replacement of air filter 112 Clock phase adjustment 62 Compatible Signals 122 Connecting the power cord 37 Connecting with personal computers 29 ...remove the projection lens ŋŋŋŋ 36 I Indication of monitor lamp 111 Initialize 84 Installation dimensions diagram 26 Installation Setting 78 Installing the input module 30 L Lamp relay 80 Lamp select 79 Lamp unit replacement 115 Large Screen Correction 72 List of P IN P 124 Load all ...
... 53 Before asking for service 117 Blanking adjustment 64 C Changing the security password 89 Changing the text 89 Cleaning and replacement of air filter 112 Clock phase adjustment 62 Compatible Signals 122 Connecting the power cord 37 Connecting with personal computers 29 ...remove the projection lens ŋŋŋŋ 36 I Indication of monitor lamp 111 Initialize 84 Installation dimensions diagram 26 Installation Setting 78 Installing the input module 30 L Lamp relay 80 Lamp select 79 Lamp unit replacement 115 Large Screen Correction 72 List of P IN P 124 Load all ...


