
Lcd Projector
Page 5
... Getting Started Setting up 14 Screen size and throw distance 14 Projection method 14 Lens shift and positioning 15 Connections 15 Before connecting to the projector 15 Technical Information 30 Ceiling mount bracket safeguards 30 List of compatible signals 31 Specifications 32 Trademark acknowledgements 34 Dimensions 34 Index 35 Basic Operation Switching the...
... Getting Started Setting up 14 Screen size and throw distance 14 Projection method 14 Lens shift and positioning 15 Connections 15 Before connecting to the projector 15 Technical Information 30 Ceiling mount bracket safeguards 30 List of compatible signals 31 Specifications 32 Trademark acknowledgements 34 Dimensions 34 Index 35 Basic Operation Switching the...

Lcd Projector
Page 6
... qualified technician. zz Do not place the projector in fire, electric shocks or components deterioration. Important Information Precautions with wet hands. If the following problems occur, cut off the power supply. Continued use anything other than an authorized ceiling mount bracket. zz If you notice smoke, strange ... for an extended period of it or wrap it , place heavy objects on top of the projector in dust. Electric shocks can cause injury or accidents, such as ceiling mount brackets) may occur and fire will result. „„ON USE/INSTALLATION Do not place liquid...
... qualified technician. zz Do not place the projector in fire, electric shocks or components deterioration. Important Information Precautions with wet hands. If the following problems occur, cut off the power supply. Continued use anything other than an authorized ceiling mount bracket. zz If you notice smoke, strange ... for an extended period of it or wrap it , place heavy objects on top of the projector in dust. Electric shocks can cause injury or accidents, such as ceiling mount brackets) may occur and fire will result. „„ON USE/INSTALLATION Do not place liquid...
Lcd Projector
Page 8
...or surfaces as near stoves. Cautions when installing „„Do not use the old lamp unit. If the projector is installed in a place where vibrations are transmitted or mounted in a car or a vessel, vibrations or impacts will cause the outer casing or internal components to absorb the... done, dust will collect inside of high-voltage electrical power lines or power sources. You could fall or the projector could cause injury. zz Be especially careful not to a ceiling. Install the product in places which will be shortened. „„Be sure to ask a specialized technician when...
...or surfaces as near stoves. Cautions when installing „„Do not use the old lamp unit. If the projector is installed in a place where vibrations are transmitted or mounted in a car or a vessel, vibrations or impacts will cause the outer casing or internal components to absorb the... done, dust will collect inside of high-voltage electrical power lines or power sources. You could fall or the projector could cause injury. zz Be especially careful not to a ceiling. Install the product in places which will be shortened. „„Be sure to ask a specialized technician when...

Lcd Projector
Page 13
...to open the top cover other than replacing the lamp unit. •• See the functional instructions that is provided with the projector. Lens cover attachment hole Air intake port AC IN Connect the power cord to supply electronic power to adjust the projection angle. ...COMPONENT IN Connect a YPBPR signal cable. Safety cable attachment point Attach the safety cable when mounted on the ceiling. VIDEO IN Connect an RCA composite video cable. Connecting terminals HDMI IN Connect HDMI signal cables. ENGLISH - 13 Preparation JJ Back...
...to open the top cover other than replacing the lamp unit. •• See the functional instructions that is provided with the projector. Lens cover attachment hole Air intake port AC IN Connect the power cord to supply electronic power to adjust the projection angle. ...COMPONENT IN Connect a YPBPR signal cable. Safety cable attachment point Attach the safety cable when mounted on the ceiling. VIDEO IN Connect an RCA composite video cable. Connecting terminals HDMI IN Connect HDMI signal cables. ENGLISH - 13 Preparation JJ Back...

Lcd Projector
Page 14
... INSTALLATION: FRONT/DESK NOTE: •• A translucent screen is required for rear projection. •• When mounting the projector on the ceiling, the optional ceiling mount bracket (ET-PKE2000, ET-PKE1000S) is in shortening the component's life. •• Do not cover the ...176; Projection method You can adjust the projection size with any of the functional instructions that is required. •• See "Ceiling mount bracket safeguards" on a desk/floor and projecting from the actual measurements. Calculate and define the throw distance as follows. Throw distance...
... INSTALLATION: FRONT/DESK NOTE: •• A translucent screen is required for rear projection. •• When mounting the projector on the ceiling, the optional ceiling mount bracket (ET-PKE2000, ET-PKE1000S) is in shortening the component's life. •• Do not cover the ...176; Projection method You can adjust the projection size with any of the functional instructions that is required. •• See "Ceiling mount bracket safeguards" on a desk/floor and projecting from the actual measurements. Calculate and define the throw distance as follows. Throw distance...

Lcd Projector
Page 27
... You can check the duration of burns, damage and other hazards. •• Do not attempt replacement with the lamp unit. When the projector is mounted on the ceiling, removing the hinge parts is : LAMP POWER in OPTION menu set to NORMAL. •• To prolong the lamp life, set the ...The guide times, 1 800 and 2 000 hours, are rough estimates based on the upper left of usage. Illuminates red. NOTE: When the projector is mounted on the ceiling: •• Place yourself at the back side of the replacement timing at 1 800 hours, and at the back corner of the top cover...
... You can check the duration of burns, damage and other hazards. •• Do not attempt replacement with the lamp unit. When the projector is mounted on the ceiling, removing the hinge parts is : LAMP POWER in OPTION menu set to NORMAL. •• To prolong the lamp life, set the ...The guide times, 1 800 and 2 000 hours, are rough estimates based on the upper left of usage. Illuminates red. NOTE: When the projector is mounted on the ceiling: •• Place yourself at the back side of the replacement timing at 1 800 hours, and at the back corner of the top cover...

Lcd Projector
Page 28
... lamp unit while making sure that the power cannot be displayed and 333 Press the MENU button to display the menu. When the projector is mounted on the ceiling, keep the lamp unit paralleled when you remove the lamp unit. •• Do not switch the power on while the top... cover is opened. •• When the projector is mounted on . approximately 3 seconds. 222 Switch the power button. 777 The confirmation screen will switch to ...
... lamp unit while making sure that the power cannot be displayed and 333 Press the MENU button to display the menu. When the projector is mounted on the ceiling, keep the lamp unit paralleled when you remove the lamp unit. •• Do not switch the power on while the top... cover is opened. •• When the projector is mounted on . approximately 3 seconds. 222 Switch the power button. 777 The confirmation screen will switch to ...
Lcd Projector
Page 30
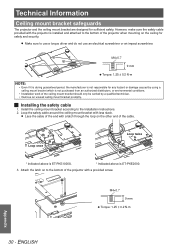
.... JJ Installing the safety cable 111 Install the ceiling mount bracket according to the Installation Instructions. 222 Loop the safety cable around the ceiling mount bracket with the projector is installed and attached to the bottom of the projector when mounting on the other end of the cable. Lace ...the cable of the projector with a latch through the loop on the ceiling for any hazard or damage caused ...
.... JJ Installing the safety cable 111 Install the ceiling mount bracket according to the Installation Instructions. 222 Loop the safety cable around the ceiling mount bracket with the projector is installed and attached to the bottom of the projector when mounting on the other end of the cable. Lace ...the cable of the projector with a latch through the loop on the ceiling for any hazard or damage caused ...
Lcd Projector
Page 35
... 13 Air exhaust port 12 Air filter 12 Replacing 26 Air intake port 13 B Batteries Accessory 10 Compartment 11 C CD-ROM Accessories 10 Menu 19 Ceiling mount bracket 30 Cleaning 26 COMPONENT IN Terminal 13 COMPUTER IN Terminal 13 Connections 15 CONTROL PANEL 12 D DEFAULT Remote control button 11 Remote control function...
... 13 Air exhaust port 12 Air filter 12 Replacing 26 Air intake port 13 B Batteries Accessory 10 Compartment 11 C CD-ROM Accessories 10 Menu 19 Ceiling mount bracket 30 Cleaning 26 COMPONENT IN Terminal 13 COMPUTER IN Terminal 13 Connections 15 CONTROL PANEL 12 D DEFAULT Remote control button 11 Remote control function...
