

Hd Home Cinema Projector
Page 6
...materials such as doing so can result in a plastic bag and keep them onto the projector, as carpets or sponge mats. Continued use other than an authorized ceiling mount bracket. Failure to prevent it into the projector or drop them away from the wall outlet and wipe it may result in dust.... Do not place the projector on top of it or wrap it from becoming covered in ...
...materials such as doing so can result in a plastic bag and keep them onto the projector, as carpets or sponge mats. Continued use other than an authorized ceiling mount bracket. Failure to prevent it into the projector or drop them away from the wall outlet and wipe it may result in dust.... Do not place the projector on top of it or wrap it from becoming covered in ...
Hd Home Cinema Projector
Page 7
... addition, turn off the power and disconnect the power cord plug when you place directly into the lens while the projector is mounted in the ceiling. Do not place your hands or face, or objects which cannot withstand heat close to the air outlet port. Electric shocks or ...deterioration. Strong light is better to overheat, leak, explode or catch fire, and burns or other injury may cause the falling down of the projector which could result. Replacement of the battery compartment and surrounding area may result. The lamp has high internal pressure. The lamp can result. ...
... addition, turn off the power and disconnect the power cord plug when you place directly into the lens while the projector is mounted in the ceiling. Do not place your hands or face, or objects which cannot withstand heat close to the air outlet port. Electric shocks or ...deterioration. Strong light is better to overheat, leak, explode or catch fire, and burns or other injury may cause the falling down of the projector which could result. Replacement of the battery compartment and surrounding area may result. The lamp has high internal pressure. The lamp can result. ...
Hd Home Cinema Projector
Page 15
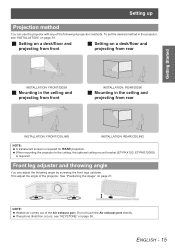
... INSTALLATION: FRONT/DESK J Mounting in the ceiling and projecting from front INSTALLATION: REAR/DESK J Mounting in the ceiling and projecting from rear INSTALLATION: FRONT/CEILING INSTALLATION: REAR/CEILING NOTE: A translucent screen is required. NOTE: Heated air comes out of the projector. Setting up /down. To set the desired method in the ceiling, the optional ceiling mount bracket (ET-PKX100, ET...
... INSTALLATION: FRONT/DESK J Mounting in the ceiling and projecting from front INSTALLATION: REAR/DESK J Mounting in the ceiling and projecting from rear INSTALLATION: FRONT/CEILING INSTALLATION: REAR/CEILING NOTE: A translucent screen is required. NOTE: Heated air comes out of the projector. Setting up /down. To set the desired method in the ceiling, the optional ceiling mount bracket (ET-PKX100, ET...
Hd Home Cinema Projector
Page 39
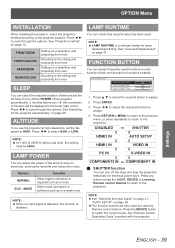
... Press I H to the projector position. Press RETURN or MENU to return to the previous menu, or press repeatedly to return to each function button and access the functions instantly. The function buttons are also used as in the ceiling and projecting from rear Mounting in a small room NOTE...detected, the function is a relevant matter for electrical power save on page 41. FRONT/DESK FRONT/CEILING REAR/DESK REAR/CEILING Setting on a desk/floor and projecting from front Mounting in the ceiling and projecting from front Setting on page 25. NOTE: See "Selecting the input signal" on page...
... Press I H to the projector position. Press RETURN or MENU to return to the previous menu, or press repeatedly to return to each function button and access the functions instantly. The function buttons are also used as in the ceiling and projecting from rear Mounting in a small room NOTE...detected, the function is a relevant matter for electrical power save on page 41. FRONT/DESK FRONT/CEILING REAR/DESK REAR/CEILING Setting on a desk/floor and projecting from front Mounting in the ceiling and projecting from front Setting on page 25. NOTE: See "Selecting the input signal" on page...
Hd Home Cinema Projector
Page 43
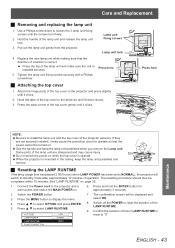
... seconds. 2. ENGLISH - 43 Pull out the lamp unit gently from the projector. Hook the tabs of the projector securely. Grip the handle and keep the lamp unit paralleled and remove. When the projector is mounted in LAMP RUNTIME is installed securely. 5. The resetting procedure should thus be ...until the screws turn freely. 2. Care and Replacement J Removing and replacing the lamp unit 1. Hold the handle of time in the ceiling, keep the lamp unit paralleled when you remove the Lamp unit. Press the MENU button to select OPTION and press ENTER. 5. Confirm...
... seconds. 2. ENGLISH - 43 Pull out the lamp unit gently from the projector. Hook the tabs of the projector securely. Grip the handle and keep the lamp unit paralleled and remove. When the projector is mounted in LAMP RUNTIME is installed securely. 5. The resetting procedure should thus be ...until the screws turn freely. 2. Care and Replacement J Removing and replacing the lamp unit 1. Hold the handle of time in the ceiling, keep the lamp unit paralleled when you remove the Lamp unit. Press the MENU button to select OPTION and press ENTER. 5. Confirm...
