
Owner Manual
Page 1
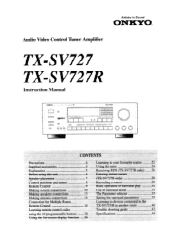
... source 22 Using the tuner 24 Receiving RDS (TX-SV727R only) 26 Entering station names (TX-SV727R only) 28 Recording a source 29 Basic operation of Surround play 32 Use of surround mode 33 The Parameter selector 33 Setting the surround parameters 35 Listening to devices connected to the TX-SV727/R in Sound ONKYO Audio Video Control Tuner Amplifier TX-SV727 TX-SV727R Instruction Manual OPJECYCO . ..0 • WA., k+ RI DV CO' CORO'S IIR tn,.W",•7. Artistry in another room 40 Trouble shooting guide 42 Specifications...
... source 22 Using the tuner 24 Receiving RDS (TX-SV727R only) 26 Entering station names (TX-SV727R only) 28 Recording a source 29 Basic operation of Surround play 32 Use of surround mode 33 The Parameter selector 33 Setting the surround parameters 35 Listening to devices connected to the TX-SV727/R in Sound ONKYO Audio Video Control Tuner Amplifier TX-SV727 TX-SV727R Instruction Manual OPJECYCO . ..0 • WA., k+ RI DV CO' CORO'S IIR tn,.W",•7. Artistry in another room 40 Trouble shooting guide 42 Specifications...
Owner Manual
Page 2
... a different source while you record, or put background music on your choice of the Onkyo A/V Tuner Amplifier. fection. Stereo mode: 100 watts per chan- nel (8 ohm). rate surround sound), the TX-SV727/R gives you a choice of EC directive 87/ 308/EEC. Your authorized Onkyo service center has details.) ■ On-screen Displays Easy-to operate the equipment. ors make adjusting the surround sound parameters simple. ■ Programmable Universal RI Remote Control The programmable universal remote gives...
... a different source while you record, or put background music on your choice of the Onkyo A/V Tuner Amplifier. fection. Stereo mode: 100 watts per chan- nel (8 ohm). rate surround sound), the TX-SV727/R gives you a choice of EC directive 87/ 308/EEC. Your authorized Onkyo service center has details.) ■ On-screen Displays Easy-to operate the equipment. ors make adjusting the surround sound parameters simple. ■ Programmable Universal RI Remote Control The programmable universal remote gives...
Owner Manual
Page 3
... operating and use instructions should not attempt to the presence of time. 16. If the plug does not fi t fully into the appliance; Heat - Power Sources - NO USER-SERVICEABLE PARTS INSIDE. The appliance should be sure the antenna system is intended to alert the user to service the appliance beyond that may block the ventilation openings; Power-Cord Protection - NATIONAL ELECTRICAL CODE S2898A ANTENNA DISCHARGE...
... operating and use instructions should not attempt to the presence of time. 16. If the plug does not fi t fully into the appliance; Heat - Power Sources - NO USER-SERVICEABLE PARTS INSIDE. The appliance should be sure the antenna system is intended to alert the user to service the appliance beyond that may block the ventilation openings; Power-Cord Protection - NATIONAL ELECTRICAL CODE S2898A ANTENNA DISCHARGE...

Owner Manual
Page 5
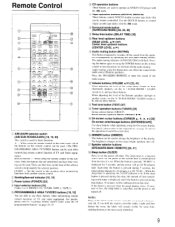
... to emulate the audience experience found in DOLBY STEREO theaters. nels are encoded, or matrixed, into digital form and produces reflected sound from the 282-00 remote control alone will not reach these effects, Rear (Surround) speakers and center speaker are not in the same room as the TX-SV727/R. You can also control most ONKYO CD players, cassette decks and digital audio tape decks that all be aimed at...
... to emulate the audience experience found in DOLBY STEREO theaters. nels are encoded, or matrixed, into digital form and produces reflected sound from the 282-00 remote control alone will not reach these effects, Rear (Surround) speakers and center speaker are not in the same room as the TX-SV727/R. You can also control most ONKYO CD players, cassette decks and digital audio tape decks that all be aimed at...

Owner Manual
Page 8
...; Selective tone control indicator 1-9; ,,It function display Frequency / input selector / character / Preset station / sleep timer / multisource volume level / delay time / center, rear volume level ft Recording out / multi-source indicators f2) RDS indicator (TX-SV727R only) 13; Control positions and names For more information about buttons or controls, turn to the page number listed in the brackets after each item. Front panel 0 © ® © 0000 CD 0 00 0 ONICY0 AUDIO DEO CONTROL TUN. FM stereo indicator Audio muting indicator I 7; Tape-2 monitor indicator 1*- Surround...
...; Selective tone control indicator 1-9; ,,It function display Frequency / input selector / character / Preset station / sleep timer / multisource volume level / delay time / center, rear volume level ft Recording out / multi-source indicators f2) RDS indicator (TX-SV727R only) 13; Control positions and names For more information about buttons or controls, turn to the page number listed in the brackets after each item. Front panel 0 © ® © 0000 CD 0 00 0 ONICY0 AUDIO DEO CONTROL TUN. FM stereo indicator Audio muting indicator I 7; Tape-2 monitor indicator 1*- Surround...
Owner Manual
Page 9
... A / B-SUB ROOM / LEARN switch to mute the sound of the multi -source. 4 Volume buttons (VOLUME Al!') [23, 41] When adjusting the level of TV and Video equipment.) B/SUB ROOM - LEARN - Press the SPEAKERS REMOTE to A, and use these buttons when operating using this time, the amount of time remaining on the remote controller are used when memorizing remote control function of the Front Main, Center or Rear (Surround) speakers, set . For details, please refer to 4, PHONO. IDEO-0 TAPE TAPE 2 1. 4E1 CD I I PoWER...
... A / B-SUB ROOM / LEARN switch to mute the sound of the multi -source. 4 Volume buttons (VOLUME Al!') [23, 41] When adjusting the level of TV and Video equipment.) B/SUB ROOM - LEARN - Press the SPEAKERS REMOTE to A, and use these buttons when operating using this time, the amount of time remaining on the remote controller are used when memorizing remote control function of the Front Main, Center or Rear (Surround) speakers, set . For details, please refer to 4, PHONO. IDEO-0 TAPE TAPE 2 1. 4E1 CD I I PoWER...

Owner Manual
Page 11
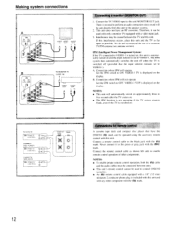
... Subwoofer speakers L LI R ink INPUT n Multi-source power amplifer Rear speakers (Surround) NPUT O Front Remote speakers (another room) Amplifier connections This unit is equipped with this unit alone. The shape, number and total capacity of the VCR to the VIDEO-2 and/or VIDEO-3 L and R "OUT" jacks. • When using a playback-only VCR, you to connect an external power amplifier. Be careful that is turned off . • No signals will be output from FRONT, REAR, CENTER and SUB WOOFER PRE...
... Subwoofer speakers L LI R ink INPUT n Multi-source power amplifer Rear speakers (Surround) NPUT O Front Remote speakers (another room) Amplifier connections This unit is equipped with this unit alone. The shape, number and total capacity of the VCR to the VIDEO-2 and/or VIDEO-3 L and R "OUT" jacks. • When using a playback-only VCR, you to connect an external power amplifier. Be careful that is turned off . • No signals will be output from FRONT, REAR, CENTER and SUB WOOFER PRE...
Owner Manual
Page 12
... MONITOR OUT jack. This unit does not have the ONKYO RI mark can be operated using the accessory remote control with the RI mark. IPM (Intelligent Power Management System) If the TV connected to VIDEO-1 is turned on, this unit is no need to perform an audio connection since sound will not operate Set the IPM switch to the speaker systems. 2. B. Connection where IPM will be sent directly...
... MONITOR OUT jack. This unit does not have the ONKYO RI mark can be operated using the accessory remote control with the RI mark. IPM (Intelligent Power Management System) If the TV connected to VIDEO-1 is turned on, this unit is no need to perform an audio connection since sound will not operate Set the IPM switch to the speaker systems. 2. B. Connection where IPM will be sent directly...
Owner Manual
Page 17
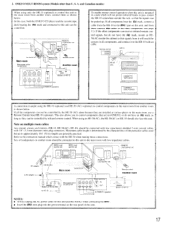
... HE-50(AC) or HE-10 should be connected with low capacitance shielded 2-wire coaxial cables with low impedance cables. Sets of the TX-SV727/R ,RONT SPE.EHS + - S. If all the components can be controlled by infrared remote control. Remote control aunts snort HR-10 HE-50 (AC) EX-SV727 R CASSETTE TAPE DECK COMPACT DISC PLAYER connection example using only the HR-I0 (optional) to pass, mount the HR-10 somewhere outside the...
... HE-50(AC) or HE-10 should be connected with low capacitance shielded 2-wire coaxial cables with low impedance cables. Sets of the TX-SV727/R ,RONT SPE.EHS + - S. If all the components can be controlled by infrared remote control. Remote control aunts snort HR-10 HE-50 (AC) EX-SV727 R CASSETTE TAPE DECK COMPACT DISC PLAYER connection example using only the HR-I0 (optional) to pass, mount the HR-10 somewhere outside the...
Owner Manual
Page 20
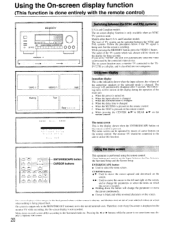
... main unit. When the surround mode is changed . play a separate sub-screen 20 If you set the Input Selector, the Rec Selector. Using the On-screen display function (This function is done entirely with the remote control) 1 == O- (0 o MEMORY CD 00 0 ==. =I ENTER/ESCAPE button CURSOR buttons This operation is performed using the remote control. The following items will be connected to the unit to select the menu screen. When pressing the CENTER A / V 'or REAR •/• on...
... main unit. When the surround mode is changed . play a separate sub-screen 20 If you set the Input Selector, the Rec Selector. Using the On-screen display function (This function is done entirely with the remote control) 1 == O- (0 o MEMORY CD 00 0 ==. =I ENTER/ESCAPE button CURSOR buttons This operation is performed using the remote control. The following items will be connected to the unit to select the menu screen. When pressing the CENTER A / V 'or REAR •/• on...

Owner Manual
Page 21
.../BS devices connected to the Image input. Group = C A • ID Preset = 9ch • ID DOLI3Y PRO LOGIC Sur. Select the number of the projector or TV used for the background. When there is replaced with the CURSOR buttons • or • on the Surround Setup screen and the 4 or 0. Mode 3: The image from the input signal is an image input signal, the input signal will display the main menu. 6. ENTER...
.../BS devices connected to the Image input. Group = C A • ID Preset = 9ch • ID DOLI3Y PRO LOGIC Sur. Select the number of the projector or TV used for the background. When there is replaced with the CURSOR buttons • or • on the Surround Setup screen and the 4 or 0. Mode 3: The image from the input signal is an image input signal, the input signal will display the main menu. 6. ENTER...

Owner Manual
Page 23
... jack. Adjust the tone controls (See the following explanation) PHONES Using headphones Stereo headphones with a standard binaural (stereo) plug can be connected to the REMOTE terminals. This indicates that unit. 5. Turn on when the AC power cord for the Front L and R speakers. Dimmer button This button can be used , refer to each section: Using the surround effects (see page 35, 36) Using the multi-source (see page 40, 41) Tone and balance controls Treble and bass and selective tone...
... jack. Adjust the tone controls (See the following explanation) PHONES Using headphones Stereo headphones with a standard binaural (stereo) plug can be connected to the REMOTE terminals. This indicates that unit. 5. Turn on when the AC power cord for the Front L and R speakers. Dimmer button This button can be used , refer to each section: Using the surround effects (see page 35, 36) Using the multi-source (see page 40, 41) Tone and balance controls Treble and bass and selective tone...

Owner Manual
Page 30
... equalizer to TAPE-2. Connect the VCR to turn on the rear panel. 2. REC OUT _1 1 I I 1 177E1 0- 'oc,1 I I I I I I I I I VIDEO -2 VIDEO -3 On screen 1. Select the Rec Selector screen from FM or AM while listening to another source, the tuner's frequency and group displays will be recorded. (Other than TAPE-2) 2. Note: • The source you selected to record will be recorded. Press the TAPE-2 MONITOR button to VIDEO-2, and/or VIDEO-3. Press the input selector button of the tape by turning TAPE...
... equalizer to TAPE-2. Connect the VCR to turn on the rear panel. 2. REC OUT _1 1 I I 1 177E1 0- 'oc,1 I I I I I I I I I VIDEO -2 VIDEO -3 On screen 1. Select the Rec Selector screen from FM or AM while listening to another source, the tuner's frequency and group displays will be recorded. (Other than TAPE-2) 2. Note: • The source you selected to record will be recorded. Press the TAPE-2 MONITOR button to VIDEO-2, and/or VIDEO-3. Press the input selector button of the tape by turning TAPE...

Owner Manual
Page 31
...) Monitor TV INPUT VIDEO INPUT AUDIO a VI E0 AUDIO O INPUT OUT NN , OUT 'l O V U.7 ( --s Rear panel of TX-SV727/R Recording to VIDEO-2 and VIDEO-3 a. played in step 1, and start recording on the other VCR (connected to he recorded while the REC OUT indicator is flashing. Start the source selected in red boxes. (*) 4. to VIDEO-3 (or 2)). Press the FM Input Selector and tune in a red box. (*) 3. To moid the TV picture with FM sound, receive...
...) Monitor TV INPUT VIDEO INPUT AUDIO a VI E0 AUDIO O INPUT OUT NN , OUT 'l O V U.7 ( --s Rear panel of TX-SV727/R Recording to VIDEO-2 and VIDEO-3 a. played in step 1, and start recording on the other VCR (connected to he recorded while the REC OUT indicator is flashing. Start the source selected in red boxes. (*) 4. to VIDEO-3 (or 2)). Press the FM Input Selector and tune in a red box. (*) 3. To moid the TV picture with FM sound, receive...

Owner Manual
Page 33
... actual theater. All input sound is provided with 5 kinds of Surround modes. Use of surround mode This unit is output from the front speakers directly. Select a mode by pressing the DOLBY PRO LOGIC button, DSP MODE button or BYPASS button. (When using video tape and laser discs with Dolby Surround. (Hall Simulates the atmosphere of music you do not wish to the lower items. Pressing the PARAMETER CONTROLLER button in each display can decode four channel sur- Surround mode ( Dolby Pro...
... actual theater. All input sound is provided with 5 kinds of Surround modes. Use of surround mode This unit is output from the front speakers directly. Select a mode by pressing the DOLBY PRO LOGIC button, DSP MODE button or BYPASS button. (When using video tape and laser discs with Dolby Surround. (Hall Simulates the atmosphere of music you do not wish to the lower items. Pressing the PARAMETER CONTROLLER button in each display can decode four channel sur- Surround mode ( Dolby Pro...

Owner Manual
Page 35
...the remote control to adjust the levels. 7. A VOLUME V 5,7 Remote control TEST 6, 8 . PARAMETER CONTROLLER. Setting the Dolby Pro Logic surround parameters When using video cassette tapes or video discs with Dolby surround. 2. Adjust the center level, and rear level. (Explanation 2, page 37) Use the • or V CENTER (REAR) LEVEL buttons on the remote control to turn the test tone on screen to select either NORMAL, WIDEBAND or PHANTOM. 4. Using remote control, press the SURROUND MODE button to the desired listening position. 5. Use the MASTER VOLUME to set the volume to...
...the remote control to adjust the levels. 7. A VOLUME V 5,7 Remote control TEST 6, 8 . PARAMETER CONTROLLER. Setting the Dolby Pro Logic surround parameters When using video cassette tapes or video discs with Dolby surround. 2. Adjust the center level, and rear level. (Explanation 2, page 37) Use the • or V CENTER (REAR) LEVEL buttons on the remote control to turn the test tone on screen to select either NORMAL, WIDEBAND or PHANTOM. 4. Using remote control, press the SURROUND MODE button to the desired listening position. 5. Use the MASTER VOLUME to set the volume to...

Owner Manual
Page 37
... relative volumes of program sources are used, the front, rear and center speakers should be set to PHANTOM, you cannot adjust the center level here. • When the test tone is set to the same volume. 3. When the center mode is on, if you press any button on the main unit or the remote control other than MASTER VOLUME, CENTER LEVEL, REAR LEVEL, SPEAKERS MAIN, DIMMERor MUTING, the test tone will automatically turn so you usually listen from the different speakers. • Set...
... relative volumes of program sources are used, the front, rear and center speakers should be set to PHANTOM, you cannot adjust the center level here. • When the test tone is set to the same volume. 3. When the center mode is on, if you press any button on the main unit or the remote control other than MASTER VOLUME, CENTER LEVEL, REAR LEVEL, SPEAKERS MAIN, DIMMERor MUTING, the test tone will automatically turn so you usually listen from the different speakers. • Set...

Owner Manual
Page 41
... control non-ONKYO devices from another room (sub room). Adjust the level using the VOLUME A / V buttons, set to turn off . 2. Press the SPEAKERS REMOTE button to illuminate the REMOTE indicator. • Press the MAIN button to A, the MASTER VOLUME affects the speaker volume in the main room. • The remote control can use the Input Selector button to press the MULTI SOURCE button before pressing the Input Selector button. Pressing the button again will turn off , and control from the TAPE- 1 and 2, and VIDEO...
... control non-ONKYO devices from another room (sub room). Adjust the level using the VOLUME A / V buttons, set to turn off . 2. Press the SPEAKERS REMOTE button to illuminate the REMOTE indicator. • Press the MAIN button to A, the MASTER VOLUME affects the speaker volume in the main room. • The remote control can use the Input Selector button to press the MULTI SOURCE button before pressing the Input Selector button. Pressing the button again will turn off , and control from the TAPE- 1 and 2, and VIDEO...
Owner Manual
Page 42
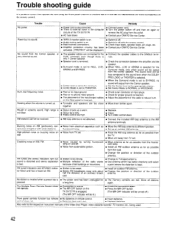
... for a long time. . The sound level will be displayed.) • Switch to off. • Switch to different position. together. Hum, low-frequency noise. • Poor or no input ground. • Poor or no sound will output from the road. • Change the position or direction of the TX-SV727/R. • AC fuse blown. • Connect power cord. • Turn the power button off with weak stations). Trouble shooting guide If a problem fir,t upc c the remote control.
... for a long time. . The sound level will be displayed.) • Switch to off. • Switch to different position. together. Hum, low-frequency noise. • Poor or no input ground. • Poor or no sound will output from the road. • Change the position or direction of the TX-SV727/R. • AC fuse blown. • Connect power cord. • Turn the power button off with weak stations). Trouble shooting guide If a problem fir,t upc c the remote control.
Owner Manual
Page 43
... switch the TV/Monitor mode automatically). In this case, please memorize the codes once again. The codes memorized by the button of your authorized ONKYO Service Center. Answers A : Hit multi-source button, select a source (CD, FM) then hit remote speaker button. A : Make sure you should see that of the existing remote control, or if the reaction time of the machine is shorter than one hour, memorized gotten". Do not use...
... switch the TV/Monitor mode automatically). In this case, please memorize the codes once again. The codes memorized by the button of your authorized ONKYO Service Center. Answers A : Hit multi-source button, select a source (CD, FM) then hit remote speaker button. A : Make sure you should see that of the existing remote control, or if the reaction time of the machine is shorter than one hour, memorized gotten". Do not use...


