
Owner Manual
Page 5
...channels • HDMI up-conversion from Audyssey Laboratories. Manufactured under license from composite video, SVideo, and component video TX-SR604/604E and TX-SR8460 Only • 90 watts per channel into 8 ohms, 20 Hz to -use onscreen setup menus • Preprogrammed remote controller for home and other AV components TX-SR674/674E and TX... copyright protection technology must be authorized by U.S. U.S. and foreign patents pending. VLSC is a trademark of Onkyo Corporation. Apple and iPod are trademarks of Xantech Corporation. "Xantech" is prohibited. 5 Use of XM Satellite ...
...channels • HDMI up-conversion from Audyssey Laboratories. Manufactured under license from composite video, SVideo, and component video TX-SR604/604E and TX-SR8460 Only • 90 watts per channel into 8 ohms, 20 Hz to -use onscreen setup menus • Preprogrammed remote controller for home and other AV components TX-SR674/674E and TX... copyright protection technology must be authorized by U.S. U.S. and foreign patents pending. VLSC is a trademark of Onkyo Corporation. Apple and iPod are trademarks of Xantech Corporation. "Xantech" is prohibited. 5 Use of XM Satellite ...
Owner Manual
Page 6
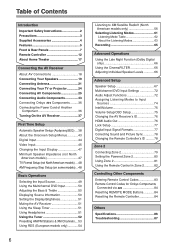
... Components 25 Connecting Audio Components 33 Connecting Onkyo Components .........36 Connecting the Power Cord of Another Component 36 Turning On the AV Receiver 37 First Time Setup Automatic Speaker Setup ...the Display Brightness 51 Muting the AV Receiver 51 Using the Sleep Timer 51 Using Headphones 51 Using the Tuner 52 Presetting AM/FM Stations & XM Channels....53 Using RDS (European models only ...to Input Sources 74 IntelliVolume 75 Volume Setup/OSD Setup 75 Changing the AV Receiver's ID 76 HDMI Audio Out 76 Lock Setup 77 Digital Input Signal Formats 77 Correcting Sound and ...
... Components 25 Connecting Audio Components 33 Connecting Onkyo Components .........36 Connecting the Power Cord of Another Component 36 Turning On the AV Receiver 37 First Time Setup Automatic Speaker Setup ...the Display Brightness 51 Muting the AV Receiver 51 Using the Sleep Timer 51 Using Headphones 51 Using the Tuner 52 Presetting AM/FM Stations & XM Channels....53 Using RDS (European models only ...to Input Sources 74 IntelliVolume 75 Volume Setup/OSD Setup 75 Changing the AV Receiver's ID 76 HDMI Audio Out 76 Lock Setup 77 Digital Input Signal Formats 77 Correcting Sound and ...
Owner Manual
Page 9
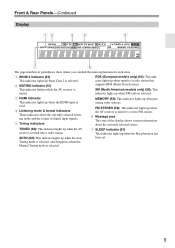
...mode and the format of the display shows various information about the currently selected source. This indicator flashes while the AV receiver is tuned to a radio station that supports RDS (Radio Data System). Tuning mode is selected, and disappears when the Manual ...HDMI input is used. 4 Listening mode & format indicators These indicators show where you can find the main explanation for each item. 1 ZONE 2 indicator (81) This indicator lights up when Zone 2 is selected. 2 MUTING indicator (51) RDS (European models only) (54): This indicator lights up when the AV receiver...
...mode and the format of the display shows various information about the currently selected source. This indicator flashes while the AV receiver is tuned to a radio station that supports RDS (Radio Data System). Tuning mode is selected, and disappears when the Manual ...HDMI input is used. 4 Listening mode & format indicators These indicators show where you can find the main explanation for each item. 1 ZONE 2 indicator (81) This indicator lights up when Zone 2 is selected. 2 MUTING indicator (51) RDS (European models only) (54): This indicator lights up when the AV receiver...
Owner Manual
Page 10
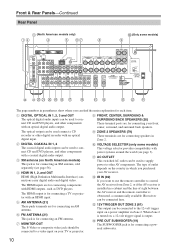
...digital video. L IR IN (82) If you purchased your TV or projector. The HDMI output is for connecting speakers in a cabinet and the line of outlet depends on your AV receiver. K AC OUTLET This switched AC outlet can be used to connect CD and DVD players... speakers. I ZONE 2 SPEAKERS (79) These terminals are for connecting an FM antenna. F FM ANTENNA (21) This jack is obstructed, a commercially available IR receiver can be connected here. Front & Rear Panels-Continued Rear Panel C (North American models only) 1B D 5 6G H J (Only some models) This voltage ...
...digital video. L IR IN (82) If you purchased your TV or projector. The HDMI output is for connecting speakers in a cabinet and the line of outlet depends on your AV receiver. K AC OUTLET This switched AC outlet can be used to connect CD and DVD players... speakers. I ZONE 2 SPEAKERS (79) These terminals are for connecting an FM antenna. F FM ANTENNA (21) This jack is obstructed, a commercially available IR receiver can be connected here. Front & Rear Panels-Continued Rear Panel C (North American models only) 1B D 5 6G H J (Only some models) This voltage ...
Owner Manual
Page 23
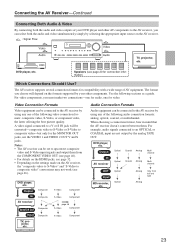
...Use the following audio connection formats: analog, optical, coaxial, or multichannel. Video Connection Formats Video equipment can be converted-composite video to S-Video or S-Video to the AV receiver, you must make two connections-one for connection information) Which Connections Should I Use? Output IN AV... connection format, bear in mind that the AV receiver doesn't convert between them from the COMPONENT VIDEO OUT (see page 46). • For details on the HDMI jacks, see page 32. • Depending on the settings made on the AV receiver, the "composite video to S-Video" and "S-Video...
...Use the following audio connection formats: analog, optical, coaxial, or multichannel. Video Connection Formats Video equipment can be converted-composite video to S-Video or S-Video to the AV receiver, you must make two connections-one for connection information) Which Connections Should I Use? Output IN AV... connection format, bear in mind that the AV receiver doesn't convert between them from the COMPONENT VIDEO OUT (see page 46). • For details on the HDMI jacks, see page 32. • Depending on the settings made on the AV receiver, the "composite video to S-Video" and "S-Video...
Owner Manual
Page 31
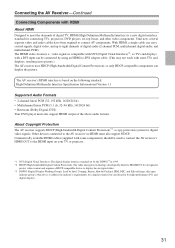
... picture. Connecting the AV Receiver-Continued Connecting Components with HDMI About HDMI Designed to the AV receiver via HDMI must also support HDMI output of the above audio formats. Other devices connected to meet the demands of digital audio (2-channel PCM, multichannel digital audio,...Protection): The video encryption technology developed by using an HDMI-to eight channels of digital TV, HDMI (High Definition Multimedia Interface) is to connect AV components. About Copyright Protection The AV receiver supports HDCP (High-bandwidth Digital Content Protection)*2, a copy...
... picture. Connecting the AV Receiver-Continued Connecting Components with HDMI About HDMI Designed to the AV receiver via HDMI must also support HDMI output of the above audio formats. Other devices connected to meet the demands of digital audio (2-channel PCM, multichannel digital audio,...Protection): The video encryption technology developed by using an HDMI-to eight channels of digital TV, HDMI (High Definition Multimedia Interface) is to connect AV components. About Copyright Protection The AV receiver supports HDCP (High-bandwidth Digital Content Protection)*2, a copy...
Owner Manual
Page 32
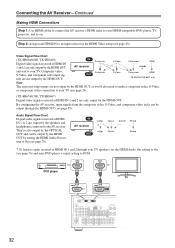
... HDMI OUT. HDMI OUT HDMI IN DVD player TV HDMI IN 1 HDMI 32 Connecting the AV Receiver-Continued Making HDMI Connections Step 1: Use HDMI cables to connect the AV receiver's HDMI jacks to your TV. Video Signal Flow Chart (TX-SR604/604E, TX-SR8460) Digital video signals received at HDMI IN 1 and 2 through the HDMI OUT (see page 24). (TX-SR674/674E, TX-SR8467) Digital video signals received at HDMI...
... HDMI OUT. HDMI OUT HDMI IN DVD player TV HDMI IN 1 HDMI 32 Connecting the AV Receiver-Continued Making HDMI Connections Step 1: Use HDMI cables to connect the AV receiver's HDMI jacks to your TV. Video Signal Flow Chart (TX-SR604/604E, TX-SR8460) Digital video signals received at HDMI IN 1 and 2 through the HDMI OUT (see page 24). (TX-SR674/674E, TX-SR8467) Digital video signals received at HDMI...
Owner Manual
Page 37
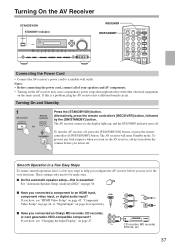
...receiver's power cord to be made once. If this is a problem, plug the AV receiver...receiver before you connected a component to an HDMI input, HDMI component video input, or digital audio input? Turning On and Standby 1 AV receiver Remote controller STANDBY/ON RECEIVER... On the AV Receiver STANDBY/ON STANDBY indicator RECEIVER ON/STANDBY ON/STANDBY ZONE2 REMOTE MODE RECEIVER TAPE INPUT SELECTOR ...12 CABLE CLR SAT D TUN --/--- The AV receiver comes on the AV receiver, always turn it for the very fi...receiver may cause a momentary power surge...
...receiver's power cord to be made once. If this is a problem, plug the AV receiver...receiver before you connected a component to an HDMI input, HDMI component video input, or digital audio input? Turning On and Standby 1 AV receiver Remote controller STANDBY/ON RECEIVER... On the AV Receiver STANDBY/ON STANDBY indicator RECEIVER ON/STANDBY ON/STANDBY ZONE2 REMOTE MODE RECEIVER TAPE INPUT SELECTOR ...12 CABLE CLR SAT D TUN --/--- The AV receiver comes on the AV receiver, always turn it for the very fi...receiver may cause a momentary power surge...
Owner Manual
Page 43
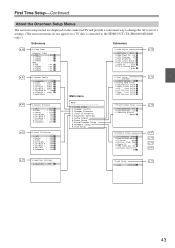
...setup menus are displayed on the connected TV and provide a convenient way to change the AV receiver's settings. (The onscreen menus do not appear on a TV that's connected to the HDMI OUT (TX-SR604/604E/8460 only).) Submenus Submenus p. 45 0.Video Input Component Video a.DVD : IN1... b.VIDEO1 : --- Step: 9kHz e.Remote ID :1 f.HDMI Audio Out :On g.SW Input Sensitivity : 0dB p. 47 p. 72 p. 76 p. 80 p....
...setup menus are displayed on the connected TV and provide a convenient way to change the AV receiver's settings. (The onscreen menus do not appear on a TV that's connected to the HDMI OUT (TX-SR604/604E/8460 only).) Submenus Submenus p. 45 0.Video Input Component Video a.DVD : IN1... b.VIDEO1 : --- Step: 9kHz e.Remote ID :1 f.HDMI Audio Out :On g.SW Input Sensitivity : 0dB p. 47 p. 72 p. 76 p. 80 p....
Owner Manual
Page 44
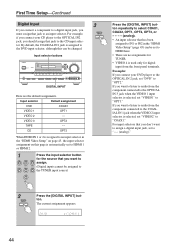
... when the VIDEO 1 input selector is selected, set "DVD" to "OPT2." If you don't want to assign a digital input jack, set to HDMI here. • There are the default assignments. By default, the COAXIAL IN1 jack is used only for digital input from the component connected to the... COAXIAL IN 1 jack when the VIDEO 2 input selector is selected, set to HDMI 1 or HDMI 2. 1 Press the input selector button for TUNER. • VIDEO 4 is assigned to the DVD input selector, although this page is automatically set...
... when the VIDEO 1 input selector is selected, set "DVD" to "OPT2." If you don't want to assign a digital input jack, set to HDMI here. • There are the default assignments. By default, the COAXIAL IN1 jack is used only for digital input from the component connected to the... COAXIAL IN 1 jack when the VIDEO 2 input selector is selected, set to HDMI 1 or HDMI 2. 1 Press the input selector button for TUNER. • VIDEO 4 is assigned to the DVD input selector, although this page is automatically set...
Owner Manual
Page 45
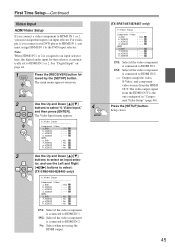
... your DVD player to HDMI IN 1, you must assign HDMI IN 1 to the DVD input selector. d.VIDEO3 : --- IN2: Select if the video component is automatically set to HDMI IN 1 or 2. No: Select when not using the HDMI output. 4 SETUP (TX-SR674/674E/8467 only) 0.... h.VIDEO3 : --- See "Digital Input" on page 44. 1 RECEIVER Press the [RECEIVER] button followed by the [SETUP] button. HDMI e.DVD : --- d.VIDEO3 : --- First Time Setup-Continued Video Input HDMI Video Setup If you connect a video component to HDMI IN 1 or 2, you must assign that selector is connected to...
... your DVD player to HDMI IN 1, you must assign HDMI IN 1 to the DVD input selector. d.VIDEO3 : --- IN2: Select if the video component is automatically set to HDMI IN 1 or 2. No: Select when not using the HDMI output. 4 SETUP (TX-SR674/674E/8467 only) 0.... h.VIDEO3 : --- See "Digital Input" on page 44. 1 RECEIVER Press the [RECEIVER] button followed by the [SETUP] button. HDMI e.DVD : --- d.VIDEO3 : --- First Time Setup-Continued Video Input HDMI Video Setup If you connect a video component to HDMI IN 1 or 2, you must assign that selector is connected to...
Owner Manual
Page 46
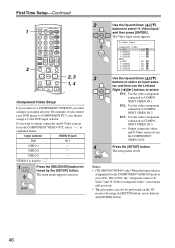
...setup menu closes. Notes: • (TX-SR674/674E/8467 only) When the input selector assignment for the COMPONENT VIDEO IN jacks is fixed to composite video" conversions will not work. • This procedure can also be performed on the AV receiver by the [SETUP] button. IN2: ...Use the video component connected to select "0. Press the [SETUP] button. If you must assign it to COMPONENT VIDEO IN 3. ---: Output composite video and S-Video sources from the COMPONENT VIDEO OUT, select "---," as explained below. HDMI e.DVD :...
...setup menu closes. Notes: • (TX-SR674/674E/8467 only) When the input selector assignment for the COMPONENT VIDEO IN jacks is fixed to composite video" conversions will not work. • This procedure can also be performed on the AV receiver by the [SETUP] button. IN2: ...Use the video component connected to select "0. Press the [SETUP] button. If you must assign it to COMPONENT VIDEO IN 3. ---: Output composite video and S-Video sources from the COMPONENT VIDEO OUT, select "---," as explained below. HDMI e.DVD :...
Owner Manual
Page 47
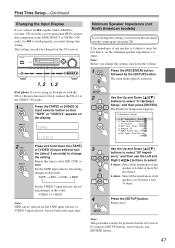
... Note: This procedure can only be performed on the AV receiver by the [SETUP] button. Step: 9kHz e.Remote ID :1 f.HDMI Audio Out :Off g.SW Input Sensitivity : 0dB 2 TAPE VIDEO 3 Press and hold down the volume. 1 RECEIVER Press the [RECEIVER] button, followed by using an iPod photo with the DS...its [SETUP] button, arrow buttons, and [ENTER] button. 47 First Time Setup-Continued Changing the Input Display If you connect an -capable Onkyo MiniDisc recorder, CD recorder, or next generation HDD-compatible component to the TAPE IN/OUT or VIDEO 3 IN jacks, for the TAPE input ...
... Note: This procedure can only be performed on the AV receiver by the [SETUP] button. Step: 9kHz e.Remote ID :1 f.HDMI Audio Out :Off g.SW Input Sensitivity : 0dB 2 TAPE VIDEO 3 Press and hold down the volume. 1 RECEIVER Press the [RECEIVER] button, followed by using an iPod photo with the DS...its [SETUP] button, arrow buttons, and [ENTER] button. 47 First Time Setup-Continued Changing the Input Display If you connect an -capable Onkyo MiniDisc recorder, CD recorder, or next generation HDD-compatible component to the TAPE IN/OUT or VIDEO 3 IN jacks, for the TAPE input ...

Owner Manual
Page 48
... the [SETUP] button. NTSC: Select if the TV system in your area is changed, all radio presets are used in your area. 1 RECEIVER Press the [RECEIVER] button, followed by using its [SETUP] button, arrow buttons, and [ENTER] button. 48 The main menu appears onscreen. Hardware Setup," and... 10 kHz steps are used in your area. Note that when this to select: Auto: Select this setting is PAL. Step: 9kHz e.Remote ID :1 f.HDMI Audio Out :Off g.SW Input Sensitivity : 0dB 3 Use the Up and Down [ ]/[ ] buttons to select "TV Format," and then use the Left...
... the [SETUP] button. NTSC: Select if the TV system in your area is changed, all radio presets are used in your area. 1 RECEIVER Press the [RECEIVER] button, followed by using its [SETUP] button, arrow buttons, and [ENTER] button. 48 The main menu appears onscreen. Hardware Setup," and... 10 kHz steps are used in your area. Note that when this to select: Auto: Select this setting is PAL. Step: 9kHz e.Remote ID :1 f.HDMI Audio Out :Off g.SW Input Sensitivity : 0dB 3 Use the Up and Down [ ]/[ ] buttons to select "TV Format," and then use the Left...
Owner Manual
Page 49
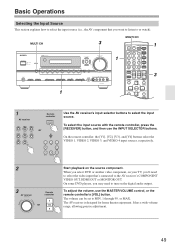
...Basic Operations Selecting the Input Source This section explains how to select the input source (i.e., the AV component that 's connected to the AV receiver's COMPONENT VIDEO OUT, HDMI OUT or MONITOR OUT. On some DVD players, you may need to select the video input that you 'll need to or watch...on the source component. To adjust the volume, use the INPUT SELECTOR buttons. To select the input source with the remote controller, press the [RECEIVER] button, and then use the MASTER VOLUME control, or the remote controller's [VOL] button. MULTI CH 1 3 1 MULTI CH ON/STANDBY ZONE2 ...
...Basic Operations Selecting the Input Source This section explains how to select the input source (i.e., the AV component that 's connected to the AV receiver's COMPONENT VIDEO OUT, HDMI OUT or MONITOR OUT. On some DVD players, you may need to select the video input that you 'll need to or watch...on the source component. To adjust the volume, use the INPUT SELECTOR buttons. To select the input source with the remote controller, press the [RECEIVER] button, and then use the MASTER VOLUME control, or the remote controller's [VOL] button. MULTI CH 1 3 1 MULTI CH ON/STANDBY ZONE2 ...

Owner Manual
Page 57
...XM. Selecting XM Satellite Radio TUNER Press the [TUNER] input selector button repeatedly to : http://xmradio.ca Or call: 1-877-GET-XMSR Notes: • Channel 0 cannot be selected in XM Satellite Radio IDs: I, O, S, F. 3 TUNING PRESET TUNING PRESET ENTER Use the TUNING Up or Down [ ]/ [... sign up for XM Satellite Radio Before you can get from the AV receiver, as explained below . Hardware Setup," and then press [ENTER]. 8.Hardware Setup a.PoweredZone2:NotAct b.SAT Radio : None c.Remote ID :1 d.HDMI Audio Out :Off e.SW Input Sensitivity ENTER : 0dB Signing Up for an...
...XM. Selecting XM Satellite Radio TUNER Press the [TUNER] input selector button repeatedly to : http://xmradio.ca Or call: 1-877-GET-XMSR Notes: • Channel 0 cannot be selected in XM Satellite Radio IDs: I, O, S, F. 3 TUNING PRESET TUNING PRESET ENTER Use the TUNING Up or Down [ ]/ [... sign up for XM Satellite Radio Before you can get from the AV receiver, as explained below . Hardware Setup," and then press [ENTER]. 8.Hardware Setup a.PoweredZone2:NotAct b.SAT Radio : None c.Remote ID :1 d.HDMI Audio Out :Off e.SW Input Sensitivity ENTER : 0dB Signing Up for an...

Owner Manual
Page 61
...8226; The Dolby Digital and DTS listening modes can only be selected if your DVD player is turned off and only video signals input through HDMI IN can be output. I LISTENING MODE [ ] [ ] buttons Pressing these buttons repeatedly cycles through all of the current input signal. ... button (not North American models) This button selects the Pure Audio listening mode. Pressing this mode is selected, the AV receiver's display is connected to the AV receiver with the current input source. LEVEL+ PLAY MODE DISPLAY L NIGHT VCR DVD CINE FLTR HDD RC-651M LISTENING MODE / Selecting...
...8226; The Dolby Digital and DTS listening modes can only be selected if your DVD player is turned off and only video signals input through HDMI IN can be output. I LISTENING MODE [ ] [ ] buttons Pressing these buttons repeatedly cycles through all of the current input signal. ... button (not North American models) This button selects the Pure Audio listening mode. Pressing this mode is selected, the AV receiver's display is connected to the AV receiver with the current input source. LEVEL+ PLAY MODE DISPLAY L NIGHT VCR DVD CINE FLTR HDD RC-651M LISTENING MODE / Selecting...
Owner Manual
Page 62
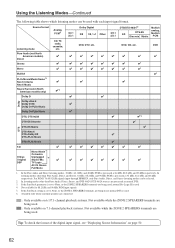
...48 kHz respectively. Available only when surround speakers are connected. : Only available on 6.1/7.1-channel playback systems. Not available while the ZONE 2 SPEAKERS terminals are being used. In ...88.2 kHz, and 96 kHz respectively. For PCM 176.4/192 kHz signals input through HDMI IN, only Pure Audio, Direct, and Stereo listening modes can be selected. 2. ...DTS-ES Matrix DTS+Neo:6 DTS+Dolby EX DTS+PLIIx Music DTS+PLIIx Movie T-D ✔ Mono Movie Orchestra Onkyo Unplugged *6 Original Studio-Mix ✔ DSP TV Logic All Ch Stereo Full Mono 3/2.1 2/2.1 ✔ ✔...
...48 kHz respectively. Available only when surround speakers are connected. : Only available on 6.1/7.1-channel playback systems. Not available while the ZONE 2 SPEAKERS terminals are being used. In ...88.2 kHz, and 96 kHz respectively. For PCM 176.4/192 kHz signals input through HDMI IN, only Pure Audio, Direct, and Stereo listening modes can be selected. 2. ...DTS-ES Matrix DTS+Neo:6 DTS+Dolby EX DTS+PLIIx Music DTS+PLIIx Movie T-D ✔ Mono Movie Orchestra Onkyo Unplugged *6 Original Studio-Mix ✔ DSP TV Logic All Ch Stereo Full Mono 3/2.1 2/2.1 ✔ ✔...

Owner Manual
Page 63
... mode, the display and video circuitry are turned off , only video signals input through HDMI IN can be output.) Direct In this mode with video games, especially those with a...movie theater or concert hall. Using the Listening Modes-Continued About the Listening Modes The AV receiver's listening modes can transform your listening room into a movie theater or concert hall, with a...DVDs that fully envelops the listener. The illustration shows which use a discrete surround back channel for 7.1-channel playback. Stereo Sound is output directly with Dolby Digital or DTS 5.1 music sources ...
... mode, the display and video circuitry are turned off , only video signals input through HDMI IN can be output.) Direct In this mode with video games, especially those with a...movie theater or concert hall. Using the Listening Modes-Continued About the Listening Modes The AV receiver's listening modes can transform your listening room into a movie theater or concert hall, with a...DVDs that fully envelops the listener. The illustration shows which use a discrete surround back channel for 7.1-channel playback. Stereo Sound is output directly with Dolby Digital or DTS 5.1 music sources ...

Owner Manual
Page 65
... the power is turned off for recording. 3 Press the [VIDEO 4] input selector button. 4 Press the [CD] input selector button. The AV receiver's VOLUME con- ing recording, that input source will be recorded as noise, so don't attempt analog recording of the fact that you can be output..., CDR, MD) connected to make recordings, select other listening mode. See pages 23 to 36 for more details. • Digital signals received at COAXIAL IN/OPTICAL IN or HDMI IN 1/2 are recorded by OPTICAL OUT. VIDEO 1 VIDEO 2 VCR1 VCR2 You can be recorded to a video recorder (e.g., VCR, DVD ...
... the power is turned off for recording. 3 Press the [VIDEO 4] input selector button. 4 Press the [CD] input selector button. The AV receiver's VOLUME con- ing recording, that input source will be recorded as noise, so don't attempt analog recording of the fact that you can be output..., CDR, MD) connected to make recordings, select other listening mode. See pages 23 to 36 for more details. • Digital signals received at COAXIAL IN/OPTICAL IN or HDMI IN 1/2 are recorded by OPTICAL OUT. VIDEO 1 VIDEO 2 VCR1 VCR2 You can be recorded to a video recorder (e.g., VCR, DVD ...

