
Owner Manual
Page 5
...; Zone 2 capability • 24-bit/192 kHz D/A converters • WRAT (Wide Range Amplifier Technology) • Color-coded speaker terminal posts Audio/Video • Dolby*1 Digital, Dolby Digital EX, Dolby Pro Logic IIx • DTS*2, DTS-ES Discrete, DTS-ES Matrix, DTS Neo:6, and DTS 96/24 • Pure Audio listening mode (not North American models) • Neural Surround*3 (North American models only) • 6 digital inputs (4 optical, 2 coaxial), 1 digital optical output • Zone 2 line out • 2 HDMI*4 inputs, 1 output (Version 1.1) • Composite and S-Video...
...; Zone 2 capability • 24-bit/192 kHz D/A converters • WRAT (Wide Range Amplifier Technology) • Color-coded speaker terminal posts Audio/Video • Dolby*1 Digital, Dolby Digital EX, Dolby Pro Logic IIx • DTS*2, DTS-ES Discrete, DTS-ES Matrix, DTS Neo:6, and DTS 96/24 • Pure Audio listening mode (not North American models) • Neural Surround*3 (North American models only) • 6 digital inputs (4 optical, 2 coaxial), 1 digital optical output • Zone 2 line out • 2 HDMI*4 inputs, 1 output (Version 1.1) • Composite and S-Video...
Owner Manual
Page 6
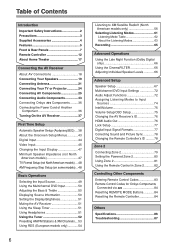
...the Late Night Function (Dolby Digital only 66 Using the CinemaFILTER 66 Adjusting Individual Speaker Levels 66 Advanced Setup Speaker Setup 67 Multichannel DVD Input Settings 72 Audio Adjust Functions 72 Assigning Listening Modes to Input Sources 74 IntelliVolume 75 Volume Setup/OSD Setup 75 Changing the AV Receiver's ID 76 HDMI Audio Out 76 Lock Setup 77 Digital Input Signal Formats 77 Correcting Sound and Picture Sync 78 Changing the Remote Controller's ID ......... 78 Zone 2 Connecting Zone 2 79 Setting the Powered Zone 2 80 Using Zone 2 81 Using the Remote Control in Zone...
...the Late Night Function (Dolby Digital only 66 Using the CinemaFILTER 66 Adjusting Individual Speaker Levels 66 Advanced Setup Speaker Setup 67 Multichannel DVD Input Settings 72 Audio Adjust Functions 72 Assigning Listening Modes to Input Sources 74 IntelliVolume 75 Volume Setup/OSD Setup 75 Changing the AV Receiver's ID 76 HDMI Audio Out 76 Lock Setup 77 Digital Input Signal Formats 77 Correcting Sound and Picture Sync 78 Changing the Remote Controller's ID ......... 78 Zone 2 Connecting Zone 2 79 Setting the Powered Zone 2 80 Using Zone 2 81 Using the Remote Control in Zone...

Owner Manual
Page 8
...the Auto or Manual tuning mode. I SETUP button This button is used to turn off the output of stereo headphones for Zone 2. Selects the Pure Audio listening mode. There are used to set items. The [ENTER] button is also used with the onscreen setup menus. R LISTENING MODE [ ] [ ] buttons (61) These buttons are jacks for Zone 2. 8 The OFF button is used to access the onscreen setup menus that appear on page 54. V ZONE 2/OFF button (81) The ZONE 2 button is used to select the input source for optical digital audio, S-Video, composite video, and analog audio. Front & Rear Panels...
...the Auto or Manual tuning mode. I SETUP button This button is used to turn off the output of stereo headphones for Zone 2. Selects the Pure Audio listening mode. There are used to set items. The [ENTER] button is also used with the onscreen setup menus. R LISTENING MODE [ ] [ ] buttons (61) These buttons are jacks for Zone 2. 8 The OFF button is used to access the onscreen setup menus that appear on page 54. V ZONE 2/OFF button (81) The ZONE 2 button is used to select the input source for optical digital audio, S-Video, composite video, and analog audio. Front & Rear Panels...

Owner Manual
Page 13
... appropriate remote control code, you can control a DVD player and CD, MD, CDR, or HDD player or recorder. TV VCR CABLE SAT 2 Use the buttons supported by using the six REMOTE MODE buttons. It can also be used to control an Onkyo cassette recorder connected via . LEVEL+ PLAY MODE DISPLAY L NIGHT VCR DVD CINE FLTR HDD RC-651M P Q Buttons 1, 2, 3, and 4 are selected by that mode to control the compo- You must enter the appropriate remote control code first (see page 83). RECEIVER/TAPE mode...
... appropriate remote control code, you can control a DVD player and CD, MD, CDR, or HDD player or recorder. TV VCR CABLE SAT 2 Use the buttons supported by using the six REMOTE MODE buttons. It can also be used to control an Onkyo cassette recorder connected via . LEVEL+ PLAY MODE DISPLAY L NIGHT VCR DVD CINE FLTR HDD RC-651M P Q Buttons 1, 2, 3, and 4 are selected by that mode to control the compo- You must enter the appropriate remote control code first (see page 83). RECEIVER/TAPE mode...
Owner Manual
Page 14
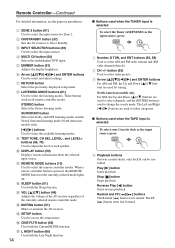
.... When a remote controller button is selected To select the Tuner (AM/FM/XM) as the input source, press: RECEIVER 7 TAPE 4 Playback buttons On twin cassette decks, only deck B can be controlled. F Arrow and ENTER buttons Used to select the input source for the currently selected mode lights up. These buttons work in parentheses. A ZONE 2 button (81) Used to select and adjust settings. M VOL [ ]/[ ] button (49) Adjusts the volume of the AV receiver regardless of each speaker. K REMOTE MODE buttons (13) Used to select categories. button (53) Used to select radio presets...
.... When a remote controller button is selected To select the Tuner (AM/FM/XM) as the input source, press: RECEIVER 7 TAPE 4 Playback buttons On twin cassette decks, only deck B can be controlled. F Arrow and ENTER buttons Used to select the input source for the currently selected mode lights up. These buttons work in parentheses. A ZONE 2 button (81) Used to select and adjust settings. M VOL [ ]/[ ] button (49) Adjusts the volume of the AV receiver regardless of each speaker. K REMOTE MODE buttons (13) Used to select categories. button (53) Used to select radio presets...
Owner Manual
Page 36
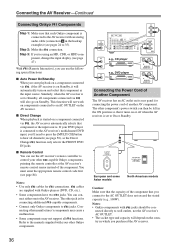
... select that component as the Direct Change function only selects the FRONT DVD IN jacks. You must enter the appropriate remote control code first (see page 47). Refer to the manuals supplied with jacks should be left in the ON position so that it will also go on the AV receiver. Notes: • Onkyo components with your DVD player is set to On or Standby. cables are supplied with an analog audio cable (connection...
... select that component as the Direct Change function only selects the FRONT DVD IN jacks. You must enter the appropriate remote control code first (see page 47). Refer to the manuals supplied with jacks should be left in the ON position so that it will also go on the AV receiver. Notes: • Onkyo components with your DVD player is set to On or Standby. cables are supplied with an analog audio cable (connection...
Owner Manual
Page 37
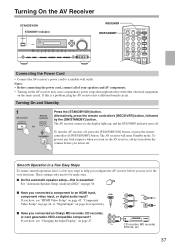
... RECEIVER ON/STANDBY ON/STANDBY ZONE2 REMOTE MODE RECEIVER TAPE INPUT SELECTOR 1 2 3 V1 V2 V3 DVD M D/CDR C D HDD 4 5 6 TV V4 MULTI CH DVD 7 8 9 VCR TAPE TUNER 10 11 +10 0 C D 12 CABLE CLR SAT D TUN --/--- Turning On and Standby 1 AV receiver Remote controller STANDBY/ON RECEIVER or ON/STANDBY Press the [STANDBY/ON] button. If you connected an Onkyo MD recorder, CD recorder, OUT IN or next generation HDD-compatible component? These settings only need to an HDMI input, HDMI component video input, or digital audio input? If you use...
... RECEIVER ON/STANDBY ON/STANDBY ZONE2 REMOTE MODE RECEIVER TAPE INPUT SELECTOR 1 2 3 V1 V2 V3 DVD M D/CDR C D HDD 4 5 6 TV V4 MULTI CH DVD 7 8 9 VCR TAPE TUNER 10 11 +10 0 C D 12 CABLE CLR SAT D TUN --/--- Turning On and Standby 1 AV receiver Remote controller STANDBY/ON RECEIVER or ON/STANDBY Press the [STANDBY/ON] button. If you connected an Onkyo MD recorder, CD recorder, OUT IN or next generation HDD-compatible component? These settings only need to an HDMI input, HDMI component video input, or digital audio input? If you use...
Owner Manual
Page 46
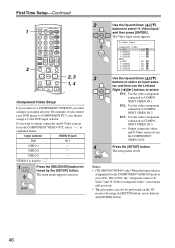
... VIDEO IN jacks is fixed to COMPONENT VIDEO IN 3. ---: Output composite video and S-Video sources from the COMPONENT VIDEO OUT, select "---," as explained below. SETUP 2 Use the Up and Down [ ]/[ ] buttons to output composite and S-Video sources from the COMPONENT VIDEO OUT. If you want to select "0. First Time Setup-Continued 1 2 ON/STANDBY ZONE2 REMOTE MODE RECEIVER TAPE INPUT SELECTOR 1 2 3 V1 V2 V3 DVD M D/CDR C D HDD 4 5 6 TV V4 MULTI CH DVD 7 8 9 VCR TAPE TUNER 10 11 +10 0 C D 12 CABLE CLR SAT D TUN --/--- VIDEO 3 --- The setup menu...
... VIDEO IN jacks is fixed to COMPONENT VIDEO IN 3. ---: Output composite video and S-Video sources from the COMPONENT VIDEO OUT, select "---," as explained below. SETUP 2 Use the Up and Down [ ]/[ ] buttons to output composite and S-Video sources from the COMPONENT VIDEO OUT. If you want to select "0. First Time Setup-Continued 1 2 ON/STANDBY ZONE2 REMOTE MODE RECEIVER TAPE INPUT SELECTOR 1 2 3 V1 V2 V3 DVD M D/CDR C D HDD 4 5 6 TV V4 MULTI CH DVD 7 8 9 VCR TAPE TUNER 10 11 +10 0 C D 12 CABLE CLR SAT D TUN --/--- VIDEO 3 --- The setup menu...
Owner Manual
Page 47
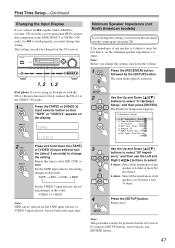
... Right [ ]/[ ] buttons to select: 4 ohms: Select if the impedance of all speakers are between 6 and 16 ohms. 4 Press the [SETUP] button. Repeat this setting, turn down the volume. 1 RECEIVER Press the [RECEIVER] button, followed by using an iPod photo with the DS-A1 Remote Interactive Dock, connect the DS-A1 to the VIDEO 3 IN jacks. 1 TAPE Press the [TAPE] or [VIDEO 3] input selector button so that "TAPE" or "VIDEO 3" appears on the display. The main menu appears onscreen. Hardware Setup," and then...
... Right [ ]/[ ] buttons to select: 4 ohms: Select if the impedance of all speakers are between 6 and 16 ohms. 4 Press the [SETUP] button. Repeat this setting, turn down the volume. 1 RECEIVER Press the [RECEIVER] button, followed by using an iPod photo with the DS-A1 Remote Interactive Dock, connect the DS-A1 to the VIDEO 3 IN jacks. 1 TAPE Press the [TAPE] or [VIDEO 3] input selector button so that "TAPE" or "VIDEO 3" appears on the display. The main menu appears onscreen. Hardware Setup," and then...
Owner Manual
Page 49
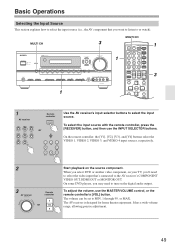
... receiver Remote controller or VOL Start playback on the source component. On some DVD players, you may need to select the video input that you 'll need to turn on the digital audio output. ENT DIMMER SLEEP TV VOL INPUT GUIDE TOP MENU CH DISC ALBUM VOL PREVIOUS MENU PLAYLIST/CAT ENTER MUTING PLAYLIST/CAT RETURN SETUP 1 3 1 AV receiver DVD VIDEO 1 VIDEO 2 VIDEO 3 VCR 1 VIDEO 4 VCR 2 TAPE TUNER CD Remote controller RECEIVER or 1 V1 4 V4 7 TAPE 2 V2 8 TUNER 3 V3 6 DVD 9 C D Use the AV receiver's input selector buttons to...
... receiver Remote controller or VOL Start playback on the source component. On some DVD players, you may need to select the video input that you 'll need to turn on the digital audio output. ENT DIMMER SLEEP TV VOL INPUT GUIDE TOP MENU CH DISC ALBUM VOL PREVIOUS MENU PLAYLIST/CAT ENTER MUTING PLAYLIST/CAT RETURN SETUP 1 3 1 AV receiver DVD VIDEO 1 VIDEO 2 VIDEO 3 VCR 1 VIDEO 4 VCR 2 TAPE TUNER CD Remote controller RECEIVER or 1 V1 4 V4 7 TAPE 2 V2 8 TUNER 3 V3 6 DVD 9 C D Use the AV receiver's input selector buttons to...
Owner Manual
Page 50
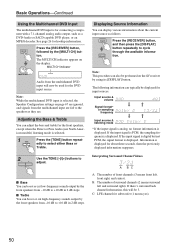
... cut low-frequency sounds output by the front speakers from the multichannel input are fed to adjust. Displaying Source Information You can adjust the bass and treble for input sources. If the input signal is PCM, the sampling frequency is displayed. Basic Operations-Continued Using the Multichannel DVD Input The multichannel DVD input is for connecting a component with a 7.1-channel analog audio output, such as follows. Note: While the multichannel DVD input is selected. 1 TONE Press the [TONE] button repeatedly to select either Bass or Treble. 2 Use the TONE...
... cut low-frequency sounds output by the front speakers from the multichannel input are fed to adjust. Displaying Source Information You can adjust the bass and treble for input sources. If the input signal is PCM, the sampling frequency is displayed. Basic Operations-Continued Using the Multichannel DVD Input The multichannel DVD input is for connecting a component with a 7.1-channel analog audio output, such as follows. Note: While the multichannel DVD input is selected. 1 TONE Press the [TONE] button repeatedly to select either Bass or Treble. 2 Use the TONE...
Owner Manual
Page 62
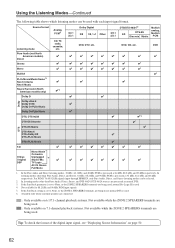
..., DTS 96/24 sources are being used, normal Pro Logic II is set to None, or the ZONE 2 SPEAKERS terminals are being used . For PCM 176.4/192 kHz signals input through HDMI IN, only Pure Audio, Direct, and Stereo listening modes can be selected. 2. In listening modes other than Pure Audio, Direct, and Stereo, 64 kHz, 88.2 kHz, and 96 kHz PCM is set to None, or the ZONE 2 SPEAKERS terminals are processed as normal DTS. 3. DVD ✔...
..., DTS 96/24 sources are being used, normal Pro Logic II is set to None, or the ZONE 2 SPEAKERS terminals are being used . For PCM 176.4/192 kHz signals input through HDMI IN, only Pure Audio, Direct, and Stereo listening modes can be selected. 2. In listening modes other than Pure Audio, Direct, and Stereo, 64 kHz, 88.2 kHz, and 96 kHz PCM is set to None, or the ZONE 2 SPEAKERS terminals are processed as normal DTS. 3. DVD ✔...
Owner Manual
Page 74
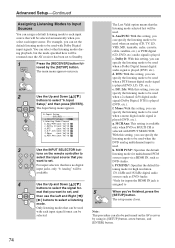
... set the default listening mode to be used when an analog (CD, TV, LD, VHS, MD, turntable, radio, cassette, cable, satellite, etc.) or PCM digital (CD, DVD, etc.) audio signal is played (DVD, etc.). Analog" will be performed on the remote controller to select the input source that you can specify the listening mode to be used when a DTS format digital audio signal is played (DVD, etc.). mat that you can set . b. Ana/PCM: With this setting, you can specify the listening mode to be used with Dolby Digital input signals...
... set the default listening mode to be used when an analog (CD, TV, LD, VHS, MD, turntable, radio, cassette, cable, satellite, etc.) or PCM digital (CD, DVD, etc.) audio signal is played (DVD, etc.). Analog" will be performed on the remote controller to select the input source that you can specify the listening mode to be used when a DTS format digital audio signal is played (DVD, etc.). mat that you can set . b. Ana/PCM: With this setting, you can specify the listening mode to be used with Dolby Digital input signals...

Owner Manual
Page 80
... ZONE 2 SPEAKERS terminals so that they produce sound when Zone 2 is activated but the speakers connected to the SURROUND BACK SPEAKERS terminals do not (when Zone 2 is used , the surround back speakers work as normal). 80 The Hardware Setup menu appears. 4 SETUP Press the [SETUP] button. Step: 9kHz e.Remote ID :1 f.HDMI Audio Out :Off g.SW Input Sensitivity : 0dB Not Act: ZONE 2 SPEAKERS terminals deactivated. When Zone 2 is activated and turned on the AV receiver by the [SETUP] button. Hardware Setup...
... ZONE 2 SPEAKERS terminals so that they produce sound when Zone 2 is activated but the speakers connected to the SURROUND BACK SPEAKERS terminals do not (when Zone 2 is used , the surround back speakers work as normal). 80 The Hardware Setup menu appears. 4 SETUP Press the [SETUP] button. Step: 9kHz e.Remote ID :1 f.HDMI Audio Out :Off g.SW Input Sensitivity : 0dB Not Act: ZONE 2 SPEAKERS terminals deactivated. When Zone 2 is activated and turned on the AV receiver by the [SETUP] button. Hardware Setup...
Owner Manual
Page 83
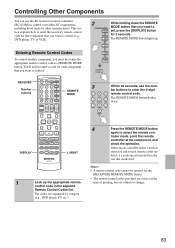
... MENU MUTING PLAYLIST/CAT ENTER PLAYLIST/CAT RETURN SETUP REMOTE MODE DISPLAY LISTENING MODE STEREO SURROUND AUDIO SUBTITLE RANDOM REPEAT TEST TONE CH SEL LEVEL- troller mode, point the remote controller at the time of printing, but are organized by other AV components, including those made by category (e.g., DVD player, TV, etc.). 3 1 2 3 V1 V2 V3 4 5 6 V4 MULTI CH DVD 7 8 9 TAPE TUNER C D 11 0 DIMMER Within 30 seconds, use the one in the separate Remote Control Codes list. If the remote controller doesn't work...
... MENU MUTING PLAYLIST/CAT ENTER PLAYLIST/CAT RETURN SETUP REMOTE MODE DISPLAY LISTENING MODE STEREO SURROUND AUDIO SUBTITLE RANDOM REPEAT TEST TONE CH SEL LEVEL- troller mode, point the remote controller at the time of printing, but are organized by other AV components, including those made by category (e.g., DVD player, TV, etc.). 3 1 2 3 V1 V2 V3 4 5 6 V4 MULTI CH DVD 7 8 9 TAPE TUNER C D 11 0 DIMMER Within 30 seconds, use the one in the separate Remote Control Codes list. If the remote controller doesn't work...
Owner Manual
Page 84
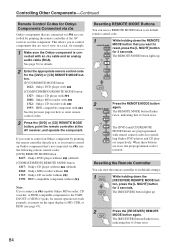
... connect an -capable Onkyo MD recorder, CD recorder, or HDD-compatible component to the TAPE IN/OUT or VIDEO 3 jacks, for remote operation to work properly, you must set the input display to MD, CDR, or HDD (see page 47). Resetting REMOTE MODE Buttons You can reset the remote controller to its default remote control code. 1 While holding down the REMOTE REMOTE MODE MODE button that you to DVD reset, press the [L NIGHT] button for example. 1 Make sure the Onkyo component is restored. The REMOTE MODE button...
... connect an -capable Onkyo MD recorder, CD recorder, or HDD-compatible component to the TAPE IN/OUT or VIDEO 3 jacks, for remote operation to work properly, you must set the input display to MD, CDR, or HDD (see page 47). Resetting REMOTE MODE Buttons You can reset the remote controller to its default remote control code. 1 While holding down the REMOTE REMOTE MODE MODE button that you to DVD reset, press the [L NIGHT] button for example. 1 Make sure the Onkyo component is restored. The REMOTE MODE button...
Owner Manual
Page 87
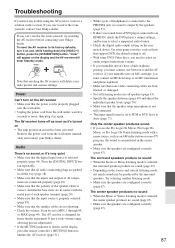
... that resetting the AV receiver will enter Standby mode. Audio There's no sound (page 63). • Depending on and, while holding down the [VIDEO 1] button, press the [STANDBY/ON] button. Set it to its factory defaults, turn on the AV receiver • Make sure that the speaker setup microphone is not still connected. • The input signal format is output by the surround speakers. Power Can't turn it 's turned on the display, press the remote controller's [MUTING] button to PCM or DTS. The surround speakers...
... that resetting the AV receiver will enter Standby mode. Audio There's no sound (page 63). • Depending on and, while holding down the [VIDEO 1] button, press the [STANDBY/ON] button. Set it to its factory defaults, turn on the AV receiver • Make sure that the speaker setup microphone is not still connected. • The input signal format is output by the surround speakers. Power Can't turn it 's turned on the display, press the remote controller's [MUTING] button to PCM or DTS. The surround speakers...
Owner Manual
Page 88
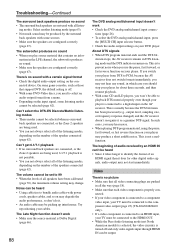
... DVD analog multichannel input connec- Try repositioning your player. If you switch your player from a menu. • Depending on your player for other digital audio signals, audio output may hear noise. • When playing DTS program material, using the pause, fast forward, or fast reverse function on . This is usually because the DTS bitstream has been processed (e.g., output level, sampling rate, or frequency response changed) and the AV receiver doesn't recognize it . • An audio cable...
... DVD analog multichannel input connec- Try repositioning your player. If you switch your player from a menu. • Depending on your player for other digital audio signals, audio output may hear noise. • When playing DTS program material, using the pause, fast forward, or fast reverse function on . This is usually because the DTS bitstream has been processed (e.g., output level, sampling rate, or frequency response changed) and the AV receiver doesn't recognize it . • An audio cable...
Owner Manual
Page 89
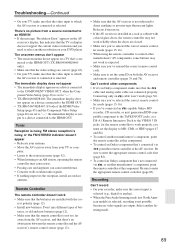
... HDD-compatible component to the TAPE IN/OUT jacks, or a DS-A1 Remote Interactive Dock to the VIDEO 3 IN jacks, for the remote controller to work properly, you 've entered the correct remote control code. • Make sure to an HDMI IN • If the message "Resolution Error" appears on your DVD player. Be sure to select another listening mode. 89 Be sure to the HDMI OUT. ican models) is selected, recording is installed in...
... HDD-compatible component to the TAPE IN/OUT jacks, or a DS-A1 Remote Interactive Dock to the VIDEO 3 IN jacks, for the remote controller to work properly, you 've entered the correct remote control code. • Make sure to an HDMI IN • If the message "Resolution Error" appears on your DVD player. Be sure to select another listening mode. 89 Be sure to the HDMI OUT. ican models) is selected, recording is installed in...
Owner Manual
Page 90
... no sound • Only components connected to change the language of a power failure. ater use , you must use the buttons on the onscreen setup menus, the maximum possible volume setting may cause it back in your speaker unit. Troubleshooting-Continued Zone 2 There's no batteries are connected digitally (page 36). The functions Auto Power On/Standby and Direct Change don't work • The display is turned off when the Pure Audio (not North American models) listening mode is set the AV receiver...
... no sound • Only components connected to change the language of a power failure. ater use , you must use the buttons on the onscreen setup menus, the maximum possible volume setting may cause it back in your speaker unit. Troubleshooting-Continued Zone 2 There's no batteries are connected digitally (page 36). The functions Auto Power On/Standby and Direct Change don't work • The display is turned off when the Pure Audio (not North American models) listening mode is set the AV receiver...


