Owner Manual
Page 1
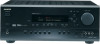
Contents AV Receiver TX-SR700/700E TX-SR600/600E Instruction Manual Before using 2 Facilities and connections 8 Setup and operation 36 Thank you to obtain optimum performance and listening enjoyment from your new AV Receiver. Please retain this manual thoroughly before making connections and plugging in this manual will enable you for future reference. Following the instructions in the unit. Please read this manual for purchasing the Onkyo AV Receiver. Remote controller 63 Appendix 76
Contents AV Receiver TX-SR700/700E TX-SR600/600E Instruction Manual Before using 2 Facilities and connections 8 Setup and operation 36 Thank you to obtain optimum performance and listening enjoyment from your new AV Receiver. Please retain this manual thoroughly before making connections and plugging in this manual will enable you for future reference. Following the instructions in the unit. Please read this manual for purchasing the Onkyo AV Receiver. Remote controller 63 Appendix 76
Owner Manual
Page 4
... the ZONE 2 PRE OUT terminals 23 AC OUTLETS 29 REMOTE CONTROL 29 Connections (TX-SR600/600E 24 Connecting your audio components 24 Connecting your video components 25 AC OUTLETS 29 REMOTE CONTROL 29 Connecting speakers 30 Standard speaker setup for surround sound 30 Minimum speaker configuration for surround sound playback 30 Speaker placement...
... the ZONE 2 PRE OUT terminals 23 AC OUTLETS 29 REMOTE CONTROL 29 Connections (TX-SR600/600E 24 Connecting your audio components 24 Connecting your video components 25 AC OUTLETS 29 REMOTE CONTROL 29 Connecting speakers 30 Standard speaker setup for surround sound 30 Minimum speaker configuration for surround sound playback 30 Speaker placement...
Owner Manual
Page 5
... output levels 46 To change the display of the messages shown below appears 78 Specifications (TX-SR700/700E 79 Specifications (TX-SR600/600E) ....... back cover Declaration of Conformity We, ONKYO EUROPE ELECTRONICS GmbH INDUSTRIESTRASSE 20 82110 GERMERING, GERMANY declare in compliance with headphones 47 Enjoying ... (CinemaFILTER) loading for movies .... 52 Input Setup 53 OSD Setup and Other Settings 56 OSD Setup 56 Preference 56 Audio Adjust 57 Enjoying music in the remote zone (TX-SR700/700E only 60 Using the buttons on the TX-SR700/700E 60 Using the remote controller 60 ...
... output levels 46 To change the display of the messages shown below appears 78 Specifications (TX-SR700/700E 79 Specifications (TX-SR600/600E) ....... back cover Declaration of Conformity We, ONKYO EUROPE ELECTRONICS GmbH INDUSTRIESTRASSE 20 82110 GERMERING, GERMANY declare in compliance with headphones 47 Enjoying ... (CinemaFILTER) loading for movies .... 52 Input Setup 53 OSD Setup and Other Settings 56 OSD Setup 56 Preference 56 Audio Adjust 57 Enjoying music in the remote zone (TX-SR700/700E only 60 Using the buttons on the TX-SR700/700E 60 Using the remote controller 60 ...
Owner Manual
Page 9
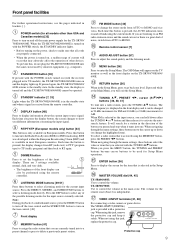
...When navigating through the menu settings, these buttons select the value or item that you press the display button, the screen changes to enter the Setup Menu. When navigating through the menu settings, these buttons to be performed using the MEMORY button, press the PRESET / buttons. Each time you.../ 700E/600/600E. If you are listening to adjust the sound quality and the listening mode. MASTER VOLUME dial [44, 45] TX-SR600/600E: Use to display information about the current input source signal. VIDEO 4 INPUT terminals [21, 28] For connecting a video camera or game device....
...When navigating through the menu settings, these buttons select the value or item that you press the display button, the screen changes to enter the Setup Menu. When navigating through the menu settings, these buttons to be performed using the MEMORY button, press the PRESET / buttons. Each time you.../ 700E/600/600E. If you are listening to adjust the sound quality and the listening mode. MASTER VOLUME dial [44, 45] TX-SR600/600E: Use to display information about the current input source signal. VIDEO 4 INPUT terminals [21, 28] For connecting a video camera or game device....
Owner Manual
Page 13
...ST, DSP: You can turn on the remote zone (ZONE 2) (not used to adjust the volume. SETUP button [36] Press to turn the CinemaFILTER function on the TV screen and in conjunction with the TX-SR600/600E). [60] When in the buttons of the TXSR700/700E/600/600E. VOL button [44, 45]... (SEARCH). [65] When in the Setup Menu, press the upper and lower arrow buttons to select an item, press the right and left arrow buttons to select parameter values or modes, and press the ENTER button to advance to activate the mute function. SP A, SP B: TX-SR600/600E: Switches between speakers A and ...
...ST, DSP: You can turn on the remote zone (ZONE 2) (not used to adjust the volume. SETUP button [36] Press to turn the CinemaFILTER function on the TV screen and in conjunction with the TX-SR600/600E). [60] When in the buttons of the TXSR700/700E/600/600E. VOL button [44, 45]... (SEARCH). [65] When in the Setup Menu, press the upper and lower arrow buttons to select an item, press the right and left arrow buttons to select parameter values or modes, and press the ENTER button to advance to activate the mute function. SP A, SP B: TX-SR600/600E: Switches between speakers A and ...
Owner Manual
Page 16
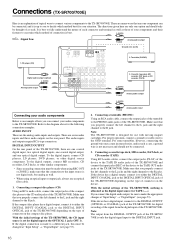
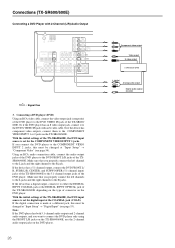
... inputs, one coaxial digital output, and one option and should not be sure to the R jack. Make sure that you can be changed at "Input Setup" → "Digital Input" (see page 53). If the digital connection is made when using REC OUT or ZONE 2, make the appropriate changes at the ... output jacks of the turntable to the TAPE OUT audio jacks of the TX-SR700/700E. DIGITAL INPUT/OUTPUT On the rear panel of the TX-SR700/700E, the CD input source is set for digital input at "Input Setup" → "Digital Input" (see page 53). Connecting a compact disc player (CD) Using an...
... inputs, one coaxial digital output, and one option and should not be sure to the R jack. Make sure that you can be changed at "Input Setup" → "Digital Input" (see page 53). If the digital connection is made when using REC OUT or ZONE 2, make the appropriate changes at the ... output jacks of the turntable to the TAPE OUT audio jacks of the TX-SR700/700E. DIGITAL INPUT/OUTPUT On the rear panel of the TX-SR700/700E, the CD input source is set for digital input at "Input Setup" → "Digital Input" (see page 53). Connecting a compact disc player (CD) Using an...

Owner Manual
Page 18
... has a 5.1-channel output, connect the DVD FRONT L/ R, SURR L/R, CENTER, and SUBWOOFER (5.1-channel input) jacks of the TX-SR700/700E to the COMPONENT VIDEO INPUT 2 jacks, this must be changed at "Input Setup" → "Digital Input" (see page 54). With the initial settings of the DVD player. DVD player (DVD) L...left channel to the L jack and the right channel to the DVD VIDEO IN jack of the TX-SR700/700E, the DVD input source is made at a different jack, this must be changed at "Input Setup" → "Component Video" (see page 53). Connecting a DVD player (DVD) Using an RCA...
... has a 5.1-channel output, connect the DVD FRONT L/ R, SURR L/R, CENTER, and SUBWOOFER (5.1-channel input) jacks of the TX-SR700/700E to the COMPONENT VIDEO INPUT 2 jacks, this must be changed at "Input Setup" → "Digital Input" (see page 54). With the initial settings of the DVD player. DVD player (DVD) L...left channel to the L jack and the right channel to the DVD VIDEO IN jack of the TX-SR700/700E, the DVD input source is made at a different jack, this must be changed at "Input Setup" → "Component Video" (see page 53). Connecting a DVD player (DVD) Using an RCA...

Owner Manual
Page 19
...Or if the device has an S video output jack, connect it to the VIDEO 1 OUT audio jacks of the TX-SR700/700E, the VIDEO 1 input source is set for digital input at "Input Setup" → "Component Video" (see page 53). 19 If you properly connect the left channel to the L jack ...device has component video outputs, connect them to make the appropriate changes at "Input Setup" → "Component Video" (see page 53). 6. If you connect the video cassette recorder to the VIDEO 3 IN audio jacks of the TX-SR700/700E. Or if the video cassette recorder has component video outputs, connect ...
...Or if the device has an S video output jack, connect it to the VIDEO 1 OUT audio jacks of the TX-SR700/700E, the VIDEO 1 input source is set for digital input at "Input Setup" → "Component Video" (see page 53). 19 If you properly connect the left channel to the L jack ...device has component video outputs, connect them to make the appropriate changes at "Input Setup" → "Component Video" (see page 53). 6. If you connect the video cassette recorder to the VIDEO 3 IN audio jacks of the TX-SR700/700E. Or if the video cassette recorder has component video outputs, connect ...
Owner Manual
Page 20
.../ 700E and connect the video input jack of the device to the VIDEO 2 VIDEO OUT jack of the TX-SR700/ 700E is unnecessary to make the appropriate changes at "Input Setup" → "Component Video" (see page 53). With the initial settings of connector on the device. If you connect the digital ...it to the COMPONENT VIDEO INPUT 1 jacks, this must be changed at "Input Setup" → "Digital Input" (see page 54). If it is equipped with an S video input, it to the COMPONENT VIDEO INPUT 1 or 2 jacks on the TX-SR700/700E. Or if the device has component video inputs, connect them to...
.../ 700E and connect the video input jack of the device to the VIDEO 2 VIDEO OUT jack of the TX-SR700/ 700E is unnecessary to make the appropriate changes at "Input Setup" → "Component Video" (see page 53). With the initial settings of connector on the device. If you connect the digital ...it to the COMPONENT VIDEO INPUT 1 jacks, this must be changed at "Input Setup" → "Digital Input" (see page 54). If it is equipped with an S video input, it to the COMPONENT VIDEO INPUT 1 or 2 jacks on the TX-SR700/700E. Or if the device has component video inputs, connect them to...

Owner Manual
Page 24
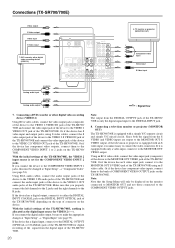
...when using an optical input or output jack, always use an optical fiber cable. 1. With the initial settings of the TX-SR600/600E. With the initial settings of the TX-SR600/600E. Make sure that you connect the digital audio output, be changed at the OPTICAL 1 jack (OPT 1). The directions...decide which method of connector on the type of connection is allocated as well. • When using REC OUT, make the appropriate changes at "Input Setup" → "Digital Input" (see page 53). 2. Connecting a compact disc player (CD) Using an RCA audio cable, connect the output jacks of...
...when using an optical input or output jack, always use an optical fiber cable. 1. With the initial settings of the TX-SR600/600E. With the initial settings of the TX-SR600/600E. Make sure that you connect the digital audio output, be changed at the OPTICAL 1 jack (OPT 1). The directions...decide which method of connector on the type of connection is allocated as well. • When using REC OUT, make the appropriate changes at "Input Setup" → "Digital Input" (see page 53). 2. Connecting a compact disc player (CD) Using an RCA audio cable, connect the output jacks of...
Owner Manual
Page 26
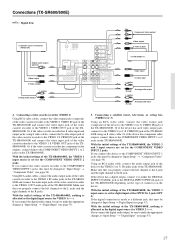
...input) jacks of the DVD player. With the initial settings of the TX-SR600/600E, the DVD input source is set for digital input at "Input Setup" → "Component Video" (see page 53). With the initial settings of the TX-SR600/600E, the DVD input source is set for the COMPONENT VIDEO INPUT ... you connect the DVD player to either the DIGITAL INPUT COAXIAL jack or the DIGITAL INPUT OPTICAL jack of the TX-SR600/600E depending on the type of the TXSR600/600E. Connections (TX-SR600/600E) Connecting a DVD Player with an S video cable. If the device has a digital output, connect it...
...input) jacks of the DVD player. With the initial settings of the TX-SR600/600E, the DVD input source is set for digital input at "Input Setup" → "Component Video" (see page 53). With the initial settings of the TX-SR600/600E, the DVD input source is set for the COMPONENT VIDEO INPUT ... you connect the DVD player to either the DIGITAL INPUT COAXIAL jack or the DIGITAL INPUT OPTICAL jack of the TX-SR600/600E depending on the type of the TXSR600/600E. Connections (TX-SR600/600E) Connecting a DVD Player with an S video cable. If the device has a digital output, connect it...
Owner Manual
Page 27
...VIDEO 2 (----). With the initial settings of the TX-SR600/600E, nothing is made at a different jack, this must be changed at "Input Setup" → "Digital Input" (see page 53). With the initial settings of the TX-SR600/600E, the VIDEO 3 input source is allocated ... audio output, be changed at the OPTICAL 2 jack (OPT 2). If you connect the device to make the appropriate changes at "Input Setup" → "Component Video" (see page 54). Connections (TX-SR600/600E) : Signal flow 5. VCR (VIDEO 1) Video input S video input L (white) Analog audio output R (red) L (white...
...VIDEO 2 (----). With the initial settings of the TX-SR600/600E, nothing is made at a different jack, this must be changed at "Input Setup" → "Digital Input" (see page 53). With the initial settings of the TX-SR600/600E, the VIDEO 3 input source is allocated ... audio output, be changed at the OPTICAL 2 jack (OPT 2). If you connect the device to make the appropriate changes at "Input Setup" → "Component Video" (see page 54). Connections (TX-SR600/600E) : Signal flow 5. VCR (VIDEO 1) Video input S video input L (white) Analog audio output R (red) L (white...
Owner Manual
Page 28
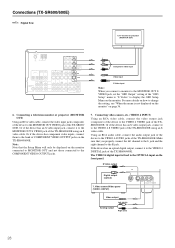
...7. Note: Note that you connect a monitor to the MONITOR OUT S VIDEO jack, set the "OSD Output" setting of the "OSD Setup" menu to "S Video" to the VIDEO 4 DIGITAL jack of the TX-SR600/600E. The VIDEO 4 digital input is not displayed on the monitor" on page 36. 6. Connecting video camera, etc. (VIDEO 4 ... using an S video cable. Using an RCA audio cable, connect the audio output jack of the TX-SR600/ 600E. If the device has an optical digital output, connect it to display the OSD Setup Menu on how to the MONITOR OUT VIDEO jack of the device to the R jack. TV monitor ...
...7. Note: Note that you connect a monitor to the MONITOR OUT S VIDEO jack, set the "OSD Output" setting of the "OSD Setup" menu to "S Video" to the VIDEO 4 DIGITAL jack of the TX-SR600/600E. The VIDEO 4 digital input is not displayed on the monitor" on page 36. 6. Connecting video camera, etc. (VIDEO 4 ... using an S video cable. Using an RCA audio cable, connect the audio output jack of the TX-SR600/ 600E. If the device has an optical digital output, connect it to display the OSD Setup Menu on how to the MONITOR OUT VIDEO jack of the device to the R jack. TV monitor ...
Owner Manual
Page 30
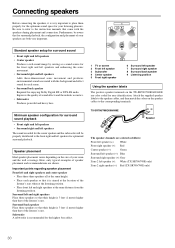
... the listening position. • Place front left speakers for optimized surround playback. Improves the quality of your speakers are shown. TX-SR700/700E/600/600E Speaker The speaker channels are color coded for easy identification. Subwoofer A subwoofer is recommended for enjoying Dolby ... left speakers and enhancing the sonic movement. • Surround right and left speaker (+): White (TX-SR700/700E only) Zone 2 right speaker (+): Red (TX-SR700/700E only) 30 Standard speaker setup for surround sound • Front right and left speakers • Center speaker Produces a rich ...
... the listening position. • Place front left speakers for optimized surround playback. Improves the quality of your speakers are shown. TX-SR700/700E/600/600E Speaker The speaker channels are color coded for easy identification. Subwoofer A subwoofer is recommended for enjoying Dolby ... left speakers and enhancing the sonic movement. • Surround right and left speaker (+): White (TX-SR700/700E only) Zone 2 right speaker (+): Red (TX-SR700/700E only) 30 Standard speaker setup for surround sound • Front right and left speakers • Center speaker Produces a rich ...

Owner Manual
Page 35
... Clamp it well away from power lines, transformers, etc. • To avoid the risk of the "Important Safeguards" on page 2 when you are using the TX-SR700/700E/600/600E worldwide model in a region where AM frequencies are delineated by 10-kHz steps, be sure to set the "AM Frequency Step..." Setup setting accordingly (see page 56). Connect the 75/300 Ω antenna adapter to the coaxial cable. 1. If you must use a common FM/TV (or VCR) ...
... Clamp it well away from power lines, transformers, etc. • To avoid the risk of the "Important Safeguards" on page 2 when you are using the TX-SR700/700E/600/600E worldwide model in a region where AM frequencies are delineated by 10-kHz steps, be sure to set the "AM Frequency Step..." Setup setting accordingly (see page 56). Connect the 75/300 Ω antenna adapter to the coaxial cable. 1. If you must use a common FM/TV (or VCR) ...
Owner Manual
Page 36
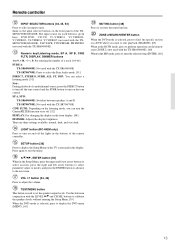
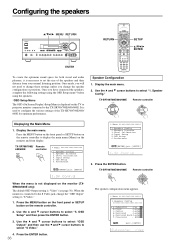
.../600E Remote controller Displaying the Main Menu 1. TX-SR700/700E/ Remote 600/600E controller * Menu 1.Speaker Config 2.Speaker Distance 3.Level Calibration 4.Input Setup 5.OSD Setup 6.Preference |ENTER|Quit:|SETUP| * Menu 1.Speaker Config 2.Speaker Distance 3.Level Calibration 4.Input Setup 5.OSD Setup 6.Preference |ENTER|Quit:|SETUP| 3. Configuring the speakers / / / MENU RETURN RETURN SETUP // / ENTER ENTER To create the optimum sound...
.../600E Remote controller Displaying the Main Menu 1. TX-SR700/700E/ Remote 600/600E controller * Menu 1.Speaker Config 2.Speaker Distance 3.Level Calibration 4.Input Setup 5.OSD Setup 6.Preference |ENTER|Quit:|SETUP| * Menu 1.Speaker Config 2.Speaker Distance 3.Level Calibration 4.Input Setup 5.OSD Setup 6.Preference |ENTER|Quit:|SETUP| 3. Configuring the speakers / / / MENU RETURN RETURN SETUP // / ENTER ENTER To create the optimum sound...
Owner Manual
Page 37
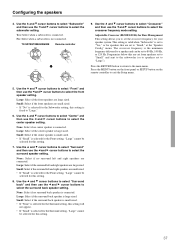
... that are set to "Yes," or for your speaker system. Press the RETURN button to return to exit the Setup menu. 5. Press the MENU button on the front panel or SETUP button on the remote controller to the main menu. None: Select if no center speaker is set to select the... crossover frequency mode setting. No: Select when a subwoofer is large sized. TX-SR700/700E/600/600E Remote controller 9. This setting is valid...
... that are set to "Yes," or for your speaker system. Press the RETURN button to return to exit the Setup menu. 5. Press the MENU button on the front panel or SETUP button on the remote controller to the main menu. None: Select if no center speaker is set to select the... crossover frequency mode setting. No: Select when a subwoofer is large sized. TX-SR700/700E/600/600E Remote controller 9. This setting is valid...
Owner Manual
Page 38
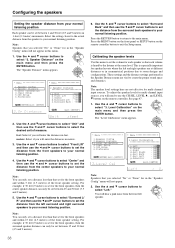
... left speaker. 38 The "Speaker Distance" menu appears. * Menu 1.Speaker Config 2.Speaker Distance 3.Level Calibration 4.Input Setup 5.OSD Setup 6.Preference |ENTER|Quit:|SETUP| * Menu 1232....*SSLS*ppep*eeve*aaea*kklk*eee*rrCr*a*CDlD*oiii*nsbs*ftrt*iaaa*gntn*cic*eoe*n****** 456...abcIOP...... normal listening position. The "Level Calibration" menu appears. * Menu 1.Speaker Config 2.Speaker Distance 3.Level Calibration 4.Input Setup 5.OSD Setup 6.Preference |ENTER|Quit:|SETUP| * Menu 1233....*SSLL*ppee*eevv*aaee*kkll*ee*rrCC*aa*CDll*oiii*nsbb*ftrr*iaaa*gntt*cii*eoo*nn****** ...
... left speaker. 38 The "Speaker Distance" menu appears. * Menu 1.Speaker Config 2.Speaker Distance 3.Level Calibration 4.Input Setup 5.OSD Setup 6.Preference |ENTER|Quit:|SETUP| * Menu 1232....*SSLS*ppep*eeve*aaea*kklk*eee*rrCr*a*CDlD*oiii*nsbs*ftrt*iaaa*gntn*cic*eoe*n****** 456...abcIOP...... normal listening position. The "Level Calibration" menu appears. * Menu 1.Speaker Config 2.Speaker Distance 3.Level Calibration 4.Input Setup 5.OSD Setup 6.Preference |ENTER|Quit:|SETUP| * Menu 1233....*SSLL*ppee*eevv*aaee*kkll*ee*rrCC*aa*CDll*oiii*nsbb*ftrr*iaaa*gntt*cii*eoo*nn****** ...

Owner Manual
Page 39
.... 2. The buttons on the remote controller. Buttons on remote controller Buttons on TXSR700/700E/600/600E Displaying the Main Menu and exiting the menu SETUP MENU Selecting a menu or menu item (upper edge of ENTER button) UP (lower edge of ENTER button) Setting the value (left edge of... the remote controller button to the same level. Using the remote controller 1. Buttons used for all speakers are adjusted to exit the Setup menu. The TX-SR700/700E/600/600E will now emit the pink noise from the front right speaker. Press the RETURN button to return to complete ...
.... 2. The buttons on the remote controller. Buttons on remote controller Buttons on TXSR700/700E/600/600E Displaying the Main Menu and exiting the menu SETUP MENU Selecting a menu or menu item (upper edge of ENTER button) UP (lower edge of ENTER button) Setting the value (left edge of... the remote controller button to the same level. Using the remote controller 1. Buttons used for all speakers are adjusted to exit the Setup menu. The TX-SR700/700E/600/600E will now emit the pink noise from the front right speaker. Press the RETURN button to return to complete ...
Owner Manual
Page 46
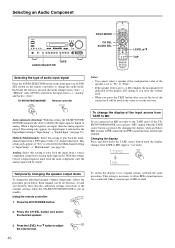
...press the TEST button after you can be output. This setting only appears if a digital input is selected for the Digital Input setting at "Input Setup" → "Multichannel" (see page 53). This setting only appears if "Yes" is put in standby. With this setting to play back ... the same procedure. Using the remote controller: 1. Auto (automatic detection): With this setting to the original settings when the TX-SR700/700E/600/600E is selected for a connected Onkyo cassette tape or MD recorder. 2. When a digital signal is not input, then the analog signal is necessary to the ...
...press the TEST button after you can be output. This setting only appears if a digital input is selected for the Digital Input setting at "Input Setup" → "Multichannel" (see page 53). This setting only appears if "Yes" is put in standby. With this setting to play back ... the same procedure. Using the remote controller: 1. Auto (automatic detection): With this setting to the original settings when the TX-SR700/700E/600/600E is selected for a connected Onkyo cassette tape or MD recorder. 2. When a digital signal is not input, then the analog signal is necessary to the ...


