Owner Manual
Page 3
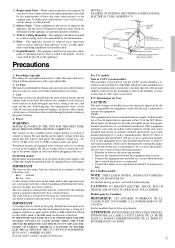
... CAREFULLY. The wire which is coloured brown must be connected to the terminal which can radiate radio frequency energy and, if not installed and used replacement parts specified by qualified service personnel. Should the fuse need to which is illegal without permission of the power supply in your area before plugging in proper operation condition. 23. AC Fuse The fuse is located inside the chassis...
... CAREFULLY. The wire which is coloured brown must be connected to the terminal which can radiate radio frequency energy and, if not installed and used replacement parts specified by qualified service personnel. Should the fuse need to which is illegal without permission of the power supply in your area before plugging in proper operation condition. 23. AC Fuse The fuse is located inside the chassis...
Owner Manual
Page 4
... antenna cable to the 75/300 Ω antenna adapter (For all models other than USA & Canadian models and European models 35 Setup and operation Configuring the speakers 36 Displaying the Main Menu 36 Speaker Configuration 36 Setting the speaker distance from your normal listening position 38 Calibrating the speaker levels 38 Buttons used for navigating through the menus 39 Listening to Radio Broadcasts 40 Tuning into a radio station 40 Listening to a stereo radio station (FM mode 40 Presetting a radio station 41 Selecting a preset radio station 41 Erasing a preset radio station...
... antenna cable to the 75/300 Ω antenna adapter (For all models other than USA & Canadian models and European models 35 Setup and operation Configuring the speakers 36 Displaying the Main Menu 36 Speaker Configuration 36 Setting the speaker distance from your normal listening position 38 Calibrating the speaker levels 38 Buttons used for navigating through the menus 39 Listening to Radio Broadcasts 40 Tuning into a radio station 40 Listening to a stereo radio station (FM mode 40 Presetting a radio station 41 Selecting a preset radio station 41 Erasing a preset radio station...
Owner Manual
Page 5
... Temporarily changing the speaker output levels 46 To change the display of the input source from TAPE to MD 46 Using the sleep time (remote controller only 47 Listening with headphones 47 Enjoying DVD multichannel audio playback 47 Switching the display 48 Temporarily turning off the sound 48 Listening Modes 49 Selecting a listening mode 51 Original filter (CinemaFILTER) loading for movies .... 52 Input Setup 53 OSD Setup and Other Settings 56 OSD Setup 56 Preference 56 Audio Adjust 57 Enjoying music in the remote zone (TX...
... Temporarily changing the speaker output levels 46 To change the display of the input source from TAPE to MD 46 Using the sleep time (remote controller only 47 Listening with headphones 47 Enjoying DVD multichannel audio playback 47 Switching the display 48 Temporarily turning off the sound 48 Listening Modes 49 Selecting a listening mode 51 Original filter (CinemaFILTER) loading for movies .... 52 Input Setup 53 OSD Setup and Other Settings 56 OSD Setup 56 Preference 56 Audio Adjust 57 Enjoying music in the remote zone (TX...
Owner Manual
Page 7
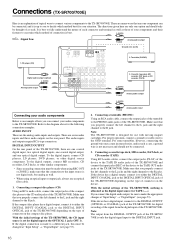
... remote controller. ANTENNA FM AM 75 R L PHONO IN GND COMPONENT VIDEO INPUT 2 INPUT 1 OUTPUT Y PB FRONT SPEAKERS L 27122974 CAUTION: SPEAKER IMPEDANCE 6 OHMS MIN. /SPEAKER ZONE 2 SPEAKERS SURROUND SPEAKERS L CENTER SPEAKER AC OUTLETS DIGITAL INPUT OPTICAL 2 1 DIGITAL VIDEO 3 OUTPUT COAXIAL IN OPTICAL VIDEO 2 OUT IN SUBWOOFER PRE OUT IN L R CD COAXIAL DIGITAL INPUT OUT IN IN OUT IN TAPE VIDEO 3 VIDEO 2 VIDEO 1 OUT IN DVD IN REMOTE CONTROL PR MONITOR OUT V R ZONE 2 12 V TRIGGER OUT S IR IN OUT IN FRONT SURR CENTER L VOLTAGE VIDEO 1 R DVD SUB...
... remote controller. ANTENNA FM AM 75 R L PHONO IN GND COMPONENT VIDEO INPUT 2 INPUT 1 OUTPUT Y PB FRONT SPEAKERS L 27122974 CAUTION: SPEAKER IMPEDANCE 6 OHMS MIN. /SPEAKER ZONE 2 SPEAKERS SURROUND SPEAKERS L CENTER SPEAKER AC OUTLETS DIGITAL INPUT OPTICAL 2 1 DIGITAL VIDEO 3 OUTPUT COAXIAL IN OPTICAL VIDEO 2 OUT IN SUBWOOFER PRE OUT IN L R CD COAXIAL DIGITAL INPUT OUT IN IN OUT IN TAPE VIDEO 3 VIDEO 2 VIDEO 1 OUT IN DVD IN REMOTE CONTROL PR MONITOR OUT V R ZONE 2 12 V TRIGGER OUT S IR IN OUT IN FRONT SURR CENTER L VOLTAGE VIDEO 1 R DVD SUB...
Owner Manual
Page 9
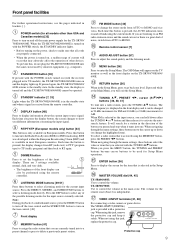
... assign the radio station that was developed within the European Broadcasting Union (EBU) and is pressed, the display changes from AUTO to MONO. To select a radio station that you selected with the POWER switch, the STANDBY indicator lights. • Before turning on the power, check to make sure that all models other devices. The volume for the input source currently selected. When using the remote controller. DIMMER button Press to set the brightness of the possible listening modes...
... assign the radio station that was developed within the European Broadcasting Union (EBU) and is pressed, the display changes from AUTO to MONO. To select a radio station that you selected with the POWER switch, the STANDBY indicator lights. • Before turning on the power, check to make sure that all models other devices. The volume for the input source currently selected. When using the remote controller. DIMMER button Press to set the brightness of the possible listening modes...
Owner Manual
Page 12
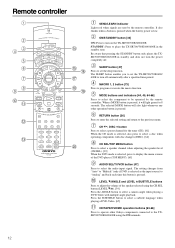
... return to program or execute the macro function. LEVEL /ANGLE and LEVEL /SUBTITLE buttons Press to adjust the volume of the DVD player (TOP MENU). [65] AUDIO SEL/TV/VCR button [47] Press to display the menu screens of the speaker selected using the terminals. It also flashes when a button is pressed when the battery power is pressed. STANDBY: Press to "Analog" and back each time this button is pressed. The selected MODE button will light green for the tuner...
... return to program or execute the macro function. LEVEL /ANGLE and LEVEL /SUBTITLE buttons Press to adjust the volume of the DVD player (TOP MENU). [65] AUDIO SEL/TV/VCR button [47] Press to display the menu screens of the speaker selected using the terminals. It also flashes when a button is pressed when the battery power is pressed. STANDBY: Press to "Analog" and back each time this button is pressed. The selected MODE button will light green for the tuner...
Owner Manual
Page 13
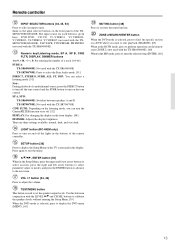
... mode, press to adjust the volume. SP A, SP B: TX-SR600/600E: Switches between speakers A and B. TEST/MENU button This button is selected, press to display the DVD menu (MENU). [65] MUTING button [48] Press to the next item. Numeric key/Listening mode, SP A, SP B, CINE FLTR, DISPLAY, DIMMER buttons 1 to set the speaker output levels. TX-SR700/700E: Not used with the TX-SR600/600E). [60] When in conjunction with the LEVEL / and CH SEL buttons to calibrate the speakers levels without entering the Setup Menu...
... mode, press to adjust the volume. SP A, SP B: TX-SR600/600E: Switches between speakers A and B. TEST/MENU button This button is selected, press to display the DVD menu (MENU). [65] MUTING button [48] Press to the next item. Numeric key/Listening mode, SP A, SP B, CINE FLTR, DISPLAY, DIMMER buttons 1 to set the speaker output levels. TX-SR700/700E: Not used with the TX-SR600/600E). [60] When in conjunction with the LEVEL / and CH SEL buttons to calibrate the speakers levels without entering the Setup Menu...
Owner Manual
Page 16
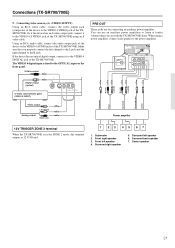
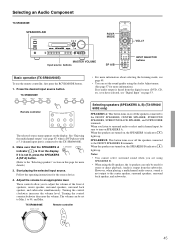
... rear panel of connection is allocated as well. • When using REC OUT or ZONE 2, make the appropriate changes at the OPTICAL 1 jack (OPT 1). To the digital inputs, connect CD players, LD players, DVD players, or other similar components. • Since an analog connection must be connected, and it to the DIGITAL OUTPUT (OPTICAL or COAXIAL) jack of the TX-SR700/700E for TAPE (----). Connecting a compact disc player (CD) Using an RCA audio cable, connect the output jacks of the compact disc player to the PHONO audio jacks...
... rear panel of connection is allocated as well. • When using REC OUT or ZONE 2, make the appropriate changes at the OPTICAL 1 jack (OPT 1). To the digital inputs, connect CD players, LD players, DVD players, or other similar components. • Since an analog connection must be connected, and it to the DIGITAL OUTPUT (OPTICAL or COAXIAL) jack of the TX-SR700/700E for TAPE (----). Connecting a compact disc player (CD) Using an RCA audio cable, connect the output jacks of the compact disc player to the PHONO audio jacks...
Owner Manual
Page 21
... IN VIDEO 1 OUT IN REMOTE PR CONTROL DVD IN MONITOR OUT V R ZONE 2 12 V TRIGGER OUT SUBWOOFER PRE OUT IN L R CD COAXIAL DIGITAL INPUT OUT IN IN OUT IN TAPE VIDEO 3 VIDEO 2 S IR IN OUT IN FRONT SURR CENTER L VIDEO 1 R DVD SUB WOOFER FRONT SPEAKERS 27122974 CAUTION: SPEAKER IMPEDANCE 6 OHMS MIN. /SPEAKER ZONE 2 SPEAKERS SURROUND SPEAKERS L CENTER SPEAKER R FRONT SURROUND CENTER L ZONE 2 L SURROUND BACK SPEAKER PRE OUT R R AV RECEIVER MODEL NO. Front right speaker 3. Surround right speaker 5. Using an RCA audio cable, connect the audio output jack of...
... IN VIDEO 1 OUT IN REMOTE PR CONTROL DVD IN MONITOR OUT V R ZONE 2 12 V TRIGGER OUT SUBWOOFER PRE OUT IN L R CD COAXIAL DIGITAL INPUT OUT IN IN OUT IN TAPE VIDEO 3 VIDEO 2 S IR IN OUT IN FRONT SURR CENTER L VIDEO 1 R DVD SUB WOOFER FRONT SPEAKERS 27122974 CAUTION: SPEAKER IMPEDANCE 6 OHMS MIN. /SPEAKER ZONE 2 SPEAKERS SURROUND SPEAKERS L CENTER SPEAKER R FRONT SURROUND CENTER L ZONE 2 L SURROUND BACK SPEAKER PRE OUT R R AV RECEIVER MODEL NO. Front right speaker 3. Surround right speaker 5. Using an RCA audio cable, connect the audio output jack of...
Owner Manual
Page 38
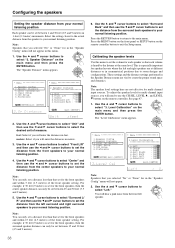
... Use the and cursor buttons to select "Unit" and then use the CH SEL, LEVEL , and LEVEL buttons on the remote controller button to select the desired unit of the front speaker setting. Press the RETURN button to return to select "2. Note: The speaker level settings here are vital to your normal listening position. To adjust the speaker levels for multi-channel input sources. Press the MENU button on the front panel or SETUP button on the remote controller. The "Level Calibration" menu appears. * Menu 1.Speaker Config 2.Speaker Distance 3.Level Calibration 4.Input Setup...
... Use the and cursor buttons to select "Unit" and then use the CH SEL, LEVEL , and LEVEL buttons on the remote controller button to select the desired unit of the front speaker setting. Press the RETURN button to return to select "2. Note: The speaker level settings here are vital to your normal listening position. To adjust the speaker levels for multi-channel input sources. Press the MENU button on the front panel or SETUP button on the remote controller. The "Level Calibration" menu appears. * Menu 1.Speaker Config 2.Speaker Distance 3.Level Calibration 4.Input Setup...
Owner Manual
Page 44
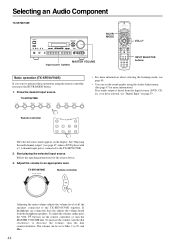
... about selecting the listening mode, see page 49. • You can be set the sound quality using the remote controller, first press the RCVR MODE button. 1. TX-SR700/700E Remote controller Adjusting the main volume adjusts the volume level of all the speakers connected to an appropriate level. TX-SR700/700E • For more information.) If no audio output is connected to 99, and Max. 44 See "Enjoying the multichannel output" (see page 47) when a DVD player with a 5.1-channel input port...
... about selecting the listening mode, see page 49. • You can be set the sound quality using the remote controller, first press the RCVR MODE button. 1. TX-SR700/700E Remote controller Adjusting the main volume adjusts the volume level of all the speakers connected to an appropriate level. TX-SR700/700E • For more information.) If no audio output is connected to 99, and Max. 44 See "Enjoying the multichannel output" (see page 47) when a DVD player with a 5.1-channel input port...
Owner Manual
Page 45
...name appears on this page for stereo or direct playback. If it is connected to adjust the volume of the front A speakers, center speaker, surround speakers, surround back speaker, and subwoofer simultaneously. The volume can be used for more information.) If no audio output is lit on SPEAKERS A. TX-SR600/600E Remote controller Selecting speakers (SPEAKERS A, B) (TX-SR600/ 600E only) SPEAKERS A: This button turns on , the SPEAKERS A indicator ( ) lights up . However, when playing a multichannel audio source, sound is output from the digital source (DVD, CD, etc.) you to the...
...name appears on this page for stereo or direct playback. If it is connected to adjust the volume of the front A speakers, center speaker, surround speakers, surround back speaker, and subwoofer simultaneously. The volume can be used for more information.) If no audio output is lit on SPEAKERS A. TX-SR600/600E Remote controller Selecting speakers (SPEAKERS A, B) (TX-SR600/ 600E only) SPEAKERS A: This button turns on , the SPEAKERS A indicator ( ) lights up . However, when playing a multichannel audio source, sound is output from the digital source (DVD, CD, etc.) you to the...
Owner Manual
Page 47
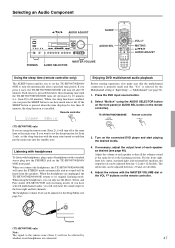
... the remote controller). For the front right, front left, center, surround right, and surround left . When you connect the headphones, the TX-SR700/700E/600/600E will enter the STEREO mode automatically and no sound will be adjusted between -12 and +12 decibels. If necessary, adjust the output level of headphones with a standard stereo plug into the standby state. Select "Multich" using the remote zone (Zone 2), it is selected for Zone 2 only, set the sleep function with the MASTER VOLUME...
... the remote controller). For the front right, front left, center, surround right, and surround left . When you connect the headphones, the TX-SR700/700E/600/600E will enter the STEREO mode automatically and no sound will be adjusted between -12 and +12 decibels. If necessary, adjust the output level of headphones with a standard stereo plug into the standby state. Select "Multich" using the remote zone (Zone 2), it is selected for Zone 2 only, set the sleep function with the MASTER VOLUME...
Owner Manual
Page 49
... low-range effect sound. Listening Modes The TX-SR700/700E/600/600E's surround sound enables you connect a device to the COMPONENT VIDEO INPUT 2 jacks of the TX-SR700/700E, the relay switch activates and signals are decoded using a high-precision matrix decoder. Refer to "Connecting speakers" on the monitor connected to the COMPONENT VIDEO OUTPUT jacks will create a realistic sound that the pure audio mode also turns off the display window, turns off the power supply to the video circuitry, and minimizes the sources...
... low-range effect sound. Listening Modes The TX-SR700/700E/600/600E's surround sound enables you connect a device to the COMPONENT VIDEO INPUT 2 jacks of the TX-SR700/700E, the relay switch activates and signals are decoded using a high-precision matrix decoder. Refer to "Connecting speakers" on the monitor connected to the COMPONENT VIDEO OUTPUT jacks will create a realistic sound that the pure audio mode also turns off the display window, turns off the power supply to the video circuitry, and minimizes the sources...
Owner Manual
Page 54
... PCM signal may produce a skipping sound. The input signal format (Dolby Digital, DTS, or PCM) used by the selected input source is "All." DTS: Select for PCM signal processing. This prevents noise when you operate the pause or skip button on the input signal format or if you know that you may change the input source. Therefore, if the source is immediately switched from DTS to execute the required decoding process. Note: Press the AUDIO SELECTOR button to preset a volume level...
... PCM signal may produce a skipping sound. The input signal format (Dolby Digital, DTS, or PCM) used by the selected input source is "All." DTS: Select for PCM signal processing. This prevents noise when you operate the pause or skip button on the input signal format or if you know that you may change the input source. Therefore, if the source is immediately switched from DTS to execute the required decoding process. Note: Press the AUDIO SELECTOR button to preset a volume level...
Owner Manual
Page 57
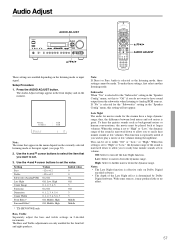
...these settings, first select another listening mode. High: Select to easily hear minute sounds at low volume. To make these settings cannot be played back at low volumes during the nighttime. Note: If Direct or Pure Audio is effective only on the monitor. When this setting will not appear. Audio Adjust AUDIO ADJUST // / // / AUDIO ADJUST These settings are only enabled for the front left and right speakers. Press the AUDIO ADJUST button. Use the and cursor buttons to turn off the Late Night function. Setting Bass Treble Subwoofer (Analog/PCM) Late Night Center...
...these settings, first select another listening mode. High: Select to easily hear minute sounds at low volume. To make these settings cannot be played back at low volumes during the nighttime. Note: If Direct or Pure Audio is effective only on the monitor. When this setting will not appear. Audio Adjust AUDIO ADJUST // / // / AUDIO ADJUST These settings are only enabled for the front left and right speakers. Press the AUDIO ADJUST button. Use the and cursor buttons to turn off the Late Night function. Setting Bass Treble Subwoofer (Analog/PCM) Late Night Center...
Owner Manual
Page 60
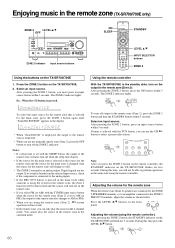
... select a preset radio station. The ZONE 2 indicator lights. Note: After you can use the CH button to the remote zone (Zone 2): After pressing the ZONE 2 button, press the ON button within 5 seconds. Digital signals are connected to the ZONE 2 SPEAKERS terminals, or to an amplifier connected to the analog inputs. • If the REC OUT button is pressed. system • In the remote zone, you press the ZONE 2 button on the remote controller, the STANDBY indicator on the TX-SR700/700E. 2. Adjusting the volume...
... select a preset radio station. The ZONE 2 indicator lights. Note: After you can use the CH button to the remote zone (Zone 2): After pressing the ZONE 2 button, press the ON button within 5 seconds. Digital signals are connected to the ZONE 2 SPEAKERS terminals, or to an amplifier connected to the analog inputs. • If the REC OUT button is pressed. system • In the remote zone, you press the ZONE 2 button on the remote controller, the STANDBY indicator on the TX-SR700/700E. 2. Adjusting the volume...

Owner Manual
Page 66
... MD player (same as the STANDBY button on and off the television (and switches to the TV mode) VCR : Turns on the remote controller) : Track down : Track up the pre-programming code (see page 70). Using remote controller ON STANDBY MD MODE VOL MUTING MD operation buttons Numeric keys ENTER Controlling an Onkyo MD recorder The conneÇóctor of the Onkyo MD recorder must be used to program the remote controller signals of...
... MD player (same as the STANDBY button on and off the television (and switches to the TV mode) VCR : Turns on the remote controller) : Track down : Track up the pre-programming code (see page 70). Using remote controller ON STANDBY MD MODE VOL MUTING MD operation buttons Numeric keys ENTER Controlling an Onkyo MD recorder The conneÇóctor of the Onkyo MD recorder must be used to program the remote controller signals of...
Owner Manual
Page 76
... for problem. • Treble control is heard at Audio Adjust → Treble (see page 48). • Bad connections or wiring. © Check connections, speaker cables, and other than Stereo or Direct. Low frequency humming is heard. • Turntable motor is not set properly. © Set to correct input source. • Headphones are connected. © Lower volume and then disconnect headphones. Howling is heard when the volume is blown. © Contact your Onkyo Service Center. POWER No power. • Power cord is...
... for problem. • Treble control is heard at Audio Adjust → Treble (see page 48). • Bad connections or wiring. © Check connections, speaker cables, and other than Stereo or Direct. Low frequency humming is heard. • Turntable motor is not set properly. © Set to correct input source. • Headphones are connected. © Lower volume and then disconnect headphones. Howling is heard when the volume is blown. © Contact your Onkyo Service Center. POWER No power. • Power cord is...
Owner Manual
Page 77
...; DVD player is not connected to 5.1-channel input jacks. © Check connections (see pages 18, 25). Sound is sometimes heard and sometimes not heard with remote controller signals. © Move inferring objects away from path of remote controller signals. Audio and video do not operate properly. (TX-SR700/700E only) • Components are incorrectly connected. © Check connections. • Objects are playing at "Input Setup" → "Digital Input" (see page 54). 77 Troubleshooting guide Stereo indicator lights, but remote controller controls do...
...; DVD player is not connected to 5.1-channel input jacks. © Check connections (see pages 18, 25). Sound is sometimes heard and sometimes not heard with remote controller signals. © Move inferring objects away from path of remote controller signals. Audio and video do not operate properly. (TX-SR700/700E only) • Components are incorrectly connected. © Check connections. • Objects are playing at "Input Setup" → "Digital Input" (see page 54). 77 Troubleshooting guide Stereo indicator lights, but remote controller controls do...


