
Owners Manual - English
Page 2
...24 Using Direct 24 Using the Advanced Music Optimizer 24 Setting the Audio options 25 Displaying the Fixed PCM Setting menu 26 6 Setup Using the Setup 27 Manual speaker setup 27 Speaker Setting 27 X.Over 28 Channel Level 28 Speaker Distance 29 The Input Assign menu 29 The Auto Power Down menu ...technology 21 Pairing with no HDMI terminal 13 Connecting antennas 14 Using external antennas 14 Connecting a USB device 15 Plugging in the receiver 15 3 Basic Setup Automatically setting up for buying this Onkyo product. Contents Thank you will know how to your model properly.
...24 Using Direct 24 Using the Advanced Music Optimizer 24 Setting the Audio options 25 Displaying the Fixed PCM Setting menu 26 6 Setup Using the Setup 27 Manual speaker setup 27 Speaker Setting 27 X.Over 28 Channel Level 28 Speaker Distance 29 The Input Assign menu 29 The Auto Power Down menu ...technology 21 Pairing with no HDMI terminal 13 Connecting antennas 14 Using external antennas 14 Connecting a USB device 15 Plugging in the receiver 15 3 Basic Setup Automatically setting up for buying this Onkyo product. Contents Thank you will know how to your model properly.
Owners Manual - English
Page 3
...place the speakers will have hot fumes or oils (such as a kitchen) The unit is a full-fledged AV receiver equipped with the sound. - setup to set the video input on your system • Automatically setting up using connections other movement - in places that have a big effect on the... menu (page 29) (When using a digital connection from the Blu-ray Disc/DVD player to put it on the following supplied accessories: • Setup microphone • Remote control • AAA size IEC R03 dry cell batteries (to this receiver. near a cassette deck (or close to hook up...
...place the speakers will have hot fumes or oils (such as a kitchen) The unit is a full-fledged AV receiver equipped with the sound. - setup to set the video input on your system • Automatically setting up using connections other movement - in places that have a big effect on the... menu (page 29) (When using a digital connection from the Blu-ray Disc/DVD player to put it on the following supplied accessories: • Setup microphone • Remote control • AAA size IEC R03 dry cell batteries (to this receiver. near a cassette deck (or close to hook up...

Owners Manual - English
Page 4
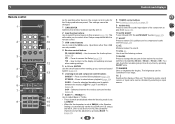
...when making settings 7 Tuner control/Cursor buttons TUNING - RETURN - These are also used to move the cursors when displaying the Setup, for standard decoding and to switch between the modes of remote control on page 5. 13 14 6 HOME/ENTER/RETURN buttons HOME - DSP - ... DSP B D/DVD CBL /SAT STRM BOX GAME C D HOME ENTER RETURN T V TUNER USB MASTER VOLUME 8 2 4 31 PHONES TONE SETUP MIC USB 5V / 0.5A AV RECEIVER TX-SR373 9 10 11 12 1 ÍON/STANDBY 2 BLUETOOTH Switches to the BT Audio input 3 Remote sensor Receives the signals from the speakers. ...
...when making settings 7 Tuner control/Cursor buttons TUNING - RETURN - These are also used to move the cursors when displaying the Setup, for standard decoding and to switch between the modes of remote control on page 5. 13 14 6 HOME/ENTER/RETURN buttons HOME - DSP - ... DSP B D/DVD CBL /SAT STRM BOX GAME C D HOME ENTER RETURN T V TUNER USB MASTER VOLUME 8 2 4 31 PHONES TONE SETUP MIC USB 5V / 0.5A AV RECEIVER TX-SR373 9 10 11 12 1 ÍON/STANDBY 2 BLUETOOTH Switches to the BT Audio input 3 Remote sensor Receives the signals from the speakers. ...
Owners Manual - English
Page 6
... Use the arrow buttons when setting up your surround sound system (page 27). 6 Listening mode and component control buttons DIRECT - DSP - Press to access the Setup (page 27). - 1 Remote control 1 RECEIVER BD/DVD CBL/SAT STRM BOX AUDIO SEL 9 LATE NIGHT 2 10 TOP MENU 11 3 QUICK MENU 12 4... the front speaker is set above 150 Hz, the subwoofer channel level will enable you to control other devices, the remote control codes for the Onkyo products are not possible. 4 Receiver control buttons Q (QUICK MENU) - Off). You can be changed. 1 ÍRECEIVER Switches the receiver ...
... Use the arrow buttons when setting up your surround sound system (page 27). 6 Listening mode and component control buttons DIRECT - DSP - Press to access the Setup (page 27). - 1 Remote control 1 RECEIVER BD/DVD CBL/SAT STRM BOX AUDIO SEL 9 LATE NIGHT 2 10 TOP MENU 11 3 QUICK MENU 12 4... the front speaker is set above 150 Hz, the subwoofer channel level will enable you to control other devices, the remote control codes for the Onkyo products are not possible. 4 Receiver control buttons Q (QUICK MENU) - Off). You can be changed. 1 ÍRECEIVER Switches the receiver ...

Owners Manual - English
Page 9
... open the tabs and insert exposed wire. 3 Release the tabs. 12 mm (1/2 in the diagram) but using at least three speakers is recommended, and a complete setup is output from each of the bare speaker wire touches the back panel it may cause the power to the AC power source. To prevent...
... open the tabs and insert exposed wire. 3 Release the tabs. 12 mm (1/2 in the diagram) but using at least three speakers is recommended, and a complete setup is output from each of the bare speaker wire touches the back panel it may cause the power to the AC power source. To prevent...
Owners Manual - English
Page 10
... and sound signals can be transmitted simultaneously with , including DVDVideo, DVD-Audio, SACD, Dolby Digital Plus, Dolby TrueHD, DTS-HD Master Audio (see The HDMI Setup menu on the connected equipment. - 4K 24p, 4K 25p, 4K 30p, 4K 50p and 4K 60p signals are trademarks of Sony 10 In this case...
... and sound signals can be transmitted simultaneously with , including DVDVideo, DVD-Audio, SACD, Dolby Digital Plus, Dolby TrueHD, DTS-HD Master Audio (see The HDMI Setup menu on the connected equipment. - 4K 24p, 4K 25p, 4K 30p, 4K 50p and 4K 60p signals are trademarks of Sony 10 In this case...
Owners Manual - English
Page 12
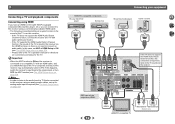
Please refer to the TV's operation manual for directions on connections and setup for analog audio input is required (see The Input Assign menu on page ..., switch the receiver's input back to the original input, or turn OFF the ARC function (see The HDMI Setup menu on page 30). Important • When the ARC function is ON and the receiver is required to listen... receiver. - OSD can connect it to this receiver using an analog audio cables, set ARC at HDMI Setup to ON (see The HDMI Setup menu on page 30). - 2 Connecting a TV and playback components Connecting using HDMI If you have an...
Please refer to the TV's operation manual for directions on connections and setup for analog audio input is required (see The Input Assign menu on page ..., switch the receiver's input back to the original input, or turn OFF the ARC function (see The HDMI Setup menu on page 30). Important • When the ARC function is ON and the receiver is required to listen... receiver. - OSD can connect it to this receiver using an analog audio cables, set ARC at HDMI Setup to ON (see The HDMI Setup menu on page 30). - 2 Connecting a TV and playback components Connecting using HDMI If you have an...
Owners Manual - English
Page 15
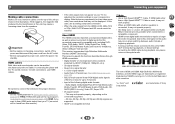
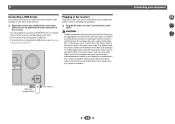
... likely to be disconnected by removing the mains plug from the wall socket when not in the cord or tie it damaged, ask your nearest Onkyo authorized service center or your dealer for a replacement. • The receiver should be routed such that they are wet as this receiver, including ... to this could cause a short circuit or electric shock. Check the power cord once in after you an electrical shock. USB SETUP MIC USB 5V / 0.5A AV RECEIVER TX-SR373 USB mass storage device This receiver Connecting your USB device to the USB terminal on the front panel of this receiver. •...
... likely to be disconnected by removing the mains plug from the wall socket when not in the cord or tie it damaged, ask your nearest Onkyo authorized service center or your dealer for a replacement. • The receiver should be routed such that they are wet as this receiver, including ... to this could cause a short circuit or electric shock. Check the power cord once in after you an electrical shock. USB SETUP MIC USB 5V / 0.5A AV RECEIVER TX-SR373 USB mass storage device This receiver Connecting your USB device to the USB terminal on the front panel of this receiver. •...
Owners Manual - English
Page 16
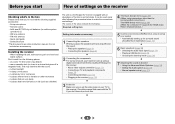
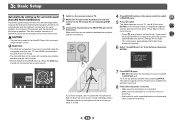
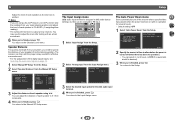
... the receiver and your TV. 2 Switch the TV input to your normal listening position. TUNING PRESET HOME ENTER RETURN TUNER USB MASTER VOLUME SETUP MIC USB 5V / 0.5A AV RECEIVER TX-SR373 If you cancel the AccuEQ Room Cal. If you have connected using the AccuEQ Room Cal. 3: Basic... Setup Automatically setting up . • See below for notes regarding background noise and other possible interference. 16 This also enables correction of distortion ...
... the receiver and your TV. 2 Switch the TV input to your normal listening position. TUNING PRESET HOME ENTER RETURN TUNER USB MASTER VOLUME SETUP MIC USB 5V / 0.5A AV RECEIVER TX-SR373 If you cancel the AccuEQ Room Cal. If you have connected using the AccuEQ Room Cal. 3: Basic... Setup Automatically setting up . • See below for notes regarding background noise and other possible interference. 16 This also enables correction of distortion ...
Owners Manual - English
Page 17
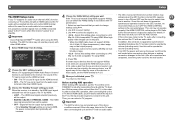
...8226; For correct speaker settings, do not adjust the volume during the test tones. 10 Confirm the speaker configuration. setup below). setup has finished, then the Setup screen is automatically displayed. Check for the AccuEQ Room Cal. The configuration shown on page 27). When you have....; to be happening, switch off the walls, obstacles blocking the speakers from the listening position. The settings made in step 11, the AccuEQ Room Cal. setup. 2 4 31 17 Check Front [ YES ] Center [ YES ] Surround [ YES ] Subwoofer [ YES ] 9:NEXT OK Return • With ...
...8226; For correct speaker settings, do not adjust the volume during the test tones. 10 Confirm the speaker configuration. setup below). setup has finished, then the Setup screen is automatically displayed. Check for the AccuEQ Room Cal. The configuration shown on page 27). When you have....; to be happening, switch off the walls, obstacles blocking the speakers from the listening position. The settings made in step 11, the AccuEQ Room Cal. setup. 2 4 31 17 Check Front [ YES ] Center [ YES ] Surround [ YES ] Subwoofer [ YES ] 9:NEXT OK Return • With ...
Owners Manual - English
Page 18
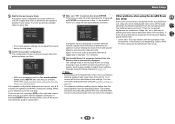
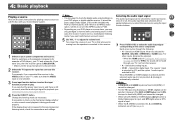
.... 3 Press input function buttons to select the input function you have one), then the receiver (press ÍRECEIVER). • Make sure the setup microphone is disconnected. 2 Switch the TV input to the input that the VIDEO input is an MPEG audio option, set this to convert the MPEG...is not provided, A (analog) is still no sound, select the audio input signal for playback (see page 5). 18 However, if the ARC at HDMI Setup is set to play. Note • You may only get digital 2 channel stereo and analog sound. Selects an HDMI signal. 4: Basic playback Playing a source...
.... 3 Press input function buttons to select the input function you have one), then the receiver (press ÍRECEIVER). • Make sure the setup microphone is disconnected. 2 Switch the TV input to the input that the VIDEO input is an MPEG audio option, set this to convert the MPEG...is not provided, A (analog) is still no sound, select the audio input signal for playback (see page 5). 18 However, if the ARC at HDMI Setup is set to play. Note • You may only get digital 2 channel stereo and analog sound. Selects an HDMI signal. 4: Basic playback Playing a source...
Owners Manual - English
Page 24
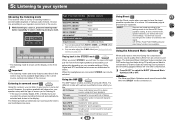
...listening to any source in surround sound SURR SURROUND Using this section may not be set to see Setting the Audio options on your speaker setup and the type of various audio formats. Game-Sports Suitable for sports programs. Game-Rock Creates a live concert sound for video games. ...you want . Game-RPG Suitable for rock and/ or pop music. Important • The listening modes and many features described in the Manual SP Setup (speaker setting, X.Over, channel level, speaker distance), as well as with various soundtracks to ON, when the DIRECT mode is Dolby Digital, DTS...
...listening to any source in surround sound SURR SURROUND Using this section may not be set to see Setting the Audio options on your speaker setup and the type of various audio formats. Game-Sports Suitable for sports programs. Game-Rock Creates a live concert sound for video games. ...you want . Game-RPG Suitable for rock and/ or pop music. Important • The listening modes and many features described in the Manual SP Setup (speaker setting, X.Over, channel level, speaker distance), as well as with various soundtracks to ON, when the DIRECT mode is Dolby Digital, DTS...
Owners Manual - English
Page 27
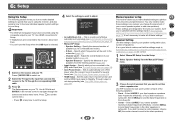
... 16, it isn't necessary to make detailed settings to specify how you're using the composite output to your TV. Manual speaker setup This receiver allows you to make sure that the settings made in Automatically setting up for surround sound (AccuEQ Room Calibration) on page...page 28). - Use HDMI connections for surround sound (AccuEQ Room Calibration) on the receiver and your TV. This is selected. X.Over - 6: Setup Using the Setup The following speakers: • Front - Press ÍRECEIVER to switch on page 16 are connected to the receiver, disconnect them. • You...
... 16, it isn't necessary to make detailed settings to specify how you're using the composite output to your TV. Manual speaker setup This receiver allows you to make sure that the settings made in Automatically setting up for surround sound (AccuEQ Room Calibration) on page...page 28). - Use HDMI connections for surround sound (AccuEQ Room Calibration) on the receiver and your TV. This is selected. X.Over - 6: Setup Using the Setup The following speakers: • Front - Press ÍRECEIVER to switch on page 16 are connected to the receiver, disconnect them. • You...
Owners Manual - English
Page 28
... Setting on -screen: 2c.Channel Level Front L Center [ Front R [ Surround R [ Surround L [ Subwoofer [ 0dB 0dB] 0dB] 0dB] 0dB] 0dB] Return 28 The Auto setup will be fixed to YES. In this case, try changing the position or direction of your front speakers and PLUS for the front speakers, the...; The test tones used in the amount of bass, it set to PLUS and YES or the front speakers set to the Manual SP Setup menu. 6 Setup • Surr - Select LARGE if your room you press ENTER. Depending on the speaker placement of each channel using /. You...
... Setting on -screen: 2c.Channel Level Front L Center [ Front R [ Surround R [ Surround L [ Subwoofer [ 0dB 0dB] 0dB] 0dB] 0dB] 0dB] Return 28 The Auto setup will be fixed to YES. In this case, try changing the position or direction of your front speakers and PLUS for the front speakers, the...; The test tones used in the amount of bass, it set to PLUS and YES or the front speakers set to the Manual SP Setup menu. 6 Setup • Surr - Select LARGE if your room you press ENTER. Depending on the speaker placement of each channel using /. You...
Owners Manual - English
Page 29
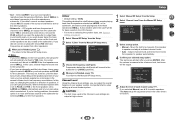
... the level after a specified time has passed (when the power has been on page 18. 1 Select 'Manual SP Setup' from the Setup. 2 Select 'Speaker Distance' from the Setup. You can select 2, 4 or 6 hours, or OFF (if no operation for the (CD) audio input terminal....Return Return 3 Select the desired input option for several hours). • Default setting: OFF 1 Select 'Auto Power Down' from the Manual SP Setup menu. 2.Manual SP Setup a.Speaker Setting b.X.Over c.Channel Level d.Speaker Distance 2d.Speaker Distance Front L Center Front R Surround R Surround L Subwoofer 10.0 ft [ 10.0...
... the level after a specified time has passed (when the power has been on page 18. 1 Select 'Manual SP Setup' from the Setup. 2 Select 'Speaker Distance' from the Setup. You can select 2, 4 or 6 hours, or OFF (if no operation for the (CD) audio input terminal....Return Return 3 Select the desired input option for several hours). • Default setting: OFF 1 Select 'Auto Power Down' from the Manual SP Setup menu. 2.Manual SP Setup a.Speaker Setting b.X.Over c.Channel Level d.Speaker Distance 2d.Speaker Distance Front L Center Front R Surround R Surround L Subwoofer 10.0 ft [ 10.0...
Owners Manual - English
Page 30
..., or a 3D signal may not operate properly with other than HDMI inputs. 3 Choose the 'Standby Through' setting you can select a TV program. 6 Setup The HDMI Setup menu If your TV supports an audio return channel (ARC) function, connect your TV and this unit with an HDMI cable and the TV... audio will be inputted into the wall socket. 2 4 31 30 The TV's sound is possible to transfer signals from the Setup. Use / to the relevant device's instruction manual for an audio cable to be input via the HDMI terminal. • OFF - Refer ...
..., or a 3D signal may not operate properly with other than HDMI inputs. 3 Choose the 'Standby Through' setting you can select a TV program. 6 Setup The HDMI Setup menu If your TV supports an audio return channel (ARC) function, connect your TV and this unit with an HDMI cable and the TV... audio will be inputted into the wall socket. 2 4 31 30 The TV's sound is possible to transfer signals from the Setup. Use / to the relevant device's instruction manual for an audio cable to be input via the HDMI terminal. • OFF - Refer ...
Owners Manual - English
Page 31
...input function is ON) # The CEC (Consumer Electronic Control) function may lie there. setup, the speaker size setting (LARGE or SMALL) is incorrect. If the message persists, call a Onkyo authorized independent service company. # If there is very little low frequency information in the ...+/- Check the setting for details. Refer to the relevant device's instruction manual for the Auto Power Down function (see Connecting your nearest Onkyo authorized independent service company to carry out repair work , turn OFF the HDMI CONTROL setting on page 8). # Use the same type of...
...input function is ON) # The CEC (Consumer Electronic Control) function may lie there. setup, the speaker size setting (LARGE or SMALL) is incorrect. If the message persists, call a Onkyo authorized independent service company. # If there is very little low frequency information in the ...+/- Check the setting for details. Refer to the relevant device's instruction manual for the Auto Power Down function (see Connecting your nearest Onkyo authorized independent service company to carry out repair work , turn OFF the HDMI CONTROL setting on page 8). # Use the same type of...
Owners Manual - English
Page 32
... the HDMI setting is set to the communication mode supporting the BLUETOOTH wireless technology. Be consistent with the Deep Color feature. The OSD screen (Setup, etc.) isn't displayed. # The OSD will not output from the HDMI terminal. Use HDMI connections when setting up . 2 4 31 Configuration Connect your monitor, please consult...
... the HDMI setting is set to the communication mode supporting the BLUETOOTH wireless technology. Be consistent with the Deep Color feature. The OSD screen (Setup, etc.) isn't displayed. # The OSD will not output from the HDMI terminal. Use HDMI connections when setting up . 2 4 31 Configuration Connect your monitor, please consult...

Owners Manual - English
Page 34
... those of Qualcomm Technologies International, Ltd. Other trademarks and trade names are registered trademarks of Dolby Laboratories. Manufactured under license from Dolby Laboratories. 7 Furnished Parts Setup microphone 1 Remote control 1 Dry cell batteries (AAA size IEC R03 2 AM loop antenna 1 FM wire antenna 1 Quick start guide Safety Brochure Note • Specifications and...
... those of Qualcomm Technologies International, Ltd. Other trademarks and trade names are registered trademarks of Dolby Laboratories. Manufactured under license from Dolby Laboratories. 7 Furnished Parts Setup microphone 1 Remote control 1 Dry cell batteries (AAA size IEC R03 2 AM loop antenna 1 FM wire antenna 1 Quick start guide Safety Brochure Note • Specifications and...


