
Owner's Manual English
Page 5
... den übrigen einschlägigen Bestimmungen der Richtlinie 1999/5/EG befindet. -Käesolevaga kinnitab Onkyo Corporation seadme TX-NR828 vastavust direktiivi 1999/5/EÜ põhinõuetele ja nimetatud direktiivist tulenevatele teistele asjakohastele sätetele...setup microphone (➔ page 28) Remote controller (RC-840M) and two batteries (AA/R6) (➔ page 13) Quick Start Guide * In catalogs and on direktiivin 1999/5/EY oleellisten vaatimusten ja sitä koskevien direktiivin muiden ehtojen mukainen. -Härmed förklarar Onkyo Corporation att denna TX-NR828...
... den übrigen einschlägigen Bestimmungen der Richtlinie 1999/5/EG befindet. -Käesolevaga kinnitab Onkyo Corporation seadme TX-NR828 vastavust direktiivi 1999/5/EÜ põhinõuetele ja nimetatud direktiivist tulenevatele teistele asjakohastele sätetele...setup microphone (➔ page 28) Remote controller (RC-840M) and two batteries (AA/R6) (➔ page 13) Quick Start Guide * In catalogs and on direktiivin 1999/5/EY oleellisten vaatimusten ja sitä koskevien direktiivin muiden ehtojen mukainen. -Härmed förklarar Onkyo Corporation att denna TX-NR828...

Owner's Manual English
Page 6
... Selecting Speaker Layout 53 Using the Whole House Mode 53 Using Easy Macros 54 Using the Home Menu 55 Advanced Operations On-screen Setup 56 Using the Quick Setup 56 Using the Audio Settings of Contents 6 Features 7 Front & Rear Panels 8 Front Panel 8 Display 10 Rear Panel 11... Power Cord 24 Turning On 24 Turning Off 24 Firmware Update Notification 25 About the HYBRID STANDBY indicator 25 Initial Setup 25 Selecting the Language for Onkyo Components Connected via RI 83 Resetting the REMOTE MODE Buttons 83 Resetting the Remote Controller 84 Controlling Other Components 84 ...
... Selecting Speaker Layout 53 Using the Whole House Mode 53 Using Easy Macros 54 Using the Home Menu 55 Advanced Operations On-screen Setup 56 Using the Quick Setup 56 Using the Audio Settings of Contents 6 Features 7 Front & Rear Panels 8 Front Panel 8 Display 10 Rear Panel 11... Power Cord 24 Turning On 24 Turning Off 24 Firmware Update Notification 25 About the HYBRID STANDBY indicator 25 Initial Setup 25 Selecting the Language for Onkyo Components Connected via RI 83 Resetting the REMOTE MODE Buttons 83 Resetting the Remote Controller 84 Controlling Other Components 84 ...

Owner's Manual English
Page 7
...Inputs (1 on front panel) and 2 Outputs • 4K (up-scaling and Passthrough*)-compatible HDMI Inputs * Compatible with HDMI IN 1 to HDMI IN 4 only • Onkyo Q for System Control • 5 Digital Inputs (2 Optical/3 Coaxial) • Component Video Switching (2 Inputs/1 Output) • Banana Plug-Compatible Speaker Posts * In Europe... Control Function (up to 800 ms) • Auto Standby Function • On-Screen Display via HDMI • Preprogrammed (with onscreen display setup) RI-Compatible Learning Remote with 4 Activities and Mode-Key LEDs En-7 Safety Information and Introduction
...Inputs (1 on front panel) and 2 Outputs • 4K (up-scaling and Passthrough*)-compatible HDMI Inputs * Compatible with HDMI IN 1 to HDMI IN 4 only • Onkyo Q for System Control • 5 Digital Inputs (2 Optical/3 Coaxial) • Component Video Switching (2 Inputs/1 Output) • Banana Plug-Compatible Speaker Posts * In Europe... Control Function (up to 800 ms) • Auto Standby Function • On-Screen Display via HDMI • Preprogrammed (with onscreen display setup) RI-Compatible Learning Remote with 4 Activities and Mode-Key LEDs En-7 Safety Information and Introduction

Owner's Manual English
Page 9
...) buttons S DIMMER button (North American models) (52) T MEMORY button (41) U TUNING MODE button (41) V LISTENING MODE buttons (44) W WHOLE HOUSE MODE button (53) X SETUP MIC jack (28) Y QUICK SETUP button (56) Z HOME button (55) [ RETURN button " USB port (35) # AUX INPUT jacks (19) $ RT/PTY/TP button (European and Australian models) (42...
...) buttons S DIMMER button (North American models) (52) T MEMORY button (41) U TUNING MODE button (41) V LISTENING MODE buttons (44) W WHOLE HOUSE MODE button (53) X SETUP MIC jack (28) Y QUICK SETUP button (56) Z HOME button (55) [ RETURN button " USB port (35) # AUX INPUT jacks (19) $ RT/PTY/TP button (European and Australian models) (42...

Owner's Manual English
Page 12
...button (24) C ACTIVITIES buttons (54, 90) D REMOTE MODE/INPUT SELECTOR buttons (32) E SP (speaker layout) button (53) F R/X/F/S and ENTER buttons G Q SETUP button (56) H Listening Mode buttons (44) I C O For detailed information, see the pages in parentheses. You can select AM or FM by pressing TUNER repeatedly. See... when a REMOTE MODE other components. Remote Controller Controlling the AV Receiver To control the AV receiver, press RECEIVER to control Onkyo Blu-ray Disc/DVD player, CD player, and other than Receiver mode is selected. B R/X buttons (41) C D.TUN button (41) D...
...button (24) C ACTIVITIES buttons (54, 90) D REMOTE MODE/INPUT SELECTOR buttons (32) E SP (speaker layout) button (53) F R/X/F/S and ENTER buttons G Q SETUP button (56) H Listening Mode buttons (44) I C O For detailed information, see the pages in parentheses. You can select AM or FM by pressing TUNER repeatedly. See... when a REMOTE MODE other components. Remote Controller Controlling the AV Receiver To control the AV receiver, press RECEIVER to control Onkyo Blu-ray Disc/DVD player, CD player, and other than Receiver mode is selected. B R/X buttons (41) C D.TUN button (41) D...
Owner's Manual English
Page 16
... to "4ohms" (➔ page 63). In other words, connect positive (+) terminals only to positive (+) terminals, and negative (-) terminals only to speaker wiring polarity. En-16 A setup wizard is 4 ohms or more, but less than 6 ohms, be sure to set the minimum speaker impedance to short the positive and negative wires. If...
... to "4ohms" (➔ page 63). In other words, connect positive (+) terminals only to positive (+) terminals, and negative (-) terminals only to speaker wiring polarity. En-16 A setup wizard is 4 ohms or more, but less than 6 ohms, be sure to set the minimum speaker impedance to short the positive and negative wires. If...

Owner's Manual English
Page 18
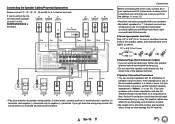
.... En-18 Connecting the TV/AV components Before connecting the power cord, connect all the way to the AV receiver's GND screw. To display the setup menu on a router so the AV receiver can be connected to your Blu-ray Disc/DVD player, etc. $ Use this jack to connect to the...
.... En-18 Connecting the TV/AV components Before connecting the power cord, connect all the way to the AV receiver's GND screw. To display the setup menu on a router so the AV receiver can be connected to your Blu-ray Disc/DVD player, etc. $ Use this jack to connect to the...

Owner's Manual English
Page 19
See "Performing Wireless LAN Setup" for connections (➔ page 30). Computer or media server Do not connect the AV receiver's USB port to on a router, which has a 4-port 100Base-TX switch built-in. Music on your computer. These settings can be changed .) Input selector buttons... components than the abovementioned quantities are Q-compatible (As of January 2013). ■ TV • Sharp TV ■ Players/Recorders • Onkyo and Integra Q-compatible players • Toshiba players and recorders • Sharp players and recorders (only when used together with Sharp TV) * ...
See "Performing Wireless LAN Setup" for connections (➔ page 30). Computer or media server Do not connect the AV receiver's USB port to on a router, which has a 4-port 100Base-TX switch built-in. Music on your computer. These settings can be changed .) Input selector buttons... components than the abovementioned quantities are Q-compatible (As of January 2013). ■ TV • Sharp TV ■ Players/Recorders • Onkyo and Integra Q-compatible players • Toshiba players and recorders • Sharp players and recorders (only when used together with Sharp TV) * ...

Owner's Manual English
Page 24
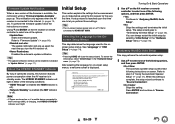
...; Turning on power management settings, see "Auto Standby" (➔ page 76). • If the HDMI Through setting is not set in a Few Easy Steps (Initial Setup) To ensure smooth operation, here's a few easy steps to help you configure the AV receiver before you turn down the volume before you use with... 1 Connect the supplied power cord to be used with the AV receiver. The supplied power cord is designed exclusively for use it off. See "Initial Setup" for the very first time.
...; Turning on power management settings, see "Auto Standby" (➔ page 76). • If the HDMI Through setting is not set in a Few Easy Steps (Initial Setup) To ensure smooth operation, here's a few easy steps to help you configure the AV receiver before you turn down the volume before you use with... 1 Connect the supplied power cord to be used with the AV receiver. The supplied power cord is designed exclusively for use it off. See "Initial Setup" for the very first time.
Owner's Manual English
Page 25
... optimized circuitry, this function reduces power consumption when the AV receiver is off ). -"Network Standby" is enabled (the NET indicator is in the "Hardware Setup" menu (➔ page 78). Note • If Zones are turned on or, if a mobile device connected to the Front Input (MHL) is ... one of the options. ` Update Now: Starts the firmware update. Now, would you to make before using the AV receiver for the onscreen setup menus. To perform the firmware update, follow the instructions on the AV receiver or remote controller to select one of the following instructions on . ...
... optimized circuitry, this function reduces power consumption when the AV receiver is off ). -"Network Standby" is enabled (the NET indicator is in the "Hardware Setup" menu (➔ page 78). Note • If Zones are turned on or, if a mobile device connected to the Front Input (MHL) is ... one of the options. ` Update Now: Starts the firmware update. Now, would you to make before using the AV receiver for the onscreen setup menus. To perform the firmware update, follow the instructions on the AV receiver or remote controller to select one of the following instructions on . ...

Owner's Manual English
Page 26
...and then press ENTER. ` Yes: Confirms that the source is complete when the message "Successfully connected." To restart the initial setup, select "Initial Setup" in the "Hardware Setup" menu (➔ page 78). Refer to step 5 of "Looking up for Remote Control Codes" (➔ page 82)....one of the following options, and then press ENTER. ` Yes: Returns to step 2. `No, Done Checking: The setup wizard continues to "Remote Mode Setup". The setup wizard goes to perform the network checking. Follow the troubleshooting instructions and recheck the source. 4 Use R/X to select one ...
...and then press ENTER. ` Yes: Confirms that the source is complete when the message "Successfully connected." To restart the initial setup, select "Initial Setup" in the "Hardware Setup" menu (➔ page 78). Refer to step 5 of "Looking up for Remote Control Codes" (➔ page 82)....one of the following options, and then press ENTER. ` Yes: Returns to step 2. `No, Done Checking: The setup wizard continues to "Remote Mode Setup". The setup wizard goes to perform the network checking. Follow the troubleshooting instructions and recheck the source. 4 Use R/X to select one ...

Owner's Manual English
Page 27
...(RFI) can measure up test tones played through each speaker as Audyssey MultEQ Room Correction and Speaker Setup runs. • Audyssey MultEQ Room Correction and Speaker Setup cannot be used in measuring, the better the listening environment will sit). Audyssey MultEQ can be performed... a seated listener with Audyssey Dynamic EQ® and Audyssey Dynamic Volume® (➔ page 69). Using the Automatic Speaker Setup With the supplied calibrated microphone, Audyssey MultEQ® automatically determines the number of speakers connected, their size for purposes of bass management...
...(RFI) can measure up test tones played through each speaker as Audyssey MultEQ Room Correction and Speaker Setup runs. • Audyssey MultEQ Room Correction and Speaker Setup cannot be used in measuring, the better the listening environment will sit). Audyssey MultEQ can be performed... a seated listener with Audyssey Dynamic EQ® and Audyssey Dynamic Volume® (➔ page 69). Using the Automatic Speaker Setup With the supplied calibrated microphone, Audyssey MultEQ® automatically determines the number of speakers connected, their size for purposes of bass management...

Owner's Manual English
Page 28
... Yes Perform the "2. This process takes a few minutes. 8 When prompted, repeat step 7. Audyssey MultEQ performs more measurements. MultEQ: Auto Setup Subwoofer Front Center Surround Front Wide Front High Surround Back Surround Back Ch Save Cancel -- Note • The on-screen menus appear only on...can view the calculated settings for measurement, "Audyssey" cannot be selected. • These settings are played through the subwoofer. En-28 Speaker Setup" according to change the setting. Powered Zone 2 (➔ page 64) - Use the volume control on the AV receiver and the ...
... Yes Perform the "2. This process takes a few minutes. 8 When prompted, repeat step 7. Audyssey MultEQ performs more measurements. MultEQ: Auto Setup Subwoofer Front Center Surround Front Wide Front High Surround Back Surround Back Ch Save Cancel -- Note • The on-screen menus appear only on...can view the calculated settings for measurement, "Audyssey" cannot be selected. • These settings are played through the subwoofer. En-28 Speaker Setup" according to change the setting. Powered Zone 2 (➔ page 64) - Use the volume control on the AV receiver and the ...

Owner's Manual English
Page 29
... again. • Speaker Matching Error! If this message appears after Audyssey MultEQ Room Correction and Speaker Setup requires you may appear. Turning On & Basic Operations The setup of the subwoofer manually. • Sometimes due to your Onkyo dealer. • Speaker Detect Error This message appears if a speaker is in this procedure simply by...
... again. • Speaker Matching Error! If this message appears after Audyssey MultEQ Room Correction and Speaker Setup requires you may appear. Turning On & Basic Operations The setup of the subwoofer manually. • Sometimes due to your Onkyo dealer. • Speaker Detect Error This message appears if a speaker is in this procedure simply by...

Owner's Manual English
Page 30
...it links your AV receiver (wireless client) with the "Status" option on your Access Point starts and Wi-Fi indicator flashes. The "Wireless Setup" menu is displayed scrolling on the AV receiver's display. 2. Use R/X to your Access Point device. Turning On & Basic Operations ■ ...) "Push Button Configuration (Select from Router)", and press ENTER. After the connection to your Access Point device for operations. Performing Wireless LAN Setup A wireless LAN (WLAN) is a local area network that has a built-in router functionality. To achieve a wireless network connection, you ...
...it links your AV receiver (wireless client) with the "Status" option on your Access Point starts and Wi-Fi indicator flashes. The "Wireless Setup" menu is displayed scrolling on the AV receiver's display. 2. Use R/X to your Access Point device. Turning On & Basic Operations ■ ...) "Push Button Configuration (Select from Router)", and press ENTER. After the connection to your Access Point device for operations. Performing Wireless LAN Setup A wireless LAN (WLAN) is a local area network that has a built-in router functionality. To achieve a wireless network connection, you ...

Owner's Manual English
Page 31
... is selected in "Network Connection" in the list of available Access Points, the setting also can review your Access Point will provide one of your setup with "OK". ■ WPA/WPA2 method 1. Use R/X to select "Search Wireless Network" and then press ENTER. Use the keyboard on screen ... "OK". ■ No encryption If your Access Point is completed, Wi-Fi indicator lights and the connection status is displayed on the "Wireless Setup" menu. Connection to your Access Point is not done successfully. Note • If Wi-Fi indicator doesn't light, the connection to your Access...
... is selected in "Network Connection" in the list of available Access Points, the setting also can review your Access Point will provide one of your setup with "OK". ■ WPA/WPA2 method 1. Use R/X to select "Search Wireless Network" and then press ENTER. Use the keyboard on screen ... "OK". ■ No encryption If your Access Point is completed, Wi-Fi indicator lights and the connection status is displayed on the "Wireless Setup" menu. Connection to your Access Point is not done successfully. Note • If Wi-Fi indicator doesn't light, the connection to your Access...

Owner's Manual English
Page 32
Reading this manual from Separate Sources" (➔ page 43) • "Controlling Other Components" (➔ page 82) • "Using the Onkyo Dock" (➔ page 87) Playback This section describes the basic operation such as playback, listening mode, and other AV components. 3 Select the ... depends on the country.) Playback 1 Turn on the AV receiver, the TV and the AV components. * When you to understand the basic connection/setup/operation. ■ Screen Saver If there is no video signal on the current input source and no operation for other useful functions. Playback •...
Reading this manual from Separate Sources" (➔ page 43) • "Controlling Other Components" (➔ page 82) • "Using the Onkyo Dock" (➔ page 87) Playback This section describes the basic operation such as playback, listening mode, and other AV components. 3 Select the ... depends on the country.) Playback 1 Turn on the AV receiver, the TV and the AV components. * When you to understand the basic connection/setup/operation. ■ Screen Saver If there is no video signal on the current input source and no operation for other useful functions. Playback •...

Owner's Manual English
Page 34
... AV receiver to the AV receiver, BLUETOOTH input selector is automatically selected. • If you 've selected NET or USB as input selector in Quick Setup, and press ENTER (➔ page 56). BLUETOOTH indicator flashes and the AV receiver is put to face one another Bluetoothenabled device, hold down BLUETOOTH button...
... AV receiver to the AV receiver, BLUETOOTH input selector is automatically selected. • If you 've selected NET or USB as input selector in Quick Setup, and press ENTER (➔ page 56). BLUETOOTH indicator flashes and the AV receiver is put to face one another Bluetoothenabled device, hold down BLUETOOTH button...

Owner's Manual English
Page 37
...press MENU with the station selected or while the station is playing. Then, use R/X to select "Rename this device may vary depending on the Setup menu to some stations. The network service screen appears. Playing Music Files on the "My Favorites" tab, and enter the Internet radio station's ...) field. To listen to other Internet radio stations, you may not be customized by the Internet radio station, you must register your Internet browser (Web Setup). 4 Click on a Server (DLNA) You need to connect the AV receiver to delete a station saved in the Home menu. 2 Press MODE/D (...
...press MENU with the station selected or while the station is playing. Then, use R/X to select "Rename this device may vary depending on the Setup menu to some stations. The network service screen appears. Playing Music Files on the "My Favorites" tab, and enter the Internet radio station's ...) field. To listen to other Internet radio stations, you may not be customized by the Internet radio station, you must register your Internet browser (Web Setup). 4 Click on a Server (DLNA) You need to connect the AV receiver to delete a station saved in the Home menu. 2 Press MODE/D (...

Owner's Manual English
Page 38
...Player 11 configuration. Tip • Windows Media Player 11 can be downloaded for free from the Microsoft web site. ■ Windows Media Player 12 Setup This section explains how to configure Windows Media Player 12 so that the AV receiver can play the music files stored on your personal computer...AV receiver is selected, verify that no information can be checked. 5 Click "OK" to close the dialog box. Windows Media Player Setup ■ Windows Media Player 11 Setup This section explains how to configure Windows Media Player 11 so that the AV receiver can play the music files stored on the...
...Player 11 configuration. Tip • Windows Media Player 11 can be downloaded for free from the Microsoft web site. ■ Windows Media Player 12 Setup This section explains how to configure Windows Media Player 12 so that the AV receiver can play the music files stored on your personal computer...AV receiver is selected, verify that no information can be checked. 5 Click "OK" to close the dialog box. Windows Media Player Setup ■ Windows Media Player 11 Setup This section explains how to configure Windows Media Player 11 so that the AV receiver can play the music files stored on the...


